RSS

Monthly Archives: February 2018

Sighting in Your Rifle

So you’ve acquired a new hunting rifle. After saving your hard-earned cash and landing permission from your other half, the gun rests in your hot little hands. It looks great, feels great… it probably smells great… but more importantly does it shoot great? Now its time to hit the range and get this baby sighted in.

Truth is the same holds true for rifles we’ve had for many years. Chances are they don’t require the full-meal-deal, but sighting in, confirming that our equipment is in good working order, or realigning sights is something we should do on a regular basis.

Unfortunately many of us try to kill two birds with one stone. We visit the range infrequently and attempt to sight in and practice shooting all at the same time. It’s important to remember, sighting is very different from regular shooting practice. The process of sighting in involves aligning the scope (or other sights) with the firearm when using a specific bullet and load. Shooting practice involves discharging and often experimenting with different positions to allow our bodies to grow accustomed to the form and function of shooting.

k_wilson_sighting_in2Believe it or not, many of us don’t sight in properly. It never ceases to amaze me how many hunters pick up their guns once or twice a year, assume it’s shooting straight and hit the woods without a second thought. As a professional outfitter I see it all the time. In fact, I’ve seen guests take it personally when, after arrival in camp, I ask them to take a few practice shots – just to make sure their gun is properly sighted in. As though I’m insinuating that they haven’t prepared for their hunt, once in a while I get a hunter who thinks I’m a control freak. Then the truth comes out. After a few shots it becomes obvious; better than half are inevitably in need of scope adjustments. Every one swears that they were shooting one-inch groups at home, but now their rifle requires major scope adjustments. In their defense, a multitude of things can happen to guns in transit. Blunt trauma to cases or directly to the scope itself can throw it way out of whack; hence the need to sight it.

To be honest many of us are guilty of not maintaining our rifle and scope. If you shoot regularly that’s one thing; you’re constantly checking it and tweaking the scope when necessary. In reality, most of us don’t. By in large, recreational hunters pick up their guns a few times each year. Whether you’re tuning a brand new rifle or confirming the accuracy of an old one, here are a few tips for sighting in:

1) Bore sight your rifle before shooting
k_wilson_sighting_in3This first step applies mostly to rifles and scopes that have a new marriage. The first time a scope is mounted to a rifle the gunsmith will usually use a bore sighting tool. This tool is used to approximately align the crosshairs of the scope with the rifle barrel. Unfortunately some folks erroneously rely on bore sighting alone to zero their gun. Remember bore sighting can be precise but most often it only approximates accuracy. If, when you visit the range, you discover that you’re not even hitting the paper at all, consider rough bore sighting your gun. Practical with bolt-action rifles, by removing the bolt, you can stand behind the gun, look through the barrel and center the target. Then without adjusting the gun, look through the scope and make the necessary adjustments to bring the crosshairs in alignment with the target. This should get you hitting the paper in no time, then you can move on to shooting.

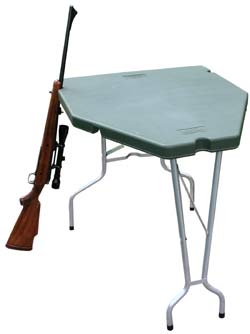
2) Shoot from a stable platform and rest
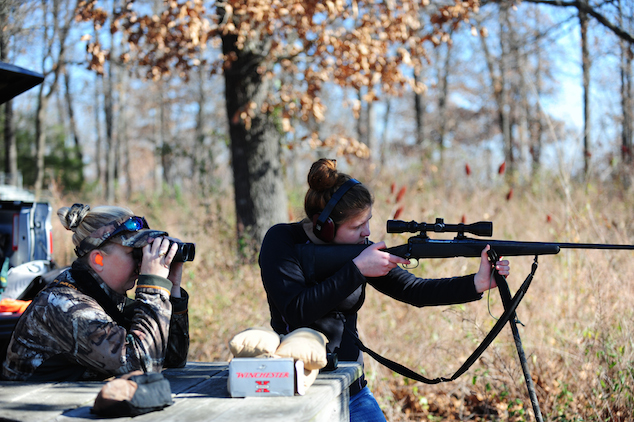
To reliably confirm the accuracy of your rifle and scope, you must shoot from a rest. I’m not sure I should say this or not, but I will. To illustrate the naivety of some, I’ve actually witnessed guys trying to sight in their rifles at the range by shooting freehand from a standing position. Needless to say these are the guys that get frustrated because they’re not hitting anything.

Remember, when we’re sighting in our rifles we’re not testing our shooting skill, but rather the accuracy of the gun, scope and bullet being used. Our goal should be to eliminate or at least minimize human error and allow the equipment to do its thing. With this in mind, a stable shooting bench or table is always recommended. Most shooting ranges are furnished with suitable tables or benches and adjustable stools. If you’re using a portable bench, make sure it is resting level on solid ground. Likewise, it’s imperative to use a shooting rest. In my opinion a vice can be that much better. I really like MTM Case-Gard products (www.mtmcase-gard.com). They make a variety of shooting supplies that are both affordable and practical. Few of us exhibit perfect shooting form. By understanding the biomechanics involved with aiming, breathing, squeezing the trigger and following through we can better acknowledge how to eliminate torsion while shooting from a rest. By cradling the rifle fore-end on a rest or in a vice, we can align our sights with the downrange target and maintain that alignment for a long period of time. Then, by gently squeezing the trigger to discharge, we minimize our human influence thereby allowing the firearm to perform more or less on its own.

3) Begin at close range, then move out to 100 yards and further
I’ve heard much discussion about the standard 100 yard shot and arguably for most bore-sighted rifles, sighting in at that distance is fine. But talk to the pros and most will agree that you should begin at 25 yards if you want to do it right. Making adjustments at close range is easier than at longer distances. At 25 yards you’ll find it easier to acquire your target; it simply appears larger and is easier to center the crosshairs at this short distance. Inaccuracies are simpler to rectify and adjustments can be made quickly at that distance. Remember, inaccuracies are exaggerated that much more at greater downrange distances.

k_wilson_sighting_in1
As you make your fine adjustments to your scope, be aware of the increments and don’t overdo it. For example, with my Leupold VXIII, one click = 1/4 inch adjustment. So, if my shots were hitting consistently two inches to the left of center, I would likely need to dial the adjustment eight clicks in that direction, then shoot another round of bullets. Some folks disagree, but in my opinion it is better to make subtle adjustments, then shoot to confirm that you are working toward the zero mark. As long as there are no fliers, a series of three shots is typically representative of where the gun is shooting. Although with today’s scopes I don’t believe it is as crucial, I still like to give it a firm tap to seat the crosshairs after each adjustment.

When your rifle and scope are in sync at 25 yards, move to 100 yards. Most big game rifle and bullet combinations that are sighted in a couple inches high at 100 yards will shoot a hair low at 25 yards – with most deer hunters this is considered ideal (e.g., I like my 300 Win Mag to be 2″ high at 100 yards). Once your rifle is sighted in, try shooting at 200, 300 and 400 yards to better learn how your rifle, scope and ammunition perform at greater distances.

4) Use the same ammunition that you plan to hunt with
Not all ammunition performs the same. Be sure to sight in your rifle with the load that you plan to hunt with. Ballistics of variable bullet weights and designs (not to mention manufacturers) will perform differently. For instance, Winchester Ammunition’s 150 grain Supreme Elite XP3 (www.winchester.com) will inevitably perform differently than Remington’s 180 grain Core-Lokt, PSP (www.remington.com) shot out of my 300 Winchester Magnum.

If you reload your own ammunition, then you’re likely acquainted with factors affecting bullet performance. Working the right load may take some trial and error, but the same applies – always sight in with the bullet and load you intend to hunt with.

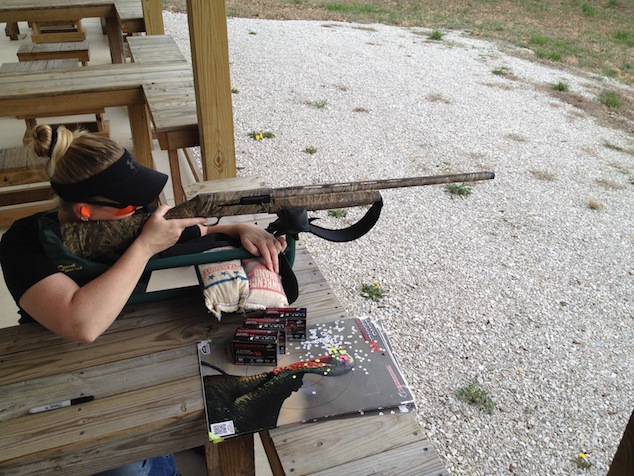
5) Record and reference each shot
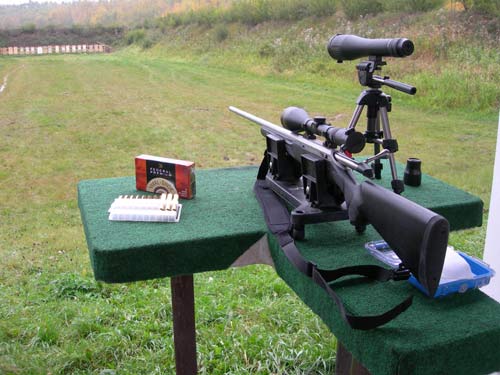
Sighting in can be as labor-intensive as you make it. As a rule, several items are required and several more make the job that much easier. As an absolute necessity, we require a table or bench, a shooting rest, our rifle, ammunition and a target. Beyond these basics, the job is much easier with a spotting scope, tripod, and additional targets along with a marker.

As you begin shooting, be sure to analyze and record each shot. I like to use a Bushnell Elite 15-45x 60 mm spotting scope (www.bushnell.com) mounted on a solid tripod. At 45 power magnification, I can see every detail on the downrange target. My scope allows me to closely assess where I hit in relation to where I aimed. Further, many shooters like to keep a matching target on the bench while they are shooting. By checking their shot, then marking it on the target beside them, they can better track their progressions to confirm any scope adjustments and accuracy. This eliminates much of the guessing about which shot was which.

Follow our FISHING BLOG

WEB   RATES     FISH    HUNT    CABINS    PHOTOS

Enter your email address to subscribe to this blog and receive notifications of new posts by email.


Tags: , , , , , , ,

Moose Stir Fry

8

This delicious moose dish is low in fat. The amount of each ingredient is proportional to how many people you’re serving. Using half a pound of moose, as this recipe does, makes two large servings.

Ingredients

  • 1/2 lb. moose steak
  • 1/2 cup carrots
  • 1/2 cup bean sprouts
  • 1/4 cup celery
  • 1/2 cup snow peas
  • 1/2 cup broccoli
  • 1/4 cup unsalted peanuts
  • 2 cloves of garlic, minced
  • 1/2 cup soy sauce
  • 1 tbsp crushed red pepper
  • 1 tbsp cumin
  • Cooked noodles (excluding seasoning packet)

Preparation

  • Slice steaks cross grain and marinade in soy sauce for one day. Throw a little oil into a hot wok to avoid sticking. Stir in moose for about 1 minute.
  • Add other ingredients, including seasoning, stirring frequently. Add additional soy sauce to coat all ingredients.
  • Stir in noodles and serve immediately.

Follow our FISHING BLOG

WEBSITE    RATES     FISH    HUNT    CABINS    PHOTOS

Enter your email address to subscribe to this blog and receive notifications of new posts by email.


Leave a comment

Posted by on February 22, 2018 in moose, recipe, Wawang Lake Resort


Tags: , , , , , , , ,

Quick tips for hunter safety

climbing treestandWhile reading some great hunting articles last night, I came across a very overlooked topic.  This is an article written by Tyrrell Hearn and is a great quick snippet on basic hunter safety tricks!


Over the years we have all heard of hunting accidents and how bad they can be. Hunting safety should be paramount in the mind on any hunter, especially those using high-powered rifles. It goes without saying that guns are designed to take life quickly and effectively, making it imperative that you treat them as such. If you are a hunter, here are a couple tips to keep you safe this season.


Blind placement– Keep in mind that there are people around you who may also be hunting in the mornings and evenings. Be mindful of other known hunting groups in your area. Having a chat with them about the direction of their firing lanes so everyone is up to date on their neighbor’s new hunting spots is a great way to stay safe.IMG_5703 (640x495)

Less powerful bullets– It is always a draw to buy the highest grain bullet for your guns, however, higher grain equals a faster and longer bullet trajectory. Pick something a little smaller but effective for the game you are targeting.

Aviary Photo_130254763368957516

Hollow points– Buy hollow point bullets. Full Metal Jacketed bullets are not legal to hunt with in most areas anyway. Hollow or soft tipped bullets will break up even if they are only hitting brush and small trees. Lessening your chance of a bullet traveling way past your target.

P1040004

Safety orange– Wear your safety gear so that even at a distance, the most novice of hunter will not mistake you for an animal.

Stay safe, think ahead, and have a great hunting season!

Follow our FISHING BLOG

WEB   RATES     FISH    HUNT    CABINS    PHOTOS

Enter your email address to subscribe to this blog and receive notifications of new posts by email.


Tags: , , , , , , , , ,

Sharpen your bow skill during the off season!


bow1

We practice with our bows all summer long, but after opening day its easy to get wrapped up in the hunting and forget about practicing. But even if you’re spending your time in the field and can’t hit the archery range every day, you can still keep your edge. Shooting in hunting situations is obviously different from target shooting. In the real world, weather conditions, shot angles, brush and other obstacles can impact your shot. Also, when the time comes to take a shot during a hunting situation you’re usually either stiff and cold from sitting in a treestand or sucking wind from running up a hill. All this combined with the fact that you must make a clean shot with the first arrow makes it all the more important to keep your shooting skills sharp. Here are a couple tips.

Practice Drawing
One of the biggest challenges to making a “cold shot” is that often the muscles I use for properly drawing my bow are stiff. The simplest way to cure this is to periodically pick a target, draw your bow, aim, hold, and let down your draw. This keeps you loosened up, plus drawing and aiming without actually shooting helps you focus on the target.


Practice Shooting

Although just drawing and aiming will help a lot, the single biggest help is to actually shoot while out hunting. A common practice among traditional shooters is to carry one or two blunt pointed arrows in your quiver so that you can stump shoot in your down time. Stump shooting is fantastic for keeping you warmed up, but unlike just drawing, actually completing your shots will bring your release into play, as well as give you all sorts of angles and situations to practice.

Small game is even better than stumps (grouse and rabbits taste a lot better too). Grouse can be deceivingly tough to hit. You want to aim for the base of the neck or the head. Sometimes they flush at the shot, but grouse will go in the direction that their head is pointing, so if you use a snaro point, you can either take their head off or hit them in the body as they flush. The best thing about grouse is they often give you extremely challenging shots, and if you can become consistent at taking them, you will be ready for the big game (make sure to check your local regulations before taking any small game with a bow).


Follow our FISHING BLOG

WEB   RATES     FISH    HUNT    CABINS    PHOTOS

Enter your email address to subscribe to this blog and receive notifications of new posts by email.


Tags: , , , , , , , , ,

Field dressing a black bear

With the bear hunt just around the corner, we will cover the basics 🙂  Pictures have been withheld due to graphic nature.

Instructions

imagesFG3W4IGS 1. Clear an area surrounding the black bear. Make the area large enough to allow room to move around and roll the animal away from the entrails. The lowest part of the ground should be reserved for the entrails. Move the bear onto its back. Spread the rear legs and either have your partners hold them apart or secure them with ropes. Repeat with the front legs.

  1.  2. Insert one of your knives in the cavity at the base of the bear’s throat. Cut the blood vessels with a deep, crosswise motion to open the jugular vein and bleed the animal. Move the bear so the blood will flow away from it and clear the ground as needed.
  2. Cut the skin in a straight line from the breastbone — located just below the rib cage — to the base of the bear’s jaw. Cut the muscles along this area to the bone to expose the throat and windpipe. From the same starting point, cut the skin in a straight line down to the anus. Some areas require hunters to leave the genitals for sex identification; cut around the genitals slightly to preserve them.
  3. Split the breastbone.  This can be done with a bone saw, hack saw or a couple of axes.  If you choose to use axes, hold one axe against the breastbone and hammer it with the other axe; this will break the bone from the base of the rib cage up to and through the top ribs. Open the chest by pulling the front legs apart. Cut the windpipe and gullet close to the head. Lay them in the chest cavity for later.
  4. Cut through the abdominal muscles; start at the base of the rib cage. Take care not to puncture the intestines, the stomach or the bladder; doing so could taint the meat. Sever the muscles down to the pelvic bone. Enlist your partners to hold open the bear so you can work more smoothly.
  5. Break the pelvic bone by using the same technique implemented the breastbone. Do not cut the urinary tract as it may contaminate the meat. Start on one side of the chest cavity and use your knife to cut the diaphragm from the chest wall. Start at the base of the ribs and slice as far back into the cavity as possible. Have your partners pull the organs to the side so you can see and cut more easily. Repeat the process on the other side of the black bear.
  6. Cut the intestines and rectum from the split pelvic bone to where the rectum meets the muscle tissue at the anus. Cut a circle in the skin at the base of the tail; cut 1 to 2 inches from the anus. Cut the muscles to the top of the pelvic bone to free the anus and rectum. Pull the lower intestine, rectum and anus away from the cavity and hold clear. You must not puncture or cut the urinary tract or intestines.
  7. Hold the parts, roll the black bear away and allow the intestines and stomach to spill onto the ground. Grab the windpipe to pull the lungs and heart out onto the ground. Cut any remaining diaphragm tissue to free the organs. Complete the field dressing by draining as much blood from the bear as possible and wiping the body cavity with cloth rags to clean. Do not use water. At this point your main concern becomes to cool the cavity and prepare for transport which can be done by propping the cavity open with a tree branch.

    IMG_6110 - Copy

    Proper field care will ensure less weight and trouble with removal and transportation from the hunt site.

     For more information on black bear hunting, visit us at http://www.wawangresort.com

    Follow our FISHING BLOG

    WEB   RATES     FISH    HUNT    CABINS    PHOTOS

    Enter your email address to subscribe to this blog and receive notifications of new posts by email.


Tags: , , , , , , ,

Firearm Safety

by Marti Davis

Marti-Davis

Safety, safety, safety

Firearm safety must always be our number one priority. Always remember to treat every gun as if it is loaded. That means always pointing the gun in a safe direction. Make sure you’re using the proper ammunition for the firearm. Keep your finger off the trigger until you’re ready to fire.

When you’re hunting from an elevated stand, never climb with the firearm. Use a rope to raise and lower the unloaded gun after you’re safely strapped in to your stand. You can never be too careful or safe when it comes to handling and hunting with firearms.

Marti-Davis-rifle

Know right from wrong

Before you do any kind of hunting with a gun, you must familiarize yourself with the state’s game laws and regulations. Even if you’re a seasoned hunter, you need to refresh your memory and check for any changes in the regulations that might affect your hunt. If you know and follow the regulations, when you do have an encounter with a conservation agent, you won’t have anything to worry about.

And while we’re on the subject of conservation agents, if you happen to get stopped by an agent, be courteous. It will take only a few minutes for the agent to check and see if you have the proper licenses and tags. Conservation agents have a job to do, and this is just a small part of it.

Cleaning and Maintenance

While some firearms take more cleaning and maintenance than others, you should take proper care of all firearms. If you do, they will last for many years, with the possibility of being handed down from generation to generation.

I like to use a combination cleaner-lubricant-protectant, such as Break Free CLP. A quick wipe-down at the end of a day afield is sufficient, unless you’ve been out hunting in rain or snow, or in extremely dusty or brushy conditions. In that case you probably need to break down the firearm to a certain extent. Remember to follow all manufacturer’s instructions on breakdown and reassembly. Never skip any steps the manufacturer recommends.

I also like to use a bore snake for a quick pass-through on my barrels. I use a little of the Break Free CLP on the snake and pull it through two or three times. It’s a great time saver for those quick, after-hunt wipe-downs between the thorough cleanings that require breaking down the gun.

And don’t forget that new guns need thorough cleaning when you first get them. Most come packed with a coating of heavy grease.

When it comes to maintenance on your firearms, I highly recommend that you find a reputable gunsmith in your area to take care of any malfunctioning firearms. For safety’s sake, never shoot any gun that is not in perfect working order. When in doubt, consult your gunsmith.

Sighting in or Patterning

Before going afield, you must take the time to sight in your rifle or pattern your shotgun. Even if you’re going out with the same deer rifle you’ve used for several years, take the time to make sure your gun is still zeroed in. Even the smallest of bumps can sometimes knock sights or scopes off zero.

With shotguns, make sure to pattern them to see which load works best with which choke. Once you get that figured out, make sure to use the same load each time you hunt with that shotgun and choke.

To be an ethical and responsible hunter, you have to know your own and your firearm’s limitations before you step out in the field. As ethical hunters, we always want to make the quickest and most humane kill shots we can.

Marti-patterning

Transporting your firearms

Transporting can be as simple as using a sling to throw the gun over your shoulder, making it easier to carry in the field.

In a vehicle, I highly recommend a case of some sort when transporting firearms, whether it’s a simple zip-up, soft-sided case or a padded, hard-shell transport case. For one thing, a case protects the gun—for another, in some states it is the law. This is another area where it’s necessary to know the regulations and laws in the state you are hunting—or even just traveling through. Some states also require firearms to be cased when transporting them on all-terrain vehicles in the field.

Marti-Davis-truck-copy-2

Follow-through

When throwing a ball, you must follow through to complete the action. The same applies to shooting a rifle or shotgun. Once you make the shot, you must follow through. If you’re shooting a bolt-action or pump-style rifle, follow-through includes working the action and chambering a fresh round. Be ready to make a follow-up shot if necessary. The same goes for shotguns. After you complete the shot, get another shot shell into the chamber and be prepared to make a quick follow-up shot. Of course if you’re using an autoloader, the gun does this for you. Just stay on the gun and be ready in case you need to take another shot.

Storage

After the hunt, be sure to unload and store your firearms properly. As I mentioned when discussing cleaning and maintenance, wipe down or clean your firearms prior to storage. Always make sure to store all guns beyond the reach of children or anyone else you don’t want having access to them. Always store ammunition separately from all firearms.

Marti-and-Barb-afield-copy

These safety rules need to become second nature, yet always in the forefront while you are working with firearms, especially while hunting.

IMG_2075-e1429190999379

Marti Davis

Marti Davis is a staff member for Browning Trail Cameras, WoolX and Mossy Oak.
She is an authority on most types of hunting in North America, and very active in
mentoring the next generation of young hunters.


Follow our FISHING BLOG

WEB   RATES     FISH    HUNT    CABINS    PHOTOS

Enter your email address to subscribe to this blog and receive notifications of new posts by email.


Tags: , , , , , , , , , ,

Stop Adding Fat to Your Game Meat

While my Wyoming elk tag has so far gone unfilled, my friend Tess was luckier, tagging her first elk in a Nebraska cornfield not long ago. A heat wave prompted us to spend all day Sunday butchering and last night we put about 20 lbs. of trimmings through the grinder.

I’ve been processing my own (and others) deer and elk for about a dozen years and view adding some type of fat to ground venison as a necessary evil. I prefer ground pork, adding anywhere from 10 to 20 percent. Due to a calculating error on my part (I was told there would be no math!), Tess’ grind ended up at about 25 percent pork, a bit more than she preferred.

Ground_Elk_0910_004
This math problem set me to wondering why hunters take a healthy source of protein and fatten it up? That’s like someone on a diet taking a carrot stick and dipping it in ranch dressing. Quick research shows no clear consensus on what or how much fat to add. Some hunters swear by 50/50, others just 10 percent. Some like pork, others beef tallow. Some add bacon ends and pieces.

Certainly, there’s a rationale to adding fat, including enhancing flavor because, hey, we all know fat tastes good. Fat also keeps meat from drying out when you fry it and helps patties from falling apart. But is there a better, healthier alternative? Yes, depending on how you’re planning to cook it.

Burgers on the grill are probably how much of the ground venison in America makes it to the table. I’ll be the first to admit, making a good burger without fat sounds impossible. The fat not only makes a burger juicy, it also helps it stay in patty form. Next time you have some 100 percent ground venison you want to throw on the grill, trying adding an egg and some breadcrumbs to serve as a binder. I’ve also heard of using steel-cut oats, diced onion, shredded potato and even powdered milk.

When frying ground venison for tacos, chili or spaghetti, cook it without fat. The spices should cover any gamy flavor you or your family might object to. (If not, find a new butcher to process your deer or learn to do it yourself. Since I started DIY processing 12 years ago, I’ve never had gamy game meat.) If the dry texture turns you off, try frying it in a little bit of olive oil, or add moisture as the venison browns in the form of stock, tomato juice or other flavored liquid.

As you can see, there are lots of alternatives to adding fat to your ground venison. What about you? How do you keep your low-fat game meat low fat? – David Draper, Wild Chef Blogger

Follow our FISHING BLOG

WEB   RATES     FISH    HUNT    CABINS    PHOTOS
 BROCHURE    HUNT BOOKLET

Enter your email address to subscribe to this blog and receive notifications of new posts by email.


Tags: , , , , , , , , ,

 
%d bloggers like this: