RSS

Category Archives: Ammunition

Bargain vs. Premium Ammo

You get what you pay for. That’s an adage we generally believe in. But does it hold up with respect to ammunition? We set out to answer that question by testing the accuracy of a variety of value-priced .308 hunting ammo against more costly stuff.

ammo1

Methodology
Using three .308 rifles in the test—one hunting rig and two precision rifles that we knew would be ringers.

We put a number of budget and premium loads through all three rifles over the course of one day, ensuring the results wouldn’t be influenced by different environmental conditions. We also used a standard 5-shot-group protocol, and shot two groups with each load at 100 yards. As a control to establish a baseline level of accuracy for each rifle, we also shot 5-shot groups using Federal’s Gold Medal load with 175-grain Sierra BTHPs.

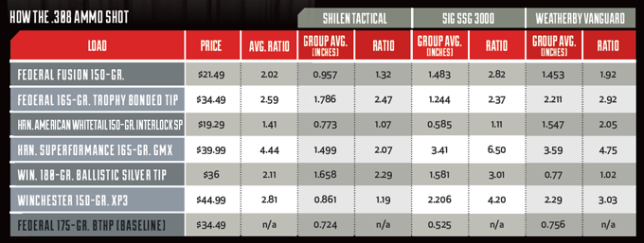
Using the baseline match load to calculate a ratio for each hunting load by dividing the size of the hunting-load groups into the size of the match-load groups. The closer to 1 that ratio is, the better the hunting load performed. None of the hunting loads outshot the match load, so all these ratios were greater than one.

Results
The outcome was interesting. The best hunting ammo was Hornady’s American Whitetail 150-grain Interlock SP. Compared to the baseline groups with the match ammo, this budget-priced load ($19.29 for a box of 20) shot nearly as well as the match ammo in all three rifles and had an impressive 1.41 average ratio. Federal’s Fusion, another bargain ammo ($21.49 for a box of 20) was second best among the loads, with an average ratio of 2.02.

The only expensive load that delivered consistent performance in all three rifles was Federal’s 165-grain Trophy Bonded Tip ($34.49 per box), The two Winchester loads had nearly identical levels of performance, though again, the less expensive 180-grain BST (2.11 ratio average) outshot the more expensive 150-gr. XP3 (2.81 ratio average).

ammo2

It’s worth noting when purchasing premium ammo that the promise of greater accuracy is certainly implied because it uses better quality components, but that much of its benefit is based on the idea that it will perform better on game.

Conclusion
It pays to try different loads in several different bullet weights in your rifles. Investing money to find an accurate load is the cheapest way to get the most from your rig.

Follow our FISHING BLOG

Enter your email address to subscribe to this blog and receive notifications of new posts by email.

Email Me....


Tags: , , , , , , , , ,

Sighting in Your Rifle

So you’ve acquired a new hunting rifle. After saving your hard-earned cash and landing permission from your other half, the gun rests in your hot little hands. It looks great, feels great… it probably smells great… but more importantly does it shoot great? Now its time to hit the range and get this baby sighted in.

Truth is the same holds true for rifles we’ve had for many years. Chances are they don’t require the full-meal-deal, but sighting in, confirming that our equipment is in good working order, or realigning sights is something we should do on a regular basis.

Unfortunately many of us try to kill two birds with one stone. We visit the range infrequently and attempt to sight in and practice shooting all at the same time. It’s important to remember, sighting is very different from regular shooting practice. The process of sighting in involves aligning the scope (or other sights) with the firearm when using a specific bullet and load. Shooting practice involves discharging and often experimenting with different positions to allow our bodies to grow accustomed to the form and function of shooting.

k_wilson_sighting_in2Believe it or not, many of us don’t sight in properly. It never ceases to amaze me how many hunters pick up their guns once or twice a year, assume it’s shooting straight and hit the woods without a second thought. As a professional outfitter I see it all the time. In fact, I’ve seen guests take it personally when, after arrival in camp, I ask them to take a few practice shots – just to make sure their gun is properly sighted in. As though I’m insinuating that they haven’t prepared for their hunt, once in a while I get a hunter who thinks I’m a control freak. Then the truth comes out. After a few shots it becomes obvious; better than half are inevitably in need of scope adjustments. Every one swears that they were shooting one-inch groups at home, but now their rifle requires major scope adjustments. In their defense, a multitude of things can happen to guns in transit. Blunt trauma to cases or directly to the scope itself can throw it way out of whack; hence the need to sight it.

To be honest many of us are guilty of not maintaining our rifle and scope. If you shoot regularly that’s one thing; you’re constantly checking it and tweaking the scope when necessary. In reality, most of us don’t. By in large, recreational hunters pick up their guns a few times each year. Whether you’re tuning a brand new rifle or confirming the accuracy of an old one, here are a few tips for sighting in:

1) Bore sight your rifle before shooting
k_wilson_sighting_in3This first step applies mostly to rifles and scopes that have a new marriage. The first time a scope is mounted to a rifle the gunsmith will usually use a bore sighting tool. This tool is used to approximately align the crosshairs of the scope with the rifle barrel. Unfortunately some folks erroneously rely on bore sighting alone to zero their gun. Remember bore sighting can be precise but most often it only approximates accuracy. If, when you visit the range, you discover that you’re not even hitting the paper at all, consider rough bore sighting your gun. Practical with bolt-action rifles, by removing the bolt, you can stand behind the gun, look through the barrel and center the target. Then without adjusting the gun, look through the scope and make the necessary adjustments to bring the crosshairs in alignment with the target. This should get you hitting the paper in no time, then you can move on to shooting.

2) Shoot from a stable platform and rest
To reliably confirm the accuracy of your rifle and scope, you must shoot from a rest. I’m not sure I should say this or not, but I will. To illustrate the naivety of some, I’ve actually witnessed guys trying to sight in their rifles at the range by shooting freehand from a standing position. Needless to say these are the guys that get frustrated because they’re not hitting anything.

Remember, when we’re sighting in our rifles we’re not testing our shooting skill, but rather the accuracy of the gun, scope and bullet being used. Our goal should be to eliminate or at least minimize human error and allow the equipment to do its thing. With this in mind, a stable shooting bench or table is always recommended. Most shooting ranges are furnished with suitable tables or benches and adjustable stools. If you’re using a portable bench, make sure it is resting level on solid ground. Likewise, it’s imperative to use a shooting rest. In my opinion a vice can be that much better. I really like MTM Case-Gard products (www.mtmcase-gard.com). They make a variety of shooting supplies that are both affordable and practical. Few of us exhibit perfect shooting form. By understanding the biomechanics involved with aiming, breathing, squeezing the trigger and following through we can better acknowledge how to eliminate torsion while shooting from a rest. By cradling the rifle fore-end on a rest or in a vice, we can align our sights with the downrange target and maintain that alignment for a long period of time. Then, by gently squeezing the trigger to discharge, we minimize our human influence thereby allowing the firearm to perform more or less on its own.

3) Begin at close range, then move out to 100 yards and further
I’ve heard much discussion about the standard 100 yard shot and arguably for most bore-sighted rifles, sighting in at that distance is fine. But talk to the pros and most will agree that you should begin at 25 yards if you want to do it right. Making adjustments at close range is easier than at longer distances. At 25 yards you’ll find it easier to acquire your target; it simply appears larger and is easier to center the crosshairs at this short distance. Inaccuracies are simpler to rectify and adjustments can be made quickly at that distance. Remember, inaccuracies are exaggerated that much more at greater downrange distances.

k_wilson_sighting_in1
As you make your fine adjustments to your scope, be aware of the increments and don’t overdo it. For example, with my Leupold VXIII, one click = 1/4 inch adjustment. So, if my shots were hitting consistently two inches to the left of center, I would likely need to dial the adjustment eight clicks in that direction, then shoot another round of bullets. Some folks disagree, but in my opinion it is better to make subtle adjustments, then shoot to confirm that you are working toward the zero mark. As long as there are no fliers, a series of three shots is typically representative of where the gun is shooting. Although with today’s scopes I don’t believe it is as crucial, I still like to give it a firm tap to seat the crosshairs after each adjustment.

When your rifle and scope are in sync at 25 yards, move to 100 yards. Most big game rifle and bullet combinations that are sighted in a couple inches high at 100 yards will shoot a hair low at 25 yards – with most deer hunters this is considered ideal (e.g., I like my 300 Win Mag to be 2″ high at 100 yards). Once your rifle is sighted in, try shooting at 200, 300 and 400 yards to better learn how your rifle, scope and ammunition perform at greater distances.

4) Use the same ammunition that you plan to hunt with
Not all ammunition performs the same. Be sure to sight in your rifle with the load that you plan to hunt with. Ballistics of variable bullet weights and designs (not to mention manufacturers) will perform differently. For instance, Winchester Ammunition’s 150 grain Supreme Elite XP3 (www.winchester.com) will inevitably perform differently than Remington’s 180 grain Core-Lokt, PSP (www.remington.com) shot out of my 300 Winchester Magnum.

If you reload your own ammunition, then you’re likely acquainted with factors affecting bullet performance. Working the right load may take some trial and error, but the same applies – always sight in with the bullet and load you intend to hunt with.

5) Record and reference each shot
Sighting in can be as labor-intensive as you make it. As a rule, several items are required and several more make the job that much easier. As an absolute necessity, we require a table or bench, a shooting rest, our rifle, ammunition and a target. Beyond these basics, the job is much easier with a spotting scope, tripod, and additional targets along with a marker.

As you begin shooting, be sure to analyze and record each shot. I like to use a Bushnell Elite 15-45x 60 mm spotting scope (www.bushnell.com) mounted on a solid tripod. At 45 power magnification, I can see every detail on the downrange target. My scope allows me to closely assess where I hit in relation to where I aimed. Further, many shooters like to keep a matching target on the bench while they are shooting. By checking their shot, then marking it on the target beside them, they can better track their progressions to confirm any scope adjustments and accuracy. This eliminates much of the guessing about which shot was which.

Follow our FISHING BLOG

WEB   RATES     FISH    HUNT    CABINS    PHOTOS

Enter your email address to subscribe to this blog and receive notifications of new posts by email.

Email Me....


Tags: , , , , , , ,

The Truth About Shotgun Ammo

Article by Phil Bourjaily

Our tests at a high-tech ballistic research laboratory may change the way you buy loads and guns…and even how you hunt.

Opener_2

Shotgun columnist Bob Brister spent six months shooting at 16-foot-long homemade targets mounted on a trailer hitched to a station wagon that his wife drove past. Brister conducted this novel experiment to understand the effect of shot stringing at crossing game birds.

While it had long been known that a swarm of shot lengthened as it flew downrange, no one agreed on what it meant. Brister’s patterns, which sometimes splattered the length of his 16-foot-long targets, indicated that if you shot at a bluebill streaking past your decoys, up to 30 percent of the pattern might arrive too late to hit the bird.

A lot has changed since 1976. There are new questions about shot gunning to answer and, fortunately, new ways to answer them.

testrange
I don’t own an $80,000 high-speed camera, but Federal Cartridge Co. has one in its underground test range (above). They also have a computerized shotgun pattern analyzer, a walk-in cooler full of ballistic gelatin, and a factory full of shotshells to test. Federal granted my request to spend a couple of days there in April to test shotgun loads. I had countless questions, but was able to answer these six.

Some things I thought I knew turned out to be wrong. Others were right. And several changed the way I think about shotshells.

1. Is a 3 1/2-Inch 12-Gauge More Effective Than a 3-Inch 12-Gauge?

 shotshells1

I’ve always believed the brutal recoil of a 31⁄2-inch 12-gauge magnum negates any ballistic advantage over the standard 3-inch magnum. I have always suspected, too, that cramming what amounts to a 10-gauge load into a 12-gauge barrel produced poor, ragged patterns and longer shot strings that made the extra pain even less worthwhile.

Test Loads:
– 12-gauge, 3-inch, 11⁄4-ounce loads of Black Cloud steel BB shot at 1450 fps (Modified choke)
– 12-gauge, 31⁄2-inch, 11⁄2-ounce loads of Black Cloud steel BB shot at 1500 fps (Modified choke)
Results: Both loads patterned almost identically on a 30-inch circle at 40 yards: The 31⁄2-inch load put 72.6 percent of its shot in the circle, with 77 pellet hits. The 3-inch placed 71.8 percent of its shot in the circle, with 63 hits.

There was no significant difference between the lengths of the shot strings, which averaged 42 inches for the 3-inch and 49 inches for the 31⁄2-inch midway between muzzle and target. Both loads exhibited equal penetration in ballistic gelatin at 30 yards—5 inches—despite the 31⁄2-inch shell’s 50 fps head start in muzzle velocity.

The Takeaway: I expected the 31⁄2 to string out longer and pattern worse than the 3-inch load, but it patterned just as well. The higher pellet count of the 31⁄2-inch resulted in significantly more hits in the circle, but both loads put enough hits on target to kill geese.

However, the improvement in performance comes at a cost of a whopping 50 percent increase in recoil. Even with a gun seated in a massive rest, I could feel the difference, and the muzzle blast was noticeably louder in the test tunnel, too. I shot some of those same 31⁄2-inch shells while trying to shoot a triple on a five-stand range. I could hit the first target always, but recovering from the shot to make the next two was almost impossible.

Is the 31⁄2-inch more effective than the 3-inch? Yes—if you can withstand the recoil. “More” is only better if you can put it on target.

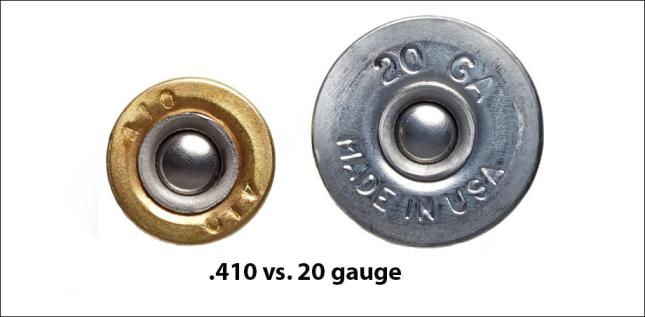
2. Is the .410 a Suitable Gauge for Young, Beginning Hunters?
shotshells2 

The .410 is a ballistic disgrace, and a crippler of game birds. Just ask me and all the other gun writers who have repeated that “fact” over the years. I believe beginning hunters should shoot a 20-gauge, not a .410, despite the higher recoil and extra weight of the 20. A comparison between the two, I was sure, would dramatically show the 20’s superiority.

Test Loads:
– .410 11⁄16-ounce loads of Game-Shok Upland No. 6 shot at 1135 fps (Full choke)
– 20-gauge 7⁄8-ounce loads of Game-Shok Upland No. 6 shot at 1210 fps (Modified choke)
Results: Unlike other gauges, which are patterned at 40 yards, .410s are typically patterned at 25 yards. We picked 30 yards as a compromise distance and to reflect the shorter ranges at which beginners shoot. The Full choke .410 shot 87.8 percent patterns at 30 yards, while the Modified 20 shot 84.6 percent. The higher pellet count and higher velocity of the 20 combined to put more pellets in the 30-inch circle (173) than the .410 (139). Penetration was better, too—3.3 inches vs. 3 inches. The 46-inch-long shot string of the 20-gauge, which was measured at 20 yards, was a full 20 inches shorter than the .410’s shot string.

The Takeaway: The .410 surprised us with great patterns. However, the .410’s shot string, which was 50 percent longer than that of the 20-gauge, revealed a shortcoming: The longer the string, the slower the trailing pellets are traveling, and therefore the less energy they retain. The .410 not only puts fewer pellets on target than the 20-gauge, but the .410’s tail-end pellets won’t hit as hard. Even so, I will give the .410 more respect in the future. I waited until my kids were 11 and 12 and big enough to shoot 20-gauges, but if a child is too small to handle a 20, a .410 can work.

3. Is a 20-gauge as Effective as a 12-Gauge for Doves?

 shotshells3

There’s a faction of smallbore shooters—including some people I hunt with—who condemn the 12-gauge as “unsporting.” As a 12-gauge shooter, I see it as being versatile and ballistically efficient. This test was my chance to crush my detractors with science. One area where 12s and 20s can be compared in an apples-to-apples format is the dove field, where many hunters shoot 1-ounce loads with either gauge, so that became the basis for the test.

Test Loads
:
– 20-gauge 1-ounce loads of Game-Shok Upland No. 71⁄2 shot at 1165 fps (Modified choke)
– 12-gauge 1-ounce loads of Game-Shok Upland No. 71⁄2 shot at 1235 fps (Modified choke)
Results: The 12-gauge delivered a 50.7 percent pattern with 202 pellets in a 30-inch circle at 40 yards. The 20 did just 39.6 percent with 149 pellets inside the circle. The 12 achieved slightly deeper penetration (2.875 inches vs. 2.5625) in gelatin at 30 yards, likely due to the higher muzzle velocity. The high-speed camera showed no statistical difference between the lengths of the shot strings, which averaged 55 inches for the 12-gauge and 57 for the 20 at 20 yards.

The Takeaway: I thought the 12 would win, but I hadn’t expected it to beat the 20 so badly. Out of curiosity we tested the 20-gauge with one size larger shot to see if we could improve its performance. With No. 6 shot the 20 delivered a huge 15 percent increase in pattern density. That gave us a bonus takeaway: If you want to tighten patterns (sometimes by a lot), shoot larger shot.

A 20-gauge is fun to handle and shoot, but when it comes to putting pellets on target efficiently, it loses out to the 12.

4. Is Steel Shot Suitable for Pheasants?

 shotshells4

A growing number of pheasant hunters have to shoot nontoxic ammunition. Pheasants are tough birds and elusive cripples, so choosing the right shell matters, especially when you go from dense lead to lighter steel. In the field I have had no trouble killing wild birds with steel shot, but while dead is dead, I wanted to quantify the differences between steel and lead loads.

Test Loads:
– 12-gauge 11⁄8-ounce loads of Federal Prairie Storm No. 3 steel at 1600 fps (Modified choke)
– 12-gauge 11⁄8-ounce loads of Wing-Shok High Velocity No. 6 lead at 1500 fps (Modified choke)
Results: As expected, the hard steel pellets patterned tighter than lead (62.5 percent vs. 52.6 percent) inside a 30-inch circle at 40 yards. Nevertheless, the higher pellet count of the lead load meant more pellets in the circle: 128 hits, compared to 102 hits for the steel load. The lead pellets also penetrated 4.12 inches into the 30-yard gelatin, compared to steel’s 3.43 inches. The lead load had a shorter shot string (55 inches) at 20 yards than the steel load (61 inches).

The Takeaway: Even with advances in steel ammunition, lead is still superior. Usually hunters switching from lead to steel compensate for steel’s light weight by following the “rule of two” and going up two sizes in shot. Yet despite my choosing three sizes larger in steel and driving it 100 fps faster than the lead load, it didn’t perform as well as lead in the test. The “rule of two” should be the “rule of three or maybe four.” Steel 3s and 2s make the best pellet choice. Steel pellets, which remain round and fly true, patterned more efficiently than lead, resulting in tighter patterns. Given the lower pellet count and retained energy of steel, though, I would not go to a more open choke if switching from lead to steel. Still, modern steel loads are effective for pheasants.

5. Are Premium Buckshot Loads Worth the High Cost?

 shotshell5

One important lesson Brister learned was that hard shot loaded with ground plastic buffer protected the pellets from deforming in the barrel. Premium buffered magnum waterfowl loads clearly outperformed nonbuffered loads. But would this be true for the biggest pellets of all? Premium buck costs nearly $2 per shell, twice the cost of standard loads, so I wanted to see if it was worth the price.

Test Loads :
– 12-gauge, 3-inch, 15-pellet loads of Federal Vital-Shok buffered, copper-plated 00 buckshot at 1100 fps (Modified choke)
– 12-gauge, 3-inch, 15-pellet handloads of unbuffered, unplated 00 buck at 1210 fps (Modified choke)
Results: Premium buckshot averaged 12.4 pellets in a 30-inch circle at 40 yards, whereas unbuffered buck averaged 11 hits. The pattern diameter of the buffered load at 40 yards was 31.65 inches; the unbuffered load spread out to 36.89 inches. The unbuffered buck penetrated deeper (16.84 inches vs. 14.62 inches) than the premium, probably due to its higher muzzle velocity.

The Takeaway: There was a dramatic difference in the shape of recovered buffered and unbuffered pellets. I had thought the deformed, unbuffered pellets would string out farther due to increased air resistance and pattern much worse. That didn’t happen. Unbuffered buckshot tore uneven holes in paper, yet it penetrated deeply into the gelatin.

We did notice an odd phenomenon during this test. Occasionally two pellets would fly through the same hole in the paper or into the gel. With only 15 pellets in the pattern, the odds against that happening are very high—unless there is a drafting effect where a trailing pellet falls in behind a pellet in front of it, the same way race cars draft one another. You can’t rely on that happening, but when it does, the second pellet into the hole will penetrate almost twice as deeply as the rest.

Premium buckshot put roughly 13 percent more pellets on target. Whether that’s worth double the cost is a personal decision.

6. Which is Better for Turkeys: Lighter, Faster Loads or Heavier, Slower Loads?

shotshells6_cThe trend to lighter, faster turkey loads made me wonder if heavy and slow loads would perform better. Theoretically, a lower-velocity load will pattern tighter than a faster load because the lower launch speed deforms fewer pellets, leaving more of them round to fly true. But at the same time, a lighter load should pattern tighter than a heavier load for the same reason: the more lead pellets on top of one another in a shell, the more pellets deform when that shell is fired.

Test Loads:
– 12-gauge, 3-inch, 13⁄4-ounce loads of Mag-Shok Lead High Velocity No. 5 shot at 1300 fps (Modified choke)
– 12-gauge, 3-inch, 2-ounce loads of Mag-Shok Lead No. 5 shot at 1150 fps (Modified choke)
Results: The 13⁄4-ounce load patterned more efficiently, putting 70.2 percent of its charge in a 30-inch circle at 40 yards, compared to 61.4 percent for the 2-ounce load. It also outpenetrated the 2-ounce load in gelatin at 30 yards, 4 inches to 3.65 (though the latter is certainly adequate to kill a turkey). In number of hits, however, the 2-ounce load narrowly won, 216 pellets to 209. Recoil is about the same.

The Takeaway: Essentially the test resulted in a tie, although the heavier load snuck a few extra pellets into the target area. Recoil from both shells was almost identical. I would favor the lighter load because more penetration, while it may not help, can’t hurt, either.

Looking at these results, however, I can’t help but wonder if a slower 13⁄4-ounce load wouldn’t pattern better than either of these. Unfortunately, “slow” is a tough sell to the American public, so unless you handload your own turkey ammo, you may never find out. It’s a tie, so choose the one that patterns best in your gun.

BONUS: Does Shot String Length Matter?

 stringtheory 

It matters some, but not for the reasons we think. During these tests, Federal engineers Erik Carlson and Adam Moser measured shot strings at 20 yards and extrapolated lengths for 40 yards. The longest shot string in our tests, the 66-inch .410 string, would be about 10 feet long at 40 yards. Match that against a bird flying 40 mph at 40 yards, as Brister simulated in his tests, and you will lose only a small percentage of pattern density, perhaps about 5 percent, not the 30 percent loss Brister saw with some 1976-era lead waterfowl magnums.

Brister believed long shot strings were more forgiving of error than short strings. If you were to overlead a target, he thought, the trailing pellets might still break it, so the longer the string, the greater the margin for error. In theory that is true, but practically speaking, the chance is very slim of a trailing pellet breaking a target. The disadvantage is that the longer the string, the slower the trailing pellets, and the less energy they’ll have on target.

Follow our FISHING BLOG

WEB   RATES     FISH    HUNT    CABINS    PHOTOS
BROCHURE    HUNT BOOKLET
Enter your email address to subscribe to this blog and receive notifications of new posts by email.

Email Me....


Tags: , , , , , , , ,

The Truth About Shotgun Ammo

Article by Phil Bourjaily

Our tests at a high-tech ballistic research laboratory may change the way you buy loads and guns…and even how you hunt.

Opener_2

Shotgun columnist Bob Brister spent six months shooting at 16-foot-long homemade targets mounted on a trailer hitched to a station wagon that his wife drove past. Brister conducted this novel experiment to understand the effect of shot stringing at crossing game birds.

While it had long been known that a swarm of shot lengthened as it flew downrange, no one agreed on what it meant. Brister’s patterns, which sometimes splattered the length of his 16-foot-long targets, indicated that if you shot at a bluebill streaking past your decoys, up to 30 percent of the pattern might arrive too late to hit the bird.

A lot has changed since 1976. There are new questions about shot gunning to answer and, fortunately, new ways to answer them.

testrange
I don’t own an $80,000 high-speed camera, but Federal Cartridge Co. has one in its underground test range (above). They also have a computerized shotgun pattern analyzer, a walk-in cooler full of ballistic gelatin, and a factory full of shotshells to test. Federal granted my request to spend a couple of days there in April to test shotgun loads. I had countless questions, but was able to answer these six.

Some things I thought I knew turned out to be wrong. Others were right. And several changed the way I think about shotshells.

1. Is a 3 1/2-Inch 12-Gauge More Effective Than a 3-Inch 12-Gauge?

 shotshells1

I’ve always believed the brutal recoil of a 31⁄2-inch 12-gauge magnum negates any ballistic advantage over the standard 3-inch magnum. I have always suspected, too, that cramming what amounts to a 10-gauge load into a 12-gauge barrel produced poor, ragged patterns and longer shot strings that made the extra pain even less worthwhile.

Test Loads:
– 12-gauge, 3-inch, 11⁄4-ounce loads of Black Cloud steel BB shot at 1450 fps (Modified choke)
– 12-gauge, 31⁄2-inch, 11⁄2-ounce loads of Black Cloud steel BB shot at 1500 fps (Modified choke)
Results: Both loads patterned almost identically on a 30-inch circle at 40 yards: The 31⁄2-inch load put 72.6 percent of its shot in the circle, with 77 pellet hits. The 3-inch placed 71.8 percent of its shot in the circle, with 63 hits.

There was no significant difference between the lengths of the shot strings, which averaged 42 inches for the 3-inch and 49 inches for the 31⁄2-inch midway between muzzle and target. Both loads exhibited equal penetration in ballistic gelatin at 30 yards—5 inches—despite the 31⁄2-inch shell’s 50 fps head start in muzzle velocity.

The Takeaway: I expected the 31⁄2 to string out longer and pattern worse than the 3-inch load, but it patterned just as well. The higher pellet count of the 31⁄2-inch resulted in significantly more hits in the circle, but both loads put enough hits on target to kill geese.

However, the improvement in performance comes at a cost of a whopping 50 percent increase in recoil. Even with a gun seated in a massive rest, I could feel the difference, and the muzzle blast was noticeably louder in the test tunnel, too. I shot some of those same 31⁄2-inch shells while trying to shoot a triple on a five-stand range. I could hit the first target always, but recovering from the shot to make the next two was almost impossible.

Is the 31⁄2-inch more effective than the 3-inch? Yes—if you can withstand the recoil. “More” is only better if you can put it on target.

2. Is the .410 a Suitable Gauge for Young, Beginning Hunters?

shotshells2 

The .410 is a ballistic disgrace, and a crippler of game birds. Just ask me and all the other gun writers who have repeated that “fact” over the years. I believe beginning hunters should shoot a 20-gauge, not a .410, despite the higher recoil and extra weight of the 20. A comparison between the two, I was sure, would dramatically show the 20’s superiority.

Test Loads:
– .410 11⁄16-ounce loads of Game-Shok Upland No. 6 shot at 1135 fps (Full choke)
– 20-gauge 7⁄8-ounce loads of Game-Shok Upland No. 6 shot at 1210 fps (Modified choke)
Results: Unlike other gauges, which are patterned at 40 yards, .410s are typically patterned at 25 yards. We picked 30 yards as a compromise distance and to reflect the shorter ranges at which beginners shoot. The Full choke .410 shot 87.8 percent patterns at 30 yards, while the Modified 20 shot 84.6 percent. The higher pellet count and higher velocity of the 20 combined to put more pellets in the 30-inch circle (173) than the .410 (139). Penetration was better, too—3.3 inches vs. 3 inches. The 46-inch-long shot string of the 20-gauge, which was measured at 20 yards, was a full 20 inches shorter than the .410’s shot string.

The Takeaway: The .410 surprised us with great patterns. However, the .410’s shot string, which was 50 percent longer than that of the 20-gauge, revealed a shortcoming: The longer the string, the slower the trailing pellets are traveling, and therefore the less energy they retain. The .410 not only puts fewer pellets on target than the 20-gauge, but the .410’s tail-end pellets won’t hit as hard. Even so, I will give the .410 more respect in the future. I waited until my kids were 11 and 12 and big enough to shoot 20-gauges, but if a child is too small to handle a 20, a .410 can work.

3. Is a 20-gauge as Effective as a 12-Gauge for Doves?

 shotshells3

There’s a faction of smallbore shooters—including some people I hunt with—who condemn the 12-gauge as “unsporting.” As a 12-gauge shooter, I see it as being versatile and ballistically efficient. This test was my chance to crush my detractors with science. One area where 12s and 20s can be compared in an apples-to-apples format is the dove field, where many hunters shoot 1-ounce loads with either gauge, so that became the basis for the test.

Test Loads
:
– 20-gauge 1-ounce loads of Game-Shok Upland No. 71⁄2 shot at 1165 fps (Modified choke)
– 12-gauge 1-ounce loads of Game-Shok Upland No. 71⁄2 shot at 1235 fps (Modified choke)
Results: The 12-gauge delivered a 50.7 percent pattern with 202 pellets in a 30-inch circle at 40 yards. The 20 did just 39.6 percent with 149 pellets inside the circle. The 12 achieved slightly deeper penetration (2.875 inches vs. 2.5625) in gelatin at 30 yards, likely due to the higher muzzle velocity. The high-speed camera showed no statistical difference between the lengths of the shot strings, which averaged 55 inches for the 12-gauge and 57 for the 20 at 20 yards.

The Takeaway: I thought the 12 would win, but I hadn’t expected it to beat the 20 so badly. Out of curiosity we tested the 20-gauge with one size larger shot to see if we could improve its performance. With No. 6 shot the 20 delivered a huge 15 percent increase in pattern density. That gave us a bonus takeaway: If you want to tighten patterns (sometimes by a lot), shoot larger shot.

A 20-gauge is fun to handle and shoot, but when it comes to putting pellets on target efficiently, it loses out to the 12.

4. Is Steel Shot Suitable for Pheasants?

 shotshells4

A growing number of pheasant hunters have to shoot nontoxic ammunition. Pheasants are tough birds and elusive cripples, so choosing the right shell matters, especially when you go from dense lead to lighter steel. In the field I have had no trouble killing wild birds with steel shot, but while dead is dead, I wanted to quantify the differences between steel and lead loads.

Test Loads:
– 12-gauge 11⁄8-ounce loads of Federal Prairie Storm No. 3 steel at 1600 fps (Modified choke)
– 12-gauge 11⁄8-ounce loads of Wing-Shok High Velocity No. 6 lead at 1500 fps (Modified choke)
Results: As expected, the hard steel pellets patterned tighter than lead (62.5 percent vs. 52.6 percent) inside a 30-inch circle at 40 yards. Nevertheless, the higher pellet count of the lead load meant more pellets in the circle: 128 hits, compared to 102 hits for the steel load. The lead pellets also penetrated 4.12 inches into the 30-yard gelatin, compared to steel’s 3.43 inches. The lead load had a shorter shot string (55 inches) at 20 yards than the steel load (61 inches).

The Takeaway: Even with advances in steel ammunition, lead is still superior. Usually hunters switching from lead to steel compensate for steel’s light weight by following the “rule of two” and going up two sizes in shot. Yet despite my choosing three sizes larger in steel and driving it 100 fps faster than the lead load, it didn’t perform as well as lead in the test. The “rule of two” should be the “rule of three or maybe four.” Steel 3s and 2s make the best pellet choice. Steel pellets, which remain round and fly true, patterned more efficiently than lead, resulting in tighter patterns. Given the lower pellet count and retained energy of steel, though, I would not go to a more open choke if switching from lead to steel. Still, modern steel loads are effective for pheasants.

5. Are Premium Buckshot Loads Worth the High Cost?

 shotshell5

One important lesson Brister learned was that hard shot loaded with ground plastic buffer protected the pellets from deforming in the barrel. Premium buffered magnum waterfowl loads clearly outperformed nonbuffered loads. But would this be true for the biggest pellets of all? Premium buck costs nearly $2 per shell, twice the cost of standard loads, so I wanted to see if it was worth the price.

Test Loads :
– 12-gauge, 3-inch, 15-pellet loads of Federal Vital-Shok buffered, copper-plated 00 buckshot at 1100 fps (Modified choke)
– 12-gauge, 3-inch, 15-pellet handloads of unbuffered, unplated 00 buck at 1210 fps (Modified choke)
Results: Premium buckshot averaged 12.4 pellets in a 30-inch circle at 40 yards, whereas unbuffered buck averaged 11 hits. The pattern diameter of the buffered load at 40 yards was 31.65 inches; the unbuffered load spread out to 36.89 inches. The unbuffered buck penetrated deeper (16.84 inches vs. 14.62 inches) than the premium, probably due to its higher muzzle velocity.

The Takeaway: There was a dramatic difference in the shape of recovered buffered and unbuffered pellets. I had thought the deformed, unbuffered pellets would string out farther due to increased air resistance and pattern much worse. That didn’t happen. Unbuffered buckshot tore uneven holes in paper, yet it penetrated deeply into the gelatin.

We did notice an odd phenomenon during this test. Occasionally two pellets would fly through the same hole in the paper or into the gel. With only 15 pellets in the pattern, the odds against that happening are very high—unless there is a drafting effect where a trailing pellet falls in behind a pellet in front of it, the same way race cars draft one another. You can’t rely on that happening, but when it does, the second pellet into the hole will penetrate almost twice as deeply as the rest.

Premium buckshot put roughly 13 percent more pellets on target. Whether that’s worth double the cost is a personal decision.

6. Which is Better for Turkeys: Lighter, Faster Loads or Heavier, Slower Loads?

shotshells6_cThe trend to lighter, faster turkey loads made me wonder if heavy and slow loads would perform better. Theoretically, a lower-velocity load will pattern tighter than a faster load because the lower launch speed deforms fewer pellets, leaving more of them round to fly true. But at the same time, a lighter load should pattern tighter than a heavier load for the same reason: the more lead pellets on top of one another in a shell, the more pellets deform when that shell is fired.

Test Loads:
– 12-gauge, 3-inch, 13⁄4-ounce loads of Mag-Shok Lead High Velocity No. 5 shot at 1300 fps (Modified choke)
– 12-gauge, 3-inch, 2-ounce loads of Mag-Shok Lead No. 5 shot at 1150 fps (Modified choke)
Results: The 13⁄4-ounce load patterned more efficiently, putting 70.2 percent of its charge in a 30-inch circle at 40 yards, compared to 61.4 percent for the 2-ounce load. It also outpenetrated the 2-ounce load in gelatin at 30 yards, 4 inches to 3.65 (though the latter is certainly adequate to kill a turkey). In number of hits, however, the 2-ounce load narrowly won, 216 pellets to 209. Recoil is about the same.

The Takeaway: Essentially the test resulted in a tie, although the heavier load snuck a few extra pellets into the target area. Recoil from both shells was almost identical. I would favor the lighter load because more penetration, while it may not help, can’t hurt, either.

Looking at these results, however, I can’t help but wonder if a slower 13⁄4-ounce load wouldn’t pattern better than either of these. Unfortunately, “slow” is a tough sell to the American public, so unless you handload your own turkey ammo, you may never find out. It’s a tie, so choose the one that patterns best in your gun.

BONUS: Does Shot String Length Matter?

 stringtheory 

It matters some, but not for the reasons we think. During these tests, Federal engineers Erik Carlson and Adam Moser measured shot strings at 20 yards and extrapolated lengths for 40 yards. The longest shot string in our tests, the 66-inch .410 string, would be about 10 feet long at 40 yards. Match that against a bird flying 40 mph at 40 yards, as Brister simulated in his tests, and you will lose only a small percentage of pattern density, perhaps about 5 percent, not the 30 percent loss Brister saw with some 1976-era lead waterfowl magnums.

Brister believed long shot strings were more forgiving of error than short strings. If you were to overlead a target, he thought, the trailing pellets might still break it, so the longer the string, the greater the margin for error. In theory that is true, but practically speaking, the chance is very slim of a trailing pellet breaking a target. The disadvantage is that the longer the string, the slower the trailing pellets, and the less energy they’ll have on target.

Follow our FISHING BLOG

WEB   RATES     FISH    HUNT    CABINS    PHOTOS
BROCHURE    HUNT BOOKLET
Enter your email address to subscribe to this blog and receive notifications of new posts by email.

Email Me....


Tags: , , , , , , , ,

How to Judge Your Shooting Distance

 A great article by Kevin Wilson

Accurately judging distance is the first step toward proper shot placement. Instinctive or calculated, bowhunters rely on it for close range shooting. Gun hunters count on their ability to estimate longer distances. Over time we all learn our own tricks for calculating distance but with the advent of laser rangefinders many of us won’t leave home without them. Regardless of how you go about it, determining yardage can make or break your hunt.

I will remember one hunt as long as I live. The outcome was downright depressing all because I misjudged the distance. It happened 16 years ago. I was a neophyte bowhunter at the time. I’d set up a treestand in a small block of trees that I knew held several bucks and does. The previous winter I’d picked up some huge sheds that taped out at 183 Boone & Crockett inches. Knowing that the gigantic buck had survived the winter, my hopes ran high and I knew there was always a chance he’d show up in the timber I was hunting. As luck would have it 45 minutes after climbing into my stand I heard leaves crunching underfoot. Straining to look through the trees, sure enough a smaller basket rack buck was making his way toward my stand. Always an impressive sight I enjoyed the view as he walked 10 yards from me. Then I heard more rustling in the leaves and looked over to see him. He was nothing short of magnificent! Based on his sheds, it looked like he’d grown at least another 15 inches putting him well into the high 190’s – a buck of a lifetime in anyone’s books! He walked 12 yards from my stand but I couldn’t get to full draw with him in plain view. As soon as he turned I capitalized. At full-draw, I locked my 20 yard pin on his body as he continued to amble forward. Walking straight away there was no shot opportunity at all! By the time he stopped, I estimated he was standing at 30 yards. With all the concentration I could muster, I focused and released. The arrow flew where I’d aimed, in perfect alignment with his chest, but literally inches high splitting the hair on his back! Completely awestruck and in total disbelief, that gut-wrenching feeling overcame me as I watched my world-class archery whitetail bound away never to be seen again… and all because I’d misjudged the distance!

Since that day I have made it my lifelong mission to learn how to accurately judge distance. From capitalizing on today’s technologically advanced laser range finding devices to using topographic characteristics to assist in calculating distance, and understanding the influences of terrain, it is an ongoing practice in my world. Regardless of whether you’re an archer or a rifleman, here are a few considerations that might help you as you learn to accurately judge distances.

The Technological Solution
Today’s technology is a saving grace for hunters. Many of us won’t leave home without our laser rangefinder. Portable and easy to use, we simply identify our target, adjust the setting, point, hit the button and, voila! … distance is displayed on the screen. With yardage confirmed, all that remains is the shot itself.

When I began bowhunting nearly two decades ago rangefinders had a simple dial that brought the target image into focus when the dial was turned. Wherever the dial ended up, that was your yardage. Today, thanks to innovation, laser rangefinders are readily available and relatively affordable. In fact today there is really no reason not to use a rangefinder. Many manufacturers have their own versions, but in my opinion, one of the latest and greatest inventions is Bushnell’s Laser Arc. I’ve got the Elite 1500 model. The ARC stands for Angle Range Compensation. While traditional rangefinders are precision optical instruments designed to be used on a level plain (line of sight), the ARC rangefinder compensates for angles from a treestand for instance, or up or down a mountain slope. I have owned and used several different kinds of rangefinders over the years. The Laser ARC is my absolute favorite. Using digital technology, it has a built-in inclinometer that displays the exact slope angle from +/- 60º of elevation with +/- 1.0 degree accuracy. Hunters have always struggled with extreme uphill and downhill angles. These severe angles alter true horizontal distance to the target. The ARC solves this problem. It has three primary settings: bow mode, rifle mode, and a regular mode (for line of sight distance calculation only).

It has a bow mode that displays line of site distance, degree of elevation, and true horizontal distance from 5-99 yards (or meters). For longer range shooters, it also has a rifle mode that calculates and displays the amount of bullet drop, at the target in inches (or centimeters). In the rifle mode, the amount of bullet drop is determined by the line of sight distance to the target, degree of elevation, along with the specific ballistic characteristics of the caliber and ammunition. As the hunter ranges the target, the line of sight, degree of elevation, and bullet-drop/holdover in inches or centimeters is displayed from 100-800 yards (or meters). Here’s where the technology shines ballistically. In the start-up menu, one of eight ballistic groups can be selected by the user, with each formula representing a given combination of caliber and loads.

Laser rangefinding technology, and the ARC system in particular, is invaluable but what if we don’t have one? Then it comes down to a matter of practice and estimation to determine our downrange distances.

Practice
For most of us, learning to judge distance takes considerable practice. Only by doing it a lot, and under variable conditions, can we become competent at it. Shooting is a lot like golf. Understanding how your bow or gun works (i.e., trajectory and ballistics) and interpreting the size of the target animal relative to the terrain can only be learned through firsthand repetitive experience. So how do we get all this supposed experience when we can only take a finite number of animals each year? The answer lies in visiting the gun or archery range.

For bowhunters, nothing beats practice on the 3D course. Today’s 3D targets, like those made by MacKenzie, are very lifelike and offer as realistic practice as you’re likely to get anywhere. Most are made to scale and can be strategically placed in any range situation to simulate realistic hunting scenarios. On my local 3D course, our club uses everything from coyote targets to whitetailed deer, mountain goat, elk, moose, wild hog, turkey and more. Some are set at long distances over 60 yards through wide open clearings while others are placed in the trees, often with very small shooting windows at closer distances like 20 or 30 yards. Most 3D ranges have a good assortment of field scenarios to allow practicing archers to hone their skills.

Likewise, rifle and muzzleloader hunters should visit the range regularly to hone shooting skills. Unfortunately due to the expansive nature of bullets today’s 3D targets aren’t an option. Alternatively silhouettes are. Most rifle ranges offer variable range distances from 100 to 400 yards. At my club our furthest distance is 600 yards. Unless you’re really into the long range thing 400 yards is a stretch for most big game hunters. By shooting repeatedly at 100, 200, 300, and 400 yards, we grow accustomed to what those distances look and feel like. By taking note of the size of target in our scope at specified magnifications we can also learn to estimate distances. For example, at 10x zoom on my Leupold scope, I know that a deer will fill a certain percentage of the field of view. By acknowledging how much of the animal is in the field of view, I can guess the approximate yardage with relative accuracy. Likewise, at 200 and 300 yards, that deer will appear smaller respectively.

Break Distances into Increments
Whether we’re hunting remote regions or in farmland things like trees, rocks, fence posts, and power poles can be used to aid in judging distances. As an archer I’ve learned to make a mental note of things like trees, shrubs, rocks or other physical land-based objects at 10 yard increments out to a distance of 50 yards from where I’m sitting. By burning those objects into my memory I’m better able to make quick decisions when an animal steps into a shooting lane. I’m guessing it may be the same throughout North America but where I do much of my hunting I’ve learned that power poles are set at a standard distance of 100 yards apart. Any time I’m hunting a wide open power line or in farm country I can use those power poles as markers to estimate yardage. As a rule, regardless of what kind of weapon you’re hunting with, breaking distances down into increments simplifies things. Remember, if you’re sitting in a stationary stand or ground blind there is always the option of setting out yardage markers at desirable increments, e.g., every 10 yards.

Consider Where and What You’re Shooting
Judging distances on the open prairies is a very different game than judging distance in the dense forest. Likewise, estimating the distance of a large target like a moose can be tricky if you’re more accustomed to looking at antelope. Dense cover and the size of the animal can play tricks on your mind.

As an archer, I spend most of my time hunting heavy mixed forest areas comprised of aspens and evergreens. Rarely do I see deer, moose or elk at distances further than 80 yards unless its down a long open cutline or across a clear cut. So, whenever I head out to different states or provinces to hunt smaller species like pronghorn antelope, it usually takes some time to acclimatize and recalibrate my brain to accurately judge distances. In my experience, smaller big game species in open terrain tend to appear further away while larger species under heavy cover often look closer than they really are. Unfortunately there are no set rules here; you just need to figure out what works best for you under variable conditions.

Follow our FISHING BLOG

WEB   RATES     FISH    HUNT    CABINS    PHOTOS
BROCHURE    HUNT BOOKLET

Enter your email address to subscribe to this blog and receive notifications of new posts by email.

Email Me....


Tags: , , , , , , , , , , , ,

Tips For More Grouse

trees3Learn to Recognize Good Cover
Some hunters seem to have a sixth sense about where the grouse are. This isn’t magic but rather the culmination of years of experience, observation, and a working knowledge of what the birds need. These guys are constantly reading about grouse habitat and lore; they take note of wherever they hear drumming in the spring. They know that good grouse cover holds food and provides protection from predators — if it is near an evergreen stand or gravel so much the better.

Take a page from these hunters. Every time you or your dog move a bird, have a good look around after the smoke has cleared — you’ll see a pattern soon enough. Study grouse biology at home; carry field guides when you hunt; learn to recognize common grouse foods in your area. After a while you’ll develop that sixth sense too.

Keep a Log
Every serious grouse hunter I know keeps a hunting log. Some maintain elaborate leather-bound journals in which they detail particulars of the hunt such as the date, cover, number of flushes, dog work, weather, harvest, and crop contents of the birds. Other keep it simple, by marking covers on their handheld GPS. Either way, the hunter is reminded of the places that produced grouse last season.gps

Do this consistently and it won’t take many seasons before you have a bevy of early, mid, and late season options. The more options you have, the better your chance of having a grouse dinner.

Break Some Clay
Over the course of a season, few of us get enough shots at grouse. So it only stands to reason that a hunter ought to make the most of each opportunity. I do this by honing my shotgunning skills in the off-season. Skeet, trap, or sporting clays keep a hunter sharp so that mounting and swinging his scattergun becomes second nature. You’ll still miss — grouse have a way of humbling everyone — but you’ll also make some shots that you might not have without the off-season practice. It just takes a few of these to turn a mediocre season into a great one.

Don’t Forget the Dog Days
Spring and summer are tailor-made for training your dog. Despite this, few of us take advantage of the opportunity. Instead, we expect our dogs to work flawlessly on opening day and we’re actually surprised when that doesn’t happen.

Does your flushing dog hunt too far ahead and blow cover before you get there? A little “hup training” (teaching your dog to sit on command, no matter how far away) in the off season goes a long way towards remedying this. You might also consider brushing up on retrieving drills or introducing your dog to pigeons or game farm forays prior to the season. Some advanced training, such as steadying to wing and shot (where a dog sits down automatically at each flush) might require the help of a professional dog trainer. If that’s what you want, the off-season is the time to do it.

P1040011

Pointing dogs have their own set of training needs, which might include bolstering staunchness, retrieving, hunting range and finding dead birds. Whatever your canine hunting partner’s flaw is, the off-season is the time to address it.

The idea is to learn to handle your dog so that you perform as a well-oiled team during the hunting season. There are plenty of great dog training books and videos — the off-season is when you should benefit from them most.

Follow the Food
Grouse eat hundreds of types of food and each provides a clue as to where the birds are hanging out. That’s why it’s a good idea to check the crop of every bird you shoot. Knowing what grouse are eating helps you understand their habits and tells you where you should focus your hunting efforts. If the last three birds you shot were full of blackberries, for instance, it’s definitely time to hunt any of your covers that hold these shrubs.

Against the Wind
A dog relies on his nose to find birds. So why would you hunt with the wind at its back? We all know that there isn’t any good reason for doing so, but it’s one of the first things excited dog handlers forget when approaching good cover.

If you hunt into the wind, your dog will work closer, scent more game and, hopefully, find more birds. It’s a simple but often overlooked strategy that can make the difference between a full and empty game bag. This is also an important consideration when looking for a lost bird. Take your dog downwind from where you think it fell and let it start hunting from there.

Stop and Start
A good grouse hunting dog provides opportunities that you might not have otherwise had, but that’s not to say that a dog less hunter can’t do well. The key, for a dog less hunter, is to stop and start through likely cover and change direction often. These unpredictable patterns unnerve grouse and invariably pressure them into flushing. Another added bonus is that when you stop you can sometimes hear the put-put-put of a grouse moving just ahead of you. If that’s the case, get the gun up and rush it.

Don’t Hesitate
A good upland shot doesn’t hesitate. He takes the first available shot, even if it’s not a great one.

If you wait for a better chance you’ll rarely get it. Similarly, if you are leading a bird that disappears behind a screen of leaves, follow through, and shoot anyway. You’ll be surprised how often you connect. If not, shells are cheap.

While we’re on the subject of shooting, be ready for the second flush. Often, especially, early in the season when birds are still in their family groups, multiple flushes do occur. If you keep this in mind, they won’t catch you flat-footed — or with an empty gun.

Follow Up
Whenever you flush a bird and don’t fold it, mark where you last saw it. Most times they won’t fly much further than 150 yards. If you marked it well and follow up immediately, you have a good chance of forcing a second flush.


This slideshow requires JavaScript.

Another advantage of following up on grouse is that they sometimes lead you to new covers. If that’s the case, don’t forget to mark it.

Lastly, never assume that you missed any grouse that you shot at. After the shot, keep quiet and listen. Sometimes you’ll hear a mortally wounded grouse doing its death dance against the ground — that’s the one that you thought you missed.

The Right Tools
A fast-handling 12, 16 or 20 gauge shotgun is ideal for birds. Most gunners like double guns. Some happen to prefer a pump because that’s what they shoot best with.  However, don’t discount the light weight, easy to carry .410 shotgun.  Nice little gun with ever growing in popularity in our neck of the woods.

Whatever, your preference, you can’t go wrong using 2 3/4-inch shells filled with 7.5 shot. Grouse aren’t tough birds and it doesn’t take much to bring them down. Since most shots are within 15 yards, the more open-choked your barrels are, the better.

Other essential grouse hunting tools include a quality blaze orange upland hunting vest with a lined game pouch; brush pants; comfortable, well-supported hunting boots; and a compass and/or GPS. If you are hunting with a dog, a whistle, water bottle, portable dog dish, dog first aid kit, and lead are important too. When working heavy, thorny cover, a pair of shooting glasses that protect your eyes are worth their weight in gold.

Conclusion
No one ever said grouse hunting was complicated. But it does take some planning, know-how and skill. Over the last few years, these strategies have made many a much better grouse hunter. Hopefully, they’ll do the same for you.

Follow our FISHING BLOG

WEB   RATES     FISH    HUNT    CABINS    PHOTOS
BROCHURE    HUNT BOOKLET

Enter your email address to subscribe to this blog and receive notifications of new posts by email.

Email Me....


Tags: , , , , , , ,

Bargain vs. Premium Ammo

You get what you pay for. That’s an adage we generally believe in. But does it hold up with respect to ammunition? We set out to answer that question by testing the accuracy of a variety of value-priced .308 hunting ammo against more costly stuff.

ammo1

Methodology
Using three .308 rifles in the test—one hunting rig and two precision rifles that we knew would be ringers.

We put a number of budget and premium loads through all three rifles over the course of one day, ensuring the results wouldn’t be influenced by different environmental conditions. We also used a standard 5-shot-group protocol, and shot two groups with each load at 100 yards. As a control to establish a baseline level of accuracy for each rifle, we also shot 5-shot groups using Federal’s Gold Medal load with 175-grain Sierra BTHPs.

Using the baseline match load to calculate a ratio for each hunting load by dividing the size of the hunting-load groups into the size of the match-load groups. The closer to 1 that ratio is, the better the hunting load performed. None of the hunting loads outshot the match load, so all these ratios were greater than one.

Results
The outcome was interesting. The best hunting ammo was Hornady’s American Whitetail 150-grain Interlock SP. Compared to the baseline groups with the match ammo, this budget-priced load ($19.29 for a box of 20) shot nearly as well as the match ammo in all three rifles and had an impressive 1.41 average ratio. Federal’s Fusion, another bargain ammo ($21.49 for a box of 20) was second best among the loads, with an average ratio of 2.02.

The only expensive load that delivered consistent performance in all three rifles was Federal’s 165-grain Trophy Bonded Tip ($34.49 per box), The two Winchester loads had nearly identical levels of performance, though again, the less expensive 180-grain BST (2.11 ratio average) outshot the more expensive 150-gr. XP3 (2.81 ratio average).

ammo2

It’s worth noting when purchasing premium ammo that the promise of greater accuracy is certainly implied because it uses better quality components, but that much of its benefit is based on the idea that it will perform better on game.

Conclusion
It pays to try different loads in several different bullet weights in your rifles. Investing money to find an accurate load is the cheapest way to get the most from your rig.

Follow our FISHING BLOG

WEB   RATES     FISH    HUNT    CABINS    PHOTOS
BROCHURE    HUNT BOOKLET

Enter your email address to subscribe to this blog and receive notifications of new posts by email.

Email Me....


Tags: , , , , , , , , ,

Sighting in Your Rifle

So you’ve acquired a new hunting rifle. After saving your hard-earned cash and landing permission from your other half, the gun rests in your hot little hands. It looks great, feels great… it probably smells great… but more importantly does it shoot great? Now its time to hit the range and get this baby sighted in.

Truth is the same holds true for rifles we’ve had for many years. Chances are they don’t require the full-meal-deal, but sighting in, confirming that our equipment is in good working order, or realigning sights is something we should do on a regular basis.

Unfortunately many of us try to kill two birds with one stone. We visit the range infrequently and attempt to sight in and practice shooting all at the same time. It’s important to remember, sighting is very different from regular shooting practice. The process of sighting in involves aligning the scope (or other sights) with the firearm when using a specific bullet and load. Shooting practice involves discharging and often experimenting with different positions to allow our bodies to grow accustomed to the form and function of shooting.

k_wilson_sighting_in2Believe it or not, many of us don’t sight in properly. It never ceases to amaze me how many hunters pick up their guns once or twice a year, assume it’s shooting straight and hit the woods without a second thought. As a professional outfitter I see it all the time. In fact, I’ve seen guests take it personally when, after arrival in camp, I ask them to take a few practice shots – just to make sure their gun is properly sighted in. As though I’m insinuating that they haven’t prepared for their hunt, once in a while I get a hunter who thinks I’m a control freak. Then the truth comes out. After a few shots it becomes obvious; better than half are inevitably in need of scope adjustments. Every one swears that they were shooting one-inch groups at home, but now their rifle requires major scope adjustments. In their defense, a multitude of things can happen to guns in transit. Blunt trauma to cases or directly to the scope itself can throw it way out of whack; hence the need to sight it.

To be honest many of us are guilty of not maintaining our rifle and scope. If you shoot regularly that’s one thing; you’re constantly checking it and tweaking the scope when necessary. In reality, most of us don’t. By in large, recreational hunters pick up their guns a few times each year. Whether you’re tuning a brand new rifle or confirming the accuracy of an old one, here are a few tips for sighting in:

1) Bore sight your rifle before shooting
k_wilson_sighting_in3This first step applies mostly to rifles and scopes that have a new marriage. The first time a scope is mounted to a rifle the gunsmith will usually use a bore sighting tool. This tool is used to approximately align the crosshairs of the scope with the rifle barrel. Unfortunately some folks erroneously rely on bore sighting alone to zero their gun. Remember bore sighting can be precise but most often it only approximates accuracy. If, when you visit the range, you discover that you’re not even hitting the paper at all, consider rough bore sighting your gun. Practical with bolt-action rifles, by removing the bolt, you can stand behind the gun, look through the barrel and center the target. Then without adjusting the gun, look through the scope and make the necessary adjustments to bring the crosshairs in alignment with the target. This should get you hitting the paper in no time, then you can move on to shooting.

2) Shoot from a stable platform and rest
To reliably confirm the accuracy of your rifle and scope, you must shoot from a rest. I’m not sure I should say this or not, but I will. To illustrate the naivety of some, I’ve actually witnessed guys trying to sight in their rifles at the range by shooting freehand from a standing position. Needless to say these are the guys that get frustrated because they’re not hitting anything.

Remember, when we’re sighting in our rifles we’re not testing our shooting skill, but rather the accuracy of the gun, scope and bullet being used. Our goal should be to eliminate or at least minimize human error and allow the equipment to do its thing. With this in mind, a stable shooting bench or table is always recommended. Most shooting ranges are furnished with suitable tables or benches and adjustable stools. If you’re using a portable bench, make sure it is resting level on solid ground. Likewise, it’s imperative to use a shooting rest. In my opinion a vice can be that much better. I really like MTM Case-Gard products (www.mtmcase-gard.com). They make a variety of shooting supplies that are both affordable and practical. Few of us exhibit perfect shooting form. By understanding the biomechanics involved with aiming, breathing, squeezing the trigger and following through we can better acknowledge how to eliminate torsion while shooting from a rest. By cradling the rifle fore-end on a rest or in a vice, we can align our sights with the downrange target and maintain that alignment for a long period of time. Then, by gently squeezing the trigger to discharge, we minimize our human influence thereby allowing the firearm to perform more or less on its own.

3) Begin at close range, then move out to 100 yards and further
I’ve heard much discussion about the standard 100 yard shot and arguably for most bore-sighted rifles, sighting in at that distance is fine. But talk to the pros and most will agree that you should begin at 25 yards if you want to do it right. Making adjustments at close range is easier than at longer distances. At 25 yards you’ll find it easier to acquire your target; it simply appears larger and is easier to center the crosshairs at this short distance. Inaccuracies are simpler to rectify and adjustments can be made quickly at that distance. Remember, inaccuracies are exaggerated that much more at greater downrange distances.

k_wilson_sighting_in1
As you make your fine adjustments to your scope, be aware of the increments and don’t overdo it. For example, with my Leupold VXIII, one click = 1/4 inch adjustment. So, if my shots were hitting consistently two inches to the left of center, I would likely need to dial the adjustment eight clicks in that direction, then shoot another round of bullets. Some folks disagree, but in my opinion it is better to make subtle adjustments, then shoot to confirm that you are working toward the zero mark. As long as there are no fliers, a series of three shots is typically representative of where the gun is shooting. Although with today’s scopes I don’t believe it is as crucial, I still like to give it a firm tap to seat the crosshairs after each adjustment.

When your rifle and scope are in sync at 25 yards, move to 100 yards. Most big game rifle and bullet combinations that are sighted in a couple inches high at 100 yards will shoot a hair low at 25 yards – with most deer hunters this is considered ideal (e.g., I like my 300 Win Mag to be 2″ high at 100 yards). Once your rifle is sighted in, try shooting at 200, 300 and 400 yards to better learn how your rifle, scope and ammunition perform at greater distances.

4) Use the same ammunition that you plan to hunt with
Not all ammunition performs the same. Be sure to sight in your rifle with the load that you plan to hunt with. Ballistics of variable bullet weights and designs (not to mention manufacturers) will perform differently. For instance, Winchester Ammunition’s 150 grain Supreme Elite XP3 (www.winchester.com) will inevitably perform differently than Remington’s 180 grain Core-Lokt, PSP (www.remington.com) shot out of my 300 Winchester Magnum.

If you reload your own ammunition, then you’re likely acquainted with factors affecting bullet performance. Working the right load may take some trial and error, but the same applies – always sight in with the bullet and load you intend to hunt with.

5) Record and reference each shot
Sighting in can be as labor-intensive as you make it. As a rule, several items are required and several more make the job that much easier. As an absolute necessity, we require a table or bench, a shooting rest, our rifle, ammunition and a target. Beyond these basics, the job is much easier with a spotting scope, tripod, and additional targets along with a marker.

As you begin shooting, be sure to analyze and record each shot. I like to use a Bushnell Elite 15-45x 60 mm spotting scope (www.bushnell.com) mounted on a solid tripod. At 45 power magnification, I can see every detail on the downrange target. My scope allows me to closely assess where I hit in relation to where I aimed. Further, many shooters like to keep a matching target on the bench while they are shooting. By checking their shot, then marking it on the target beside them, they can better track their progressions to confirm any scope adjustments and accuracy. This eliminates much of the guessing about which shot was which.

Follow our FISHING BLOG

WEB   RATES     FISH    HUNT    CABINS    PHOTOS
TESTIMONIALS    BROCHURE    HUNT BOOKLET

Enter your email address to subscribe to this blog and receive notifications of new posts by email.

Email Me....


Tags: , , , , , , ,

Long-Range Shooting For Coyote & Other Varmits

coyote1edit

Much of the excitement of hunting coyotes comes from calling them close, but predators are wary by nature, especially when they’ve been called to, and shot at, before. On more than a few occasions we’ve watched a coyote come from a quarter-mile only to stop just out of what some people might call reasonable range. But with the right setup and some practice under your belt, you can push the limits of reasonable and put that long-distance dog down. Here’s where to start.

The Right Rig

coyote gun

The .22-caliber center fire cartridges – the .223 and .22-250 – are standard carry for most coyote hunters, but both can get a bit squirrely when playing the long-range game. Instead, opt for a caliber with a bit more oomph behind it, such as the .243. Stick with a polymer-tipped varmint bullet with a ballistic co-efficient topping .300. This will require a bullet weight of at least 70 grains. Remington’s 75-grain Accu-Tip V comes screeching out of the muzzle at 3,375 fps and retains enough energy past 400 yards to kill a coyote without punching a gaping hole through the pelt. Hornady’s venerable V-Max and the Federal V-Shok both offer similar ballistics.

When manufacturers tack the word “varmint” on to a rifle they are usually compelled to do one of two things: chop off the barrel to 22 inches and mill it full of flutes or they slap it into a wide, beavertail stock designed to be stable when shot from a bench. Neither is ideal for long-range coyote hunting. Of .243-caliber varmint guns on the market, few are offered in a 26-inch barrel – the Remington 700 SPS Varmint (pictured above) is one; Savage makes another. For a walk-and-stalk hunt in the wide-open West, I’d concede to a rifle with a moderately lighter 24-inch barrel. Either way, a mounted bipod, quality optics, and a good laser rangefinder are mandatory.

The Proper Setup
If a coyote can’t hear you calling, it doesn’t matter how good the spot is. On windy days, stay home or plan on calling multiple, short sets. However, on calm days, a coyote can hear a mouth-blown call more than a mile away, but it might take him 30 minutes are more to come that far, so stick out your sets as long as you can.

For maximum visibility stake out the highest point around, but remember, if you can see a coyote from a quarter-mile, he can spot movement from just as far. Stay still and only move when an approaching dog is obscured from view. Consider an electronic caller with a user-friendly remote to further minimize movement.

One final point: Don’t think the long-distance game will get you out of playing the wind as coyotes live, and die, by their nose. It does give you an advantage, however. Get the breeze in your face, quartering slightly onto your right side (for right-handed shooters), so you’ll be in the perfect position to bust him as he tries to circle downwind.

Hit Your Mark
A coyote’s vitals are the size of a grapefruit and to be successful you have to be able to hit that 5-inch circle. To do that consistently requires a rock-solid rest, accurate elevation and windage adjustments, and at least a bit of luck.

 imagesJM9HN8M9

Prone Out
At these ranges, you’re essentially a sniper, so take a tip from their kit and get as close to the ground as you can, with your legs spread and feet laid out flat. Remember, you might have to lay there for 30 minutes or more, so remove any sticks, rocks or other obstructions before you start calling. Dress warm and get comfortable.

Think There, Not Here
Sure the wind may appear consistent where you’re sitting, but coulees, breaks, valleys, or even the smallest hillock can affect wind direction and cause a miss downrange. Before pulling the trigger, assess what the wind is doing at your potential target ranges and compensate accordingly.

Watch The Impact
The best shooting advice is to watch the animal go down in the scope. By concentrating on the impact, you’ll forget about flinching as your mind almost sub-consciously causes your finger to pull the trigger. Also, you should be able to deliver a follow-up shot with a more precise hold (if necessary) when you see where your first bullet hit.

Follow our FISHING BLOG

WEB   RATES     FISH    HUNT    CABINS    PHOTOS
TESTIMONIALS    BROCHURE    HUNT BOOKLET

Enter your email address to subscribe to this blog and receive notifications of new posts by email.

Email Me....


Tags: , , , , , ,

How to Judge Your Shooting Distance

 A great article by Kevin Wilson

Accurately judging distance is the first step toward proper shot placement. Instinctive or calculated, bowhunters rely on it for close range shooting. Gun hunters count on their ability to estimate longer distances. Over time we all learn our own tricks for calculating distance but with the advent of laser rangefinders many of us won’t leave home without them. Regardless of how you go about it, determining yardage can make or break your hunt.

I will remember one hunt as long as I live. The outcome was downright depressing all because I misjudged the distance. It happened 16 years ago. I was a neophyte bowhunter at the time. I’d set up a treestand in a small block of trees that I knew held several bucks and does. The previous winter I’d picked up some huge sheds that taped out at 183 Boone & Crockett inches. Knowing that the gigantic buck had survived the winter, my hopes ran high and I knew there was always a chance he’d show up in the timber I was hunting. As luck would have it 45 minutes after climbing into my stand I heard leaves crunching underfoot. Straining to look through the trees, sure enough a smaller basket rack buck was making his way toward my stand. Always an impressive sight I enjoyed the view as he walked 10 yards from me. Then I heard more rustling in the leaves and looked over to see him. He was nothing short of magnificent! Based on his sheds, it looked like he’d grown at least another 15 inches putting him well into the high 190’s – a buck of a lifetime in anyone’s books! He walked 12 yards from my stand but I couldn’t get to full draw with him in plain view. As soon as he turned I capitalized. At full-draw, I locked my 20 yard pin on his body as he continued to amble forward. Walking straight away there was no shot opportunity at all! By the time he stopped, I estimated he was standing at 30 yards. With all the concentration I could muster, I focused and released. The arrow flew where I’d aimed, in perfect alignment with his chest, but literally inches high splitting the hair on his back! Completely awestruck and in total disbelief, that gut-wrenching feeling overcame me as I watched my world-class archery whitetail bound away never to be seen again… and all because I’d misjudged the distance!

Since that day I have made it my lifelong mission to learn how to accurately judge distance. From capitalizing on today’s technologically advanced laser range finding devices to using topographic characteristics to assist in calculating distance, and understanding the influences of terrain, it is an ongoing practice in my world. Regardless of whether you’re an archer or a rifleman, here are a few considerations that might help you as you learn to accurately judge distances.

The Technological Solution
Today’s technology is a saving grace for hunters. Many of us won’t leave home without our laser rangefinder. Portable and easy to use, we simply identify our target, adjust the setting, point, hit the button and, voila! … distance is displayed on the screen. With yardage confirmed, all that remains is the shot itself.

When I began bowhunting nearly two decades ago rangefinders had a simple dial that brought the target image into focus when the dial was turned. Wherever the dial ended up, that was your yardage. Today, thanks to innovation, laser rangefinders are readily available and relatively affordable. In fact today there is really no reason not to use a rangefinder. Many manufacturers have their own versions, but in my opinion, one of the latest and greatest inventions is Bushnell’s Laser Arc. I’ve got the Elite 1500 model. The ARC stands for Angle Range Compensation. While traditional rangefinders are precision optical instruments designed to be used on a level plain (line of sight), the ARC rangefinder compensates for angles from a treestand for instance, or up or down a mountain slope. I have owned and used several different kinds of rangefinders over the years. The Laser ARC is my absolute favorite. Using digital technology, it has a built-in inclinometer that displays the exact slope angle from +/- 60º of elevation with +/- 1.0 degree accuracy. Hunters have always struggled with extreme uphill and downhill angles. These severe angles alter true horizontal distance to the target. The ARC solves this problem. It has three primary settings: bow mode, rifle mode, and a regular mode (for line of sight distance calculation only).

It has a bow mode that displays line of site distance, degree of elevation, and true horizontal distance from 5-99 yards (or meters). For longer range shooters, it also has a rifle mode that calculates and displays the amount of bullet drop, at the target in inches (or centimeters). In the rifle mode, the amount of bullet drop is determined by the line of sight distance to the target, degree of elevation, along with the specific ballistic characteristics of the caliber and ammunition. As the hunter ranges the target, the line of sight, degree of elevation, and bullet-drop/holdover in inches or centimeters is displayed from 100-800 yards (or meters). Here’s where the technology shines ballistically. In the start-up menu, one of eight ballistic groups can be selected by the user, with each formula representing a given combination of caliber and loads.

Laser rangefinding technology, and the ARC system in particular, is invaluable but what if we don’t have one? Then it comes down to a matter of practice and estimation to determine our downrange distances.

Practice
For most of us, learning to judge distance takes considerable practice. Only by doing it a lot, and under variable conditions, can we become competent at it. Shooting is a lot like golf. Understanding how your bow or gun works (i.e., trajectory and ballistics) and interpreting the size of the target animal relative to the terrain can only be learned through firsthand repetitive experience. So how do we get all this supposed experience when we can only take a finite number of animals each year? The answer lies in visiting the gun or archery range.

For bowhunters, nothing beats practice on the 3D course. Today’s 3D targets, like those made by MacKenzie, are very lifelike and offer as realistic practice as you’re likely to get anywhere. Most are made to scale and can be strategically placed in any range situation to simulate realistic hunting scenarios. On my local 3D course, our club uses everything from coyote targets to whitetailed deer, mountain goat, elk, moose, wild hog, turkey and more. Some are set at long distances over 60 yards through wide open clearings while others are placed in the trees, often with very small shooting windows at closer distances like 20 or 30 yards. Most 3D ranges have a good assortment of field scenarios to allow practicing archers to hone their skills.

Likewise, rifle and muzzleloader hunters should visit the range regularly to hone shooting skills. Unfortunately due to the expansive nature of bullets today’s 3D targets aren’t an option. Alternatively silhouettes are. Most rifle ranges offer variable range distances from 100 to 400 yards. At my club our furthest distance is 600 yards. Unless you’re really into the long range thing 400 yards is a stretch for most big game hunters. By shooting repeatedly at 100, 200, 300, and 400 yards, we grow accustomed to what those distances look and feel like. By taking note of the size of target in our scope at specified magnifications we can also learn to estimate distances. For example, at 10x zoom on my Leupold scope, I know that a deer will fill a certain percentage of the field of view. By acknowledging how much of the animal is in the field of view, I can guess the approximate yardage with relative accuracy. Likewise, at 200 and 300 yards, that deer will appear smaller respectively.

Break Distances into Increments
Whether we’re hunting remote regions or in farmland things like trees, rocks, fence posts, and power poles can be used to aid in judging distances. As an archer I’ve learned to make a mental note of things like trees, shrubs, rocks or other physical land-based objects at 10 yard increments out to a distance of 50 yards from where I’m sitting. By burning those objects into my memory I’m better able to make quick decisions when an animal steps into a shooting lane. I’m guessing it may be the same throughout North America but where I do much of my hunting I’ve learned that power poles are set at a standard distance of 100 yards apart. Any time I’m hunting a wide open power line or in farm country I can use those power poles as markers to estimate yardage. As a rule, regardless of what kind of weapon you’re hunting with, breaking distances down into increments simplifies things. Remember, if you’re sitting in a stationary stand or ground blind there is always the option of setting out yardage markers at desirable increments, e.g., every 10 yards.

Consider Where and What You’re Shooting
Judging distances on the open prairies is a very different game than judging distance in the dense forest. Likewise, estimating the distance of a large target like a moose can be tricky if you’re more accustomed to looking at antelope. Dense cover and the size of the animal can play tricks on your mind.

As an archer, I spend most of my time hunting heavy mixed forest areas comprised of aspens and evergreens. Rarely do I see deer, moose or elk at distances further than 80 yards unless its down a long open cutline or across a clear cut. So, whenever I head out to different states or provinces to hunt smaller species like pronghorn antelope, it usually takes some time to acclimatize and recalibrate my brain to accurately judge distances. In my experience, smaller big game species in open terrain tend to appear further away while larger species under heavy cover often look closer than they really are. Unfortunately there are no set rules here; you just need to figure out what works best for you under variable conditions.

Follow our FISHING BLOG

WEB   RATES     FISH    HUNT    CABINS    PHOTOS
TESTIMONIALS    BROCHURE    HUNT BOOKLET

Enter your email address to subscribe to this blog and receive notifications of new posts by email.

Email Me....


Tags: , , , , , , , , , , , ,