RSS

Category Archives: Off the Grid

How to Judge Your Shooting Distance

 A great article by Kevin Wilson

Accurately judging distance is the first step toward proper shot placement. Instinctive or calculated, bowhunters rely on it for close range shooting. Gun hunters count on their ability to estimate longer distances. Over time we all learn our own tricks for calculating distance but with the advent of laser rangefinders many of us won’t leave home without them. Regardless of how you go about it, determining yardage can make or break your hunt.

I will remember one hunt as long as I live. The outcome was downright depressing all because I misjudged the distance. It happened 16 years ago. I was a neophyte bowhunter at the time. I’d set up a treestand in a small block of trees that I knew held several bucks and does. The previous winter I’d picked up some huge sheds that taped out at 183 Boone & Crockett inches. Knowing that the gigantic buck had survived the winter, my hopes ran high and I knew there was always a chance he’d show up in the timber I was hunting. As luck would have it 45 minutes after climbing into my stand I heard leaves crunching underfoot. Straining to look through the trees, sure enough a smaller basket rack buck was making his way toward my stand. Always an impressive sight I enjoyed the view as he walked 10 yards from me. Then I heard more rustling in the leaves and looked over to see him. He was nothing short of magnificent! Based on his sheds, it looked like he’d grown at least another 15 inches putting him well into the high 190’s – a buck of a lifetime in anyone’s books! He walked 12 yards from my stand but I couldn’t get to full draw with him in plain view. As soon as he turned I capitalized. At full-draw, I locked my 20 yard pin on his body as he continued to amble forward. Walking straight away there was no shot opportunity at all! By the time he stopped, I estimated he was standing at 30 yards. With all the concentration I could muster, I focused and released. The arrow flew where I’d aimed, in perfect alignment with his chest, but literally inches high splitting the hair on his back! Completely awestruck and in total disbelief, that gut-wrenching feeling overcame me as I watched my world-class archery whitetail bound away never to be seen again… and all because I’d misjudged the distance!

Since that day I have made it my lifelong mission to learn how to accurately judge distance. From capitalizing on today’s technologically advanced laser range finding devices to using topographic characteristics to assist in calculating distance, and understanding the influences of terrain, it is an ongoing practice in my world. Regardless of whether you’re an archer or a rifleman, here are a few considerations that might help you as you learn to accurately judge distances.

The Technological Solution
Today’s technology is a saving grace for hunters. Many of us won’t leave home without our laser rangefinder. Portable and easy to use, we simply identify our target, adjust the setting, point, hit the button and, voila! … distance is displayed on the screen. With yardage confirmed, all that remains is the shot itself.

When I began bowhunting nearly two decades ago rangefinders had a simple dial that brought the target image into focus when the dial was turned. Wherever the dial ended up, that was your yardage. Today, thanks to innovation, laser rangefinders are readily available and relatively affordable. In fact today there is really no reason not to use a rangefinder. Many manufacturers have their own versions, but in my opinion, one of the latest and greatest inventions is Bushnell’s Laser Arc. I’ve got the Elite 1500 model. The ARC stands for Angle Range Compensation. While traditional rangefinders are precision optical instruments designed to be used on a level plain (line of sight), the ARC rangefinder compensates for angles from a treestand for instance, or up or down a mountain slope. I have owned and used several different kinds of rangefinders over the years. The Laser ARC is my absolute favorite. Using digital technology, it has a built-in inclinometer that displays the exact slope angle from +/- 60º of elevation with +/- 1.0 degree accuracy. Hunters have always struggled with extreme uphill and downhill angles. These severe angles alter true horizontal distance to the target. The ARC solves this problem. It has three primary settings: bow mode, rifle mode, and a regular mode (for line of sight distance calculation only).

It has a bow mode that displays line of site distance, degree of elevation, and true horizontal distance from 5-99 yards (or meters). For longer range shooters, it also has a rifle mode that calculates and displays the amount of bullet drop, at the target in inches (or centimeters). In the rifle mode, the amount of bullet drop is determined by the line of sight distance to the target, degree of elevation, along with the specific ballistic characteristics of the caliber and ammunition. As the hunter ranges the target, the line of sight, degree of elevation, and bullet-drop/holdover in inches or centimeters is displayed from 100-800 yards (or meters). Here’s where the technology shines ballistically. In the start-up menu, one of eight ballistic groups can be selected by the user, with each formula representing a given combination of caliber and loads.

Laser rangefinding technology, and the ARC system in particular, is invaluable but what if we don’t have one? Then it comes down to a matter of practice and estimation to determine our downrange distances.

Practice
For most of us, learning to judge distance takes considerable practice. Only by doing it a lot, and under variable conditions, can we become competent at it. Shooting is a lot like golf. Understanding how your bow or gun works (i.e., trajectory and ballistics) and interpreting the size of the target animal relative to the terrain can only be learned through firsthand repetitive experience. So how do we get all this supposed experience when we can only take a finite number of animals each year? The answer lies in visiting the gun or archery range.

For bowhunters, nothing beats practice on the 3D course. Today’s 3D targets, like those made by MacKenzie, are very lifelike and offer as realistic practice as you’re likely to get anywhere. Most are made to scale and can be strategically placed in any range situation to simulate realistic hunting scenarios. On my local 3D course, our club uses everything from coyote targets to whitetailed deer, mountain goat, elk, moose, wild hog, turkey and more. Some are set at long distances over 60 yards through wide open clearings while others are placed in the trees, often with very small shooting windows at closer distances like 20 or 30 yards. Most 3D ranges have a good assortment of field scenarios to allow practicing archers to hone their skills.

Likewise, rifle and muzzleloader hunters should visit the range regularly to hone shooting skills. Unfortunately due to the expansive nature of bullets today’s 3D targets aren’t an option. Alternatively silhouettes are. Most rifle ranges offer variable range distances from 100 to 400 yards. At my club our furthest distance is 600 yards. Unless you’re really into the long range thing 400 yards is a stretch for most big game hunters. By shooting repeatedly at 100, 200, 300, and 400 yards, we grow accustomed to what those distances look and feel like. By taking note of the size of target in our scope at specified magnifications we can also learn to estimate distances. For example, at 10x zoom on my Leupold scope, I know that a deer will fill a certain percentage of the field of view. By acknowledging how much of the animal is in the field of view, I can guess the approximate yardage with relative accuracy. Likewise, at 200 and 300 yards, that deer will appear smaller respectively.

Break Distances into Increments
Whether we’re hunting remote regions or in farmland things like trees, rocks, fence posts, and power poles can be used to aid in judging distances. As an archer I’ve learned to make a mental note of things like trees, shrubs, rocks or other physical land-based objects at 10 yard increments out to a distance of 50 yards from where I’m sitting. By burning those objects into my memory I’m better able to make quick decisions when an animal steps into a shooting lane. I’m guessing it may be the same throughout North America but where I do much of my hunting I’ve learned that power poles are set at a standard distance of 100 yards apart. Any time I’m hunting a wide open power line or in farm country I can use those power poles as markers to estimate yardage. As a rule, regardless of what kind of weapon you’re hunting with, breaking distances down into increments simplifies things. Remember, if you’re sitting in a stationary stand or ground blind there is always the option of setting out yardage markers at desirable increments, e.g., every 10 yards.

Consider Where and What You’re Shooting
Judging distances on the open prairies is a very different game than judging distance in the dense forest. Likewise, estimating the distance of a large target like a moose can be tricky if you’re more accustomed to looking at antelope. Dense cover and the size of the animal can play tricks on your mind.

As an archer, I spend most of my time hunting heavy mixed forest areas comprised of aspens and evergreens. Rarely do I see deer, moose or elk at distances further than 80 yards unless its down a long open cutline or across a clear cut. So, whenever I head out to different states or provinces to hunt smaller species like pronghorn antelope, it usually takes some time to acclimatize and recalibrate my brain to accurately judge distances. In my experience, smaller big game species in open terrain tend to appear further away while larger species under heavy cover often look closer than they really are. Unfortunately there are no set rules here; you just need to figure out what works best for you under variable conditions.

Follow our FISHING BLOG

WEB   RATES     FISH    HUNT    CABINS    PHOTOS
BROCHURE    HUNT BOOKLET

Enter your email address to subscribe to this blog and receive notifications of new posts by email.

Email Me....


Tags: , , , , , , , , , , , ,

Where to Place Your Trail Cams

A trail camera won’t stumble through a bedding area, leave scent all over a trail, or exaggerate the size of a rack. And it’ll never oversleep. But your perfect little scouting buddy must be chosen wisely and placed carefully if you want to pattern that old, crafty animal you know is around. Here’s how…

CameraNO_MosaicYELLOW

The earlier version trail cameras were just a 35mm film point-and-shoot tucked in a weatherproof housing. It snapped a single picture when something triggered the sensor. After retrieving the camera, you ran to the one-hour shop to get the film developed, then thumbed through a week’s worth of pictures. More than once a stack of 36 prints revealed a handful of out-of-focus animals and a couple dozen shots of a wind-whipped brush or a drooping tree branch. That was only a few years ago.

Today, many website boasts several pages of trail cams, and even the cheapest one outperforms the original older ones. They have lenses sharp enough to count the ticks on a deer’s neck, electronic circuit boards so efficient that four AA batteries will run a unit for months, and memory cards that hold thousands of pictures you can download to your computer or delete at the touch of a button. And those are standard features on mid-priced cameras. The high-end ones will send a photo to your cellphone or laptop.

Like everything in the digital age, trail-cam technology has improved, competition has become fierce, and prices have plunged. Still, $200 is plenty of money, and matching a camera with the right features to meet your needs is critical. And even the best camera can’t take spectacular photos of a trophy buck if you don’t set it properly. But it’s not difficult to get started. These are the basics.

TrailCameras3
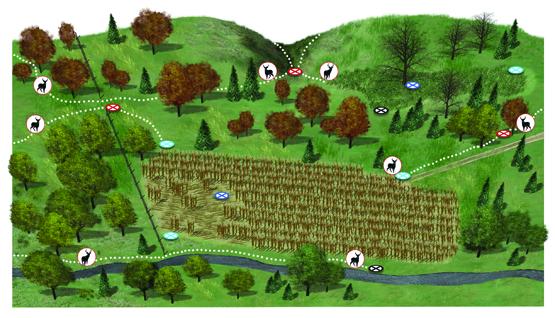
Wildlife biologists use trail cams to measure herd densities, buck-to-doe ratios, and the like. Your goals should be simpler: learning about the deer on your property, figuring out where to hunt them, and having fun in the process. You can pinpoint ideal spots before you buy a camera, and the locations you choose can determine what model is best for you. Here are four sites for four different periods.

Time: Late Summer
Site: Mineral lick
Goal: To start an inventory of buck numbers and quality on your property.
Setup: Find a spot with moderate to heavy deer traffic and spade up dirt in a 2-foot circle. Pour in half of an ice-cream pail of stock salt or commercial deer mineral and spade it into the loosened soil. Pour the rest on top.
Tips:
• Establish one or two licks per 80 acres. Allow deer up to a week to find them.
• Situate each lick 10 to 30 feet from a tree for mounting a camera.
• Jam a stick behind the camera’s top edge to point it down toward the lick.

500Time: Early Season
Site: Mock scrape
Goal: To find bucks after velvet shed, when they often relocate. Mocks can draw up to 90 percent of the bucks you’ll hunt.
Setup: Rake grass and forest debris 5 feet away from a tree that has a green, overhanging licking branch 5 to 7 feet above the ground. Activate with your own “product” (drink plenty of liquids) or deer urine.
Tips:
• If you are not getting clear shots of a buck, aim the camera at the licking branch. Most bucks will work it with their antlers.
• Establish multiple scrapes in each area and hang cameras only on the most active ones.

Time: Rut
Site: Funnel
Goal: To determine where resident bucks are traveling and whether traveling bucks are in the area.
Setup: Find terrain features that channel buck movement and hang a camera near fresh tracks and rubbing activity. Check camera every three to five days—the rut moves quickly.
Tips:
• Mount camera at a 45-degree angle to the trail. Bucks often move through funnels quickly; a camera set perpendicular to the trail might miss the shot.
• Scuff dirt in front of the camera with a boot. Such a mini mock will often make a moving buck pause and get “shot.”

Time: Late Season
Site: Food source
Goal: To find out where to fill a last-minute tag, and to know which bucks have survived the bulk of the hunting season.
Setup: Scout widely to find the hot food sources in your area, such as waste grainfields and clear-cuts. Place camera within 30 feet of the most heavily trafficked area. Load it with fresh batteries if you hunt in an extremely cold area.
Tips:
• Set up and check cameras at midday to avoid spooking feeding deer.
• If no trees are located near the food source, mount the camera on a tripod and camouflage it with grass or brush.

Make the Next Shot Count!

Follow our FISHING BLOG

WEB   RATES     FISH    HUNT    CABINS    PHOTOS
BROCHURE    HUNT BOOKLET

Enter your email address to subscribe to this blog and receive notifications of new posts by email.

Email Me....


Tags: , , , , , ,

Where to Place Your Trail Cams

A trail camera won’t stumble through a bedding area, leave scent all over a trail, or exaggerate the size of a rack. And it’ll never oversleep. But your perfect little scouting buddy must be chosen wisely and placed carefully if you want to pattern that old, crafty animal you know is around. Here’s how…

CameraNO_MosaicYELLOW

The earlier version trail cameras were just a 35mm film point-and-shoot tucked in a weatherproof housing. It snapped a single picture when something triggered the sensor. After retrieving the camera, you ran to the one-hour shop to get the film developed, then thumbed through a week’s worth of pictures. More than once a stack of 36 prints revealed a handful of out-of-focus animals and a couple dozen shots of a wind-whipped brush or a drooping tree branch. That was only a few years ago.

Today, many website boasts several pages of trail cams, and even the cheapest one outperforms the original older ones. They have lenses sharp enough to count the ticks on a deer’s neck, electronic circuit boards so efficient that four AA batteries will run a unit for months, and memory cards that hold thousands of pictures you can download to your computer or delete at the touch of a button. And those are standard features on mid-priced cameras. The high-end ones will send a photo to your cellphone or laptop.

Like everything in the digital age, trail-cam technology has improved, competition has become fierce, and prices have plunged. Still, $200 is plenty of money, and matching a camera with the right features to meet your needs is critical. And even the best camera can’t take spectacular photos of a trophy buck if you don’t set it properly. But it’s not difficult to get started. These are the basics.

TrailCameras3
Wildlife biologists use trail cams to measure herd densities, buck-to-doe ratios, and the like. Your goals should be simpler: learning about the deer on your property, figuring out where to hunt them, and having fun in the process. You can pinpoint ideal spots before you buy a camera, and the locations you choose can determine what model is best for you. Here are four sites for four different periods.

Time: Late Summer
Site: Mineral lick
Goal: To start an inventory of buck numbers and quality on your property.
Setup: Find a spot with moderate to heavy deer traffic and spade up dirt in a 2-foot circle. Pour in half of an ice-cream pail of stock salt or commercial deer mineral and spade it into the loosened soil. Pour the rest on top.
Tips:
• Establish one or two licks per 80 acres. Allow deer up to a week to find them.
• Situate each lick 10 to 30 feet from a tree for mounting a camera.
• Jam a stick behind the camera’s top edge to point it down toward the lick.

500Time: Early Season
Site: Mock scrape
Goal: To find bucks after velvet shed, when they often relocate. Mocks can draw up to 90 percent of the bucks you’ll hunt.
Setup: Rake grass and forest debris 5 feet away from a tree that has a green, overhanging licking branch 5 to 7 feet above the ground. Activate with your own “product” (drink plenty of liquids) or deer urine.
Tips:
• If you are not getting clear shots of a buck, aim the camera at the licking branch. Most bucks will work it with their antlers.
• Establish multiple scrapes in each area and hang cameras only on the most active ones.

Time: Rut
Site: Funnel
Goal: To determine where resident bucks are traveling and whether traveling bucks are in the area.
Setup: Find terrain features that channel buck movement and hang a camera near fresh tracks and rubbing activity. Check camera every three to five days—the rut moves quickly.
Tips:
• Mount camera at a 45-degree angle to the trail. Bucks often move through funnels quickly; a camera set perpendicular to the trail might miss the shot.
• Scuff dirt in front of the camera with a boot. Such a mini mock will often make a moving buck pause and get “shot.”

Time: Late Season
Site: Food source
Goal: To find out where to fill a last-minute tag, and to know which bucks have survived the bulk of the hunting season.
Setup: Scout widely to find the hot food sources in your area, such as waste grainfields and clear-cuts. Place camera within 30 feet of the most heavily trafficked area. Load it with fresh batteries if you hunt in an extremely cold area.
Tips:
• Set up and check cameras at midday to avoid spooking feeding deer.
• If no trees are located near the food source, mount the camera on a tripod and camouflage it with grass or brush.

Make the Next Shot Count!

Follow our FISHING BLOG

WEB   RATES     FISH    HUNT    CABINS    PHOTOS
BROCHURE    HUNT BOOKLET
Enter your email address to subscribe to this blog and receive notifications of new posts by email.

Email Me....


Tags: , , , , , ,

Tinywood Home on Trailer with Built In Outdoor Hot Tub

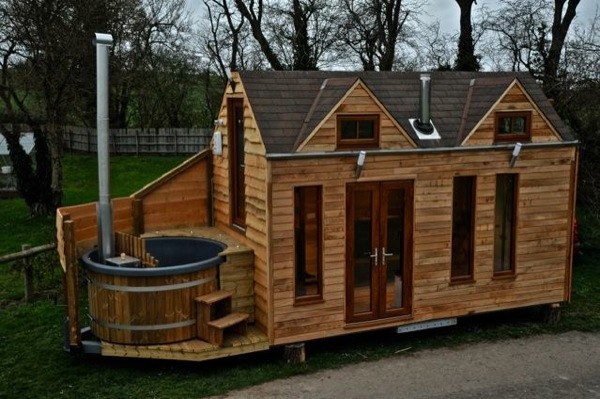
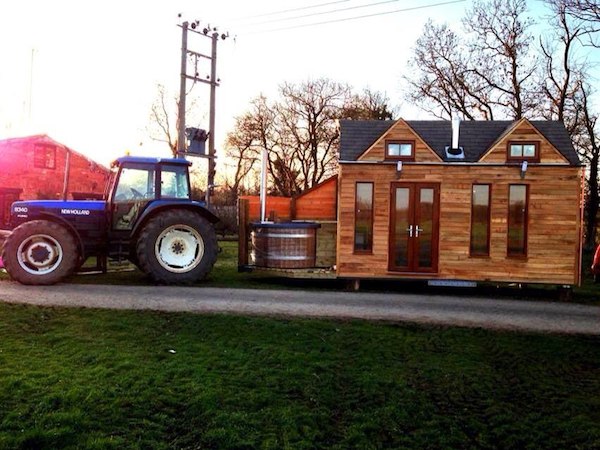
Have you ever heard about a tiny house that is also a hot tub? Yes, the project can be made and it already exists, thanks to a small company based in Warwickshire, England. The architects thought about building a home that offer comfort, relaxation and entertainment at the same time, and built this amazing tiny home that comes with an attached hot tub.

hot-tub-tiny-home-on-wheels

The company is specialized in building tiny homes and merging utility with creativity.

The inside is fully equipped as you will find a small kitchen, lounge area, two bedrooms upstairs and a functional heating system.

So after taking a look, you can say that it is the most perfect small vacation house for you and your family. As tiny as it is, there is still plenty of space inside for a family with two kids.

The outside hot tub is just an extra feature that tops the awesomeness of this house.

hot-tub-tiny-home-on-wheels-7

Follow our FISHING BLOG

WEB   RATES     FISH    HUNT    CABINS    PHOTOS
BROCHURE    HUNT BOOKLET

Enter your email address to subscribe to this blog and receive notifications of new posts by email.

Email Me....


Tags: , , , , , , , , ,

The Wrong Turn

survival3

 On Aug. 31, Bill Lawrence, 40, got separated from his hunting partners and remained lost for five days. As told to Colin Kearns.

Wednesday. I’d just killed my first squirrel when I glanced over for my friends Russell and Cris. They were gone.

Russell was the only one who’d hunted these woods, Meeman-Shelby Forest north of Memphis. We’d been hunting for 20 minutes and were deep into the forest. Russell and Cris stuck together, while I drifted to their left. I tried to stay within eyesight of them, but I was also watching for snakes. The last time I saw them, it looked like they were continuing in a straight line. Then I stopped to shoot the squirrel.

I thought I had an idea where they were, but an hour later I wasn’t any closer. I shouted, but the thick woods only swallowed my cries. So I turned to hike back to the truck, but an hour later I was even more lost. I kept walking, though, figuring I’d find a way out.

I walked, stopping to rest now and then, until it started to get dark. I’d fired a couple of shots but got no response. It never got cold, which was good because I had nothing to build a fire with. I doused myself with bug dope, then lay down. With my vest, I was able to cover my face and roll up the bottom end to use as a pillow. That dead squirrel in the pocket added a decent cushion.

I heard helicopters but they couldn’t see me through the trees, and I wasn’t going to run through the woods in the dark. I just prayed they’d find me tomorrow.

Thursday. I finished the last of the two water bottles I’d brought with me that morning. The days were hot, and I was walking and sweating a lot. I needed to stay hydrated. Fortunately, it rained that morning, and I managed to catch a half bottle’s worth of water.

I mostly squirrel hunt, but I have enough experience hunting deer and rabbits that I can identify tracks—and I know that if you follow those tracks, they’ll often lead to a water source, which in my case was a puddle in gumbo mud. I dipped my empty bottle and watched it fill with gray, grimy water. I didn’t want to drink it. I worried it’d make me sick. But what choice did I have? I was already getting dehydrated.

The taste was nasty—dirty and sandy—but the dip of mint Skoal I had in my mouth made it at least drinkable. I figured I should eat something, too, even though I wasn’t starving. I turned a dead stump over and found some nightcrawlers. They tasted about as bad as the gumbo water. I don’t know how many I ate—only that I’d never eat another one.

The rest of Thursday was a lot like Wednesday: Walk, then break for a nap. Walk, then nap. That second day, as I was walking—with no real end in sight—is when I started talking to God. Why is this happening? If I don’t make it out, will you take care of my wife and kids?

imagesTJNT6CHZThat night I awoke to a WHOOSHWHOOSHWHOOSH. Dazed, it took me a moment to realize that it was another chopper—and that it was right above me. I stumbled to find the flashlight in my vest. But by the time I turned it on, it was too late. After the chopper left, my flashlight burned out.

Friday. I kept moving and praying—all day. Walking gave me a purpose. Praying gave me strength. I truly believe my faith is what kept me from ever panicking. That afternoon I stumbled upon some persimmons. They were the most delicious things I’d eaten in a long time, and they were just sitting there on the ground, perfectly ripe, waiting to be found.
Saturday. I heard a low-flying chopper that morning. I took the T-shirt I had on under my camo shirt, tied it to the barrel of my Mossberg, and rushed to the nearest open area where I waved it around. But it never got close enough.

I was weak and tired. My body ached. For the first time I started to think I might not get out. I had started with 15 shells, and by then I only had four or five left. I’d been firing them and leaving the shells at spots where I rested. But on Saturday I decided to fire the rest I had at once. I didn’t know how much more of this misery I’d have to suffer, and I didn’t want the option of taking my own life.

Later that afternoon, as I was resting, I heard two sounds: a Harley-Davidson and a chain saw. I decided to stay put for the remainder of the day and save my energy. Tomorrow, I’d travel toward those sounds. I just knew that if I didn’t get out on Sunday, I never would.

Sunday. I came to a hill that I wasn’t sure I had the strength to climb. I sat down on a nearby log and prayed for strength. When I finally got up and walked to the hill, I glanced to the left where I saw a trail. And I took it.

Two miles later I hit a blacktop road. I fell to the ground crying. I flagged down a couple of motorcyclists who came down the road and told them who I was. “Son,” one of them said, “there’s a lot of people looking for you.”

They drove me to the camp the search team had set up nearby. Just as they got me on the stretcher and were about to drive me to the hospital, I was given a satellite phone. Kim, my wife, was on the other line. My eyes welled. “Hey,” I said. “I’m alive.”

Survival Analysis
Bill Lawrence had no method of striking fire, carried nothing to signal with but his shotgun, and possessed no tool to navigate to safety but his brain. When he became lost, he had nothing to eat but nightcrawlers and no means to disinfect water. He was unfamiliar with the country and carried no map. To sum up: He struck into the woods about as unprepared as a man can be. But before you criticize him too harshly, take a look at yourself. Have you ever been similarly unprepared for an emergency, using the excuse that you only plan to be gone a few hours and won’t stray more than a few hundred yards from the road? I know I have.

Lawrence’s ordeal should be a cautionary tale for all of us, emphasizing the importance of carrying basic survival gear every time we go afield, no matter how small that field we intend to hunt. A compass, a whistle, a sparking wheel, Tinder Tabs, and chlorine tablets weigh about as much as a tin of Altoids, and easily fit inside one. S - - t happens. Have a hat for it.

Lawrence’s reaction to being lost was to walk and then walk some more. By doing so, he disobeyed the four steps that almost ensure survival: Stop. Shelter. Signal. Stay. Had he stopped walking, tied his undershirt to a treetop or placed it in an opening where it could be seen or, better yet, spelled SOS in a clearing with branches or stones, then hunkered out of the wind to wait, he probably would have been found quickly after being reported missing. Ninety percent of search-and-rescue operations are resolved during the initial hasty search, usually within 10 hours.

One thing that Lawrence did do right needs to be emphasized: He never panicked and was determined to survive. The right attitude is one positive that can make up for a lot of negatives in any survival situation.

Follow our FISHING BLOG

WEB   RATES     FISH    HUNT    CABINS    PHOTOS
TESTIMONIALS    BROCHURE    HUNT BOOKLET

Enter your email address to subscribe to this blog and receive notifications of new posts by email.

Email Me....


Tags: , , , , , ,

How to Judge Your Shooting Distance

 A great article by Kevin Wilson

Accurately judging distance is the first step toward proper shot placement. Instinctive or calculated, bowhunters rely on it for close range shooting. Gun hunters count on their ability to estimate longer distances. Over time we all learn our own tricks for calculating distance but with the advent of laser rangefinders many of us won’t leave home without them. Regardless of how you go about it, determining yardage can make or break your hunt.

I will remember one hunt as long as I live. The outcome was downright depressing all because I misjudged the distance. It happened 16 years ago. I was a neophyte bowhunter at the time. I’d set up a treestand in a small block of trees that I knew held several bucks and does. The previous winter I’d picked up some huge sheds that taped out at 183 Boone & Crockett inches. Knowing that the gigantic buck had survived the winter, my hopes ran high and I knew there was always a chance he’d show up in the timber I was hunting. As luck would have it 45 minutes after climbing into my stand I heard leaves crunching underfoot. Straining to look through the trees, sure enough a smaller basket rack buck was making his way toward my stand. Always an impressive sight I enjoyed the view as he walked 10 yards from me. Then I heard more rustling in the leaves and looked over to see him. He was nothing short of magnificent! Based on his sheds, it looked like he’d grown at least another 15 inches putting him well into the high 190’s – a buck of a lifetime in anyone’s books! He walked 12 yards from my stand but I couldn’t get to full draw with him in plain view. As soon as he turned I capitalized. At full-draw, I locked my 20 yard pin on his body as he continued to amble forward. Walking straight away there was no shot opportunity at all! By the time he stopped, I estimated he was standing at 30 yards. With all the concentration I could muster, I focused and released. The arrow flew where I’d aimed, in perfect alignment with his chest, but literally inches high splitting the hair on his back! Completely awestruck and in total disbelief, that gut-wrenching feeling overcame me as I watched my world-class archery whitetail bound away never to be seen again… and all because I’d misjudged the distance!

Since that day I have made it my lifelong mission to learn how to accurately judge distance. From capitalizing on today’s technologically advanced laser range finding devices to using topographic characteristics to assist in calculating distance, and understanding the influences of terrain, it is an ongoing practice in my world. Regardless of whether you’re an archer or a rifleman, here are a few considerations that might help you as you learn to accurately judge distances.

The Technological Solution
Today’s technology is a saving grace for hunters. Many of us won’t leave home without our laser rangefinder. Portable and easy to use, we simply identify our target, adjust the setting, point, hit the button and, voila! … distance is displayed on the screen. With yardage confirmed, all that remains is the shot itself.

When I began bowhunting nearly two decades ago rangefinders had a simple dial that brought the target image into focus when the dial was turned. Wherever the dial ended up, that was your yardage. Today, thanks to innovation, laser rangefinders are readily available and relatively affordable. In fact today there is really no reason not to use a rangefinder. Many manufacturers have their own versions, but in my opinion, one of the latest and greatest inventions is Bushnell’s Laser Arc. I’ve got the Elite 1500 model. The ARC stands for Angle Range Compensation. While traditional rangefinders are precision optical instruments designed to be used on a level plain (line of sight), the ARC rangefinder compensates for angles from a treestand for instance, or up or down a mountain slope. I have owned and used several different kinds of rangefinders over the years. The Laser ARC is my absolute favorite. Using digital technology, it has a built-in inclinometer that displays the exact slope angle from +/- 60º of elevation with +/- 1.0 degree accuracy. Hunters have always struggled with extreme uphill and downhill angles. These severe angles alter true horizontal distance to the target. The ARC solves this problem. It has three primary settings: bow mode, rifle mode, and a regular mode (for line of sight distance calculation only).

It has a bow mode that displays line of site distance, degree of elevation, and true horizontal distance from 5-99 yards (or meters). For longer range shooters, it also has a rifle mode that calculates and displays the amount of bullet drop, at the target in inches (or centimeters). In the rifle mode, the amount of bullet drop is determined by the line of sight distance to the target, degree of elevation, along with the specific ballistic characteristics of the caliber and ammunition. As the hunter ranges the target, the line of sight, degree of elevation, and bullet-drop/holdover in inches or centimeters is displayed from 100-800 yards (or meters). Here’s where the technology shines ballistically. In the start-up menu, one of eight ballistic groups can be selected by the user, with each formula representing a given combination of caliber and loads.

Laser rangefinding technology, and the ARC system in particular, is invaluable but what if we don’t have one? Then it comes down to a matter of practice and estimation to determine our downrange distances.

Practice
For most of us, learning to judge distance takes considerable practice. Only by doing it a lot, and under variable conditions, can we become competent at it. Shooting is a lot like golf. Understanding how your bow or gun works (i.e., trajectory and ballistics) and interpreting the size of the target animal relative to the terrain can only be learned through firsthand repetitive experience. So how do we get all this supposed experience when we can only take a finite number of animals each year? The answer lies in visiting the gun or archery range.

For bowhunters, nothing beats practice on the 3D course. Today’s 3D targets, like those made by MacKenzie, are very lifelike and offer as realistic practice as you’re likely to get anywhere. Most are made to scale and can be strategically placed in any range situation to simulate realistic hunting scenarios. On my local 3D course, our club uses everything from coyote targets to whitetailed deer, mountain goat, elk, moose, wild hog, turkey and more. Some are set at long distances over 60 yards through wide open clearings while others are placed in the trees, often with very small shooting windows at closer distances like 20 or 30 yards. Most 3D ranges have a good assortment of field scenarios to allow practicing archers to hone their skills.

Likewise, rifle and muzzleloader hunters should visit the range regularly to hone shooting skills. Unfortunately due to the expansive nature of bullets today’s 3D targets aren’t an option. Alternatively silhouettes are. Most rifle ranges offer variable range distances from 100 to 400 yards. At my club our furthest distance is 600 yards. Unless you’re really into the long range thing 400 yards is a stretch for most big game hunters. By shooting repeatedly at 100, 200, 300, and 400 yards, we grow accustomed to what those distances look and feel like. By taking note of the size of target in our scope at specified magnifications we can also learn to estimate distances. For example, at 10x zoom on my Leupold scope, I know that a deer will fill a certain percentage of the field of view. By acknowledging how much of the animal is in the field of view, I can guess the approximate yardage with relative accuracy. Likewise, at 200 and 300 yards, that deer will appear smaller respectively.

Break Distances into Increments
Whether we’re hunting remote regions or in farmland things like trees, rocks, fence posts, and power poles can be used to aid in judging distances. As an archer I’ve learned to make a mental note of things like trees, shrubs, rocks or other physical land-based objects at 10 yard increments out to a distance of 50 yards from where I’m sitting. By burning those objects into my memory I’m better able to make quick decisions when an animal steps into a shooting lane. I’m guessing it may be the same throughout North America but where I do much of my hunting I’ve learned that power poles are set at a standard distance of 100 yards apart. Any time I’m hunting a wide open power line or in farm country I can use those power poles as markers to estimate yardage. As a rule, regardless of what kind of weapon you’re hunting with, breaking distances down into increments simplifies things. Remember, if you’re sitting in a stationary stand or ground blind there is always the option of setting out yardage markers at desirable increments, e.g., every 10 yards.

Consider Where and What You’re Shooting
Judging distances on the open prairies is a very different game than judging distance in the dense forest. Likewise, estimating the distance of a large target like a moose can be tricky if you’re more accustomed to looking at antelope. Dense cover and the size of the animal can play tricks on your mind.

As an archer, I spend most of my time hunting heavy mixed forest areas comprised of aspens and evergreens. Rarely do I see deer, moose or elk at distances further than 80 yards unless its down a long open cutline or across a clear cut. So, whenever I head out to different states or provinces to hunt smaller species like pronghorn antelope, it usually takes some time to acclimatize and recalibrate my brain to accurately judge distances. In my experience, smaller big game species in open terrain tend to appear further away while larger species under heavy cover often look closer than they really are. Unfortunately there are no set rules here; you just need to figure out what works best for you under variable conditions.

Follow our FISHING BLOG

WEB   RATES     FISH    HUNT    CABINS    PHOTOS
TESTIMONIALS    BROCHURE    HUNT BOOKLET

Enter your email address to subscribe to this blog and receive notifications of new posts by email.

Email Me....


Tags: , , , , , , , , , , , ,

Where to Place Your Trail Cams

A trail camera won’t stumble through a bedding area, leave scent all over a trail, or exaggerate the size of a rack. And it’ll never oversleep. But your perfect little scouting buddy must be chosen wisely and placed carefully if you want to pattern that old, crafty animal you know is around. Here’s how…

CameraNO_MosaicYELLOW

The earlier version trail cameras were just a 35mm film point-and-shoot tucked in a weatherproof housing. It snapped a single picture when something triggered the sensor. After retrieving the camera, you ran to the one-hour shop to get the film developed, then thumbed through a week’s worth of pictures. More than once a stack of 36 prints revealed a handful of out-of-focus animals and a couple dozen shots of a wind-whipped brush or a drooping tree branch. That was only a few years ago.

Today, many website boasts several pages of trail cams, and even the cheapest one outperforms the original older ones. They have lenses sharp enough to count the ticks on a deer’s neck, electronic circuit boards so efficient that four AA batteries will run a unit for months, and memory cards that hold thousands of pictures you can download to your computer or delete at the touch of a button. And those are standard features on mid-priced cameras. The high-end ones will send a photo to your cellphone or laptop.

Like everything in the digital age, trail-cam technology has improved, competition has become fierce, and prices have plunged. Still, $200 is plenty of money, and matching a camera with the right features to meet your needs is critical. And even the best camera can’t take spectacular photos of a trophy buck if you don’t set it properly. But it’s not difficult to get started. These are the basics.

TrailCameras3
Wildlife biologists use trail cams to measure herd densities, buck-to-doe ratios, and the like. Your goals should be simpler: learning about the deer on your property, figuring out where to hunt them, and having fun in the process. You can pinpoint ideal spots before you buy a camera, and the locations you choose can determine what model is best for you. Here are four sites for four different periods.

Time: Late Summer
Site: Mineral lick
Goal: To start an inventory of buck numbers and quality on your property.
Setup: Find a spot with moderate to heavy deer traffic and spade up dirt in a 2-foot circle. Pour in half of an ice-cream pail of stock salt or commercial deer mineral and spade it into the loosened soil. Pour the rest on top.
Tips:
• Establish one or two licks per 80 acres. Allow deer up to a week to find them.
• Situate each lick 10 to 30 feet from a tree for mounting a camera.
• Jam a stick behind the camera’s top edge to point it down toward the lick.

500Time: Early Season
Site: Mock scrape
Goal: To find bucks after velvet shed, when they often relocate. Mocks can draw up to 90 percent of the bucks you’ll hunt.
Setup: Rake grass and forest debris 5 feet away from a tree that has a green, overhanging licking branch 5 to 7 feet above the ground. Activate with your own “product” (drink plenty of liquids) or deer urine.
Tips:
• If you are not getting clear shots of a buck, aim the camera at the licking branch. Most bucks will work it with their antlers.
• Establish multiple scrapes in each area and hang cameras only on the most active ones.

Time: Rut
Site: Funnel
Goal: To determine where resident bucks are traveling and whether traveling bucks are in the area.
Setup: Find terrain features that channel buck movement and hang a camera near fresh tracks and rubbing activity. Check camera every three to five days—the rut moves quickly.
Tips:
• Mount camera at a 45-degree angle to the trail. Bucks often move through funnels quickly; a camera set perpendicular to the trail might miss the shot.
• Scuff dirt in front of the camera with a boot. Such a mini mock will often make a moving buck pause and get “shot.”

Time: Late Season
Site: Food source
Goal: To find out where to fill a last-minute tag, and to know which bucks have survived the bulk of the hunting season.
Setup: Scout widely to find the hot food sources in your area, such as waste grainfields and clear-cuts. Place camera within 30 feet of the most heavily trafficked area. Load it with fresh batteries if you hunt in an extremely cold area.
Tips:
• Set up and check cameras at midday to avoid spooking feeding deer.
• If no trees are located near the food source, mount the camera on a tripod and camouflage it with grass or brush.

Make the Next Shot Count!

Follow our FISHING BLOG

WEB   RATES     FISH    HUNT    CABINS    PHOTOS T
ESTIMONIALS
    BROCHURE    HUNT BOOKLET

Enter your email address to subscribe to this blog and receive notifications of new posts by email.

Email Me....


Tags: , , , , , ,

DIY – Solar Generator


wawang-lake

Follow our FISHING BLOG

WEBSITE    RATES     FISH    HUNT    CABINS    PHOTOS
TESTIMONIALS    BROCHURE    HUNT BOOKLET

Enter your email address to subscribe to this blog and receive notifications of new posts by email.

Email Me....


Tags: , , , , , , ,

Where to Place Your Trail Cams

A trail camera won’t stumble through a bedding area, leave scent all over a trail, or exaggerate the size of a rack. And it’ll never oversleep. But your perfect little scouting buddy must be chosen wisely and placed carefully if you want to pattern that old, crafty animal you know is around. Here’s how…

CameraNO_MosaicYELLOW

The earlier version trail cameras were just a 35mm film point-and-shoot tucked in a weatherproof housing. It snapped a single picture when something triggered the sensor. After retrieving the camera, you ran to the one-hour shop to get the film developed, then thumbed through a week’s worth of pictures. More than once a stack of 36 prints revealed a handful of out-of-focus animals and a couple dozen shots of a wind-whipped brush or a drooping tree branch. That was only a few years ago.

Today, many website boasts several pages of trail cams, and even the cheapest one outperforms the original older ones. They have lenses sharp enough to count the ticks on a deer’s neck, electronic circuit boards so efficient that four AA batteries will run a unit for months, and memory cards that hold thousands of pictures you can download to your computer or delete at the touch of a button. And those are standard features on mid-priced cameras. The high-end ones will send a photo to your cellphone or laptop.

Like everything in the digital age, trail-cam technology has improved, competition has become fierce, and prices have plunged. Still, $200 is plenty of money, and matching a camera with the right features to meet your needs is critical. And even the best camera can’t take spectacular photos of a trophy buck if you don’t set it properly. But it’s not difficult to get started. These are the basics.

TrailCameras3
Wildlife biologists use trail cams to measure herd densities, buck-to-doe ratios, and the like. Your goals should be simpler: learning about the deer on your property, figuring out where to hunt them, and having fun in the process. You can pinpoint ideal spots before you buy a camera, and the locations you choose can determine what model is best for you. Here are four sites for four different periods.

Time: Late Summer
Site: Mineral lick
Goal: To start an inventory of buck numbers and quality on your property.
Setup: Find a spot with moderate to heavy deer traffic and spade up dirt in a 2-foot circle. Pour in half of an ice-cream pail of stock salt or commercial deer mineral and spade it into the loosened soil. Pour the rest on top.
Tips:
• Establish one or two licks per 80 acres. Allow deer up to a week to find them.
• Situate each lick 10 to 30 feet from a tree for mounting a camera.
• Jam a stick behind the camera’s top edge to point it down toward the lick.

500Time: Early Season
Site: Mock scrape
Goal: To find bucks after velvet shed, when they often relocate. Mocks can draw up to 90 percent of the bucks you’ll hunt.
Setup: Rake grass and forest debris 5 feet away from a tree that has a green, overhanging licking branch 5 to 7 feet above the ground. Activate with your own “product” (drink plenty of liquids) or deer urine.
Tips:
• If you are not getting clear shots of a buck, aim the camera at the licking branch. Most bucks will work it with their antlers.
• Establish multiple scrapes in each area and hang cameras only on the most active ones.

Time: Rut
Site: Funnel
Goal: To determine where resident bucks are traveling and whether traveling bucks are in the area.
Setup: Find terrain features that channel buck movement and hang a camera near fresh tracks and rubbing activity. Check camera every three to five days—the rut moves quickly.
Tips:
• Mount camera at a 45-degree angle to the trail. Bucks often move through funnels quickly; a camera set perpendicular to the trail might miss the shot.
• Scuff dirt in front of the camera with a boot. Such a mini mock will often make a moving buck pause and get “shot.”

Time: Late Season
Site: Food source
Goal: To find out where to fill a last-minute tag, and to know which bucks have survived the bulk of the hunting season.
Setup: Scout widely to find the hot food sources in your area, such as waste grainfields and clear-cuts. Place camera within 30 feet of the most heavily trafficked area. Load it with fresh batteries if you hunt in an extremely cold area.
Tips:
• Set up and check cameras at midday to avoid spooking feeding deer.
• If no trees are located near the food source, mount the camera on a tripod and camouflage it with grass or brush.

Make the Next Shot Count!

Follow our FISHING BLOG

WEB   RATES     FISH    HUNT    CABINS    PHOTOS T
ESTIMONIALS
    BROCHURE    HUNT BOOKLET

Enter your email address to subscribe to this blog and receive notifications of new posts by email.

Email Me....


Tags: , , , , , ,

8 Ways to Harness Solar Energy

So much energy, so few solutions

1

The sun is the biggest source of renewable energy.

Solar power has become fairly pedestrian since the first photovoltaic cells came out of the lab in the 1950s. Today, utility-scale solar farms soak up the sun and photovoltaic panels dot rooftops across the world. The power generation is finding its way into transportation, too, alongside other clean-burning fuels like hydrogen. Just a few years ago, the Solar Impulse prototype plane flew nonstop without any fuel from San Francisco to New York. And companies like Toyota are looking to bring hydrogen cars mainstream.

Crazy Solar Power Plants

Crazy Solar Power Plants

“The U.S. was really the pioneer of the whole global solar photovoltaic industry,” said Juris Kalejs, an IEEE member and CTO of the Lowell, Massachusetts-based solar developer American Capital Energy. Having worked in photovoltaic technology development for more than 30 years, Kalejs has seen wild ideas come and go. The energy crisis of the 1970s spurred dozens of pie-in-the sky ideas, he said. But that hasn’t stopped people from innovating. Here’s his grounded take on highly unusual ways to harness solar power today.

Andre Broessel designed glass spherical lenses filled with water that act like solar concentrators.

The Los Angeles-based startup V3Solar made the news rounds last year with its literal spin on solar. Slick renderings showed a design for deep blue solar cells in a cone shape that could rotate. The company says they want to take photovoltaics from flat and static to 3-D and dynamic. A new video V3Solar put out this summer had more details about how its spinning mechanism could maximize energy generation.

Kalejs said he said he thought the setup could work but he was skeptical about the complexity. “It looks like something that’s a nice decorative piece you might find in a fountain,” he said. The company said it would show its prototypes to potential investors with a non-disclosure agreement.

Other designers are imagining different shapes for traditionally flat solar panels. Going rounder could mean capturing sunlight from every possible direction. Last year the Japanese optics company Kyosemi launched Sphelar Power to manufacture micro-spherical solar cell beads from discarded silicon and electrodes that are wired into a mesh. André Broessel, an architect at solar architecture company Rawlemon in Barcelona, designed glass spherical lenses filled with water that act like solar concentrators both large and small.

Kalejs called Broessel’s idea a neat one that would appeal to consumers but pointed to companies attempting a similar technology with 20-foot-diameter solar concentrators. “It’s a very tricky system to make and you need to make it on a large scale to make it cost effective,” he said.

Minuscule solar panels placed on microbes could create a chemical reaction akin to artificial photosynthesis

Minuscule solar panels placed on microbes could create a chemical reaction akin to artificial photosynthesis

Scores of scientists are working on artificial photosynthesis by developing systems that chemically convert sunlight, water and CO2 into oxygen and plant fuel. Unfortunately, photosynthesis has less than a percent efficiency versus 20 percent to 30 percent for regular solar cells, Kalejs pointed out. The risks with artificial plants and microbes are also quite high because a disease or fungus could wipe everything out.

British researchers from the University of East Anglia announced earlier this year that they’re working on artificial photosynthesis by placing minuscule solar panels on microbes in an effort to create hydrogen for fuel. Kalejs said he found their approach interesting and added that he’s attended National Science Foundation meetings where attendees discussed putting photosynthetic material on top of a solar cell. “Everybody’s been looking for a boost,” he said.

 Reusable peel-and-stick solar cells can be made easily and affixed to just about anything solid.


Reusable peel-and-stick solar cells can be made easily and affixed to just about anything solid.

Effective transparent and thin-film solar cells have been on the technology wish list for a long time. Several companies have already started manufacturing flexible solar panels but rigid ones remain more affordable and easier to produce, resulting in high quality. Earlier this year Stanford University and the U.S. National Renewable Energy Laboratory came up with reusable peel-and-stick solar cells that can be made easily and affixed to just about anything solid: toys, helmets, transistors and even business cards. The resulting power is still relatively small, though.

Kalejs cautioned that sunlight breaks down materials made with polymers, making the technology unstable. “It’s a short-life product right now,” he said. “The organic solar cells probably wouldn’t last more than a year or two, if that long.”

Bottle Charger is a way to recharge cell phones using a water bottle filled with boiling water and a mini-turbine

Bottle Charger is a way to recharge cell phones using a water bottle filled with boiling water and a mini-turbine

One person’s trash represents solar tech treasure for someone else. Last year blogger and tech writer Ryan Matsunaga posted step-by-step instructions on how to convert a water bottle into a solar lantern for $2. In February, Kenyan designers launched a Kickstarter campaign around the Bottle Charger, a way to recharge cell phones using a water bottle filled with boiling water and a mini-turbine. Although the initial prototype simply required a temperature differential, the designers hoped to integrate a small solar dish that could heat water with sunlight continuously during the day.

“I have no idea how cheap or stable it is,” Kalejs said of the Bottle Charger idea. “I guess you’d say, well if it works, use it.”

Solar-powered wearables will need to get more durable if they're going to be practical.

Solar-powered wearables will need to get more durable if they’re going to be practical.

Solar technology’s sleek lines and deep colors are tempting to designers who have incorporated solar cells into purses, necklaces, jackets and mini-dresses. That technology tends to be more high fashion than high function. Charging a phone in a jacket that has a solar power component can take hours. Solar-powered clothing companies have come and gone. Kalejs said that organic solar cell material wears out in a few years so even if the fashion looks timeless, the tech isn’t. He remembered seeing a company that turned spherical solar beads into jewelry and said he can still see how it would appeal to consumers.

Solar arrays could be installed in the open land than runs alongs roads. Oregon Department of Transportatio

Solar arrays could be installed in the open land than runs alongs roads.
Oregon Department of Transportatio

Roads and highways are a natural lure for solar technology innovators. Asphalt does a great job at absorbing and storing heat. Plus there’s so much of it around already — the infrastructure is there. Several years ago engineers and chemists at the University of Rhode Island created a project to develop ideas for harvesting solar heat from roads. Their suggestions included placing flexible photovoltaic cells on concrete highway dividers and installing water pipes in asphalt. At the same time, the company Solar Roadways wants to embed solar panels directly into roads.

Kalejs was highly skeptical of that, calling it a poor use of solar modules. However, solar modules could be put in conventional arrays beside the road, he said, as they’ve done in Oregon. There’s no shortage of land for that.

Follow our FISHING BLOG

WEB   RATES     FISH    HUNT    CABINS    PHOTOS
TESTIMONIALS    BROCHURE    HUNT BOOKLET

Enter your email address to subscribe to this blog and receive notifications of new posts by email.

Email Me....


Tags: , , , , , , , , ,