RSS

Category Archives: game

Stop Adding Fat to Your Game Meat

While my Wyoming elk tag has so far gone unfilled, my friend Tess was luckier, tagging her first elk in a Nebraska cornfield not long ago. A heat wave prompted us to spend all day Sunday butchering and last night we put about 20 lbs. of trimmings through the grinder.

I’ve been processing my own (and others) deer and elk for about a dozen years and view adding some type of fat to ground venison as a necessary evil. I prefer ground pork, adding anywhere from 10 to 20 percent. Due to a calculating error on my part (I was told there would be no math!), Tess’ grind ended up at about 25 percent pork, a bit more than she preferred.

Ground_Elk_0910_004
This math problem set me to wondering why hunters take a healthy source of protein and fatten it up? That’s like someone on a diet taking a carrot stick and dipping it in ranch dressing. Quick research shows no clear consensus on what or how much fat to add. Some hunters swear by 50/50, others just 10 percent. Some like pork, others beef tallow. Some add bacon ends and pieces.

Certainly, there’s a rationale to adding fat, including enhancing flavor because, hey, we all know fat tastes good. Fat also keeps meat from drying out when you fry it and helps patties from falling apart. But is there a better, healthier alternative? Yes, depending on how you’re planning to cook it.

Burgers on the grill are probably how much of the ground venison in America makes it to the table. I’ll be the first to admit, making a good burger without fat sounds impossible. The fat not only makes a burger juicy, it also helps it stay in patty form. Next time you have some 100 percent ground venison you want to throw on the grill, trying adding an egg and some breadcrumbs to serve as a binder. I’ve also heard of using steel-cut oats, diced onion, shredded potato and even powdered milk.

When frying ground venison for tacos, chili or spaghetti, cook it without fat. The spices should cover any gamy flavor you or your family might object to. (If not, find a new butcher to process your deer or learn to do it yourself. Since I started DIY processing 12 years ago, I’ve never had gamy game meat.) If the dry texture turns you off, try frying it in a little bit of olive oil, or add moisture as the venison browns in the form of stock, tomato juice or other flavored liquid.

As you can see, there are lots of alternatives to adding fat to your ground venison. What about you? How do you keep your low-fat game meat low fat? – David Draper, Wild Chef Blogger

Follow our FISHING BLOG

WEB   RATES     FISH    HUNT    CABINS    PHOTOS
 BROCHURE    HUNT BOOKLET

Enter your email address to subscribe to this blog and receive notifications of new posts by email.


Tags: , , , , , , , , ,

How to Judge Your Shooting Distance

 A great article by Kevin Wilson

Accurately judging distance is the first step toward proper shot placement. Instinctive or calculated, bowhunters rely on it for close range shooting. Gun hunters count on their ability to estimate longer distances. Over time we all learn our own tricks for calculating distance but with the advent of laser rangefinders many of us won’t leave home without them. Regardless of how you go about it, determining yardage can make or break your hunt.

I will remember one hunt as long as I live. The outcome was downright depressing all because I misjudged the distance. It happened 16 years ago. I was a neophyte bowhunter at the time. I’d set up a treestand in a small block of trees that I knew held several bucks and does. The previous winter I’d picked up some huge sheds that taped out at 183 Boone & Crockett inches. Knowing that the gigantic buck had survived the winter, my hopes ran high and I knew there was always a chance he’d show up in the timber I was hunting. As luck would have it 45 minutes after climbing into my stand I heard leaves crunching underfoot. Straining to look through the trees, sure enough a smaller basket rack buck was making his way toward my stand. Always an impressive sight I enjoyed the view as he walked 10 yards from me. Then I heard more rustling in the leaves and looked over to see him. He was nothing short of magnificent! Based on his sheds, it looked like he’d grown at least another 15 inches putting him well into the high 190’s – a buck of a lifetime in anyone’s books! He walked 12 yards from my stand but I couldn’t get to full draw with him in plain view. As soon as he turned I capitalized. At full-draw, I locked my 20 yard pin on his body as he continued to amble forward. Walking straight away there was no shot opportunity at all! By the time he stopped, I estimated he was standing at 30 yards. With all the concentration I could muster, I focused and released. The arrow flew where I’d aimed, in perfect alignment with his chest, but literally inches high splitting the hair on his back! Completely awestruck and in total disbelief, that gut-wrenching feeling overcame me as I watched my world-class archery whitetail bound away never to be seen again… and all because I’d misjudged the distance!

Since that day I have made it my lifelong mission to learn how to accurately judge distance. From capitalizing on today’s technologically advanced laser range finding devices to using topographic characteristics to assist in calculating distance, and understanding the influences of terrain, it is an ongoing practice in my world. Regardless of whether you’re an archer or a rifleman, here are a few considerations that might help you as you learn to accurately judge distances.

The Technological Solution
Today’s technology is a saving grace for hunters. Many of us won’t leave home without our laser rangefinder. Portable and easy to use, we simply identify our target, adjust the setting, point, hit the button and, voila! … distance is displayed on the screen. With yardage confirmed, all that remains is the shot itself.

When I began bowhunting nearly two decades ago rangefinders had a simple dial that brought the target image into focus when the dial was turned. Wherever the dial ended up, that was your yardage. Today, thanks to innovation, laser rangefinders are readily available and relatively affordable. In fact today there is really no reason not to use a rangefinder. Many manufacturers have their own versions, but in my opinion, one of the latest and greatest inventions is Bushnell’s Laser Arc. I’ve got the Elite 1500 model. The ARC stands for Angle Range Compensation. While traditional rangefinders are precision optical instruments designed to be used on a level plain (line of sight), the ARC rangefinder compensates for angles from a treestand for instance, or up or down a mountain slope. I have owned and used several different kinds of rangefinders over the years. The Laser ARC is my absolute favorite. Using digital technology, it has a built-in inclinometer that displays the exact slope angle from +/- 60º of elevation with +/- 1.0 degree accuracy. Hunters have always struggled with extreme uphill and downhill angles. These severe angles alter true horizontal distance to the target. The ARC solves this problem. It has three primary settings: bow mode, rifle mode, and a regular mode (for line of sight distance calculation only).

It has a bow mode that displays line of site distance, degree of elevation, and true horizontal distance from 5-99 yards (or meters). For longer range shooters, it also has a rifle mode that calculates and displays the amount of bullet drop, at the target in inches (or centimeters). In the rifle mode, the amount of bullet drop is determined by the line of sight distance to the target, degree of elevation, along with the specific ballistic characteristics of the caliber and ammunition. As the hunter ranges the target, the line of sight, degree of elevation, and bullet-drop/holdover in inches or centimeters is displayed from 100-800 yards (or meters). Here’s where the technology shines ballistically. In the start-up menu, one of eight ballistic groups can be selected by the user, with each formula representing a given combination of caliber and loads.

Laser rangefinding technology, and the ARC system in particular, is invaluable but what if we don’t have one? Then it comes down to a matter of practice and estimation to determine our downrange distances.

Practice
For most of us, learning to judge distance takes considerable practice. Only by doing it a lot, and under variable conditions, can we become competent at it. Shooting is a lot like golf. Understanding how your bow or gun works (i.e., trajectory and ballistics) and interpreting the size of the target animal relative to the terrain can only be learned through firsthand repetitive experience. So how do we get all this supposed experience when we can only take a finite number of animals each year? The answer lies in visiting the gun or archery range.

For bowhunters, nothing beats practice on the 3D course. Today’s 3D targets, like those made by MacKenzie, are very lifelike and offer as realistic practice as you’re likely to get anywhere. Most are made to scale and can be strategically placed in any range situation to simulate realistic hunting scenarios. On my local 3D course, our club uses everything from coyote targets to whitetailed deer, mountain goat, elk, moose, wild hog, turkey and more. Some are set at long distances over 60 yards through wide open clearings while others are placed in the trees, often with very small shooting windows at closer distances like 20 or 30 yards. Most 3D ranges have a good assortment of field scenarios to allow practicing archers to hone their skills.

Likewise, rifle and muzzleloader hunters should visit the range regularly to hone shooting skills. Unfortunately due to the expansive nature of bullets today’s 3D targets aren’t an option. Alternatively silhouettes are. Most rifle ranges offer variable range distances from 100 to 400 yards. At my club our furthest distance is 600 yards. Unless you’re really into the long range thing 400 yards is a stretch for most big game hunters. By shooting repeatedly at 100, 200, 300, and 400 yards, we grow accustomed to what those distances look and feel like. By taking note of the size of target in our scope at specified magnifications we can also learn to estimate distances. For example, at 10x zoom on my Leupold scope, I know that a deer will fill a certain percentage of the field of view. By acknowledging how much of the animal is in the field of view, I can guess the approximate yardage with relative accuracy. Likewise, at 200 and 300 yards, that deer will appear smaller respectively.

Break Distances into Increments
Whether we’re hunting remote regions or in farmland things like trees, rocks, fence posts, and power poles can be used to aid in judging distances. As an archer I’ve learned to make a mental note of things like trees, shrubs, rocks or other physical land-based objects at 10 yard increments out to a distance of 50 yards from where I’m sitting. By burning those objects into my memory I’m better able to make quick decisions when an animal steps into a shooting lane. I’m guessing it may be the same throughout North America but where I do much of my hunting I’ve learned that power poles are set at a standard distance of 100 yards apart. Any time I’m hunting a wide open power line or in farm country I can use those power poles as markers to estimate yardage. As a rule, regardless of what kind of weapon you’re hunting with, breaking distances down into increments simplifies things. Remember, if you’re sitting in a stationary stand or ground blind there is always the option of setting out yardage markers at desirable increments, e.g., every 10 yards.

Consider Where and What You’re Shooting
Judging distances on the open prairies is a very different game than judging distance in the dense forest. Likewise, estimating the distance of a large target like a moose can be tricky if you’re more accustomed to looking at antelope. Dense cover and the size of the animal can play tricks on your mind.

As an archer, I spend most of my time hunting heavy mixed forest areas comprised of aspens and evergreens. Rarely do I see deer, moose or elk at distances further than 80 yards unless its down a long open cutline or across a clear cut. So, whenever I head out to different states or provinces to hunt smaller species like pronghorn antelope, it usually takes some time to acclimatize and recalibrate my brain to accurately judge distances. In my experience, smaller big game species in open terrain tend to appear further away while larger species under heavy cover often look closer than they really are. Unfortunately there are no set rules here; you just need to figure out what works best for you under variable conditions.

Follow our FISHING BLOG

WEB   RATES     FISH    HUNT    CABINS    PHOTOS
BROCHURE    HUNT BOOKLET

Enter your email address to subscribe to this blog and receive notifications of new posts by email.


Tags: , , , , , , , , , , , ,

An illustrated Guide to the Best Game Meat Cuts

There are plenty of hunters out in the field bringing home dinner and we figured we would share some great guides on the best cuts and how to get them from your harvest!  Click on each picture to enlarge for greater detail 🙂

This diagram is the basic overview of the quarters and can be applied to deer, moose, elk and caribou.

illustrated deer

This second diagram is a more in depth cut selection and is coded for the sections as well.  Again, this can be applied to deer, moose, elk and caribou.

deerchart

Ensure before you properly care for your game in all stages of meat preparation to give not only longevity to the meat, but reduce the risk of cross contamination of any bacteria that could not only spoil the meat but could also make you very sick.

Happy hunting!

Follow our FISHING BLOG

WEB   RATES     FISH    HUNT    CABINS    PHOTOS
BROCHURE    HUNT BOOKLET

Enter your email address to subscribe to this blog and receive notifications of new posts by email.

 
Leave a comment

Posted by on September 28, 2017 in game, recipe, Wawang Lake Resort


Tags: , , , , , , , , , , , , , , ,

Where to Place Your Trail Cams

A trail camera won’t stumble through a bedding area, leave scent all over a trail, or exaggerate the size of a rack. And it’ll never oversleep. But your perfect little scouting buddy must be chosen wisely and placed carefully if you want to pattern that old, crafty animal you know is around. Here’s how…

CameraNO_MosaicYELLOW

The earlier version trail cameras were just a 35mm film point-and-shoot tucked in a weatherproof housing. It snapped a single picture when something triggered the sensor. After retrieving the camera, you ran to the one-hour shop to get the film developed, then thumbed through a week’s worth of pictures. More than once a stack of 36 prints revealed a handful of out-of-focus animals and a couple dozen shots of a wind-whipped brush or a drooping tree branch. That was only a few years ago.

Today, many website boasts several pages of trail cams, and even the cheapest one outperforms the original older ones. They have lenses sharp enough to count the ticks on a deer’s neck, electronic circuit boards so efficient that four AA batteries will run a unit for months, and memory cards that hold thousands of pictures you can download to your computer or delete at the touch of a button. And those are standard features on mid-priced cameras. The high-end ones will send a photo to your cellphone or laptop.

Like everything in the digital age, trail-cam technology has improved, competition has become fierce, and prices have plunged. Still, $200 is plenty of money, and matching a camera with the right features to meet your needs is critical. And even the best camera can’t take spectacular photos of a trophy buck if you don’t set it properly. But it’s not difficult to get started. These are the basics.

TrailCameras3
Wildlife biologists use trail cams to measure herd densities, buck-to-doe ratios, and the like. Your goals should be simpler: learning about the deer on your property, figuring out where to hunt them, and having fun in the process. You can pinpoint ideal spots before you buy a camera, and the locations you choose can determine what model is best for you. Here are four sites for four different periods.

Time: Late Summer
Site: Mineral lick
Goal: To start an inventory of buck numbers and quality on your property.
Setup: Find a spot with moderate to heavy deer traffic and spade up dirt in a 2-foot circle. Pour in half of an ice-cream pail of stock salt or commercial deer mineral and spade it into the loosened soil. Pour the rest on top.
Tips:
• Establish one or two licks per 80 acres. Allow deer up to a week to find them.
• Situate each lick 10 to 30 feet from a tree for mounting a camera.
• Jam a stick behind the camera’s top edge to point it down toward the lick.

500Time: Early Season
Site: Mock scrape
Goal: To find bucks after velvet shed, when they often relocate. Mocks can draw up to 90 percent of the bucks you’ll hunt.
Setup: Rake grass and forest debris 5 feet away from a tree that has a green, overhanging licking branch 5 to 7 feet above the ground. Activate with your own “product” (drink plenty of liquids) or deer urine.
Tips:
• If you are not getting clear shots of a buck, aim the camera at the licking branch. Most bucks will work it with their antlers.
• Establish multiple scrapes in each area and hang cameras only on the most active ones.

Time: Rut
Site: Funnel
Goal: To determine where resident bucks are traveling and whether traveling bucks are in the area.
Setup: Find terrain features that channel buck movement and hang a camera near fresh tracks and rubbing activity. Check camera every three to five days—the rut moves quickly.
Tips:
• Mount camera at a 45-degree angle to the trail. Bucks often move through funnels quickly; a camera set perpendicular to the trail might miss the shot.
• Scuff dirt in front of the camera with a boot. Such a mini mock will often make a moving buck pause and get “shot.”

Time: Late Season
Site: Food source
Goal: To find out where to fill a last-minute tag, and to know which bucks have survived the bulk of the hunting season.
Setup: Scout widely to find the hot food sources in your area, such as waste grainfields and clear-cuts. Place camera within 30 feet of the most heavily trafficked area. Load it with fresh batteries if you hunt in an extremely cold area.
Tips:
• Set up and check cameras at midday to avoid spooking feeding deer.
• If no trees are located near the food source, mount the camera on a tripod and camouflage it with grass or brush.

Make the Next Shot Count!

Follow our FISHING BLOG

WEB   RATES     FISH    HUNT    CABINS    PHOTOS
BROCHURE    HUNT BOOKLET

Enter your email address to subscribe to this blog and receive notifications of new posts by email.


Tags: , , , , , ,

Tinywood Home on Trailer with Built In Outdoor Hot Tub

Have you ever heard about a tiny house that is also a hot tub? Yes, the project can be made and it already exists, thanks to a small company based in Warwickshire, England. The architects thought about building a home that offer comfort, relaxation and entertainment at the same time, and built this amazing tiny home that comes with an attached hot tub.

hot-tub-tiny-home-on-wheels

The company is specialized in building tiny homes and merging utility with creativity.

The inside is fully equipped as you will find a small kitchen, lounge area, two bedrooms upstairs and a functional heating system.

So after taking a look, you can say that it is the most perfect small vacation house for you and your family. As tiny as it is, there is still plenty of space inside for a family with two kids.

The outside hot tub is just an extra feature that tops the awesomeness of this house.

hot-tub-tiny-home-on-wheels-7

Follow our FISHING BLOG

WEB   RATES     FISH    HUNT    CABINS    PHOTOS
BROCHURE    HUNT BOOKLET

Enter your email address to subscribe to this blog and receive notifications of new posts by email.


Tags: , , , , , , , , ,

Stop Adding Fat to Your Game Meat

While my Wyoming elk tag has so far gone unfilled, my friend Tess was luckier, tagging her first elk in a Nebraska cornfield not long ago. A heat wave prompted us to spend all day Sunday butchering and last night we put about 20 lbs. of trimmings through the grinder.

I’ve been processing my own (and others) deer and elk for about a dozen years and view adding some type of fat to ground venison as a necessary evil. I prefer ground pork, adding anywhere from 10 to 20 percent. Due to a calculating error on my part (I was told there would be no math!), Tess’ grind ended up at about 25 percent pork, a bit more than she preferred.

Ground_Elk_0910_004
This math problem set me to wondering why hunters take a healthy source of protein and fatten it up? That’s like someone on a diet taking a carrot stick and dipping it in ranch dressing. Quick research shows no clear consensus on what or how much fat to add. Some hunters swear by 50/50, others just 10 percent. Some like pork, others beef tallow. Some add bacon ends and pieces.

Certainly, there’s a rationale to adding fat, including enhancing flavor because, hey, we all know fat tastes good. Fat also keeps meat from drying out when you fry it and helps patties from falling apart. But is there a better, healthier alternative? Yes, depending on how you’re planning to cook it.

Burgers on the grill are probably how much of the ground venison in America makes it to the table. I’ll be the first to admit, making a good burger without fat sounds impossible. The fat not only makes a burger juicy, it also helps it stay in patty form. Next time you have some 100 percent ground venison you want to throw on the grill, trying adding an egg and some breadcrumbs to serve as a binder. I’ve also heard of using steel-cut oats, diced onion, shredded potato and even powdered milk.

When frying ground venison for tacos, chili or spaghetti, cook it without fat. The spices should cover any gamy flavor you or your family might object to. (If not, find a new butcher to process your deer or learn to do it yourself. Since I started DIY processing 12 years ago, I’ve never had gamy game meat.) If the dry texture turns you off, try frying it in a little bit of olive oil, or add moisture as the venison browns in the form of stock, tomato juice or other flavored liquid.

As you can see, there are lots of alternatives to adding fat to your ground venison. What about you? How do you keep your low-fat game meat low fat? – David Draper, Wild Chef Blogger

Follow our FISHING BLOG

WEB   RATES     FISH    HUNT    CABINS    PHOTOS
TESTIMONIALS    BROCHURE    HUNT BOOKLET

Enter your email address to subscribe to this blog and receive notifications of new posts by email.


Tags: , , , , , , , , ,

The Wrong Turn

survival3

 On Aug. 31, Bill Lawrence, 40, got separated from his hunting partners and remained lost for five days. As told to Colin Kearns.

Wednesday. I’d just killed my first squirrel when I glanced over for my friends Russell and Cris. They were gone.

Russell was the only one who’d hunted these woods, Meeman-Shelby Forest north of Memphis. We’d been hunting for 20 minutes and were deep into the forest. Russell and Cris stuck together, while I drifted to their left. I tried to stay within eyesight of them, but I was also watching for snakes. The last time I saw them, it looked like they were continuing in a straight line. Then I stopped to shoot the squirrel.

I thought I had an idea where they were, but an hour later I wasn’t any closer. I shouted, but the thick woods only swallowed my cries. So I turned to hike back to the truck, but an hour later I was even more lost. I kept walking, though, figuring I’d find a way out.

I walked, stopping to rest now and then, until it started to get dark. I’d fired a couple of shots but got no response. It never got cold, which was good because I had nothing to build a fire with. I doused myself with bug dope, then lay down. With my vest, I was able to cover my face and roll up the bottom end to use as a pillow. That dead squirrel in the pocket added a decent cushion.

I heard helicopters but they couldn’t see me through the trees, and I wasn’t going to run through the woods in the dark. I just prayed they’d find me tomorrow.

Thursday. I finished the last of the two water bottles I’d brought with me that morning. The days were hot, and I was walking and sweating a lot. I needed to stay hydrated. Fortunately, it rained that morning, and I managed to catch a half bottle’s worth of water.

I mostly squirrel hunt, but I have enough experience hunting deer and rabbits that I can identify tracks—and I know that if you follow those tracks, they’ll often lead to a water source, which in my case was a puddle in gumbo mud. I dipped my empty bottle and watched it fill with gray, grimy water. I didn’t want to drink it. I worried it’d make me sick. But what choice did I have? I was already getting dehydrated.

The taste was nasty—dirty and sandy—but the dip of mint Skoal I had in my mouth made it at least drinkable. I figured I should eat something, too, even though I wasn’t starving. I turned a dead stump over and found some nightcrawlers. They tasted about as bad as the gumbo water. I don’t know how many I ate—only that I’d never eat another one.

The rest of Thursday was a lot like Wednesday: Walk, then break for a nap. Walk, then nap. That second day, as I was walking—with no real end in sight—is when I started talking to God. Why is this happening? If I don’t make it out, will you take care of my wife and kids?

imagesTJNT6CHZ
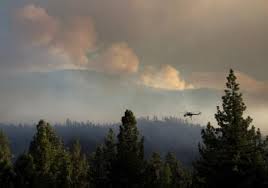
That night I awoke to a WHOOSHWHOOSHWHOOSH. Dazed, it took me a moment to realize that it was another chopper—and that it was right above me. I stumbled to find the flashlight in my vest. But by the time I turned it on, it was too late. After the chopper left, my flashlight burned out.

Friday. I kept moving and praying—all day. Walking gave me a purpose. Praying gave me strength. I truly believe my faith is what kept me from ever panicking. That afternoon I stumbled upon some persimmons. They were the most delicious things I’d eaten in a long time, and they were just sitting there on the ground, perfectly ripe, waiting to be found.
Saturday. I heard a low-flying chopper that morning. I took the T-shirt I had on under my camo shirt, tied it to the barrel of my Mossberg, and rushed to the nearest open area where I waved it around. But it never got close enough.

I was weak and tired. My body ached. For the first time I started to think I might not get out. I had started with 15 shells, and by then I only had four or five left. I’d been firing them and leaving the shells at spots where I rested. But on Saturday I decided to fire the rest I had at once. I didn’t know how much more of this misery I’d have to suffer, and I didn’t want the option of taking my own life.

Later that afternoon, as I was resting, I heard two sounds: a Harley-Davidson and a chain saw. I decided to stay put for the remainder of the day and save my energy. Tomorrow, I’d travel toward those sounds. I just knew that if I didn’t get out on Sunday, I never would.

Sunday. I came to a hill that I wasn’t sure I had the strength to climb. I sat down on a nearby log and prayed for strength. When I finally got up and walked to the hill, I glanced to the left where I saw a trail. And I took it.

Two miles later I hit a blacktop road. I fell to the ground crying. I flagged down a couple of motorcyclists who came down the road and told them who I was. “Son,” one of them said, “there’s a lot of people looking for you.”

They drove me to the camp the search team had set up nearby. Just as they got me on the stretcher and were about to drive me to the hospital, I was given a satellite phone. Kim, my wife, was on the other line. My eyes welled. “Hey,” I said. “I’m alive.”

Survival Analysis
Bill Lawrence had no method of striking fire, carried nothing to signal with but his shotgun, and possessed no tool to navigate to safety but his brain. When he became lost, he had nothing to eat but nightcrawlers and no means to disinfect water. He was unfamiliar with the country and carried no map. To sum up: He struck into the woods about as unprepared as a man can be. But before you criticize him too harshly, take a look at yourself. Have you ever been similarly unprepared for an emergency, using the excuse that you only plan to be gone a few hours and won’t stray more than a few hundred yards from the road? I know I have.

Lawrence’s ordeal should be a cautionary tale for all of us, emphasizing the importance of carrying basic survival gear every time we go afield, no matter how small that field we intend to hunt. A compass, a whistle, a sparking wheel, Tinder Tabs, and chlorine tablets weigh about as much as a tin of Altoids, and easily fit inside one. S - - t happens. Have a hat for it.

Lawrence’s reaction to being lost was to walk and then walk some more. By doing so, he disobeyed the four steps that almost ensure survival: Stop. Shelter. Signal. Stay. Had he stopped walking, tied his undershirt to a treetop or placed it in an opening where it could be seen or, better yet, spelled SOS in a clearing with branches or stones, then hunkered out of the wind to wait, he probably would have been found quickly after being reported missing. Ninety percent of search-and-rescue operations are resolved during the initial hasty search, usually within 10 hours.

One thing that Lawrence did do right needs to be emphasized: He never panicked and was determined to survive. The right attitude is one positive that can make up for a lot of negatives in any survival situation.

Follow our FISHING BLOG

WEB   RATES     FISH    HUNT    CABINS    PHOTOS
TESTIMONIALS    BROCHURE    HUNT BOOKLET

Enter your email address to subscribe to this blog and receive notifications of new posts by email.


Tags: , , , , , ,

The Game Saver Silver Vacuum Sealing System

Gamesaver2

 Last fall I replaced my Cabela’s CG-15 vacuum sealer with a new model from FoodSaver—the GameSaver Silver (GS-500), which is marketed toward sportsmen. I had originally picked up the CG-15 as a refurbished unit in Cabela’s Bargain Cave, but after probably a decade of hard use that included several elk, a couple dozen deer, a few bear and antelope, and several seasons worth of geese and ducks, it was starting to show some wear and tear. When the folks at FoodSaver reached out offering a test model of their GameSaver Silver, I was happy to take them up on it. If nothing else, I wouldn’t have to cart that beast of vacuum sealer that was the CG-15 up and down my stairs anymore.

One problem I’ve had with a lot of vacuum sealer—including so-called “commercial-grade” models—is that after a season or two of intensive use they start to suck, in that they lose some of their vacuum pressure. You might get the device to remove a lot of the air, but it doesn’t have that extra oomph to really get a good, airtight package. So far, I’ve sealed a couple of deer, one antelope, countless ducks, geese, and pheasants, and about 50 pounds of redfish fillets—and the GameSaver Silver still has enough suck to flatten an empty aluminum can, as you can see in the accompanying photo.

Gamesaver1Of course, there’s also the case of too much vacuum, especially when you’re sealing soft or delicate foods. That’s where the GameSaver’s seal override button comes in. While sealing these pheasant sausages, I was able to stop the vacuum pressure before it flattened the tubed meat by hitting the oversized seal button.

Gamesaver3


Other features I like are the handle and locking lid, which makes toting the lightweight unit easy and makes me more likely to pack the thing along on extended hunting trips. It also comes with a 12-volt adapter cord to run off a vehicle’s electrical accessory port, or, to us old timers, the cigarette lighter plug. I am a little concerned about the ruggedness of the GameSaver’s construction, but so far it’s survived nearly a year of my handling, which is saying something.

There are a few things I don’t like: The heat bar seems like it takes a long time to seal, longer than any other units I’ve tested. Some online reviewers have also complained about a tendency for the unit to overheat and shut down for a period of anywhere from 5 to 30 minutes. I personally haven’t had that problem, even when packaging an entire deer’s worth of meat, but it is worth noting.

Of course, there’s also the problem with sealing fish, chicken, or other high-moisture items. As the vacuum is running, the liquid is sucked to the top of the bag preventing the heat bar from creating a full seal. Every vacuum sealer I’ve ever used has this same problem, although the GameSaver Silver seems to be even more finicky than most. I usually combat this with either a folded-up piece of paper towel placed inside the bag or by stopping the vacuum and sealing the bag before the moisture makes it way to the seal bar. FoodSaver does sell Liquid Block bags that feature a moisture-absorbing pad. I’ve used them and they do work, but at a buck per bag, I’ll stick with my more primitive, cheaper methods.

by David Draper

Follow our FISHING BLOG

WEB   RATES     FISH    HUNT    CABINS    PHOTOS
TESTIMONIALS    BROCHURE    HUNT BOOKLET

Enter your email address to subscribe to this blog and receive notifications of new posts by email.


Tags: , , , , ,

How to Judge Your Shooting Distance

 A great article by Kevin Wilson

Accurately judging distance is the first step toward proper shot placement. Instinctive or calculated, bowhunters rely on it for close range shooting. Gun hunters count on their ability to estimate longer distances. Over time we all learn our own tricks for calculating distance but with the advent of laser rangefinders many of us won’t leave home without them. Regardless of how you go about it, determining yardage can make or break your hunt.

I will remember one hunt as long as I live. The outcome was downright depressing all because I misjudged the distance. It happened 16 years ago. I was a neophyte bowhunter at the time. I’d set up a treestand in a small block of trees that I knew held several bucks and does. The previous winter I’d picked up some huge sheds that taped out at 183 Boone & Crockett inches. Knowing that the gigantic buck had survived the winter, my hopes ran high and I knew there was always a chance he’d show up in the timber I was hunting. As luck would have it 45 minutes after climbing into my stand I heard leaves crunching underfoot. Straining to look through the trees, sure enough a smaller basket rack buck was making his way toward my stand. Always an impressive sight I enjoyed the view as he walked 10 yards from me. Then I heard more rustling in the leaves and looked over to see him. He was nothing short of magnificent! Based on his sheds, it looked like he’d grown at least another 15 inches putting him well into the high 190’s – a buck of a lifetime in anyone’s books! He walked 12 yards from my stand but I couldn’t get to full draw with him in plain view. As soon as he turned I capitalized. At full-draw, I locked my 20 yard pin on his body as he continued to amble forward. Walking straight away there was no shot opportunity at all! By the time he stopped, I estimated he was standing at 30 yards. With all the concentration I could muster, I focused and released. The arrow flew where I’d aimed, in perfect alignment with his chest, but literally inches high splitting the hair on his back! Completely awestruck and in total disbelief, that gut-wrenching feeling overcame me as I watched my world-class archery whitetail bound away never to be seen again… and all because I’d misjudged the distance!

Since that day I have made it my lifelong mission to learn how to accurately judge distance. From capitalizing on today’s technologically advanced laser range finding devices to using topographic characteristics to assist in calculating distance, and understanding the influences of terrain, it is an ongoing practice in my world. Regardless of whether you’re an archer or a rifleman, here are a few considerations that might help you as you learn to accurately judge distances.

The Technological Solution
Today’s technology is a saving grace for hunters. Many of us won’t leave home without our laser rangefinder. Portable and easy to use, we simply identify our target, adjust the setting, point, hit the button and, voila! … distance is displayed on the screen. With yardage confirmed, all that remains is the shot itself.

When I began bowhunting nearly two decades ago rangefinders had a simple dial that brought the target image into focus when the dial was turned. Wherever the dial ended up, that was your yardage. Today, thanks to innovation, laser rangefinders are readily available and relatively affordable. In fact today there is really no reason not to use a rangefinder. Many manufacturers have their own versions, but in my opinion, one of the latest and greatest inventions is Bushnell’s Laser Arc. I’ve got the Elite 1500 model. The ARC stands for Angle Range Compensation. While traditional rangefinders are precision optical instruments designed to be used on a level plain (line of sight), the ARC rangefinder compensates for angles from a treestand for instance, or up or down a mountain slope. I have owned and used several different kinds of rangefinders over the years. The Laser ARC is my absolute favorite. Using digital technology, it has a built-in inclinometer that displays the exact slope angle from +/- 60º of elevation with +/- 1.0 degree accuracy. Hunters have always struggled with extreme uphill and downhill angles. These severe angles alter true horizontal distance to the target. The ARC solves this problem. It has three primary settings: bow mode, rifle mode, and a regular mode (for line of sight distance calculation only).

It has a bow mode that displays line of site distance, degree of elevation, and true horizontal distance from 5-99 yards (or meters). For longer range shooters, it also has a rifle mode that calculates and displays the amount of bullet drop, at the target in inches (or centimeters). In the rifle mode, the amount of bullet drop is determined by the line of sight distance to the target, degree of elevation, along with the specific ballistic characteristics of the caliber and ammunition. As the hunter ranges the target, the line of sight, degree of elevation, and bullet-drop/holdover in inches or centimeters is displayed from 100-800 yards (or meters). Here’s where the technology shines ballistically. In the start-up menu, one of eight ballistic groups can be selected by the user, with each formula representing a given combination of caliber and loads.

Laser rangefinding technology, and the ARC system in particular, is invaluable but what if we don’t have one? Then it comes down to a matter of practice and estimation to determine our downrange distances.

Practice
For most of us, learning to judge distance takes considerable practice. Only by doing it a lot, and under variable conditions, can we become competent at it. Shooting is a lot like golf. Understanding how your bow or gun works (i.e., trajectory and ballistics) and interpreting the size of the target animal relative to the terrain can only be learned through firsthand repetitive experience. So how do we get all this supposed experience when we can only take a finite number of animals each year? The answer lies in visiting the gun or archery range.

For bowhunters, nothing beats practice on the 3D course. Today’s 3D targets, like those made by MacKenzie, are very lifelike and offer as realistic practice as you’re likely to get anywhere. Most are made to scale and can be strategically placed in any range situation to simulate realistic hunting scenarios. On my local 3D course, our club uses everything from coyote targets to whitetailed deer, mountain goat, elk, moose, wild hog, turkey and more. Some are set at long distances over 60 yards through wide open clearings while others are placed in the trees, often with very small shooting windows at closer distances like 20 or 30 yards. Most 3D ranges have a good assortment of field scenarios to allow practicing archers to hone their skills.

Likewise, rifle and muzzleloader hunters should visit the range regularly to hone shooting skills. Unfortunately due to the expansive nature of bullets today’s 3D targets aren’t an option. Alternatively silhouettes are. Most rifle ranges offer variable range distances from 100 to 400 yards. At my club our furthest distance is 600 yards. Unless you’re really into the long range thing 400 yards is a stretch for most big game hunters. By shooting repeatedly at 100, 200, 300, and 400 yards, we grow accustomed to what those distances look and feel like. By taking note of the size of target in our scope at specified magnifications we can also learn to estimate distances. For example, at 10x zoom on my Leupold scope, I know that a deer will fill a certain percentage of the field of view. By acknowledging how much of the animal is in the field of view, I can guess the approximate yardage with relative accuracy. Likewise, at 200 and 300 yards, that deer will appear smaller respectively.

Break Distances into Increments
Whether we’re hunting remote regions or in farmland things like trees, rocks, fence posts, and power poles can be used to aid in judging distances. As an archer I’ve learned to make a mental note of things like trees, shrubs, rocks or other physical land-based objects at 10 yard increments out to a distance of 50 yards from where I’m sitting. By burning those objects into my memory I’m better able to make quick decisions when an animal steps into a shooting lane. I’m guessing it may be the same throughout North America but where I do much of my hunting I’ve learned that power poles are set at a standard distance of 100 yards apart. Any time I’m hunting a wide open power line or in farm country I can use those power poles as markers to estimate yardage. As a rule, regardless of what kind of weapon you’re hunting with, breaking distances down into increments simplifies things. Remember, if you’re sitting in a stationary stand or ground blind there is always the option of setting out yardage markers at desirable increments, e.g., every 10 yards.

Consider Where and What You’re Shooting
Judging distances on the open prairies is a very different game than judging distance in the dense forest. Likewise, estimating the distance of a large target like a moose can be tricky if you’re more accustomed to looking at antelope. Dense cover and the size of the animal can play tricks on your mind.

As an archer, I spend most of my time hunting heavy mixed forest areas comprised of aspens and evergreens. Rarely do I see deer, moose or elk at distances further than 80 yards unless its down a long open cutline or across a clear cut. So, whenever I head out to different states or provinces to hunt smaller species like pronghorn antelope, it usually takes some time to acclimatize and recalibrate my brain to accurately judge distances. In my experience, smaller big game species in open terrain tend to appear further away while larger species under heavy cover often look closer than they really are. Unfortunately there are no set rules here; you just need to figure out what works best for you under variable conditions.

Follow our FISHING BLOG

WEB   RATES     FISH    HUNT    CABINS    PHOTOS
TESTIMONIALS    BROCHURE    HUNT BOOKLET

Enter your email address to subscribe to this blog and receive notifications of new posts by email.


Tags: , , , , , , , , , , , ,

 
%d bloggers like this: