RSS

Monthly Archives: November 2016

Sharpen Your Bow Skill During the Off Season!

bow-hunting-wawang-lakeWe practice with our bows all summer long, but after opening day its easy to get wrapped up in the hunting and forget about practicing. But even if you’re spending your time in the field and can’t hit the archery range every day, you can still keep your edge. Shooting in hunting situations is obviously different from target shooting. In the real world, weather conditions, shot angles, brush and other obstacles can impact your shot. Also, when the time comes to take a shot during a hunting situation you’re usually either stiff and cold from sitting in a treestand or sucking wind from running up a hill. All this combined with the fact that you must make a clean shot with the first arrow makes it all the more important to keep your shooting skills sharp. Here are a couple tips.

Practice Drawing
One of the biggest challenges to making a “cold shot” is that often the muscles I use for properly drawing my bow are stiff. The simplest way to cure this is to periodically pick a target, draw your bow, aim, hold, and let down your draw. This keeps you loosened up, plus drawing and aiming without actually shooting helps you focus on the target.


Practice Shooting

Although just drawing and aiming will help a lot, the single biggest help is to actually shoot while out hunting. A common practice among traditional shooters is to carry one or two blunt pointed arrows in your quiver so that you can stump shoot in your down time. Stump shooting is fantastic for keeping you warmed up, but unlike just drawing, actually completing your shots will bring your release into play, as well as give you all sorts of angles and situations to practice.

Small game is even better than stumps (grouse and rabbits taste a lot better too). Grouse can be deceivingly tough to hit. You want to aim for the base of the neck or the head. Sometimes they flush at the shot, but grouse will go in the direction that their head is pointing, so if you use a snaro point, you can either take their head off or hit them in the body as they flush. The best thing about grouse is they often give you extremely challenging shots, and if you can become consistent at taking them, you will be ready for the big game (make sure to check your local regulations before taking any small game with a bow).

Follow our FISHING BLOG

WEB   RATES     FISH    HUNT    CABINS    PHOTOS
TESTIMONIALS    BROCHURE    HUNT BOOKLET

Enter your email address to subscribe to this blog and receive notifications of new posts by email.


Tags: , , , , , , , , ,

Field dressing a black bear

With the bear hunt just around the corner, we will cover the basics 🙂  Pictures have been withheld due to graphic nature.

Instructions

imagesFG3W4IGS 1. Clear an area surrounding the black bear. Make the area large enough to allow room to move around and roll the animal away from the entrails. The lowest part of the ground should be reserved for the entrails. Move the bear onto its back. Spread the rear legs and either have your partners hold them apart or secure them with ropes. Repeat with the front legs.

  1.  2. Insert one of your knives in the cavity at the base of the bear’s throat. Cut the blood vessels with a deep, crosswise motion to open the jugular vein and bleed the animal. Move the bear so the blood will flow away from it and clear the ground as needed.
  2. Cut the skin in a straight line from the breastbone — located just below the rib cage — to the base of the bear’s jaw. Cut the muscles along this area to the bone to expose the throat and windpipe. From the same starting point, cut the skin in a straight line down to the anus. Some areas require hunters to leave the genitals for sex identification; cut around the genitals slightly to preserve them.
  3. Split the breastbone.  This can be done with a bone saw, hack saw or a couple of axes.  If you choose to use axes, hold one axe against the breastbone and hammer it with the other axe; this will break the bone from the base of the rib cage up to and through the top ribs. Open the chest by pulling the front legs apart. Cut the windpipe and gullet close to the head. Lay them in the chest cavity for later.
  4. Cut through the abdominal muscles; start at the base of the rib cage. Take care not to puncture the intestines, the stomach or the bladder; doing so could taint the meat. Sever the muscles down to the pelvic bone. Enlist your partners to hold open the bear so you can work more smoothly.
  5. Break the pelvic bone by using the same technique implemented the breastbone. Do not cut the urinary tract as it may contaminate the meat. Start on one side of the chest cavity and use your knife to cut the diaphragm from the chest wall. Start at the base of the ribs and slice as far back into the cavity as possible. Have your partners pull the organs to the side so you can see and cut more easily. Repeat the process on the other side of the black bear.
  6. Cut the intestines and rectum from the split pelvic bone to where the rectum meets the muscle tissue at the anus. Cut a circle in the skin at the base of the tail; cut 1 to 2 inches from the anus. Cut the muscles to the top of the pelvic bone to free the anus and rectum. Pull the lower intestine, rectum and anus away from the cavity and hold clear. You must not puncture or cut the urinary tract or intestines.
  7. Hold the parts, roll the black bear away and allow the intestines and stomach to spill onto the ground. Grab the windpipe to pull the lungs and heart out onto the ground. Cut any remaining diaphragm tissue to free the organs. Complete the field dressing by draining as much blood from the bear as possible and wiping the body cavity with cloth rags to clean. Do not use water. At this point your main concern becomes to cool the cavity and prepare for transport which can be done by propping the cavity open with a tree branch.

    IMG_6110 - Copy

    Proper field care will ensure less weight and trouble with removal and transportation from the hunt site.

     For more information on black bear hunting, visit us at http://www.wawangresort.com

    Follow our FISHING BLOG

    WEB   RATES     FISH    HUNT    CABINS    PHOTOS
    TESTIMONIALS    BROCHURE    HUNT BOOKLET

    Enter your email address to subscribe to this blog and receive notifications of new posts by email.


Tags: , , , , , , ,

Black Bear…the basics.

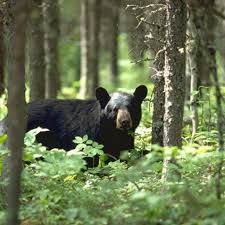
Here is a fantastic and very basic overview of black bear, what they are and why we hunt them 🙂  In the case if Wawang Lake Resort, our outfitting is done in the fall, over bait and the average weight of our boars was 278lbs last year with 2 over 400lbs 🙂  Our sows, 180lbs with three over 300 🙂

Black Bear Hunting Basics

Black Bear Paw in Hunter's Hand

If you’re considering taking up black bear hunting or trying to decide if it’s right for you, it’s a good idea to get an overview of what it’s all about. There are a lot of misconceptions about black bear hunting floating around out there, so it pays to know exactly what you’re in for when you set out to hunt “America’s bear”.

In this article, we’ll cover the basics of black bear hunting, including population, seasons, weapons, meat, trophy items, and biology relevant to hunting.


Population, Seasons, and Weapons

Although the population of the black bear (Ursus americanus) is in decline in some areas of the U.S. (due to habitat loss), in other areas it is growing rapidly, and in still others it is at an all-time high. The total population of black bears in the lower 48 is estimated to be between 300,000 to 500,000, and the Alaska population is estimated to be 100,000 or more.

Black bear hunting is permitted in a little over half of the 50 states. Many Western states have black bear hunting seasons. In some of these states, hunters are allowed to take two black bears per year. Other popular areas include portions of the upper Midwest, the East coast, and the South. Even a handful of states in the East where black bear hunting has been prohibited for years have recently opened up limited seasons.

Black bears are hunted both in the spring and the fall. However, spring seasons are only allowed in about eight states, and spring hunting often requires applying for a lottery. Fall seasons are typically general seasons, and this is the time when most bears are hunted.

Black bears can be effectively taken with any of the typical weapons used for other big game, including rifle, bow, shotgun, muzzleloader, pistol, and crossbow. (As always, be sure to check your particular state’s game regulations.)

Meat and Other Items

Black Bear MeatBlack bear meat is considered by many to be a delicacy. In fact, even as recently as the late 19th century, bear dishes were some of the most expensive items on the menus at the finest, exclusive restaurants. “Bear bacon”, the whole, smoked hind quarter of a bear, was a prized staple in the diet of settlers on the American frontier. The meat is often compared to pork or lamb, but with a distinctive flavor all its own.

Interestingly, that flavor can vary quite widely depending on what the bear has recently been eating. The most highly prized meat comes from spring bears who have been consuming large quantities of grass and other vegetation as well as fall bears who have been feasting on berries, fruit, or nuts such as acorns.

Luckily, although they are omnivores, about 80-90% of a black bear’s diet consists of plant material, so your odds of having tasty meat are extremely good. Younger bears are also widely reported to have better meat than older bears. Assuming you take a younger bear that hasn’t been eating salmon or carrion, you’re in for quite a treat.

An important word of caution here: black bear meat often contains the parasite that causes trichinosis, an infection that usually results in either no symptoms or minor digestive discomfort but in rare cases can cause more serious complications and even death (although only in less than 0.3% of cases).

Fortunately, there is a simple remedy for this. All bear meat must be cooked completely through until there is no visible pink in the meat. Cooking the meat to an internal temperature of 137 degrees is hot enough to make it safe, although the USDA recommends an internal temperature of 160 degrees. Freezing the meat has not been shown to be adequate protection against trichinosis.

Another highly edible part of a black bear is the fat. Bear fat (which is quite plentiful in fall bears) can be rendered to produce a useful and particularly flavorful cooking oil. Even from a modestly sized bear, you can easily get a couple gallons of this precious liquid.

In addition to the meat and fat, there are also a few prized items to be had from a black bear. First, the fir is soft and luxurious, and many hunters keep the hide and turn it into a rug or even clothing such as a vest. Black bear skulls are fascinating thing to look at, and they’re a great conversation starter when displayed up on the mantle or other prominent location.

Biology Relevant to Hunting

Black bears can vary greatly in size, depending on genetics, the quality of the habitat in which they live, and their gender and age. Mature boars (male bears) can weigh in at over 800 pounds in rare cases. The average adult male, however, weighs between 180 and 300 pounds, while the average adult female weighs slightly less, between 140-250 pounds. You can expect to net about 30% of the live weight in meat. For example, a 200 pound bear may produce up to 60 pounds of meat.

Black bears possess impressive athletic abilities. They can sprint at speeds over 30 mph, can climb trees with ease, and are accomplished swimmers. They also have short, curved, sharp claws and canine teeth capable of ripping and tearing flesh. With these traits, it’s easy to see why they fit squarely into the classification of dangerous game.

While black bear attacks are exceedingly rare, even for bear hunters, they do happen. And tracking wounded bears means the danger increases exponentially. The tracking is bound to take you through dense cover, and the bear’s thick fir soaks up blood fast, making for sparse blood trails to follow. Bears have even been known to loop around and double back on their trail, lying in wait for pursuing hunters. However, with proper preparation and planning, as well as solid shot placement, most bears can be recovered safely and without incident.

Note: In regions where black bears share their range with grizzly bears, it’s important to know how to identify the two bears and tell them apart so you don’t accidentally shoot a grizzly bear, which is a violation of federal law. Here’s a handy bear identification training you can take online for free so you can know for sure before you pull the trigger.

The size of a black bear’s home range can vary greatly depending on the location of food sources in the area. It can be as small as a couple square miles or it can be much larger — a male’s home range may go all the way up to 75 square miles in extreme cases. Bears are opportunistic omnivores, which means their movements are often unpredictable. This wandering lifestyle requires specialized tactics, the most common being spot-and-stalk, baiting, hunting with hounds, and calling.

Regardless of which tactics you employ, you’ll need to defeat a bear’s considerable arsenal of finely tuned senses if you want to have any hope of getting close enough for a shot.

Sense of Smell

First and foremost is their sense of smell, which is thousands of times better than a human’s. In fact, it’s been shown that if you take a bloodhound’s nose and multiply it by about seven, you’ll get a sense of the black bear’s olfactory powers.

There are both defensive and offensive strategies you can use in order to overcome these powers and get within range of a bear without it smelling you. On the defensive side, it’s wise to use as many scent control measures as logistically possible. More importantly, always keep tabs on the wind and make sure you’re hunting into it. A windchecker device, such as a small spray bottle filled with unscented talcom powder comes in real handy for this, as does a fine, frayed string tied to the end of your gun or bow.

You can also go on the offensive and use the wind to your advantage. With good scouting and planning, it’s possible to hunt with the wind at your back, allowing your scent to move out ahead of you and drive bears toward another hunter in a treestand or other fixed position.

Sense of Hearing

Next up is their sense of hearing, which is thought to be significantly better than a human’s, although it’s not known exactly how much better. They can detect a human voice at 300 yards and the cocking of a gun at 50 yards.

Your best defense against a bear’s ears is to simply be quiet. Move slowly and carefully, wear quiet clothing, and speak in whispers to your hunting companions. On the offensive side, always keep your ears tuned for bear sounds. Bears make noise when feeding, such as turning over rotten logs looking for grubs, and they communicate with each other through woofs, sniffs, grunts, and growls.

Sense of Sight

Contrary to popular belief, bears do, in fact, see in color. Their vision is roughly equivalent to a human’s — better, if you include the fact that they have excellent night vision. Although they’re somewhat near-sighted, they are adept at detecting movement, even at long distances.

To win the battle of the eyes, you’ll need to have a solid defensive plan. It’s very important to wear full camouflage and choose a pattern that breaks up your outline and matches the local vegetation well. More importantly, always move slowly and cautiously, and never move when a bear is looking in your direction.

As for offense, always carry a pair of high quality binoculars. The black color of a bear’s fur can make them a little easier to spot than other big game like deer. Carry your binoculars on your chest with a harness or “bino bra”, and use them often. When hunting open country using spot-and-stalk tactics, you can also employ a high-power spotting scope to give your eyes even more reach.

More on this next time…………………


Tags: , , , ,

What is Solunar and why is it helpful?

The solunar theory is a hypothesis that animals and fishes move according to the location of the moon in comparison to their bodies. The theory was laid out in 1926 by John Alden Knight, but was said to be used by hunters and fishermen long before the time it was published.

History

In May 1926, John Aldenn Knight put together some fishing folklore and other fishing factors such as the sun and the moon, hence the name Solunar (Sol for sun and Lunar for moon) to form a theory on the patterns of animal movement. Knight compiled a list of factors which control or influence the day-to-day behavior of many freshwater and saltwater fish. Each one of the 33 different factors were considered. All but 3 were rejected.

The three factors retained were the sun, the moon and the tide. For salt water fishing, tides have long been known as a factor which control fishes’ behavior. As Knight’s research progressed, he found that rather than just tides themselves, the relationship of the moon and sun’s positions relative to each other may be the determining factor.

In addition to the time of moon up (moonrise) – moon down, his research determined that there were intermediate times of the day that occurred in between the two major periods. From that he establishes that there were major periods (moon up – moon down) and minor periods. Knight published the first Solunar table in 1936.[3]

Tables

Solunar tables are tables that fishermen and hunters use to determine the best days of the month and times of the day for catching fish and hunting game. For fishermen, the tides, sunrise and sunset are helpful times of the day to know when the fish are going to bite. For hunters, the tides are not a factor.

Hunters use the sun and the moon to determine when the game will be moving the most.”Other conditions not being unfavorable, fish will feed, animals will move about, birds will sing and fly from place to place, in fact, all living things will become more active, more alive, during Solunar periods than at other times of apparent equal value. …anglers have found that it is a guide to the best fishing of each day, and the quality of their sport has improved…”

Using these tables, a fishermen and a hunter can tell when the moon is directly underfoot and overhead. The strongest activity occurs when there is a full moon or a new moon and is weakest when there is a quarter moon and a three quarter moon. This is because the moon and the sun’s gravitation force is strongest when directly above or directly below our head. The lunar data humans receive is better now because of the newer technology the US Naval Observatory and GPS technology.

This new technology has allowed the Solunar Theory to generate hunting and fishing times with much greater precision It is important to note that data in tables found on various websites should be reverified periodically with US Naval Observatory available data as well as compared against other reputable solunar data providers. Inconsistencies abound due to the complex nature of the Astrophysics computations and overlooked associated anomalies checking that are required to produce useful results. Moon Transits which do not occur for more than a day or associated times being off more than a few minutes are indications of a fundamental issue for a given position and should be suspect.  All data providers should be verified before assuming data presented is authoritative or accurate. 

Go to http://www.solunarforecast.com/ to create your own solunar calendar 🙂

 
Leave a comment

Posted by on November 24, 2016 in trip planning, Wawang Lake Resort


Tags: , , , , ,

Big Mistakes NOT to Make in Your Bear Stand

Part of the thrill of the hunt, is the anticipation knowing that with every second that ticks by, you are one second closer to harvesting your trophy black bear. What happens when those seconds turn into hours and then into days? Being under prepared to be in your stand for extended periods of time can be frustrating, and worse yet, can prevent you from achieving a successful hunt.

bearstand

 It would be awesome if we knew when and where the harvest was going to take place, but that wouldn’t be hunting then, would it?  Having a plan in your bear stand can make your hunt much more enjoyable. Things to consider: weather, bugs, boredom and nature calls.

Weather – Avid hunters know that fall weather can change in a heart beat. It can go from warm, to cold, windy and raining in the blink of an eye. Having the right clothes in your back pack can make the best of a somewhat undesirable situation.

Bugs – can be a huge annoyance in the great outdoors. Especially when you are forced to sit still for extended periods of time. Avoid bug sprays when bear hunting… PERIOD! A new, unfamiliar scent, along with an intuitive feeling that something isn’t right, will keep trophy bears from over coming fear and committing to your bait. Bug jackets and bug nets are a must. (Oh, on side note, make sure you practice shooting with your bug net on). Regarding the portable propane bug eliminators, we highly advise against them as it is a new scent that can be detected by a bear easily and may quickly deter them.

Boredom – Nothing will end your hunt faster than impatience and constant movement in your stand. If you are like most guys who can’t sit still for more than 30minutes at a time, you must bring something with to occupy your mind. I personally use a book. I have also seen guys use those portable, pocket video games. Regardless of what you use, make sure you sit sill and only utilize things that will be quiet and non light reflective.

Nature Calls – Ever been in the stand when all of the sudden you have to take a pee? Sucks, doesn’t it? I don’t know how many times I have had this happen to me, yet somehow I always forget to bring a container along. Put a portable urinal on your packing list. Doing so will make the difference between shooting that monster and taking it’s offspring or nothing at all.  NEVER eliminate off of or near your stand!  There is nothing more offensive and frightening to a bear than knowing a human is directly near by.

This slideshow requires JavaScript.

Remember, being prepared to sit that stand can mean the difference between a very successful harvest or having to return and start all over again!

Follow our FISHING BLOG

WEB   RATES     FISH    HUNT    CABINS    PHOTOS
TESTIMONIALS    BROCHURE    HUNT BOOKLET

Enter your email address to subscribe to this blog and receive notifications of new posts by email.

 
Leave a comment

Posted by on November 22, 2016 in black bear, hunting, Wawang Lake Resort


Tags: , , , ,

Grouse Hunting at Wawang Lake

Join us in NW Ontario CANADA for some exciting and thrilling grouse hunting

P1130017
Grouse Season:  September 15th to Oct 31st

Grouse hunting is a relaxing pastime that is getting more and more popular every year.  In our area bird hunting can be an adventure in itself!  Driving down the back roads & trails in your truck or on your ATV can not only be thrilling but breathtaking as well as you wander down roads that are in full color deserving of natures fall foliage. Just taking in these magnificent fall colors, peaceful wilderness & the wildlife that you’ll encounter will make you feel like you are definitely “North of the Tension Zone”.

The bush trails with the rise of the birds, singing of the guns, the smell of the pines along with friendly comraderie back at the camp will not long be forgotten.

Surrounding Wawang Lake are hundreds of miles of ATV trails, old logging road, game animal trails and hiking trails. The bush is just stuffed with these upland game birds and on a sunny fall afternoon you will see hoards of them. Many of our guests choose a fishing / grouse hunting combination package and spend half the their time taking advantage of the awesome northern pike and walleye fishing and spend the rest of their time enjoying the clean fall area and exploring the many trails where birds are plentiful.

There are three species of grouse found in Ontario.

Ruffed Grouse  –  Spruce Grouse  –  Sharptail Grouse

Ruffed Grouse is the most common and comprises of 80% of what you will encounter during your hunt.

The limit for grouse in Ontario is 5 birds per day in any combination of species with a total of 15 in your possession and you will be surprised at the number of grouse we do have and how fast you’ll bag those limits.

Compared to other areas the grouse cycle in our area has remained consistently high over the years and we credit this because of less human population that other places are known for.  In a nutshell what you’ll experience at Wawang Lake is a vast area of complete privacy during your hunt.

The most popular guns for grouse hunting are .410 or 20 gauge shot gun and some hunters use a 12 as well.   Quickly becoming more popular is BOW HUNTING for birds.  To increase the thrill and excitement of your hunt give your bow a try and the challenge alone is sure to thrill you.

Blaze orange hat & vest is required and must be worn out in the field

Canadian Firearms Regulations
All Firearms (does NOT include bows) being brought into Canada must be registered at the Canadian Customs at the time of entry into Canada. A one-year permit costs $50.00 Canadian, or there is a long term permit as well. If you would like further information, you can visit the Canadian Firearms Website through the link on our website or call toll free, 1-800-731-4000.

Canadian Customs
You should be aware of special customs and immigration issues whenever traveling to another country. For people with prior legal issues (including DWI’s) you need to find out what restrictions may be placed on your travel. Visit the Border Crossing Link and/or the Canada Citizenship & Immigration.

DEPOSIT REQUIREMENTS
A $150.00 non-refundable deposit is required at the time of reservation to guarantee a hunt. Balance to be paid in full upon arrival at the resort.  Hunting deposits and installments are non-refundable. Consideration may be given to date transfers if vacancy can be filled.

There are a limited number of spaces available for our hunts. Often there are more guests interested in hunting than there are available spaces, and hunts are often booked a year or more in advance. It is extremely difficult to fill spaces that become available due to cancellation. For these reasons we ask that our guests do not book hunts lightly

For further information, or, to book your next bear hunt please contact us at:
1-888-534-9217 or EMAIL

 WEBSITE    RATES     FISH    HUNT    CABINS    PHOTOS
TESTIMONIALS    BROCHURE    HUNT BOOKLET

Enter your email address to subscribe to this blog and receive notifications of new posts by email.


Tags: , , , , , ,

Building A Smoke House

9c

Building a smoke house the old fashion way is a method that has been used for generations. Many people today like to smoke their own meat not only to give it flavor but also to preserve it longer.

The size of your smoker will depend on what you plan to use it for. Whether you want it to just smoke a few fish, smoke sausage every now and then or smoke an entire animal at one time, will help you determine the size of your smoker

1

Beginning:

This slideshow requires JavaScript.

When it comes to flavor of the meat, people through the years have made up their own recipe of brine to rub over the meat before smoking it.

How To Build A Smoke House

9b

The Building Process:

This slideshow requires JavaScript.

Building a smoke house, there are a few things that should be considered when building your smoke house. It is not important to spend a small fortune for material for the construction. Reclaimed wood will work just fine. You may want a smoker big enough to walk in with shelves to lay the meat on along with hocks from the rafters to hang the meat.

You will want to vent the building to allow the smoke to travel freely through the building.

6d

The Firebox Process:

This slideshow requires JavaScript.

Building a smoke house, a very important factor  is to situate your fire box  down hill from the smoke house. This will allow the smoke to travel up hill into the smoker much easier. All that is required for a fire box is a fire box made from brick or even an old barrel with the smoke piped into the smoker will work just fine by having the fire box away from the smoker, the meat will not dry out as much as if it were right in the smoker.

1a

The Smoking Process:

This slideshow requires JavaScript.

To also help in the flavoring of the meat, by using different kinds of wood chips in the fire box will create different smoke changing the flavor in the meat.

Follow our FISHING BLOG

WEB   RATES     FISH    HUNT    CABINS    PHOTOS
TESTIMONIALS    BROCHURE    HUNT BOOKLET

Enter your email address to subscribe to this blog and receive notifications of new posts by email.


Tags: , , , , , , , , , , , ,

Sighting in Your Rifle

So you’ve acquired a new hunting rifle. After saving your hard-earned cash and landing permission from your other half, the gun rests in your hot little hands. It looks great, feels great… it probably smells great… but more importantly does it shoot great? Now its time to hit the range and get this baby sighted in.

Truth is the same holds true for rifles we’ve had for many years. Chances are they don’t require the full-meal-deal, but sighting in, confirming that our equipment is in good working order, or realigning sights is something we should do on a regular basis.

Unfortunately many of us try to kill two birds with one stone. We visit the range infrequently and attempt to sight in and practice shooting all at the same time. It’s important to remember, sighting is very different from regular shooting practice. The process of sighting in involves aligning the scope (or other sights) with the firearm when using a specific bullet and load. Shooting practice involves discharging and often experimenting with different positions to allow our bodies to grow accustomed to the form and function of shooting.

k_wilson_sighting_in2Believe it or not, many of us don’t sight in properly. It never ceases to amaze me how many hunters pick up their guns once or twice a year, assume it’s shooting straight and hit the woods without a second thought. As a professional outfitter I see it all the time. In fact, I’ve seen guests take it personally when, after arrival in camp, I ask them to take a few practice shots – just to make sure their gun is properly sighted in. As though I’m insinuating that they haven’t prepared for their hunt, once in a while I get a hunter who thinks I’m a control freak. Then the truth comes out. After a few shots it becomes obvious; better than half are inevitably in need of scope adjustments. Every one swears that they were shooting one-inch groups at home, but now their rifle requires major scope adjustments. In their defense, a multitude of things can happen to guns in transit. Blunt trauma to cases or directly to the scope itself can throw it way out of whack; hence the need to sight it.

To be honest many of us are guilty of not maintaining our rifle and scope. If you shoot regularly that’s one thing; you’re constantly checking it and tweaking the scope when necessary. In reality, most of us don’t. By in large, recreational hunters pick up their guns a few times each year. Whether you’re tuning a brand new rifle or confirming the accuracy of an old one, here are a few tips for sighting in:

1) Bore sight your rifle before shooting
k_wilson_sighting_in3This first step applies mostly to rifles and scopes that have a new marriage. The first time a scope is mounted to a rifle the gunsmith will usually use a bore sighting tool. This tool is used to approximately align the crosshairs of the scope with the rifle barrel. Unfortunately some folks erroneously rely on bore sighting alone to zero their gun. Remember bore sighting can be precise but most often it only approximates accuracy. If, when you visit the range, you discover that you’re not even hitting the paper at all, consider rough bore sighting your gun. Practical with bolt-action rifles, by removing the bolt, you can stand behind the gun, look through the barrel and center the target. Then without adjusting the gun, look through the scope and make the necessary adjustments to bring the crosshairs in alignment with the target. This should get you hitting the paper in no time, then you can move on to shooting.

2) Shoot from a stable platform and rest
To reliably confirm the accuracy of your rifle and scope, you must shoot from a rest. I’m not sure I should say this or not, but I will. To illustrate the naivety of some, I’ve actually witnessed guys trying to sight in their rifles at the range by shooting freehand from a standing position. Needless to say these are the guys that get frustrated because they’re not hitting anything.

Remember, when we’re sighting in our rifles we’re not testing our shooting skill, but rather the accuracy of the gun, scope and bullet being used. Our goal should be to eliminate or at least minimize human error and allow the equipment to do its thing. With this in mind, a stable shooting bench or table is always recommended. Most shooting ranges are furnished with suitable tables or benches and adjustable stools. If you’re using a portable bench, make sure it is resting level on solid ground. Likewise, it’s imperative to use a shooting rest. In my opinion a vice can be that much better. I really like MTM Case-Gard products (www.mtmcase-gard.com). They make a variety of shooting supplies that are both affordable and practical. Few of us exhibit perfect shooting form. By understanding the biomechanics involved with aiming, breathing, squeezing the trigger and following through we can better acknowledge how to eliminate torsion while shooting from a rest. By cradling the rifle fore-end on a rest or in a vice, we can align our sights with the downrange target and maintain that alignment for a long period of time. Then, by gently squeezing the trigger to discharge, we minimize our human influence thereby allowing the firearm to perform more or less on its own.

3) Begin at close range, then move out to 100 yards and further
I’ve heard much discussion about the standard 100 yard shot and arguably for most bore-sighted rifles, sighting in at that distance is fine. But talk to the pros and most will agree that you should begin at 25 yards if you want to do it right. Making adjustments at close range is easier than at longer distances. At 25 yards you’ll find it easier to acquire your target; it simply appears larger and is easier to center the crosshairs at this short distance. Inaccuracies are simpler to rectify and adjustments can be made quickly at that distance. Remember, inaccuracies are exaggerated that much more at greater downrange distances.

k_wilson_sighting_in1
As you make your fine adjustments to your scope, be aware of the increments and don’t overdo it. For example, with my Leupold VXIII, one click = 1/4 inch adjustment. So, if my shots were hitting consistently two inches to the left of center, I would likely need to dial the adjustment eight clicks in that direction, then shoot another round of bullets. Some folks disagree, but in my opinion it is better to make subtle adjustments, then shoot to confirm that you are working toward the zero mark. As long as there are no fliers, a series of three shots is typically representative of where the gun is shooting. Although with today’s scopes I don’t believe it is as crucial, I still like to give it a firm tap to seat the crosshairs after each adjustment.

When your rifle and scope are in sync at 25 yards, move to 100 yards. Most big game rifle and bullet combinations that are sighted in a couple inches high at 100 yards will shoot a hair low at 25 yards – with most deer hunters this is considered ideal (e.g., I like my 300 Win Mag to be 2″ high at 100 yards). Once your rifle is sighted in, try shooting at 200, 300 and 400 yards to better learn how your rifle, scope and ammunition perform at greater distances.

4) Use the same ammunition that you plan to hunt with
Not all ammunition performs the same. Be sure to sight in your rifle with the load that you plan to hunt with. Ballistics of variable bullet weights and designs (not to mention manufacturers) will perform differently. For instance, Winchester Ammunition’s 150 grain Supreme Elite XP3 (www.winchester.com) will inevitably perform differently than Remington’s 180 grain Core-Lokt, PSP (www.remington.com) shot out of my 300 Winchester Magnum.

If you reload your own ammunition, then you’re likely acquainted with factors affecting bullet performance. Working the right load may take some trial and error, but the same applies – always sight in with the bullet and load you intend to hunt with.

5) Record and reference each shot
Sighting in can be as labor-intensive as you make it. As a rule, several items are required and several more make the job that much easier. As an absolute necessity, we require a table or bench, a shooting rest, our rifle, ammunition and a target. Beyond these basics, the job is much easier with a spotting scope, tripod, and additional targets along with a marker.

As you begin shooting, be sure to analyze and record each shot. I like to use a Bushnell Elite 15-45x 60 mm spotting scope (www.bushnell.com) mounted on a solid tripod. At 45 power magnification, I can see every detail on the downrange target. My scope allows me to closely assess where I hit in relation to where I aimed. Further, many shooters like to keep a matching target on the bench while they are shooting. By checking their shot, then marking it on the target beside them, they can better track their progressions to confirm any scope adjustments and accuracy. This eliminates much of the guessing about which shot was which.

Follow our FISHING BLOG

WEB   RATES     FISH    HUNT    CABINS    PHOTOS
TESTIMONIALS    BROCHURE    HUNT BOOKLET

Enter your email address to subscribe to this blog and receive notifications of new posts by email.


Tags: , , , , , , ,

Stop Adding Fat to Your Game Meat

While my Wyoming elk tag has so far gone unfilled, my friend Tess was luckier, tagging her first elk in a Nebraska cornfield not long ago. A heat wave prompted us to spend all day Sunday butchering and last night we put about 20 lbs. of trimmings through the grinder.

I’ve been processing my own (and others) deer and elk for about a dozen years and view adding some type of fat to ground venison as a necessary evil. I prefer ground pork, adding anywhere from 10 to 20 percent. Due to a calculating error on my part (I was told there would be no math!), Tess’ grind ended up at about 25 percent pork, a bit more than she preferred.

Ground_Elk_0910_004
This math problem set me to wondering why hunters take a healthy source of protein and fatten it up? That’s like someone on a diet taking a carrot stick and dipping it in ranch dressing. Quick research shows no clear consensus on what or how much fat to add. Some hunters swear by 50/50, others just 10 percent. Some like pork, others beef tallow. Some add bacon ends and pieces.

Certainly, there’s a rationale to adding fat, including enhancing flavor because, hey, we all know fat tastes good. Fat also keeps meat from drying out when you fry it and helps patties from falling apart. But is there a better, healthier alternative? Yes, depending on how you’re planning to cook it.

Burgers on the grill are probably how much of the ground venison in America makes it to the table. I’ll be the first to admit, making a good burger without fat sounds impossible. The fat not only makes a burger juicy, it also helps it stay in patty form. Next time you have some 100 percent ground venison you want to throw on the grill, trying adding an egg and some breadcrumbs to serve as a binder. I’ve also heard of using steel-cut oats, diced onion, shredded potato and even powdered milk.

When frying ground venison for tacos, chili or spaghetti, cook it without fat. The spices should cover any gamy flavor you or your family might object to. (If not, find a new butcher to process your deer or learn to do it yourself. Since I started DIY processing 12 years ago, I’ve never had gamy game meat.) If the dry texture turns you off, try frying it in a little bit of olive oil, or add moisture as the venison browns in the form of stock, tomato juice or other flavored liquid.

As you can see, there are lots of alternatives to adding fat to your ground venison. What about you? How do you keep your low-fat game meat low fat? – David Draper, Wild Chef Blogger

Follow our FISHING BLOG

WEB   RATES     FISH    HUNT    CABINS    PHOTOS
TESTIMONIALS    BROCHURE    HUNT BOOKLET

Enter your email address to subscribe to this blog and receive notifications of new posts by email.


Tags: , , , , , , , , ,

The Wrong Turn

survival3

 On Aug. 31, Bill Lawrence, 40, got separated from his hunting partners and remained lost for five days. As told to Colin Kearns.

Wednesday. I’d just killed my first squirrel when I glanced over for my friends Russell and Cris. They were gone.

Russell was the only one who’d hunted these woods, Meeman-Shelby Forest north of Memphis. We’d been hunting for 20 minutes and were deep into the forest. Russell and Cris stuck together, while I drifted to their left. I tried to stay within eyesight of them, but I was also watching for snakes. The last time I saw them, it looked like they were continuing in a straight line. Then I stopped to shoot the squirrel.

I thought I had an idea where they were, but an hour later I wasn’t any closer. I shouted, but the thick woods only swallowed my cries. So I turned to hike back to the truck, but an hour later I was even more lost. I kept walking, though, figuring I’d find a way out.

I walked, stopping to rest now and then, until it started to get dark. I’d fired a couple of shots but got no response. It never got cold, which was good because I had nothing to build a fire with. I doused myself with bug dope, then lay down. With my vest, I was able to cover my face and roll up the bottom end to use as a pillow. That dead squirrel in the pocket added a decent cushion.

I heard helicopters but they couldn’t see me through the trees, and I wasn’t going to run through the woods in the dark. I just prayed they’d find me tomorrow.

Thursday. I finished the last of the two water bottles I’d brought with me that morning. The days were hot, and I was walking and sweating a lot. I needed to stay hydrated. Fortunately, it rained that morning, and I managed to catch a half bottle’s worth of water.

I mostly squirrel hunt, but I have enough experience hunting deer and rabbits that I can identify tracks—and I know that if you follow those tracks, they’ll often lead to a water source, which in my case was a puddle in gumbo mud. I dipped my empty bottle and watched it fill with gray, grimy water. I didn’t want to drink it. I worried it’d make me sick. But what choice did I have? I was already getting dehydrated.

The taste was nasty—dirty and sandy—but the dip of mint Skoal I had in my mouth made it at least drinkable. I figured I should eat something, too, even though I wasn’t starving. I turned a dead stump over and found some nightcrawlers. They tasted about as bad as the gumbo water. I don’t know how many I ate—only that I’d never eat another one.

The rest of Thursday was a lot like Wednesday: Walk, then break for a nap. Walk, then nap. That second day, as I was walking—with no real end in sight—is when I started talking to God. Why is this happening? If I don’t make it out, will you take care of my wife and kids?

imagesTJNT6CHZThat night I awoke to a WHOOSHWHOOSHWHOOSH. Dazed, it took me a moment to realize that it was another chopper—and that it was right above me. I stumbled to find the flashlight in my vest. But by the time I turned it on, it was too late. After the chopper left, my flashlight burned out.

Friday. I kept moving and praying—all day. Walking gave me a purpose. Praying gave me strength. I truly believe my faith is what kept me from ever panicking. That afternoon I stumbled upon some persimmons. They were the most delicious things I’d eaten in a long time, and they were just sitting there on the ground, perfectly ripe, waiting to be found.
Saturday. I heard a low-flying chopper that morning. I took the T-shirt I had on under my camo shirt, tied it to the barrel of my Mossberg, and rushed to the nearest open area where I waved it around. But it never got close enough.

I was weak and tired. My body ached. For the first time I started to think I might not get out. I had started with 15 shells, and by then I only had four or five left. I’d been firing them and leaving the shells at spots where I rested. But on Saturday I decided to fire the rest I had at once. I didn’t know how much more of this misery I’d have to suffer, and I didn’t want the option of taking my own life.

Later that afternoon, as I was resting, I heard two sounds: a Harley-Davidson and a chain saw. I decided to stay put for the remainder of the day and save my energy. Tomorrow, I’d travel toward those sounds. I just knew that if I didn’t get out on Sunday, I never would.

Sunday. I came to a hill that I wasn’t sure I had the strength to climb. I sat down on a nearby log and prayed for strength. When I finally got up and walked to the hill, I glanced to the left where I saw a trail. And I took it.

Two miles later I hit a blacktop road. I fell to the ground crying. I flagged down a couple of motorcyclists who came down the road and told them who I was. “Son,” one of them said, “there’s a lot of people looking for you.”

They drove me to the camp the search team had set up nearby. Just as they got me on the stretcher and were about to drive me to the hospital, I was given a satellite phone. Kim, my wife, was on the other line. My eyes welled. “Hey,” I said. “I’m alive.”

Survival Analysis
Bill Lawrence had no method of striking fire, carried nothing to signal with but his shotgun, and possessed no tool to navigate to safety but his brain. When he became lost, he had nothing to eat but nightcrawlers and no means to disinfect water. He was unfamiliar with the country and carried no map. To sum up: He struck into the woods about as unprepared as a man can be. But before you criticize him too harshly, take a look at yourself. Have you ever been similarly unprepared for an emergency, using the excuse that you only plan to be gone a few hours and won’t stray more than a few hundred yards from the road? I know I have.

Lawrence’s ordeal should be a cautionary tale for all of us, emphasizing the importance of carrying basic survival gear every time we go afield, no matter how small that field we intend to hunt. A compass, a whistle, a sparking wheel, Tinder Tabs, and chlorine tablets weigh about as much as a tin of Altoids, and easily fit inside one. S - - t happens. Have a hat for it.

Lawrence’s reaction to being lost was to walk and then walk some more. By doing so, he disobeyed the four steps that almost ensure survival: Stop. Shelter. Signal. Stay. Had he stopped walking, tied his undershirt to a treetop or placed it in an opening where it could be seen or, better yet, spelled SOS in a clearing with branches or stones, then hunkered out of the wind to wait, he probably would have been found quickly after being reported missing. Ninety percent of search-and-rescue operations are resolved during the initial hasty search, usually within 10 hours.

One thing that Lawrence did do right needs to be emphasized: He never panicked and was determined to survive. The right attitude is one positive that can make up for a lot of negatives in any survival situation.

Follow our FISHING BLOG

WEB   RATES     FISH    HUNT    CABINS    PHOTOS
TESTIMONIALS    BROCHURE    HUNT BOOKLET

Enter your email address to subscribe to this blog and receive notifications of new posts by email.


Tags: , , , , , ,

 
%d bloggers like this: