RSS

Monthly Archives: August 2016

The dangers of dry firing your bow

Dry-firing your bow is something you will want to avoid at all costs. To help minimize your chances of dry-firing a bow you should always draw a bow with an arrow in it, and aim it at a target. This way if you do accidentally release the string there is an arrow in it and you have a target to stop the arrow. Also if you are just trying out a bow be sure to draw with an anti-dry-fire release. When in a group of people it is very easy to become side tracked and forget to load your bow with an arrow. It’s always good to double check before you draw your bow


bowtarget


Dry firing a bow is the act of shooting a bow without an arrow. While this may seem harmless to some of us who are just starting out I assure you that this can be one of the most costly mistakes you can make.

The fact of the matter is that it can happen to anyone beginner or expert for many different reasons. Whether it be from ignorance, distractions, or accidental misfire of a release it happens all the time. So the question is what do you do if you accidentally dry-fire your bow.

There are a few outcomes that could happen when a bow is dry-fired, the first is that is that it will appear that nothing has happened to any of your bow. The second scenario is that your string breaks however everything else stays intact. The third possibility is your bowstring, and cables could snap resulting in your limbs breaking and potential debris flying all over the place. This is basically the worst case scenario and can at times be irreparable.

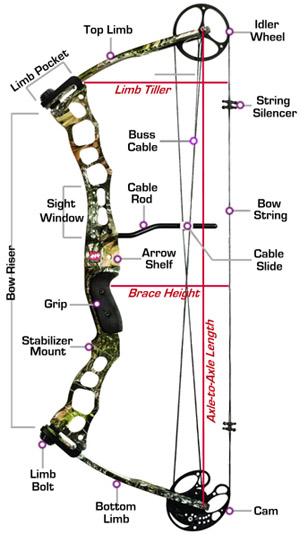
No matter what scenario your bow falls into after being dry-fired, the first thing you will need to do is to get a magnifying glass and a bright light and look over the limbs especially near the cams for any cracking, or splintering. If you find that one of both limbs have cracks or splinters in them then you will have to replace the limbs before you are able to shoot again. Failing to do so will likely cause will render the bow unusable and/or injury.

bowillustration

In any of the other cases where the string breaks and/or the bow limbs shatter, you will first go get medical attention if you need it and then you will need to bring your bow in to a bow repair shop and you will have to replace the limbs,string, and any other broken parts(axles,cams,wheels etc.).

After checking for cracks and splinters in the limbs, take a look at the cams/wheels to make sure that they have not been bent or cracked, again if they are you will need to replace them as soon as possible before you are able to shoot. Next if you were lucky enough to have your string still intact, you will need to check the whole thing for badly frayed portions, cut strands, and badly damaged areas, especially near the axles.
If everything checks out and you were unable to find anything wrong with your bow then you are lucky, and you have 2 options, your first option is to draw the bow(with an arrow) and shoot it. Make note of any weird noises, or vibrations. If you aren’t the risky type then you can bring it into a bow repair shop and they will have the tools and resources to be able to better inspect it for damages.

In closing, dry firing a bow may seem innocent, but in turn can be detrimental and even dangerous. Take your time to ensure longevity of your equipment for years to come and better success rates!

Follow our FISHING BLOG

WEB   RATES     FISH    HUNT    CABINS    PHOTOS
TESTIMONIALS    BROCHURE    HUNT BOOKLET

Enter your email address to subscribe to this blog and receive notifications of new posts by email.

Email Me....

 
Leave a comment

Posted by on August 30, 2016 in archery, bow, Wawang Lake Resort


Tags: , , , , , ,

DIY: Survival Cook Stove out of a Tin Can

This is a how-to on how to make a survival cook stove instead of spending $25 to buy one online. It is a simple projecting that requires an old can, a pair of scissors, and a knife. Be careful and pay attention to his excellent instructions! Watch this video survival training tutorial and learn how to build a cook stove out of a tin can.

Follow our FISHING BLOG

WEB   RATES     FISH    HUNT    CABINS    PHOTOS
TESTIMONIALS    BROCHURE    HUNT BOOKLET

Enter your email address to subscribe to this blog and receive notifications of new posts by email.

Email Me....


Tags: , , , , , ,

Proper Field Care for Moose

IMG_6042

One of the most common questions of a first time moose hunter is “The moose is down, now what?”

First-time moose hunters need to know that handling the animal once it is killed will not be easy. But, with the appropriate equipment and a bit of knowledge, the job can go smoothly. If you are planning to have your moose butchered by a professional, it would be wise to check with him in advance about his preferences for handling moose.

Whatever you choose to do will depend a great deal on your means of getting the moose out of the woods and how you plan to transport it to camp or home. The “game taste” people often speak of is usually the result of poor handling more than anything else. With proper care, moose meat can be outstanding table fare.

The main cause of moose meat spoilage is heat. You can avoid this danger by field dressing your moose immediately. Allow the meat to cool rapidly by providing good air circulation. You should also take every precaution to keep your moose free of dirt, debris, blood and hair.

Cheesecloth or commercial game bags offer the best protection from dirt and flies and still allow necessary air circulation. A liberal application of black pepper will also help to discourage flies.

Field dressing should take place as soon after the kill as possible. Once the animal is dead, bacterial action can spoil the meat quickly. The chance of spoilage increases the longer you wait and the warmer the temperature. Bleeding your moose is unnecessary in most cases. Normally, the animal will bleed internally, and immediate field dressing will ensure adequate bleeding.

Field Dressing Your Moose
To begin field dressing, position the moose on its back with the head slightly uphill. It is helpful to tie the legs to nearby trees. Make an incision at the base of the breastbone with the tip of a sharp knife. Be careful not to cut the intestines or other internal organs. The contents can taint the meat. Continue the incision down the length of the belly to the anus. Cut through the skin and thin wall of the body cavity only. Face the blade of the knife upward, and away from the internal organs to avoid cutting them. Use the fingers of your free hand as a guide, but be careful not to cut yourself.


 mooseprep1

If the head is not to be mounted, you can continue this cut in the opposite direction to the base of the jaw, exposing the windpipe and esophagus. The windpipe and esophagus should now be severed as close to the head as possible. (Before doing so, tie a string tightly around the esophagus to prevent the stomach’s contents from spilling.) Using your bone saw, split the chest bone down the middle, exposing the contents of the chest cavity.

If you have shot a cow moose, the reproductive tract (ovaries and uterus) can now be removed; you also have the option of waiting until the bowel has been tied. Carefully roll the internal organs to the side until you see the point where two tubes (the rectum and the vagina) exit through the pelvic bone (see illustration). The vagina is the tube nearest the belly. Grasp this and follow it carefully forward until it forks into two tubes, which are the left and right horns of the uterus.

Once you have located the uterus, insert your fingers under it and work your hand in until the organ lays in the palm of your hand. You will notice a thin, almost transparent membrane which connects this organ to the animal’s back. All that now remains is to carefully follow the horns of the uterus to the ovaries. These are bean-shaped organs one to two inches in length. They may be covered with fat so keep looking! When you find them, cut the membranes holding them in place, remove ovaries, and place them in a plastic bag. The uterus can be removed by cutting through the vagina. The ovaries and the uterus should be kept as cool as possible.

Next, circle the anus with your knife, cutting deeply to free the lower bowel. Tie this off with a string to prevent droppings from coming in contact with the meat. Now cut through the flesh of the hams down to the pelvic bone and cut through the pelvic bone with the bone saw.

The internal organs can now be removed. Grasp the tied-off esophagus and trachea and pull them gently but firmly up and back towards the body of the moose. As you do so, have your sub-permitee cut these tissues away from the carcass. Continue this process into the chest cavity, pulling the heart and lungs up and back while cutting any attachments. Once the heart and lungs are freed, cut the diaphragm away from the body on all sides. Then continue firmly pulling on the esophagus and trachea and gently roll the stomach and intestines out of the body cavity, freeing them from all attaching tissues as you go. Once all the viscera is freed of the body, it is best to pull it away from your work space.

Warning!!
Because particularly high cadmium levels have been seen in some moose liver and kidney, it is recommended that you do not consume these organ meats at all.

mooseprep2

Quartering
Quartering is recommended for moose to make handling easier and to allow rapid cooling of the carcass. The hide may be left on each quarter to offer some protection from dirt and flies. If temperatures are above 50 degrees F, you should skin the carcass in the field.

To quarter the animal, you will need a sharp knife and a bone saw. A saw is best to avoid bone splinters and damaged meat.

Begin by removing the head. To do this, cut through the flesh of the neck with your knife. Saw through the vertebrae, and use your knife again to remove the head. Make your cut as close to the head as possible to avoid wasting many pounds of valuable meat.

The next step will be to halve the animal. This is done by placing the back of your knife against the backbone between the second and third rib. Push the blade outward, completely through the flesh and hide. Cut upward using the ribs as a guide and do the same on the opposite side. You can now separate the halves by sawing through the backbone.

Quartering is accomplished by sawing straight down the backbone of each half. Underlying flesh or hide can be separated with your knife. The task of halving and quartering will be easier if the animal can be elevated on logs or sticks. Trim away any shot-damaged meat that could lead to premature spoilage.

Be sure to attach your tags before removing quarters from the place of kill. If the quarters can not be removed before darkness, try to hang them in a nearby tree or elevate them on logs to aid cooling. Cover them with boughs or meat socks and hang a marker nearby.

mooseprep3

Getting Your Moose Out Of the Woods
Getting the moose from the kill site to your vehicle or camp will probably be the toughest task you will face. If you’re fortunate, you may be able to drive close to the kill site, but many of the roads through moose hunting zones are private and may not be open to public use.

Another possibility is to locate someone with a skidder or work horses. The majority of hunters will end up packing their moose out of the woods instead of using a vehicle. To do this, you can tie the quarters to a pack frame or pack board or even suspend them from a long pole so the load can be shared. Try not to overexert yourself; the pieces will be heavy, and the going could be rough. It is a good idea to flag each quarter with a piece of blaze orange material to prevent accidents.

If the quarters are still too much to carry, the carcass can be cut into more pieces, but remember, the law requires the field-dressed carcass be delivered to a checking station for examination. Each individual piece must also be labeled with the name, address and hunting license number of the person who shot it.
It is important to get the quarters hung in a cool, shady place, preferably a meat cooler as soon as possible.

Transportation and Cooling
Always protect the carcass from dirt, heat and moisture. Transport the quarters out in the open if possible. The open back of a pickup works well. Elevate the quarters to keep cool and protect from dirt. If conditions are dusty or rainy, cover them loosely with a porous canvas tarp. Do not stack the quarters, allow them to touch or cover them with plastic. Plastic retains body heat and prevents cooling. If you transport in a covered truck or trailer, you should open windows and vents for proper air circulation.

Once back at camp or your home, hang each quarter from a cross pole of some type in a shady area with good air circulation. If you will have a long trip home, it is best to allow the meat to cool overnight before heading home. If this is not possible, consider traveling at night when temperatures are cooler.

If you are transporting your animal directly home, be cautious about hanging the meat in a garage or shed. Often these areas are not cool enough to allow proper cooling and aging of the carcass.

mooseprep4

Skinning
The quarters should be skinned immediately. If daytime temperatures are above 50 degrees and nighttime temperatures are above 40 degrees, you should remove the hide and over with cheesecloth. If the temperature is between 50 and 30 degrees, you can wait a few hours before skinning.

In skinning, work the hide away with the fingers, and peel it off while the quarters are hanging. Use a sharp knife to slice between the flesh and skin of the animal as it is pulled away. Be careful not to cut either one.

Whether you skin the quarters or not, you should cover each one with cheesecloth or a meat sock.

Aging and Butchering
Aging is intended to make the meat tender. This is best accomplished at a constant temperature of about 40 degrees. The temperature during aging must never exceed 50 degrees. For this reason, you will probably want the services of a professional butcher.

If you age your meat outdoors, three to five days is sufficient, but the period varies with temperature and size of the animal. Meat can be aged for as long as 21 days in a cooler.

If you will be handling the meat yourself, remove as much fat as possible before freezing. Removal of bones will save freezer space. Double-wrap and tightly seal all cuts of meat to prevent freezer burn. Meat should be frozen at zero degrees. Don’t try to freeze too much at once. Label and date all packages for future reference. If you don’t have the knowledge or time to process your own moose, then don’t risk ruining it; have it processed at a commercial facility.

Care Of Big Game Trophies
Proper field care of trophies is extremely important for good results in the final mount. If you intend to have the head of your moose mounted, you must take special precautions when skinning it out.

If the weather is warm, and you plan to have a head mount or a “fur on” rug made from the hide, you must remove the skin, salt flesh inside thoroughly, and roll it up flesh side in. Keep it in a cool place (never in a plastic bag) and get it to your taxidermist as soon as possible. Delay may cause “slipping” a condition in which the hair falls off the hide after the tanning process and ruins the hide for its intended use.

The taxidermist will need as much hide or “cape” to work with as possible. When field dressing, don’t cut any further up the underside than between the front legs. The diagram shows where the cuts should be made to skin the neck. Once the neck is skinned out, the head can be disjointed at the base of the skull and removed with the cape attached. Let the taxidermist skin out the head. He will want the measurements, and the skinning is included in the mounting charge. Remove as much flesh as you can, and salt the cape and all exposed flesh. The head and cape should be kept cool and delivered to the taxidermist as soon as possible.

If you keep only the antlers for mounting, be sure to leave a good portion of the skull attached. The best procedure is to check with your taxidermist in advance of your hunt for specific advice.

To care for the hide, remove all flesh and fat, then salt flesh side well. Moose hides spoil very rapidly in warm weather. You should deliver the hide to a taxidermist within 24 hours after the animal is skinned.

Fine table salt is best for use on hides. Capes will take about 30 pounds of salt. Flat skins will take 50 to 80 pounds. As a guide, figure on using half the weight of the skin in salt. About 24 hours after application, the salt will be wet and will have lost its efficiency — shake it off and re-salt.

Transport the hide rolled up, flesh side in.

mooseprep5

Follow our FISHING BLOG

WEB   RATES     FISH    HUNT    CABINS    PHOTOS
TESTIMONIALS    BROCHURE    HUNT BOOKLET
Enter your email address to subscribe to this blog and receive notifications of new posts by email.

Email Me....


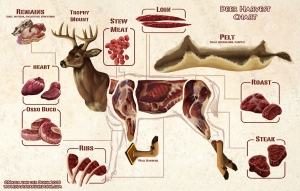
An illustrated guide to the best game meat cuts

There are plenty of hunters out in the field bringing home dinner and we figured we would share some great guides on the best cuts and how to get them from your harvest!  Click on each picture to enlarge for greater detail 🙂

This diagram is the basic overview of the quarters and can be applied to deer, moose, elk and caribou.

illustrated deer

This second diagram is a more in depth cut selection and is coded for the sections as well.  Again, this can be applied to deer, moose, elk and caribou.

deerchart

Ensure before you properly care for your game in all stages of meat preparation to give not only longevity to the meat, but reduce the risk of cross contamination of any bacteria that could not only spoil the meat but could also make you very sick.

Happy hunting!

Follow our FISHING BLOG

WEB   RATES     FISH    HUNT    CABINS    PHOTOS
TESTIMONIALS    BROCHURE    HUNT BOOKLET

Enter your email address to subscribe to this blog and receive notifications of new posts by email.

Email Me....

 
Leave a comment

Posted by on August 24, 2016 in game, recipe, Wawang Lake Resort


Tags: , , , , , , , , , , , , , , ,

Where to Place Your Trail Cams

A trail camera won’t stumble through a bedding area, leave scent all over a trail, or exaggerate the size of a rack. And it’ll never oversleep. But your perfect little scouting buddy must be chosen wisely and placed carefully if you want to pattern that old, crafty animal you know is around. Here’s how…

CameraNO_MosaicYELLOW

The earlier version trail cameras were just a 35mm film point-and-shoot tucked in a weatherproof housing. It snapped a single picture when something triggered the sensor. After retrieving the camera, you ran to the one-hour shop to get the film developed, then thumbed through a week’s worth of pictures. More than once a stack of 36 prints revealed a handful of out-of-focus animals and a couple dozen shots of a wind-whipped brush or a drooping tree branch. That was only a few years ago.

Today, many website boasts several pages of trail cams, and even the cheapest one outperforms the original older ones. They have lenses sharp enough to count the ticks on a deer’s neck, electronic circuit boards so efficient that four AA batteries will run a unit for months, and memory cards that hold thousands of pictures you can download to your computer or delete at the touch of a button. And those are standard features on mid-priced cameras. The high-end ones will send a photo to your cellphone or laptop.

Like everything in the digital age, trail-cam technology has improved, competition has become fierce, and prices have plunged. Still, $200 is plenty of money, and matching a camera with the right features to meet your needs is critical. And even the best camera can’t take spectacular photos of a trophy buck if you don’t set it properly. But it’s not difficult to get started. These are the basics.

TrailCameras3
Wildlife biologists use trail cams to measure herd densities, buck-to-doe ratios, and the like. Your goals should be simpler: learning about the deer on your property, figuring out where to hunt them, and having fun in the process. You can pinpoint ideal spots before you buy a camera, and the locations you choose can determine what model is best for you. Here are four sites for four different periods.

Time: Late Summer
Site: Mineral lick
Goal: To start an inventory of buck numbers and quality on your property.
Setup: Find a spot with moderate to heavy deer traffic and spade up dirt in a 2-foot circle. Pour in half of an ice-cream pail of stock salt or commercial deer mineral and spade it into the loosened soil. Pour the rest on top.
Tips:
• Establish one or two licks per 80 acres. Allow deer up to a week to find them.
• Situate each lick 10 to 30 feet from a tree for mounting a camera.
• Jam a stick behind the camera’s top edge to point it down toward the lick.

500Time: Early Season
Site: Mock scrape
Goal: To find bucks after velvet shed, when they often relocate. Mocks can draw up to 90 percent of the bucks you’ll hunt.
Setup: Rake grass and forest debris 5 feet away from a tree that has a green, overhanging licking branch 5 to 7 feet above the ground. Activate with your own “product” (drink plenty of liquids) or deer urine.
Tips:
• If you are not getting clear shots of a buck, aim the camera at the licking branch. Most bucks will work it with their antlers.
• Establish multiple scrapes in each area and hang cameras only on the most active ones.

Time: Rut
Site: Funnel
Goal: To determine where resident bucks are traveling and whether traveling bucks are in the area.
Setup: Find terrain features that channel buck movement and hang a camera near fresh tracks and rubbing activity. Check camera every three to five days—the rut moves quickly.
Tips:
• Mount camera at a 45-degree angle to the trail. Bucks often move through funnels quickly; a camera set perpendicular to the trail might miss the shot.
• Scuff dirt in front of the camera with a boot. Such a mini mock will often make a moving buck pause and get “shot.”

Time: Late Season
Site: Food source
Goal: To find out where to fill a last-minute tag, and to know which bucks have survived the bulk of the hunting season.
Setup: Scout widely to find the hot food sources in your area, such as waste grainfields and clear-cuts. Place camera within 30 feet of the most heavily trafficked area. Load it with fresh batteries if you hunt in an extremely cold area.
Tips:
• Set up and check cameras at midday to avoid spooking feeding deer.
• If no trees are located near the food source, mount the camera on a tripod and camouflage it with grass or brush.

Make the Next Shot Count!

Follow our FISHING BLOG

WEB   RATES     FISH    HUNT    CABINS    PHOTOS T
ESTIMONIALS
    BROCHURE    HUNT BOOKLET

Enter your email address to subscribe to this blog and receive notifications of new posts by email.

Email Me....


Tags: , , , , , ,

Field Judging Black Bear

Here is an excerpt from a fantastic article written by Carl of BCHuntingBlog.  This is always a popular question we are asked and this article gives the same advice (with photos) as we have given for many decades 🙂

Field judging Black Bears can sometimes be difficult even for the most experienced of bear hunters.  The animal you are judging is usually completely black aside from color phase bears, they have thick fur and the shadows they create can be deceiving.  With that said there are a few methods you can have at your disposal to help you determine if the bear is a shooter or not.

So how can you improve your skills at judging trophy black bear size in the field?

Let’s Get Started.

Check Out The Bears Head:

Big Bears:  Will have a very large, blocky looking head.  Their ears will look small, and almost off to the side of their skull a little.  On really big boars you might even see a crease down the center of their forehead, if that’s the case, it’s a good bear.  Other features to look for on a bears head would be scarring around the face, boars have ferocious fights, so it’s not uncommon for them to have plenty of battle scars around their muzzle, eyes and ears and these are helpful clues.

Small Bears:  Will have a small, narrow head, almost dog like.  Their ears will appear to be much larger and defined.  Almost like “Mickey Mouse” is a common description among many experienced bear hunters.

Check Out The Bears Behavior:

Big Bears:  Big dominant boars, behave like big dominant boars.  And they usually won’t be in much of a hurry unless they know you’re there and you’ve spooked him.  When big boars walk they will sometimes have a big swagger to their stride, much more so then a bear who’s on the submissive end of the spectrum.  When I shot my first Island Black Bear we watched him stand up on two legs and scratch his back on a tree for a couple minutes, without a care in the world.  When big boars decide to move they move deliberately, there is no indecision in their movements which can be noticed in younger, startled and confused bears.  Because they are dominant, the big boars will usually have a bit of a schedule and will often be caught feeding in the same places, at the same times of day.  They can do this because they are the boss!

Small Bears:  Are very cautious, they will get out of  your way quickly (so will a big old boar too if he’s spooked).  They will usually always be more alert then a dominant bear because they have to be, or they could become dinner.  Smaller bears will often seek the safety of a tree when in trouble or they just won’t stop running until they hit the coast.  When small bears run, they will appear much more agile then a larger bear.  They will will look more like a big dog running, then a lumbering old boar.

*Tip – When you’re observing a bear, and he/she doesn’t appear to be spooked, sit there and watch them for 1/2 hour or so.  Bears are pretty fascinating creatures when you watch them do their thing, and by observing you’ll learn more about them and that makes the hunt more fun.

Check Out The Bears Body:

Big Bears:  Sometimes the big boys are called “belly draggers” for a reason, and it’s possible for our bears to get this big.  Big Boars may appear to be so big, you can’t see underneath their body when they are moving around.  That’s a big bear!  If the bear you’re looking at appears to have long legs, it’s probably because he has a smaller body in proportion.  Big bears will have very muscular looking arms and legs, especially their front shoulders/neck area.

Small Bears:  Can you picture the size of a really large breed dog? OK.  That’s about the size of an “average” Island Black Bear.  An average Island Bear will weigh 150-250lbs.  An large 6′+ boar could likely weigh 300+ and the big bears do look much different as you can see in the photos.

What Are Some Additional Signs Of A Big Bear?

If it’s a big bear you’re after then you need to pay attention to the sign you see around you.  Tracks and Scat are very good indicators as to the potential size of a bear, and will let you know if a particular bear is frequenting an area.

Judging Bear Size From Tracks:

This method was shown to me by my Father who was a big game guide for nearly 30 years.  It has since been shown to me by several taxidermists and many more experienced bear hunters than I so I believe in this method.

If you can find fresh bear tracks in an area, maybe mud or soft sand (common where we hunt spring bear on the Island) measure the distance across the front pad and simply add 1.  This will give you a rough “square” of the bear.   So if you measure the bear track and it came out at 5″inches across, you would add 1 and could guesstimate that bear was roughly a 6′ foot bear.

I have tried this method on many of our harvested black bears and I have to say it’s pretty damn close!  The only problem with this method is you need to find the bear that left the track!

Judging Bear Size From Scat:

Spend a couple days bear hunting and you’ll observe several dozen or so piles of bear scat scattered across the road.  Not only can they help you see what the bears are eating but they can give you a pretty good indicator as to the size of the bear that left it.  Here’s a tip for you.  It’s not necessarily the size of the pile… It’s the diameter of the nuggets!  A really BIG bear has a really big butt and it’s not uncommon for them to leave scat the diameter of a beer can behind!  If you look at 10 piles of bear scat and then come across the one left by the big kahuna trust me… You’ll Know!

If you discover an area that has BIG tracks and some BIG (large diameter) scat, then it might be worth hunting that area a little harder.  Big Island Black Bears don’t have enormous ranges and unless you’ve spooked them heavily they will keep coming back to the same places to feed.

Hopefully you found article helpful and through experience you’ll become a much better bear hunter.  Because of their abundance it’s pretty easy to rack up experience if you’ve got the time to put a couple weekends in every year and then the patience to watch and observe what goes on around you.  Pay attention to the sign, and have a good time out there!

WEBSITE    RATES     FISH    HUNT    CABINS    PHOTOS
TESTIMONIALS    BROCHURE    HUNT BOOKLET

Enter your email address to subscribe to this blog and receive notifications of new posts by email.

Email Me....


Tags: , , , ,

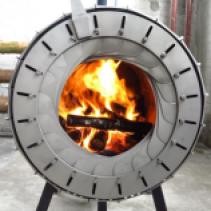
The Spruce Stove Lets You Burn an Entire Tree

the-spruce-stove-lets-you-burn-an-entire-tree-thumb

The Spruce Stove is an outdoor furnace that allows you to burn an entire tree at a time. Designed by Dutch designers Roel de Boer and Michiel Martens, the dutch stove allows you to continuously push the trunk of the tree more and more into the fire as it burns, as it holds the log up level to the fire using wheeled arms that allow you to easily slide it in.

To start the fire, simply use kindling, amber, small twigs, etc, and once the fire gets going simply push the end of the tree trunk into the fire, use the adjustable diaphragm to allow for more oxygen or less oxygen depending on what the fire needs. Once your fire starts to die down, simply push a few more inches of the trunk into the fire. When you want to stop the fire just stop pushing the log in.

The Spruce Stove is made from stainless steel, can easily withstand the heat of the fire as well as the weather, comes in three different models, weighs 110lbs, and measures 1.9 feet wide x 7.7 feet tall x 2.6 feet deep. Now you just need  go chop down a few trees.

Spruce Stove Burns an Entire Tree


Follow our FISHING BLOG

WEBSITE    RATES     FISH    HUNT    CABINS    PHOTOS
TESTIMONIALS    BROCHURE    HUNT BOOKLET

Enter your email address to subscribe to this blog and receive notifications of new posts by email.

Email Me....


Tags: , , , , , , ,

The Lynx at Wawang Lake

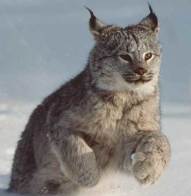
lynx

These stealthy cats avoid humans and hunt at night, so they are rarely seen.  So if you’ve had the opportunity to see one of these animals while in Canada then consider yourself very fortunate.   The lynx is a solitary cat that haunts, stalks and hunts in our remote northern Ontario forests in and around Wawang Lake Resort.  Although we’ve been at Wawang Lake for over 40 years now we have actually only seen these animals a few times.

Lynx are covered with beautiful thick fur that keeps them warm during long, frigid Canadian winters. Their large paws are also furry and hit the ground with a spreading toe motion that makes them function as natural snowshoes.

The Canada lynx is a good climber and swimmer; it constructs rough shelters under fallen trees or rock ledges. It has a thick coat and broad paws, and is twice as effective as bobcats at supporting its weight on the snow.


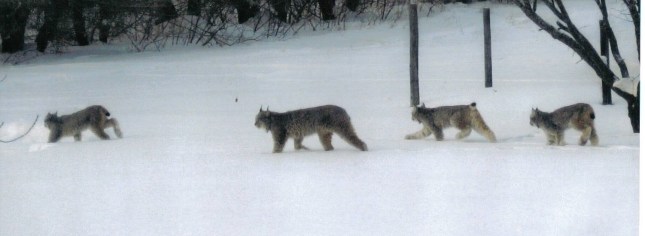
Canada Lynx_family

Lynx eat mice, squirrels, and birds, but prefer the snowshoe hare. The lynx are so dependent on this prey that their populations fluctuate with a periodic plunge in snowshoe hare numbers that occurs about every ten years.

Follow our FISHING BLOG

WEBSITE    RATES     FISH    HUNT    CABINS    PHOTOS
TESTIMONIALS    BROCHURE    HUNT BOOKLET

Enter your email address to subscribe to this blog and receive notifications of new posts by email.

Email Me....


Leave a comment

Posted by on August 16, 2016 in Canadian Lynx, Wawang Lake Resort


Tags: , , , , , ,

Flint Laces: Shoe Laces That Can Start a Fire

flint-laces-shoe-laces-that-can-start-a-fire-thumb

The Flint Laces are a pair of shoe laces that you can use in case of an emergency to start a fire with if you are otherwise incapable of starting one. Maybe you forgot your matches at home, maybe it just rained and all your matches are wet, or maybe you’re stranded in the woods without a match or a lighter and you’ve lost your manhood and just can’t make a fire using your own two hands.

flint-laces-shoe-laces-that-can-start-a-fire-9435
Each flint lace contains a hidden piece of ferro rod that is capped with rubber. Simply scrape the rubber from the rod, strike it against a knife or some steel (assuming you have some), and you will be toasting your buns on a nice hot fire in no time.

The flint laces are completely normal shoe laces other than containing a fire starter rod, they are made from type III 7 strand 550 paracord, contain 4 separate rods (1 on each end of each shoelace), come in sizes 36-108, and are perfect for when you’re planning on getting lost and stranded while hiking or camping.


Follow our FISHING BLOG

WEBSITE    RATES     FISH    HUNT    CABINS    PHOTOS
TESTIMONIALS    BROCHURE    HUNT BOOKLET

Enter your email address to subscribe to this blog and receive notifications of new posts by email.

Email Me....


Tags: , , , , , , , , ,

Moose Hunting at Wawang Lake

Deeply imbedded in the Canadian Boreal Forest we offer the very finest in Moose habitat for our hunters.  Look no farther than Wawang Lake for accommodations for your next BIG game hunt!

WawangMoose

Our hunts accommodations ONLY for Ontario Resident Moose Hunters.

If your looking for a great hunting area that has a high population of moose then look no farther than Wawang Lake Resort as we’re in the middle of the best moose hunting area in all of NW Ontario.

At Wawang Lake we offer comfortable accommodations to Resident Ontario Moose Hunters only.  Presently we don’t have any tags available and unable to take any non-resident hunters during the Moose Hunt season.

Things Moose Hunters Should Consider:

Crossbows
• Draw length must be al least (11.8 in.)
• Draw weight must be at least (119 lbs.)
• Bolt head must be at least (0.9 in.) at the widest point, and there must be at least two cutting edges of straight, sharp, un-serrated, barbless steel.

Longbows
• Draw weight must be at least (48.5 lbs.) at draw length of (27.6 in.) or less.
• Arrow length must be at least (23.6 in.).
• Broad head must be at least (0.9 in.) at the widest point, and there must be at
least two cutting edges of straight, sharp, un-serrated, barbless steel.

Rifle
We suggest using at the minimum one of the following:
300 Magnum
30-06
7MM Magnum with bullet weights in the 180 grain range
A rim-fire rifle, a shotgun smaller than 20 gauge when loaded with shot, or any shotgun loaded with shot smaller than SG or No. 1 buck cannot be used for hunting Moose.


Clothing requirements
During the rifle season hunts, a minimum of 400 square inches of uninterrupted Hunter Orange must be worn at all times.  Camouflage or open mesh orange does not meet these requirements.  An orange jacket or vest as well as an orange hat do meet these requirements.

Hunters should also have a compass or hand held G.P.S., as well as a good pair of binoculars, thermos, flashlight, lighter, warm clothing, good quality rain gear, waterproof insulated boots, gloves/mitts, long underwear.   Two-way portable radios are also recommended.  Fall hunting weather can be warm & dry to cold, wet and snowy within a few hours; so it is best to be prepared for all variables.

We trust that this information will prove to be useful in planning your next Big Game Hunt in beautiful, exciting NW Ontario.  We invite you to enjoy our ‘True Wilderness Hospitality’ while participating in a remote hunting experience.

 WEBSITE    RATES     FISH    HUNT    CABINS    PHOTOS
TESTIMONIALS    BROCHURE    HUNT BOOKLET

Enter your email address to subscribe to this blog and receive notifications of new posts by email.

Email Me....


Tags: , , , , , , , , , , ,