RSS

Category Archives: do it yourself

Turn A Shipping Container Into An Epic Off-Grid Home

What if you could spend a fraction of what it would cost to buy or build your own house and instead build a unique home that you could make completely off grid? It can be done and there’s a bunch of people who’ve done it already.

5container

Shipping containers exist in a massive surplus and someone like you or I can grab one for around $2000. From there, you can get your creative juices flowing and build an awesome home, get away or cottage like structure on your existing property providing you have the space. If you’re able to put this baby on wheels, you won’t even need any form of permit to have it around.

Innovative ideas like this are getting popular as people seek alternate ways to like modern lifestyles. There is even a site called Zigloo who has released multiple plans and ideas for making structures out of shipping containers and more. You can check them out here.

Other Off-Grid Ideas
Other off grid ideas and projects that are becoming popular are things like tiny homes and earthships. Both ideas are gaining a lot of traction lately and can be built in very modern designs so it doesn’t feel like you are heading back to the stone ages.

Below are some awesome pictures of various shipping container projects that were done by others.

This slideshow requires JavaScript.

Follow our FISHING BLOG

WEB   RATES     FISH    HUNT    CABINS    PHOTOS
TESTIMONIALS    BROCHURE    HUNT BOOKLET

Enter your email address to subscribe to this blog and receive notifications of new posts by email.

← Back

Thank you for your response. ✨

Email Me....


Tags: , , , , , , ,

Home Made Wild Game Jerky

This Jerky is a GREAT creation ever. Not to be bragging but this is one of the best jerky recipes around! This recipe is for beef but when wild game is available this jerky is outstanding. This is a must try for anyone who loves to have this on hand.

jerky

Ingredients
4 pounds round steak cut into strips no thicker than 1/4 inch (if you freeze the steak a few minutes beforehand, slicing is much easier)
4 tablespoons onion powder
1 1/3 teaspoons black pepper
1 1/3 teaspoons garlic powder
2 pinches sea salt
1 teaspoon dry Italian-style salad dressing mix
1 cup Worcestershire sauce
1 cup soy sauce
1 teaspoon hot pepper sauce

Directions
Mix together in a large bowl, the onion powder, pepper, garlic powder, salt and Italian seasoning.
Stir in Worcestershire sauce, soy sauce and pepper sauce.
Place meat into a container, and combine with marinade.
Cover, and refrigerate and marinate for 24 hours. (use large zip lock storage bags)
Place oven rack on the highest level.
Place aluminum foil on bottom of oven to catch drips.
Preheat oven to 150 degrees F.
Insert round toothpicks through the tops of the strips of meat, and hang them from the oven rack.
Bake in preheated oven for 4 hours, or until dried to desired consistency.
Store finished product in an air tight container.

Follow our FISHING BLOG

WEB   RATES     FISH    HUNT    CABINS    PHOTOS
TESTIMONIALS    BROCHURE    HUNT BOOKLET

Enter your email address to subscribe to this blog and receive notifications of new posts by email.

← Back

Thank you for your response. ✨

Email Me....


Tags: , , , , , ,

Backpackers Checklist

 The Means of A Check List

Packing a backpack seems like an easy task, until you are on the trail and forget one of the most essential items. We have prepared this infographic as well as the corresponding text to help you always pack exactly what you need. So go ahead and check it out. If you want to put it on your site there is code at the bottom as well.
2

Follow our FISHING BLOG

WEB   RATES     FISH    HUNT    CABINS    PHOTOS
TESTIMONIALS    BROCHURE    HUNT BOOKLET

Enter your email address to subscribe to this blog and receive notifications of new posts by email.

← Back

Thank you for your response. ✨

Email Me....


Tags: , , , , , , , ,

How To Call Your Shots

Calling a shot simply means the marksman can tell where his bullet hit. This can be done by observing the bullet’s flight and impact or by knowing where the sights were the instant the firearm was triggered. There are two separate, but complementary, ways to call a shot.

shot

When shooting from non-prone positions, witnessing the impact of the bullet is difficult. The trick is to focus intently on the position of the sights and take a mental snapshot of where they were in relation to the target when the bullet was fired.

The best way to develop this skill is through dry-fire practice, coupled with live-fire practice shots at the range. When dry-firing, use a small target that is a challenge to keep the crosshairs on. Don’t fight the wobble of the sight, just smoothly break the shot as it covers the target. Remember where the crosshairs were when the trigger clicked. At the range, do this with every shot.

To actually see your bullet’s impact, you must pair this level of focus with excellent form. If you are square behind the rifle and not putting any pressure on the stock that will cause it to jump to the side under recoil, you’ll be able to watch the bullet and see where it hits.

Follow our FISHING BLOG

WEB   RATES     FISH    HUNT    CABINS    PHOTOS
TESTIMONIALS    BROCHURE    HUNT BOOKLET

Enter your email address to subscribe to this blog and receive notifications of new posts by email.

← Back

Thank you for your response. ✨

Email Me....


Tags: , , , , , , , ,

Make A Vault From PVC

Whether you’re storing beans, bullets, or bars of gold, you’ll need a secure place to keep these potential survival currencies. For a quick solution, you could purchase some expensive olive-drab burial vaults, but does it really matter what color they are if they’re buried in the ground? Follow these easy steps, and you can put together a PVC pipe vault for $15 or less.

pcv1

Materials
First, you’ll need a length of PVC drain pipe. Many stores sell pre-cut two-foot sections, but, if you’re planning to make several of these, it’s cheaper to buy an eight footer and cut it down. For each vault you’ll also need an end cap, a female threaded coupling, and a plug, plus some primer and PVC cement. Four-inch pipe and fittings give you a lot more interior room than three-inch line, but the cost of four-inch fittings is roughly double that of three-inch material.

Construction

Apply your purple primer around each end of the pipe, inside the cap, and inside the female fitting (but not on the threads!). The primer dries very quickly. Once dry, wipe the cement around one end of the pipe and inside the end cap. Do this quickly, it sets up fast! Slide the cap on and press it onto the ground to force the cap on tightly. If you don’t apply pressure for 10 to 15 seconds, the reaction from the cement, primer, and plastic will actually push the fitting apart. Repeat this process with the female fitting, but push on it with the threaded section facing upward (solid cap on the ground again). This keeps cement from running down into the threads.

pcv2

Let the fumes clear out for a day before storing any food in the vault. Otherwise, wait a few hours for the cement to dry. Once you have filled your vault, screw the plug in place tightly. If you’re burying it in a damp area, use a little Teflon tape around the threads. Use pipe dope compound on the threads if you are burying it in a wet location. Use a permanently glued cap on each end if you are submerging the vault in water.

Burial
After you fill your prepper-style treasure chest with loot, bury it in a smart, secure, and memorable location. Fake pet graves, flower beds, and under a mean dog’s doghouse are a few of my top recommendations. You can either bury it horizontally or, if you have a post hole digger, drive a hole straight down and drop it in. The vertical option means minimal surface disturbance and a smaller profile if someone comes along with a metal detector. Just make sure you can find it!

Follow our FISHING BLOG

WEB   RATES     FISH    HUNT    CABINS    PHOTOS
TESTIMONIALS    BROCHURE    HUNT BOOKLET

Enter your email address to subscribe to this blog and receive notifications of new posts by email.

← Back

Thank you for your response. ✨

Email Me....


Tags: , , , , ,

How to Use Wood Sorrel for Food, and Hangovers

If you had a little too much green beer over the weekend, don’t worry — you weren’t alone. St. Patrick’s Day may have a rich historical point of origin in Ireland, but here in North America, it’s often just an excuse to chug cheap brews died into verdant colors. So here’s a little shamrock for the outdoor lover who might still overindulge.

4 clover

Wood Sorrel

The little green plant known as wood sorrel (Oxalis stricta) has often been mistaken as clover because of its three leaflets. On closer examination, you’ll find a big difference. Sorrel’s leaflets are heart shaped, while clover leaflets are round or oval. Wood sorrel grows in both sunny places and shady spots on the edges of woods throughout North America and it has many relatives growing coast to coast.

Wood sorrel usually tops out at under a foot tall, and it typically has small yellow flowers, though some species have more pinkish or purplish blooms. Looking much like a classic shamrock, the fresh leaves can be eaten raw as a tasty sour salad green.

4-Leaf Clover

4-Leaf Clover

You can also make a helpful hangover cure with wood sorrel. A handful of the leaves can be steeped in hot water for 10 minutes and then chilled to make a cold drink. This cold beverage looks and tastes like a green lemonade, and has the remarkable ability to calm nausea and soothe upset stomachs, which often go hand-in-hand with the headaches of hangovers.

While there’s no problem with the occasional consumption of this plant, use it in moderation over the long term. The sour tasting oxalic acid in wood sorrel can inhibit the body’s absorption of calcium and possibly contribute to kidney stones over time.

Look for related edible species such as the violet wood sorrel (Oxalis violacea), the pink wood sorrel (Oxalis montana), and other members of the Oxalis genus.

Have you eaten this wild edible? Or used it to treat nausea? Leave us your comments.

Happy St. Patrick’s Day!

Follow our FISHING BLOG

WEB   RATES     FISH    HUNT    CABINS    PHOTOS
TESTIMONIALS    BROCHURE    HUNT BOOKLET

Enter your email address to subscribe to this blog and receive notifications of new posts by email.

← Back

Thank you for your response. ✨

Email Me....


Tags: , , , , , ,

ID the Morel – Spring’s Best Mushroom

When the spring gobbler season and shed hunting is in full swing, you’ll probably spending a lot of time in the woods looking at the ground for antlers and turkey sign. Something else you ought to be on the lookout for is a weird little pitted thing that looks like a small, lumpy, brown brain. This time of year, that organism is most likely a common morel mushroom, a popular item of spring foragers. Here’s how to properly identify this delectable fungus.

mush

ID a Morel
The common morel (Morchella esculenta) is a prized wild mushroom that grows in forests and shady areas, primarily in April and May. These mushrooms are usually 2 to 4 inches tall. The tan, gray, or brownish colored head with irregular pitting is well camouflaged against leaf litter. If you cut the mushroom completely in half, it should be entirely hollow inside. Look carefully for the cone-shaped head to be fully fused to the stalk at the lower end.

mush2If the head is only attached at the top, and hangs like a skirt, you are probably looking at a false morel, which can be very poisonous. False morels (the genera Verpa and Gyromitra) usually grow in the summer and fall, which are great times to avoid anything resembling a morel. Another way to properly ID an edible morel is to make a spore print, which, for a common morel is yellowish. Here’s how do that.

Make a Spore Print
1. Handle your foraged mushrooms carefully, and assume that any unidentified mushroom is deadly. Get the whole thing if possible, but the cap is the part you need for spore prints.

2. Wrap each individual mushroom in wax paper or a piece of aluminum foil for transport. Plastic bags will make them sweat, and putting multiple mushrooms in a bag can create confusion.

3. Place the mushroom cap gills-down on a piece of white paper and set a cup or bowl over it. Allow it to sit several hours or, better yet, overnight.

4. Remove the cover and lift the mushroom cap. Observe the color of the spores that were deposited, and use that color for identification. Some mushrooms deposit white spores, which are hard to see on the white paper. Set a strong flashlight beside the paper, shining across the surface, to assist in your identification of pure white spores. Check this color against several guides, and double-check the mushroom’s structures against similar mushrooms to ensure that you have the right mushroom ID.

How is the morel hunting in your area so far this spring? Have you ever had a bad run-in with a misidentified mushroom?

Follow our FISHING BLOG

WEB   RATES     FISH    HUNT    CABINS    PHOTOS
TESTIMONIALS    BROCHURE    HUNT BOOKLET

Enter your email address to subscribe to this blog and receive notifications of new posts by email.

← Back

Thank you for your response. ✨

Email Me....


Tags: , , , , , , ,

Wild Plants to Cure the Flu and Common Cold

Can’t make it to the drug store right now? Whatever the reason, you do have some natural medicinal options in the winter season. Look for these three plants to lessen the symptoms and shorten the duration of your next case of the cold or flu. All you need is a sharp eye and a patch of wild growth to find these common and potent medicinal’s.

Mullein 
Mullein is a native plant, which favors dry, rocky soil and full sunlight, and is found throughout North America. An easy way to spot patches of this plants in cold weather is to look for the chocolate brown skeletons of the second-year plants. Look for 4- to 6-foot-tall stalks, which often have branching flower heads that resemble the arms of a saguaro cactus.

images2KI75GRG

The part you want for medicine are the velvety green leaves, which can still be found in winter growing in basal rosettes on one-year-old plants. Treat head colds by crushing the leaves into boiling water and breathing the steam. This medicated vapor acts as a decongestant.
barberryBarberry
The little red berries of barberry contain a compound called berberine. This acts as an immune system booster, helping your body fight off viral attacks like the common cold and the flu. The bitter taste of the berries isn’t very inviting, but eating a handful each day you’re feeling sick can shorten the illness, much like elderberry and Echinacea will. Look for small bushes with small dangling red berries. The two native varieties of the shrubs will have thorns in sets of three growing all over the twigs. The introduced Japanese species will have single thorns growing around the twigs. All three species can be used medicinally. As an additional point of identification, check the seeds in the red berries. Each berry should contain dark, slender seeds—typically two per berry.


Yarrow

This non-native plant grows from coast to coast on sunny open ground, although it’s originally nativeyarrow to Europe. Its most common use is as a poultice for cuts and other wounds. But you can fight colds and flu with it by making a tea from the leaves. Chop up the fresh leaves and add one tablespoon to one cup of scalding hot water. Soak the leaves for 10 to 15 minutes. You can sweeten the drink if you need to, or drink it commando-style. The anti-viral compounds help your immune system through its battle, while the diaphoretic compounds will get a sweat going to help break fevers.


Just make sure you use a field guide or guidance from an expert for positive identification of these plants. The last thing you need to do is poison yourself while you’re already ill.

rosehipsRose Hip Benefits
A Rose hip is the fruit of a rose. The wild dog rose is the type of rose most often cultivated for their hips. This plant grows up to ten feet tall and bears a white, very fragrant flower. Once the flower has bloomed, and all the petals have fallen off, the hip is picked and used in a wide variety of preparations. Rose hips are the best source of vitamin C; they contain 50% more vitamin C than oranges.
A single tablespoon of the pulp gives an adult more than the recommended daily allowance of 60 mg. They can be eaten raw, after being put through a blender, or soaked in water overnight and then cooked in the water for about half an hour. Because of the high vitamin C content they are an excellent immune system booster, and are often used as a supplement to prevent or treat a cold. The pulp from rose hips may be used in sauces or made into jelly.

Have you made medicine from wild plants?

Follow our FISHING BLOG

WEB   RATES     FISH    HUNT    CABINS    PHOTOS
TESTIMONIALS    BROCHURE    HUNT BOOKLET

Enter your email address to subscribe to this blog and receive notifications of new posts by email.

← Back

Thank you for your response. ✨

Email Me....


Tags: , , , , , , ,

Making Waterproof Matches

When it comes to matches, waterproof ones are best, especially in dire circumstances like a flood. Since they’re much more expensive than their pedestrian cousins, you might want to make your own.

cabdle

Use the Candle Technique
Burn a candle long enough for a pool of wax to form around the wick. Blow it out, then dip the head of your match into the wet wax, about of an inch (3 mm) up the stick. Remove the matchstick and allow the wax to dry, pinching it closed to form a water-tight seal.

Deploy the Nail Polish Ploy
Coat your matches with clear nail polish to waterproof them. Dip the head of the match and a bit of the matchstick itself into the polish, then rest the match on a counter with the head hanging off the edge to dry. Survive any wilderness situation with these critical tips.

Try the Turpentine Trick
The easiest way to waterproof your matches is simply to drop them in turpentine. Allow the matches to soak for five minutes before placing them on newspaper to dry. After twenty minutes or so, you’ll have waterproof matches that will last several months.

Follow our FISHING BLOG

WEB   RATES     FISH    HUNT    CABINS    PHOTOS
TESTIMONIALS    BROCHURE    HUNT BOOKLET

Enter your email address to subscribe to this blog and receive notifications of new posts by email.

← Back

Thank you for your response. ✨

Email Me....


Tags: , , , , , , , , ,

How to Make a Quick CAN Stove

If you suffer sticker shock after shopping for wood-burning camping stoves, you’re not alone. Why pay $60 to $100 for a titanium backpacking wood stove when you can make one out of a bean can for nothing. Sure, you could build a fire without any containment at all, but the low weight, efficiency, and minimal set-up time of a tin-can stove could make you a believer. And as long as there are sticks to burn, your stove will have fuel. Follow these easy steps, and you’ll have a lightweight bug-out-ready survival stove in no time.

1

The Gear List
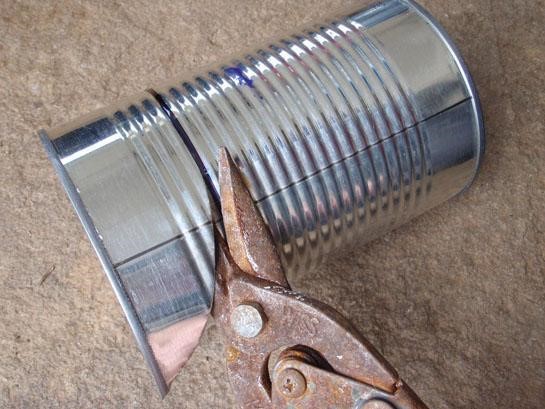
To create a bean can stove, you’ll certainly need the empty can. You’ll also need a pair of tin snips. If you don’t have a pair in your tool box, borrow a pair. You’ll also need a tape measure, a pencil or marker, a drill with a ½-inch (or similar size) drill bit, and a file to remove sharp edges when you’re done. Gloves are a good idea, too,  since you’ll be working with a lot of sharp metal.

2

The Procedure
Remove the can lid completely from a 40-ounce (or similar sized) food can. You could use a smaller can, but the 40-ounce size because one-quart water bottles will nest inside the finished stove. Next, make a mark all the way around the can about 1 ½ inches below the open top. Use your tin snips, spiraling in, to cut this ring off the top of the can, but before you start, determine whether you are using right- or left-hand snips. It will be easier if you cut in the correct direction. You could leave the can full height, but I wouldn’t recommend it. A shortened stove has better balance, and the last thing you need is for your stove to tip over.

3

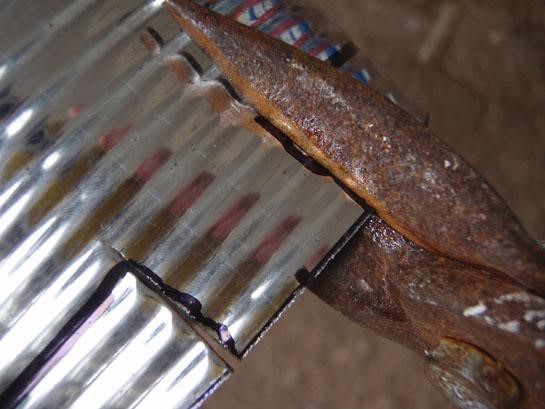
Next, make four equidistant marks around the mouth. Each mark will be the centerline for the four “teeth” on the top of your stove. Mark a line half an inch on either side of each of the four centerlines and draw a line around the can 1 inch down from the mouth. Using the tin snips again cut out the lines,  leaving four 1×1-inch teeth at the top of the can.

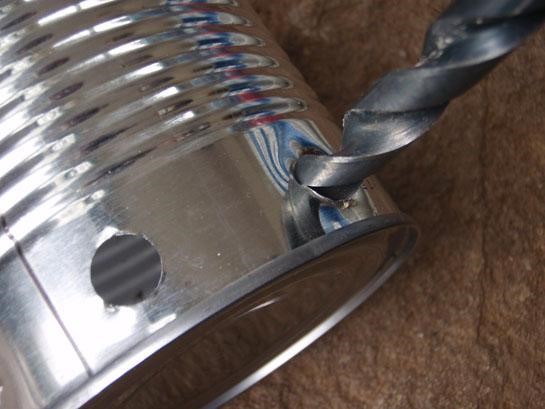
Next, drill eight equally-spaced holes around the bottom of the can wall. These will be the air intake vents. File off any sharp or rough edges from your metal work. Finally, before you start cooking food or boiling water over this stove, burn a few twigs for about ten minutes to get rid of the plastic can lining.

4

The Effectiveness
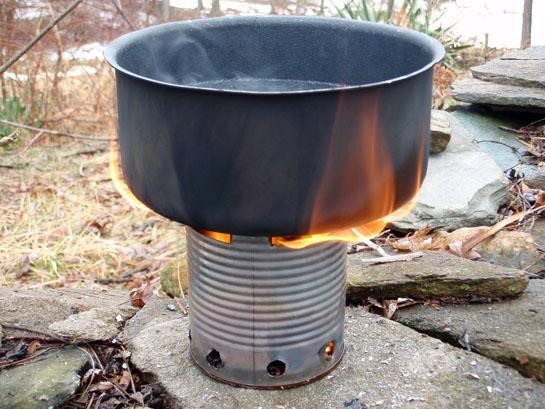
Once your stove is complete, set some tinder in the bottom and some broken twigs on the top of that. Place it in a stable, level spot and light the tinder through one of the vent holes. Place your cooking pot over the top of the stove and cook away. You will have to remove the pot every time you need to add fuel, but this is far better than trying to create stove doors for adding fuel. It also forces you to set the dangerously hot pot out of the way when refueling. This stove can burn twigs, paper, cardboard and any other solid fuel that’ll fit inside; and it boils one quart of water in about eight minutes. The finished stove weighs only 2 ½ ounces.

Follow our FISHING BLOG

WEB   RATES     FISH    HUNT    CABINS    PHOTOS
TESTIMONIALS    BROCHURE    HUNT BOOKLET

Enter your email address to subscribe to this blog and receive notifications of new posts by email.

← Back

Thank you for your response. ✨

Email Me....


Tags: , , , , , , ,