RSS

Category Archives: recipe

An illustrated Guide to the Best Game Meat Cuts

There are plenty of hunters out in the field bringing home dinner and we figured we would share some great guides on the best cuts and how to get them from your harvest!  Click on each picture to enlarge for greater detail 🙂

This diagram is the basic overview of the quarters and can be applied to deer, moose, elk and caribou.

illustrated deer

This second diagram is a more in depth cut selection and is coded for the sections as well.  Again, this can be applied to deer, moose, elk and caribou.

deerchart

Ensure before you properly care for your game in all stages of meat preparation to give not only longevity to the meat, but reduce the risk of cross contamination of any bacteria that could not only spoil the meat but could also make you very sick.

Happy Hunting!

Follow our FISHING BLOG

WEB   RATES     FISH    HUNT    CABINS    PHOTOS
TESTIMONIALS    BROCHURE    HUNT BOOKLET

Enter your email address to subscribe to this blog and receive notifications of new posts by email.

← Back

Thank you for your response. ✨

Email Me....

 
Leave a comment

Posted by on July 5, 2016 in game, recipe, Wawang Lake Resort


Tags: , , , , , , , , , , , , , , ,

Wild Mushrooms

Have you ever wondered what that orange/red plant pushing up through the soil during one of your outdoor trips to Wawang Lake?  The main edible find in our region is lobster mushrooms, Hypomyces lactifluorum, in some pretty good quantities too. On any hunt, it’s good to bring home dinner, but one doesn’t typically expect to bring home a bundle of lobsters too late into the fall.

lobster-mushrooms-wawang-lake

Typically, by the end of August and into September the brush is filled with mushrooms, edible and not. Unlike spring hunting, fall hunting in and around our area is more mushroom identifying than actually trying to find mushrooms growing. But some year the lobsters can account for a major harvest.

This slideshow requires JavaScript.

So on your next trip out into our region whether you’re fishing or grouse hunting be sure to hike the old logging roads in search of these very delicious mushrooms.  They are best boiled, then stewed in a sauce or soup, cut into small dice chunks, or thin strips and let them absorb the flavor of the sauce.


WEBSITE    RATES     FISH    HUNT    CABINS    PHOTOS
TESTIMONIALS    BROCHURE    HUNT BOOKLET

Enter your email address to subscribe to this blog and receive notifications of new posts by email.

← Back

Thank you for your response. ✨

Email Me....


Tags: , , , , , ,

Game on! : Taking the wild taste out of your harvest

There are 3 popular methods, the first a salt brine with spices. The second would be using whole milk and the third, a milder brine with carrots, onions and a potato, these veg draw out the fluids along with the salt in the brine’s.

bear roastUsing the acidic properties of these methods tenderizes the meat and in turn also draws out the ‘gamey’ flavor and makes the addition of other flavors much more simplistic.


These methods work well for wild deer, caribou, musk ox, rabbits, duck, pheasant, grouse and turkey’s. Also these meats, unlike commercial meats are very lean, so the addition of bacon, pork fat, salted pork fat or basting with butter aids it in flavor and tenderness in the end, high heat will do more harm than good, slow cooking it best to not dry out the meat, stewing or braising is the best, but some like game birds can be roasted, with deer depending on the cut, a slow stew in a crock pot or slow braise in the oven at no higher than 325 d F or 165 d C.

Happy hunting!

Follow our FISHING BLOG

WEB   RATES     FISH    HUNT    CABINS    PHOTOS
TESTIMONIALS    BROCHURE    HUNT BOOKLET

Enter your email address to subscribe to this blog and receive notifications of new posts by email.

← Back

Thank you for your response. ✨

Email Me....


Tags: , , , , , , , , , , ,

BBQ Moose Roast

How to Barbeque a Moose Roast

Have you ever wanted to barbeque a moose roast and still have it be tender? We have, and recently cooked a moose round roast on the barbeque that was so tender once we carved it, it was possible to cut it with your fork.

How did we do it? Let me tell you about it.

I started out with a moose round roast; I know this is not the best cut to be barbequing. So I knew it would require moist heat if it were to be palatable.

I remembered a friend of mine telling me how he had cooked ribs on his barbeque and had great results. I wondered if I could achieve the same?

mooseroast1

I wanted to give it a try.

The Process

The process is quite simple really, and you could likely apply this to any meat that is tough.

Cook it with moisture over a long period of time.

How much time… I cooked our roast for almost 9 hours.

Ingredients:

  • Moose round roast 3 pounds
  • 1 large onion
  • 5 cloves garlic (elephant)
  • 1 1/2 cups of barbeque sauce

 mooseroast2

Directions: Barbeque a Moose Roast

Thaw the moose roast in your refrigerator

Coarse chop the onion

Peel and slice half of the garlic and mince the balance

Start with a 8 inch by 8 inch roasting pan and place the moose round roast that you plan to barbeque onto a thin layer of the chopped onions.

Place the rest of the onions around the roast evenly.

What I did next was to sprinkle the onions with the sliced garlic and rubbed the roast itself with the minced garlic.

I followed this by pouring the barbeque sauce over the roast.

Once this was complete I covered the entire pan with a layer of heavy aluminum foil and took the pan (with the roast in it) outside to my barbeque.

I lit one burner (in my case the right hand one) and set it to low heat. I then placed the covered pan containing the moose roast I wished to barbeque on the left hand side well away from the heating element.

I then closed the lid.

mooseroast3

I have a thermometer on the outside lid of my barbeque I maintained a constant temperature of about 200 degrees Fahrenheit for 9 hours, until the internal temperature reached a minimum of 140 degrees; or your required doneness.

At the end of the cooking time the barbequed moose roast was cooked to perfection.

We served the moose roast with baby potatoes, carrots, chopped onions and mushrooms. All of which were cooked on the barbeque while the roast was cooking. All the veggies were wrapped in foil; salt, pepper and butter were added and placed directly over the burner that was set on low temperature. About 1 1/4 hours.

We made gravy from the juice from the meat pan as well we added the onions from the meat pan to our veggie dish.

Also we had grape tomatoes with feta cheese dressed with Balsamic Vinegar Reduction…

The barbequed moose roast, the entire dish… well…

Delicious

Now I can say we learned how to barbeque a moose roast… and have it tender too!

Follow our FISHING BLOG

WEB   RATES     FISH    HUNT    CABINS    PHOTOS
TESTIMONIALS    BROCHURE    HUNT BOOKLET

Enter your email address to subscribe to this blog and receive notifications of new posts by email.

← Back

Thank you for your response. ✨

Email Me....

 
Leave a comment

Posted by on June 14, 2016 in moose, recipe, Wawang Lake Resort


Tags: , , , , , , ,

Grinding Wild Game with Meatloaf Recipe

For foodies, especially those smart enough to eat within their means, there is no better everyday meat than wild-game burger, whether it is from elk, antelope, moose, or most likely, whitetail deer. No meat sold at the farmer’s market is more local, humanely raised, drug free, and genetically unmodified than that from a wild animal cleanly killed by the hunter. And if you process it yourself, you know exactly what you’re getting. No mystery meat or pink slime scares when it’s done D.I.Y. If you do decide to do the grinding at home, there are a few things to note when processing wild game into ground meat. Here are few tips to get the best from your burger.

Ground_Wild_Game

1. Buy The Best Grinder You Can Afford—and Keep it Sharp
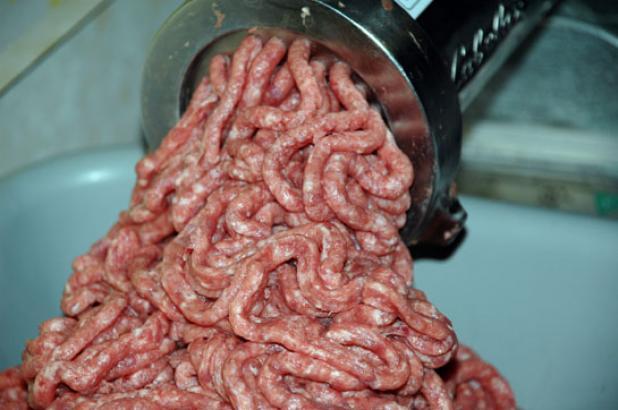
An underpowered grinder, or one with a dull knife, won’t grind meat cleanly. If the meat coming from the grinder plate looks like it’s been extruded rather than cut, make sure the back of the plate is free from sinew and the retaining ring is on tight.

2. You Get Out What You Put In
Who knows what ground meat from the grocer contains. When you do it yourself, you control the final product. Make sure you clean your meat well and trim with a judicious, yet keen, hand. Trim sinew, yellow fat, silverskin, and all bloodshot meat before it goes into the grinder.

3. Keep Things Cold
You’ll get a much better grind with less smear if your meat, and the grinder, is cold. Put cubed meat in the freezer for at least 30 minutes until it’s firm, but not hard, to the touch. Also, throw the grinder neck, auger, blades, and plate in there as well.

4. Don’t Forget Fat
Beef has fat built right in, but wild game burger needs a boost. You can use several things to up the fat content (and flavor) depending on what the final product is going to be. Bacon trimmings (sold in boxed form often called Ends and Pieces) add a distinctive flavor to burgers and meat loaf. Beef tallow and pork butt are both available from good butchers and make great fat additives. You can control the ratio of meat to fat, but I like somewhere in the neighborhood of 10 to 15 percent. Experiment until you find what’s right for you.

5. Or, Cut The Fat
Some folks want to cut the fat altogether and that’s fine, too. Just realize that a 100-percent wild-game burger can be very dry and will fall apart when cooked. To avoid crumbly burger, consider adding some type of moisture as you form your patties (same goes for meatloaf). This can be anything from eggs to bread crumbs soaked in milk. Last summer, Wild Chef readers turned in a bunch of great ideas for better burgers.
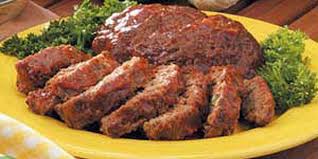
Meat Loaf

Ingredients
– 1 lb. ground meat
– 8 oz. can tomato sauce
– 1 egg, beaten
– 16 to 20 Saltine cracker crumbs
– 1/2 cup of dry oatmeal
– 1/2 onion, chopped
– ¼ cup ketchup

imagesUB61KB7K

Directions:
1. Preheat the oven to 350 degrees. In a large bowl, mix ground meat with tomato sauce and beaten egg.

2. Crush the Saltines in a gallon-sized zip-top bag and mix in the dry oatmeal and chopped onion.

3. Add the dry ingredients to the meat-egg mixture and, using your hands, blend thoroughly.

4. Form meat mixture into a loaf pan. Liberally cover top with ketchup. Bake for 45 min to 1 hour.

Follow our FISHING BLOG

WEB   RATES     FISH    HUNT    CABINS    PHOTOS
TESTIMONIALS    BROCHURE    HUNT BOOKLET

Enter your email address to subscribe to this blog and receive notifications of new posts by email.

← Back

Thank you for your response. ✨

Email Me....


Tags: , , , , , , , , ,

How to Make Game Stock

One thing you can do to amp your kitchen credibility quickly is learning to make stock—a flavorful cooking liquid that forms the base of many soups, sauces, and other recipes. Making homemade stock from venison bones or bird carcasses not only give your favorite dishes, such as the duck pho in the photo, a flavor boost, but you’ll be get every last scrap of use from your bird or game animal.

duckpho

The stock making process starts with a scrap bag—a gallon-size Ziploc kept in the freezer that collects the trimmings from onions, carrots, celery and other vegetables. (Of course, you can also make stock with fresh ingredients, but this method is kind of like saving your pennies for a rainy day.) A simple stock can be made by adding the ingredients of the scrap bag into a pot with the leftover carcass from a pheasant, grouse, duck, or goose, deer leg bones or other game scraps, covering everything with water and letting it simmer for a short period of time, say 30 minutes to an hour. However, with just a couple more steps and a bit more time (mostly unattended), you can achieve a richer, fuller flavor by roasting the scraps before soaking them.

Here’s a recipe for pheasant stock, but you could easily substitute the pheasant carcass for just about any game bird or whole or cut leg bones from deer, elk, moose, and other venison.

Stock Recipe

Ingredients
– Pheasant carcass or assorted pheasant bones (NOTE:  You can use any game bird)
– 1 cup each of celery, carrot, and onion scraps
– Assorted herbs, including thyme, parsley, and rosemary
– 1 bay leaf
– 12 cups water (or enough to cover pheasant)

Directions:
1. Preheat the oven to 450 degrees. Place the pheasant bones and vegetables in Dutch oven or heavy, ovenproof stock pot. Place the uncovered pot in the oven and roast for 30 minutes, or until ingredients are browned.

2. Move the pot to the stovetop set the heat to medium-high and add a few cups of water, scraping the bottom of the pan to loosen any browned bits. Cover the pheasant and vegetables with the remaining water, add the herbs and the bay leaf and raise the heat.

3. When the water just starts to boil, remove any scum that has risen to the top. Lower the heat and cover the pot. Simmer slowly for at least 1 hour; two is even better.

4. After a few hours, remove the pot from the heat and let it cool slightly. Remove the bones and vegetables with a slotted spoon and discard. Pour the stock through a cheesecloth-lined strainer or other fine sieve.

You can let the stock sit overnight in the fridge and skim any hardened fat from it the next day, though, with lean birds like pheasants, this generally isn’t necessary.

Stock can be stored for up to a week in the refrigerator or several months, covered, in the freezer.

Follow our FISHING BLOG

WEB   RATES     FISH    HUNT    CABINS    PHOTOS
TESTIMONIALS    BROCHURE    HUNT BOOKLET

Enter your email address to subscribe to this blog and receive notifications of new posts by email.

← Back

Thank you for your response. ✨

Email Me....


Tags: , , , , , , , , , ,

Canning Wild Game

mainMeat, poultry, and game are low acid foods and must be canned or processed in a pressure canner to assure it is safe to eat.

1. Canning frees up freezer space for other things.
2. Pressure canning can make the less tender cuts versatile.
3. Home canning meat means jars of meat on the shelf ready to go at a moment’s notice. No defrosting time. Ever tried to defrost an elk roast quickly in the microwave because you forgot to take it out earlier? Doesn’t work so well. (Ask me how I know!)
4. The best benefit? My guys love it. We are an active hunting family with 4 sons. Much of our meat is provided by the men of hunting age in our family.

Meat, poultry, and game are low acid foods and must be canned or processed in a pressure canner to assure it is safe to eat.

11 pounds pressure with a dial gauge pressure canner
15 pounds pressure with a weighted gauge pressure canner for required times.
Choose only good meat for canning, and handle it quickly and with total cleanliness, because bacteria grow rapidly in meat held at room temperature. If you have a large amount, store the part you’re not working on in the refrigerator.

canning-venison21You can:
Start with properly cleaned and chilled product.
Can fresh meat and poultry within 2 days or freeze it.
To can frozen products, thaw in the refrigerator until most ice crystals have disappeared, then handle as if they were fresh.
Trim gristle and fat off meat before canning. Fat left on meat melts and climbs on the sides of the jar during processing and may interfere with the sealing of the lid.
Salt is optional in canned meat and poultry.
Fish should be canned immediately or frozen until processed.
For large game animals (deer), follow beef processing times and methods.
For small game animals and birds, follow poultry processing times and methods.
Use canned venison or canned elk in stews, meaty soups, and even chili. You can use it to make Sloppy Joe’s and killer Enchiladas.

canning-steps-one

Follow our FISHING BLOG

WEB   RATES     FISH    HUNT    CABINS    PHOTOS
TESTIMONIALS    BROCHURE    HUNT BOOKLET

Enter your email address to subscribe to this blog and receive notifications of new posts by email.

← Back

Thank you for your response. ✨

Email Me....


Tags: , , , , , , , , , , ,

Wild Game Recipe: Rabbit Sott’olio

rabbitsottolioEmploying an old Italian method of preserving meats and vegetables called sott’olio, submerge rabbits in oil and slow-cooks them until the meat is tender and rich. Then dress the warm meat in a salad for a perfect counterbalance. The only difficult part of this recipe is pouring that much oil into a pot—but it’s worth it. Be sure to fish the garlic out of the oil for later: Spread the cloves on toasted bread for a killer snack.

Ingredients
– 2 whole wild rabbits, cleaned
– About 3 quarts vegetable oil
– About 1 quart, plus
– 1 Tbsp., plus 1⁄4 cup, olive oil
– 2 whole heads garlic, broken into individual unpeeled cloves
– 6 sprigs fresh thyme
– 1⁄3 cup, plus 1⁄4 cup,
– red wine vinegar
– 1 red onion, sliced
– 2 carrots, peeled and chopped into 1⁄2-inch pieces
– 4 cups baby arugula
– 1⁄4 cup pine nuts, lightly toasted
– 1⁄4 cup Parmigiano Reggiano cheese, shaved or grated
– Salt and freshly ground pepper, to taste

Directions:
1. Preheat the oven to 300 degrees. Rub the rabbits with salt and pepper and place in a Dutch oven. Pour in about three parts vegetable oil to one part olive oil, enough to fully submerge the rabbits. Add the garlic and thyme, and cover the Dutch oven. (A sheet of aluminum foil underneath the lid is a good idea.) Place in the oven and cook for about 11⁄2 hours, or until the meat is tender and falling off the bone. Let cool.

2. Meanwhile, combine the 1⁄3 cup red wine vinegar in a small saucepan with 1⁄3 cup water, and bring to a boil over high heat. Put the red onion slices in a bowl, and pour the vinegar mixture over the onions. Stir, add salt and pepper, then allow the onions to pickle at room temperature.

3. Heat 1 Tbsp. olive oil over low heat in a saucepan, and add the carrots. Cook, stirring occasionally, for 6 to 8 minutes, or until the carrots are tender but not mushy. Add salt and pepper, and reserve.

4. Make a vinaigrette: Put the remaining 1⁄4 cup red wine vinegar in a bowl and gradually whisk in 1⁄4 cup olive oil, until the oil and vinegar are thoroughly integrated. Add salt and pepper.

5. When the rabbits are cool, remove the meat from the bones and reserve.

6. To serve, reheat the rabbit meat in a pan with some of the oil, over low heat, just to warm through. In a large mixing bowl, gently toss the arugula with the red onions (drained), carrots, pine nuts, cheese, and about 3 Tbsp. vinaigrette. Divide the salad among four plates, and top with the rabbit, adding a few more shavings of cheese and salt and pepper as desired. Serves 4

Follow our FISHING BLOG

WEB   RATES     FISH    HUNT    CABINS    PHOTOS
TESTIMONIALS    BROCHURE    HUNT BOOKLET

Enter your email address to subscribe to this blog and receive notifications of new posts by email.

← Back

Thank you for your response. ✨

Email Me....


Tags: , , , , , , , , ,

Bacon Wrapped Moose Tenderloin

Ingredients

Moose tenderloin
Dates
Goat cheese

Marinade

1 Tbsp. mustard
1 Tbsp. honey
1/2 tsp. minced garlic
4 dashes of Worcestershire sauce
1 cup red wine

Saskatoon Glaze

1/2 cup Saskatoon berries ( you can use blueberries if Saskatoon’s are not available in your area)
3/4 cup red wine
1 Tbsp. maple syrup

moose-rolls2-copy-600x400


Rub tenderloin with mustard, combine remaining ingredients and pour over top.  Use a marinating container that and flip back and forth every so often.  Let marinade at least 4 hours or overnight.

Next stuff dates with goat cheese.  If you have un-pitted dates, simply cut the top off, using a pair of tweezers, pull the pit out.  Use a baby spoon to stuff the goat cheese in, it works quite well, the tip of the spoon was perfect for starting to put the cheese in and then using the handle end to push the goat cheese down, worked like a charm!

Thinly slice the tenderloin and then wrap around the dates and secure with toothpicks.  Place on parchment paper on a cookie sheet.

Preheat oven to 350 degrees.

Place berries, maple syrup and red wine in a pot on high heat.  Bring to a boil and let simmer for 3-5 minutes, spoon the juice over the dates and bake for 10-15 minutes(or until meat is cooked to your preferred done-ness), baste with glaze at least once during baking time.

Remove and enjoy … best eaten while warm!

This is the perfect appetizer for any party….your guests won’t even know its moose!

Follow our FISHING BLOG

WEB   RATES     FISH    HUNT    CABINS    PHOTOS
TESTIMONIALS    BROCHURE    HUNT BOOKLET

Enter your email address to subscribe to this blog and receive notifications of new posts by email.

← Back

Thank you for your response. ✨

Email Me....


Tags: , , , , , , , , , , ,

Wild Mushrooms

The main edible find in our region is  lobster mushrooms, Hypomyces lactifluorum, in some pretty good quantities. On any hunt, it’s good to bring home dinner, but one doesn’t typically expect to bring home a bundle of lobsters too late into the fall.

lobster-mushrooms-wawang-lake

Typically, by the end of August and into September the brush is filled with mushrooms, edible and not. Unlike spring hunting, fall hunting in and around our area is more mushroom identifying than actually trying to find mushrooms growing. But some year the lobsters can account for a major harvest.

This slideshow requires JavaScript.

So on your next trip out into our region whether you’re fishing or grouse hunting be sure to hike the old logging roads in search of these very delicious mushrooms.  Stay tuned for a great recipe that easy to prepare.


WEBSITE    RATES     FISH    HUNT    CABINS    PHOTOS
TESTIMONIALS    BROCHURE    HUNT BOOKLET

Enter your email address to subscribe to this blog and receive notifications of new posts by email.

← Back

Thank you for your response. ✨

Email Me....


Tags: , , , , , ,