
Follow our FISHING BLOG
WEBSITE RATES FISH HUNT CABINS PHOTOS
TESTIMONIALS BROCHURE HUNT BOOKLET
Follow our FISHING BLOG
WEBSITE RATES FISH HUNT CABINS PHOTOS
TESTIMONIALS BROCHURE HUNT BOOKLET


With the season upon us, being in the field is commonplace. In the event of an emergency or in climate weather change understanding how to create effective wilderness survival shelters is one of the most important outdoor skills. From keeping you protected from the elements to providing a place to rest, wilderness shelters serve a key role in survival situations. Not only do they provide for physical needs, but also help create a sense of home in the wilderness. Though each season and environment presents its own challenges, there are several universal principles for creating effective wilderness survival shelters:
Location
The most important aspect of making wilderness shelters is choosing a good location. A good location is one that 1) provides easy access to ample building materials such as dead sticks, leaves, and grasses; and is 2) away from major hazards such falling branches, pooling water, and insect nests. You also want a location that has a large enough flat area to allow you to lie down and sleep comfortably.
Size
A common mistake when building wilderness survival shelters is to build them too large. Not only does it take more materials, effort, and time to construct, but often ends up being cold due to the amount of space on the inside. Effective wilderness shelters are often small on the inside – just large enough to fit your body to conserve body heat.
Type
 The debris hut is an extremely versatile wilderness survival shelter. It can be built in almost any habitat and does not require tools or special equipment. Creating an effective shelter is one of the most important priorities in a survival situation. Most lost persons perish from hypothermia, which may have been easily avoided had they constructed a simple shelter.
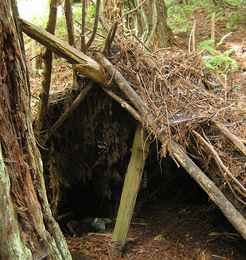
The debris hut is constructed using sticks and any available debris, such as leaves, moss, ferns, bark, etc… The key to a good shelter is to insulate yourself from all of the forms of heat loss. Your body can lose heat through direct contact with the ground, wind, and simply radiating off of your body. Therefore, your shelter needs to provide insulation and protection from all of these elements.
A completed debris shelter is like a gigantic water-resistant sleeping bag, insulated by debris and held together by sticks. To construct a debris hut:

1.) Select a location that provides ample building materials (sticks and debris) that is safe from falling branches, pooling water, and other hazards.
2.) Prop up a sturdy 8-foot pole-like branch on a stump or crook of a tree. This ridge pole should be sturdy enough to support your weight. The size of the space underneath the ridge pole should be just large enough to fit your body plus six inches of debris on all sides.
3.) Lay shorter stick along the length of the ridge pole on both sides, leaving room for a doorway. These shorter sticks are called ribbing. The ribbing sticks should touch the ground roughly six inches outside of where your body would lay.

4.) Add smaller sticks on top of and perpendicular to the ribbing sticks. These latticework sticks will keep the outer debris from falling inside the shelter.
5.) Pile large amounts of leafy debris on top, as well as inside. Use your driest, softest debris on the inside closest to your body. When complete, there should be at least three feet of debris piled up on top and on all sides of the shelter.
6.) You can lay more sticks on top to keep the wind from blowing the debris away if it is a windy day.
7.) A door plug can be created by stuffing a shirt full of leaves.
Crawl inside, being sure to burrow into the leaves, so that there is a mattress of leaves insulating you from the ground and on all sides. Though nothing like the warmth of your own bed, a debris hut will allow you to survive the night.
Follow our FISHING BLOG
WEB RATES FISH HUNT CABINS PHOTOS T
ESTIMONIALS BROCHURE HUNT BOOKLET

One thing you can do to amp your kitchen credibility quickly is learning to make stock—a flavorful cooking liquid that forms the base of many soups, sauces, and other recipes. Making homemade stock from venison bones or bird carcasses not only give your favorite dishes, such as the duck pho in the photo, a flavor boost, but you’ll be get every last scrap of use from your bird or game animal.

The stock making process starts with a scrap bag—a gallon-size Ziploc kept in the freezer that collects the trimmings from onions, carrots, celery and other vegetables. (Of course, you can also make stock with fresh ingredients, but this method is kind of like saving your pennies for a rainy day.) A simple stock can be made by adding the ingredients of the scrap bag into a pot with the leftover carcass from a pheasant, grouse, duck, or goose, deer leg bones or other game scraps, covering everything with water and letting it simmer for a short period of time, say 30 minutes to an hour. However, with just a couple more steps and a bit more time (mostly unattended), you can achieve a richer, fuller flavor by roasting the scraps before soaking them.
Here’s a recipe for pheasant stock, but you could easily substitute the pheasant carcass for just about any game bird or whole or cut leg bones from deer, elk, moose, and other venison.
Stock Recipe
Ingredients
– Pheasant carcass or assorted pheasant bones (NOTE: You can use any game bird)
– 1 cup each of celery, carrot, and onion scraps
– Assorted herbs, including thyme, parsley, and rosemary
– 1 bay leaf
– 12 cups water (or enough to cover pheasant)
Directions:
1. Preheat the oven to 450 degrees. Place the pheasant bones and vegetables in Dutch oven or heavy, ovenproof stock pot. Place the uncovered pot in the oven and roast for 30 minutes, or until ingredients are browned.
2. Move the pot to the stovetop set the heat to medium-high and add a few cups of water, scraping the bottom of the pan to loosen any browned bits. Cover the pheasant and vegetables with the remaining water, add the herbs and the bay leaf and raise the heat.
3. When the water just starts to boil, remove any scum that has risen to the top. Lower the heat and cover the pot. Simmer slowly for at least 1 hour; two is even better.
4. After a few hours, remove the pot from the heat and let it cool slightly. Remove the bones and vegetables with a slotted spoon and discard. Pour the stock through a cheesecloth-lined strainer or other fine sieve.
You can let the stock sit overnight in the fridge and skim any hardened fat from it the next day, though, with lean birds like pheasants, this generally isn’t necessary.
Stock can be stored for up to a week in the refrigerator or several months, covered, in the freezer.
Follow our FISHING BLOG
WEB RATES FISH HUNT CABINS PHOTOS
TESTIMONIALS BROCHURE HUNT BOOKLET

This is a fantastically easy and cost effective de-scenting option for hunting gear 🙂

Eons before the advent of scent-control activated charcoal hunting suits, a woman working in a Port Perry convenience store taught me how to capture offensive odors. My children suffered from motion sickness, so when I asked her for a scented air spray to mask the sour smell in the car, she suggested filling a perforated coffee can with charcoal. The results far exceeded all expectations.
Hunting season rolled around and the light bulb went on. I could use the same approach to keep hunting gear scent-free. To this day, all my tote boxes of gear and bags of hunting clothes include a perforated container filled with charcoal. When the charcoal becomes saturated and unable to absorb any more odors, I simply refill the container with new charcoal.
Ensure that the container is first cleaned very well and left to air out for a few days to get any residual coffee odor out.
When purchasing charcoal, be advised not to buy any with any extra additives to ease starting or burning…the cleaner the charcoal the better 🙂
Follow our FISHING BLOG
WEB RATES FISH HUNT CABINS PHOTOS
TESTIMONIALS BROCHURE HUNT BOOKLET

Here is a great video on how CJ Buck, President and CEO of Buck Knives sharpens a knife. Knowing how to properly sharpen a piece of equipment can not only save time but keep you from permanently damaging your knives as well.
Follow our FISHING BLOG
WEB RATES FISH HUNT CABINS PHOTOS T
ESTIMONIALS BROCHURE HUNT BOOKLET

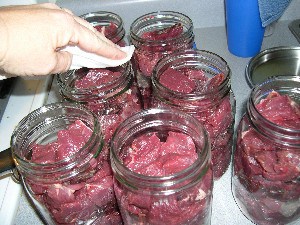
 Meat, poultry, and game are low acid foods and must be canned or processed in a pressure canner to assure it is safe to eat.
1. Canning frees up freezer space for other things.
2. Pressure canning can make the less tender cuts versatile.
3. Home canning meat means jars of meat on the shelf ready to go at a moment’s notice. No defrosting time. Ever tried to defrost an elk roast quickly in the microwave because you forgot to take it out earlier? Doesn’t work so well. (Ask me how I know!)
4. The best benefit? My guys love it. We are an active hunting family with 4 sons. Much of our meat is provided by the men of hunting age in our family.
Meat, poultry, and game are low acid foods and must be canned or processed in a pressure canner to assure it is safe to eat.
11 pounds pressure with a dial gauge pressure canner
15 pounds pressure with a weighted gauge pressure canner for required times.
Choose only good meat for canning, and handle it quickly and with total cleanliness, because bacteria grow rapidly in meat held at room temperature. If you have a large amount, store the part you’re not working on in the refrigerator.
 You can:
Start with properly cleaned and chilled product.
Can fresh meat and poultry within 2 days or freeze it.
To can frozen products, thaw in the refrigerator until most ice crystals have disappeared, then handle as if they were fresh.
Trim gristle and fat off meat before canning. Fat left on meat melts and climbs on the sides of the jar during processing and may interfere with the sealing of the lid.
Salt is optional in canned meat and poultry.
Fish should be canned immediately or frozen until processed.
For large game animals (deer), follow beef processing times and methods.
For small game animals and birds, follow poultry processing times and methods.
Use canned venison or canned elk in stews, meaty soups, and even chili. You can use it to make Sloppy Joe’s and killer Enchiladas.
Follow our FISHING BLOG
WEB RATES FISH HUNT CABINS PHOTOS
TESTIMONIALS BROCHURE HUNT BOOKLET

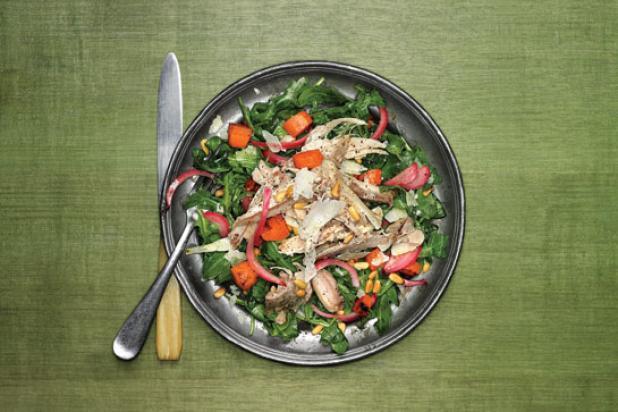 Employing an old Italian method of preserving meats and vegetables called sott’olio, submerge rabbits in oil and slow-cooks them until the meat is tender and rich. Then dress the warm meat in a salad for a perfect counterbalance. The only difficult part of this recipe is pouring that much oil into a pot—but it’s worth it. Be sure to fish the garlic out of the oil for later: Spread the cloves on toasted bread for a killer snack.
Ingredients
– 2 whole wild rabbits, cleaned
– About 3 quarts vegetable oil
– About 1 quart, plus
– 1 Tbsp., plus 1⁄4 cup, olive oil
– 2 whole heads garlic, broken into individual unpeeled cloves
– 6 sprigs fresh thyme
– 1⁄3 cup, plus 1⁄4 cup,
– red wine vinegar
– 1 red onion, sliced
– 2 carrots, peeled and chopped into 1⁄2-inch pieces
– 4 cups baby arugula
– 1⁄4 cup pine nuts, lightly toasted
– 1⁄4 cup Parmigiano Reggiano cheese, shaved or grated
– Salt and freshly ground pepper, to taste
Directions:
1. Preheat the oven to 300 degrees. Rub the rabbits with salt and pepper and place in a Dutch oven. Pour in about three parts vegetable oil to one part olive oil, enough to fully submerge the rabbits. Add the garlic and thyme, and cover the Dutch oven. (A sheet of aluminum foil underneath the lid is a good idea.) Place in the oven and cook for about 11⁄2 hours, or until the meat is tender and falling off the bone. Let cool.
2. Meanwhile, combine the 1⁄3 cup red wine vinegar in a small saucepan with 1⁄3 cup water, and bring to a boil over high heat. Put the red onion slices in a bowl, and pour the vinegar mixture over the onions. Stir, add salt and pepper, then allow the onions to pickle at room temperature.
3. Heat 1 Tbsp. olive oil over low heat in a saucepan, and add the carrots. Cook, stirring occasionally, for 6 to 8 minutes, or until the carrots are tender but not mushy. Add salt and pepper, and reserve.
4. Make a vinaigrette: Put the remaining 1⁄4 cup red wine vinegar in a bowl and gradually whisk in 1⁄4 cup olive oil, until the oil and vinegar are thoroughly integrated. Add salt and pepper.
5. When the rabbits are cool, remove the meat from the bones and reserve.
6. To serve, reheat the rabbit meat in a pan with some of the oil, over low heat, just to warm through. In a large mixing bowl, gently toss the arugula with the red onions (drained), carrots, pine nuts, cheese, and about 3 Tbsp. vinaigrette. Divide the salad among four plates, and top with the rabbit, adding a few more shavings of cheese and salt and pepper as desired. Serves 4
Follow our FISHING BLOG
WEB RATES FISH HUNT CABINS PHOTOS
TESTIMONIALS BROCHURE HUNT BOOKLET

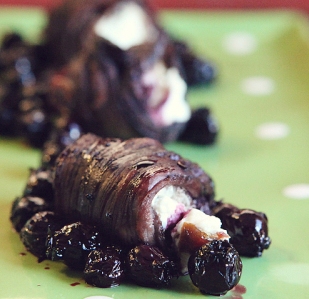
Moose tenderloin
Dates
Goat cheese
1 Tbsp. mustard
1 Tbsp. honey
1/2 tsp. minced garlic
4 dashes of Worcestershire sauce
1 cup red wine
1/2 cup Saskatoon berries ( you can use blueberries if Saskatoon’s are not available in your area)
3/4 cup red wine
1 Tbsp. maple syrup
Rub tenderloin with mustard, combine remaining ingredients and pour over top. Use a marinating container that and flip back and forth every so often. Let marinade at least 4 hours or overnight.
Next stuff dates with goat cheese. If you have un-pitted dates, simply cut the top off, using a pair of tweezers, pull the pit out. Use a baby spoon to stuff the goat cheese in, it works quite well, the tip of the spoon was perfect for starting to put the cheese in and then using the handle end to push the goat cheese down, worked like a charm!
Thinly slice the tenderloin and then wrap around the dates and secure with toothpicks. Place on parchment paper on a cookie sheet.
Preheat oven to 350 degrees.
Place berries, maple syrup and red wine in a pot on high heat. Bring to a boil and let simmer for 3-5 minutes, spoon the juice over the dates and bake for 10-15 minutes(or until meat is cooked to your preferred done-ness), baste with glaze at least once during baking time.
This is the perfect appetizer for any party….your guests won’t even know its moose!
Follow our FISHING BLOG
WEB RATES FISH HUNT CABINS PHOTOS
TESTIMONIALS BROCHURE HUNT BOOKLET

A trail camera won’t stumble through a bedding area, leave scent all over a trail, or exaggerate the size of a rack. And it’ll never oversleep. But your perfect little scouting buddy must be chosen wisely and placed carefully if you want to pattern that old, crafty animal you know is around. Here’s how…

The earlier version trail cameras were just a 35mm film point-and-shoot tucked in a weatherproof housing. It snapped a single picture when something triggered the sensor. After retrieving the camera, you ran to the one-hour shop to get the film developed, then thumbed through a week’s worth of pictures. More than once a stack of 36 prints revealed a handful of out-of-focus animals and a couple dozen shots of a wind-whipped brush or a drooping tree branch. That was only a few years ago.
Today, many website boasts several pages of trail cams, and even the cheapest one outperforms the original older ones. They have lenses sharp enough to count the ticks on a deer’s neck, electronic circuit boards so efficient that four AA batteries will run a unit for months, and memory cards that hold thousands of pictures you can download to your computer or delete at the touch of a button. And those are standard features on mid-priced cameras. The high-end ones will send a photo to your cellphone or laptop.
Like everything in the digital age, trail-cam technology has improved, competition has become fierce, and prices have plunged. Still, $200 is plenty of money, and matching a camera with the right features to meet your needs is critical. And even the best camera can’t take spectacular photos of a trophy buck if you don’t set it properly. But it’s not difficult to get started. These are the basics.

Wildlife biologists use trail cams to measure herd densities, buck-to-doe ratios, and the like. Your goals should be simpler: learning about the deer on your property, figuring out where to hunt them, and having fun in the process. You can pinpoint ideal spots before you buy a camera, and the locations you choose can determine what model is best for you. Here are four sites for four different periods.
Time: Late Summer
Site: Mineral lick
Goal: To start an inventory of buck numbers and quality on your property.
Setup: Find a spot with moderate to heavy deer traffic and spade up dirt in a 2-foot circle. Pour in half of an ice-cream pail of stock salt or commercial deer mineral and spade it into the loosened soil. Pour the rest on top.
Tips:
• Establish one or two licks per 80 acres. Allow deer up to a week to find them.
• Situate each lick 10 to 30 feet from a tree for mounting a camera.
• Jam a stick behind the camera’s top edge to point it down toward the lick.
 Time: Early Season
Site: Mock scrape
Goal: To find bucks after velvet shed, when they often relocate. Mocks can draw up to 90 percent of the bucks you’ll hunt.
Setup: Rake grass and forest debris 5 feet away from a tree that has a green, overhanging licking branch 5 to 7 feet above the ground. Activate with your own “product” (drink plenty of liquids) or deer urine.
Tips:
• If you are not getting clear shots of a buck, aim the camera at the licking branch. Most bucks will work it with their antlers.
• Establish multiple scrapes in each area and hang cameras only on the most active ones.
Time: Rut
Site: Funnel
Goal: To determine where resident bucks are traveling and whether traveling bucks are in the area.
Setup: Find terrain features that channel buck movement and hang a camera near fresh tracks and rubbing activity. Check camera every three to five days—the rut moves quickly.
Tips:
• Mount camera at a 45-degree angle to the trail. Bucks often move through funnels quickly; a camera set perpendicular to the trail might miss the shot.
• Scuff dirt in front of the camera with a boot. Such a mini mock will often make a moving buck pause and get “shot.”
Time: Late Season
Site: Food source
Goal: To find out where to fill a last-minute tag, and to know which bucks have survived the bulk of the hunting season.
Setup: Scout widely to find the hot food sources in your area, such as waste grainfields and clear-cuts. Place camera within 30 feet of the most heavily trafficked area. Load it with fresh batteries if you hunt in an extremely cold area.
Tips:
• Set up and check cameras at midday to avoid spooking feeding deer.
• If no trees are located near the food source, mount the camera on a tripod and camouflage it with grass or brush.
Follow our FISHING BLOG
WEB RATES FISH HUNT CABINS PHOTOS T
ESTIMONIALS BROCHURE HUNT BOOKLET

So much energy, so few solutions

The sun is the biggest source of renewable energy.
Solar power has become fairly pedestrian since the first photovoltaic cells came out of the lab in the 1950s. Today, utility-scale solar farms soak up the sun and photovoltaic panels dot rooftops across the world. The power generation is finding its way into transportation, too, alongside other clean-burning fuels like hydrogen. Just a few years ago, the Solar Impulse prototype plane flew nonstop without any fuel from San Francisco to New York. And companies like Toyota are looking to bring hydrogen cars mainstream.
Crazy Solar Power Plants
“The U.S. was really the pioneer of the whole global solar photovoltaic industry,” said Juris Kalejs, an IEEE member and CTO of the Lowell, Massachusetts-based solar developer American Capital Energy. Having worked in photovoltaic technology development for more than 30 years, Kalejs has seen wild ideas come and go. The energy crisis of the 1970s spurred dozens of pie-in-the sky ideas, he said. But that hasn’t stopped people from innovating. Here’s his grounded take on highly unusual ways to harness solar power today.

Andre Broessel designed glass spherical lenses filled with water that act like solar concentrators.
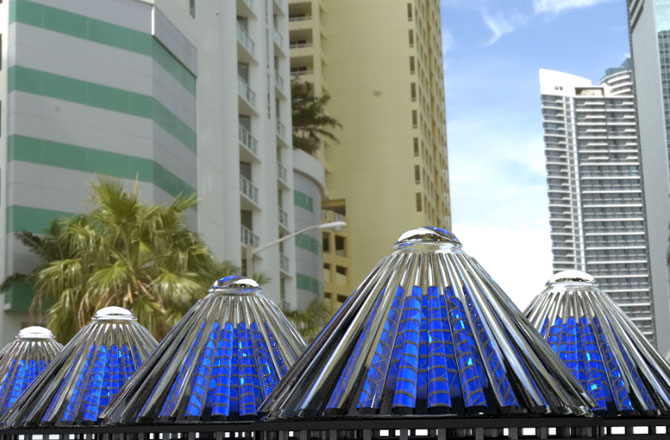
The Los Angeles-based startup V3Solar made the news rounds last year with its literal spin on solar. Slick renderings showed a design for deep blue solar cells in a cone shape that could rotate. The company says they want to take photovoltaics from flat and static to 3-D and dynamic. A new video V3Solar put out this summer had more details about how its spinning mechanism could maximize energy generation.
Kalejs said he said he thought the setup could work but he was skeptical about the complexity. “It looks like something that’s a nice decorative piece you might find in a fountain,” he said. The company said it would show its prototypes to potential investors with a non-disclosure agreement.
Other designers are imagining different shapes for traditionally flat solar panels. Going rounder could mean capturing sunlight from every possible direction. Last year the Japanese optics company Kyosemi launched Sphelar Power to manufacture micro-spherical solar cell beads from discarded silicon and electrodes that are wired into a mesh. André Broessel, an architect at solar architecture company Rawlemon in Barcelona, designed glass spherical lenses filled with water that act like solar concentrators both large and small.
Kalejs called Broessel’s idea a neat one that would appeal to consumers but pointed to companies attempting a similar technology with 20-foot-diameter solar concentrators. “It’s a very tricky system to make and you need to make it on a large scale to make it cost effective,” he said.

Minuscule solar panels placed on microbes could create a chemical reaction akin to artificial photosynthesis
Scores of scientists are working on artificial photosynthesis by developing systems that chemically convert sunlight, water and CO2 into oxygen and plant fuel. Unfortunately, photosynthesis has less than a percent efficiency versus 20 percent to 30 percent for regular solar cells, Kalejs pointed out. The risks with artificial plants and microbes are also quite high because a disease or fungus could wipe everything out.
British researchers from the University of East Anglia announced earlier this year that they’re working on artificial photosynthesis by placing minuscule solar panels on microbes in an effort to create hydrogen for fuel. Kalejs said he found their approach interesting and added that he’s attended National Science Foundation meetings where attendees discussed putting photosynthetic material on top of a solar cell. “Everybody’s been looking for a boost,” he said.

Reusable peel-and-stick solar cells can be made easily and affixed to just about anything solid.
Effective transparent and thin-film solar cells have been on the technology wish list for a long time. Several companies have already started manufacturing flexible solar panels but rigid ones remain more affordable and easier to produce, resulting in high quality. Earlier this year Stanford University and the U.S. National Renewable Energy Laboratory came up with reusable peel-and-stick solar cells that can be made easily and affixed to just about anything solid: toys, helmets, transistors and even business cards. The resulting power is still relatively small, though.
Kalejs cautioned that sunlight breaks down materials made with polymers, making the technology unstable. “It’s a short-life product right now,” he said. “The organic solar cells probably wouldn’t last more than a year or two, if that long.”

Bottle Charger is a way to recharge cell phones using a water bottle filled with boiling water and a mini-turbine
One person’s trash represents solar tech treasure for someone else. Last year blogger and tech writer Ryan Matsunaga posted step-by-step instructions on how to convert a water bottle into a solar lantern for $2. In February, Kenyan designers launched a Kickstarter campaign around the Bottle Charger, a way to recharge cell phones using a water bottle filled with boiling water and a mini-turbine. Although the initial prototype simply required a temperature differential, the designers hoped to integrate a small solar dish that could heat water with sunlight continuously during the day.
“I have no idea how cheap or stable it is,” Kalejs said of the Bottle Charger idea. “I guess you’d say, well if it works, use it.”
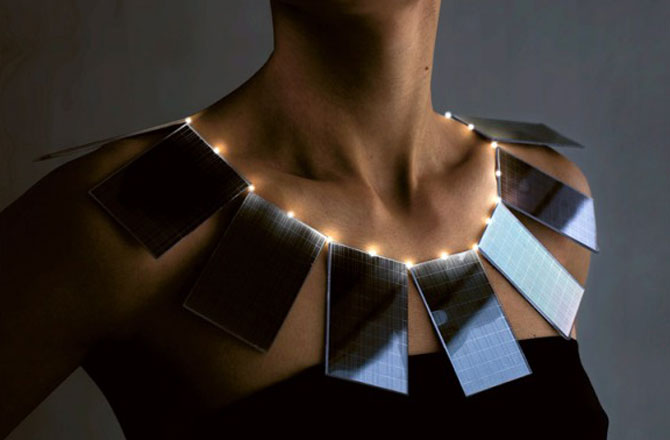
Solar-powered wearables will need to get more durable if they’re going to be practical.
Solar technology’s sleek lines and deep colors are tempting to designers who have incorporated solar cells into purses, necklaces, jackets and mini-dresses. That technology tends to be more high fashion than high function. Charging a phone in a jacket that has a solar power component can take hours. Solar-powered clothing companies have come and gone. Kalejs said that organic solar cell material wears out in a few years so even if the fashion looks timeless, the tech isn’t. He remembered seeing a company that turned spherical solar beads into jewelry and said he can still see how it would appeal to consumers.

Solar arrays could be installed in the open land than runs alongs roads.
Oregon Department of Transportatio
Roads and highways are a natural lure for solar technology innovators. Asphalt does a great job at absorbing and storing heat. Plus there’s so much of it around already — the infrastructure is there. Several years ago engineers and chemists at the University of Rhode Island created a project to develop ideas for harvesting solar heat from roads. Their suggestions included placing flexible photovoltaic cells on concrete highway dividers and installing water pipes in asphalt. At the same time, the company Solar Roadways wants to embed solar panels directly into roads.
Kalejs was highly skeptical of that, calling it a poor use of solar modules. However, solar modules could be put in conventional arrays beside the road, he said, as they’ve done in Oregon. There’s no shortage of land for that.
Follow our FISHING BLOG
WEB RATES FISH HUNT CABINS PHOTOS
TESTIMONIALS BROCHURE HUNT BOOKLET


