RSS

Monthly Archives: April 2016

Jack Knife Smartphone Bow Mount

For the tech savvy and no tech savvy alike, this seems like it would be a great asset to have in the field to relive the memory or analyze any errors that were made.  Those of you that have used it or a product similar, feel free to leave comments in the section below with your experiences 🙂

JackKnife Smartphone Bow Mount

Don’t wait until you get home to see your latest adventure or share with friends…

Social media live in the woods!

Thanks to the new patent-pending Jack Knife Smartphone bow mount from S4Gear, hunters will no longer have to wait to get home to see their latest adventure. Mounted off the sight mount, the Jack Knife allows hunters to use their phone to film their hunts from the hunter’s eyes. With the ability to view and share their footage filmed right from their bow, its social media live in the woods.

• View your placement before you track your animal
• Use your Smartphone as a training device.
• Sight mounting bracket placement records video from
the hunter’s eyes
• Use in addition to other camera to incorporate split screens in final video pieces

*Before use of the product, be sure to consult your local hunting regulations as there may be restrictions on the use of electronic devices while hunting.

Follow our HUNTING BLOG

WEB   RATES     FISH    HUNT    CABINS    PHOTOS
TESTIMONIALS    BROCHURE    HUNT BOOKLET

Enter your email address to subscribe to this blog and receive notifications of new posts by email.


Tags: , , , , , , ,

Coolest Brand Cooler

coolest-new-inventions892942423-oct-17-2014-1-600x450

Now this might not be good for your stand directly (blender and all LOL!)  But it would be great to have on location for spike camps etc.  Great idea!

Follow our HUNTING BLOG

WEB   RATES     FISH    HUNT    CABINS    PHOTOS
TESTIMONIALS    BROCHURE    HUNT BOOKLET

Enter your email address to subscribe to this blog and receive notifications of new posts by email.


Tags: , ,

Bacon Wrapped Moose Tenderloin

Ingredients

Moose tenderloin
Dates
Goat cheese

Marinade

1 Tbsp. mustard
1 Tbsp. honey
1/2 tsp. minced garlic
4 dashes of Worcestershire sauce
1 cup red wine

Saskatoon Glaze

1/2 cup Saskatoon berries ( you can use blueberries if Saskatoon’s are not available in your area)
3/4 cup red wine
1 Tbsp. maple syrup

moose-rolls2-copy-600x400


Rub tenderloin with mustard, combine remaining ingredients and pour over top.  Use a marinating container that and flip back and forth every so often.  Let marinade at least 4 hours or overnight.

Next stuff dates with goat cheese.  If you have un-pitted dates, simply cut the top off, using a pair of tweezers, pull the pit out.  Use a baby spoon to stuff the goat cheese in, it works quite well, the tip of the spoon was perfect for starting to put the cheese in and then using the handle end to push the goat cheese down, worked like a charm!

Thinly slice the tenderloin and then wrap around the dates and secure with toothpicks.  Place on parchment paper on a cookie sheet.

Preheat oven to 350 degrees.

Place berries, maple syrup and red wine in a pot on high heat.  Bring to a boil and let simmer for 3-5 minutes, spoon the juice over the dates and bake for 10-15 minutes(or until meat is cooked to your preferred done-ness), baste with glaze at least once during baking time.

Remove and enjoy … best eaten while warm!

This is the perfect appetizer for any party….your guests won’t even know its moose!

Follow our FISHING BLOG

WEB   RATES     FISH    HUNT    CABINS    PHOTOS
TESTIMONIALS    BROCHURE    HUNT BOOKLET

Enter your email address to subscribe to this blog and receive notifications of new posts by email.


Tags: , , , , , , , , , , ,

Wild Mushrooms

The main edible find in our region is  lobster mushrooms, Hypomyces lactifluorum, in some pretty good quantities. On any hunt, it’s good to bring home dinner, but one doesn’t typically expect to bring home a bundle of lobsters too late into the fall.

lobster-mushrooms-wawang-lake

Typically, by the end of August and into September the brush is filled with mushrooms, edible and not. Unlike spring hunting, fall hunting in and around our area is more mushroom identifying than actually trying to find mushrooms growing. But some year the lobsters can account for a major harvest.

This slideshow requires JavaScript.

So on your next trip out into our region whether you’re fishing or grouse hunting be sure to hike the old logging roads in search of these very delicious mushrooms.  Stay tuned for a great recipe that easy to prepare.


WEBSITE    RATES     FISH    HUNT    CABINS    PHOTOS
TESTIMONIALS    BROCHURE    HUNT BOOKLET

Enter your email address to subscribe to this blog and receive notifications of new posts by email.


Tags: , , , , , ,

Ontario’s Ruffed Grouse

Ruffed GrouseAlthough sometimes regarded as “wilderness” birds, Ruffed Grouse have no aversion to living in close proximity to humans if the cover gives them adequate security. In some areas of Ontario, Canada –  Ruffed Grouse are more abundant in remote wilderness forests. They thrive best where forests are kept young and vigorous by occasional clear-cut logging, or fire, and gradually diminish in numbers as forests mature and their critical food and cover resources deteriorate in the shade of a climax forest.

Ruffed Grouse response to man varies greatly across their range, depending upon their experiences. In southern Ontario generally they are usually quite elusive and difficult to approach. Yet they can still be killed with a canoe paddle or thrown stones in NW Ontario wilderness forests.

When the ground is bare of snow, Ruffed Grouse feed on a wide variety of green leaves and fruits, and some insects. They have also been known to eat snakes, frogs as well. But when snow covers the ground as it does for most of the winter across the major portion of their natural range, Ruffed Grouse are almost exclusively “flower-eaters,” living on the dormant flower buds or catkins of trees such as birches and pin cherry bush’s.

Known as solitary in their social behavior they do not develop a pair-bond between males and females, although there is usually at least one hen in the woods for every male. Young birds, especially, collect in temporary, loose flocks in the fall and winter, but this is not equivalent to the covey organization of the quails and partridges.

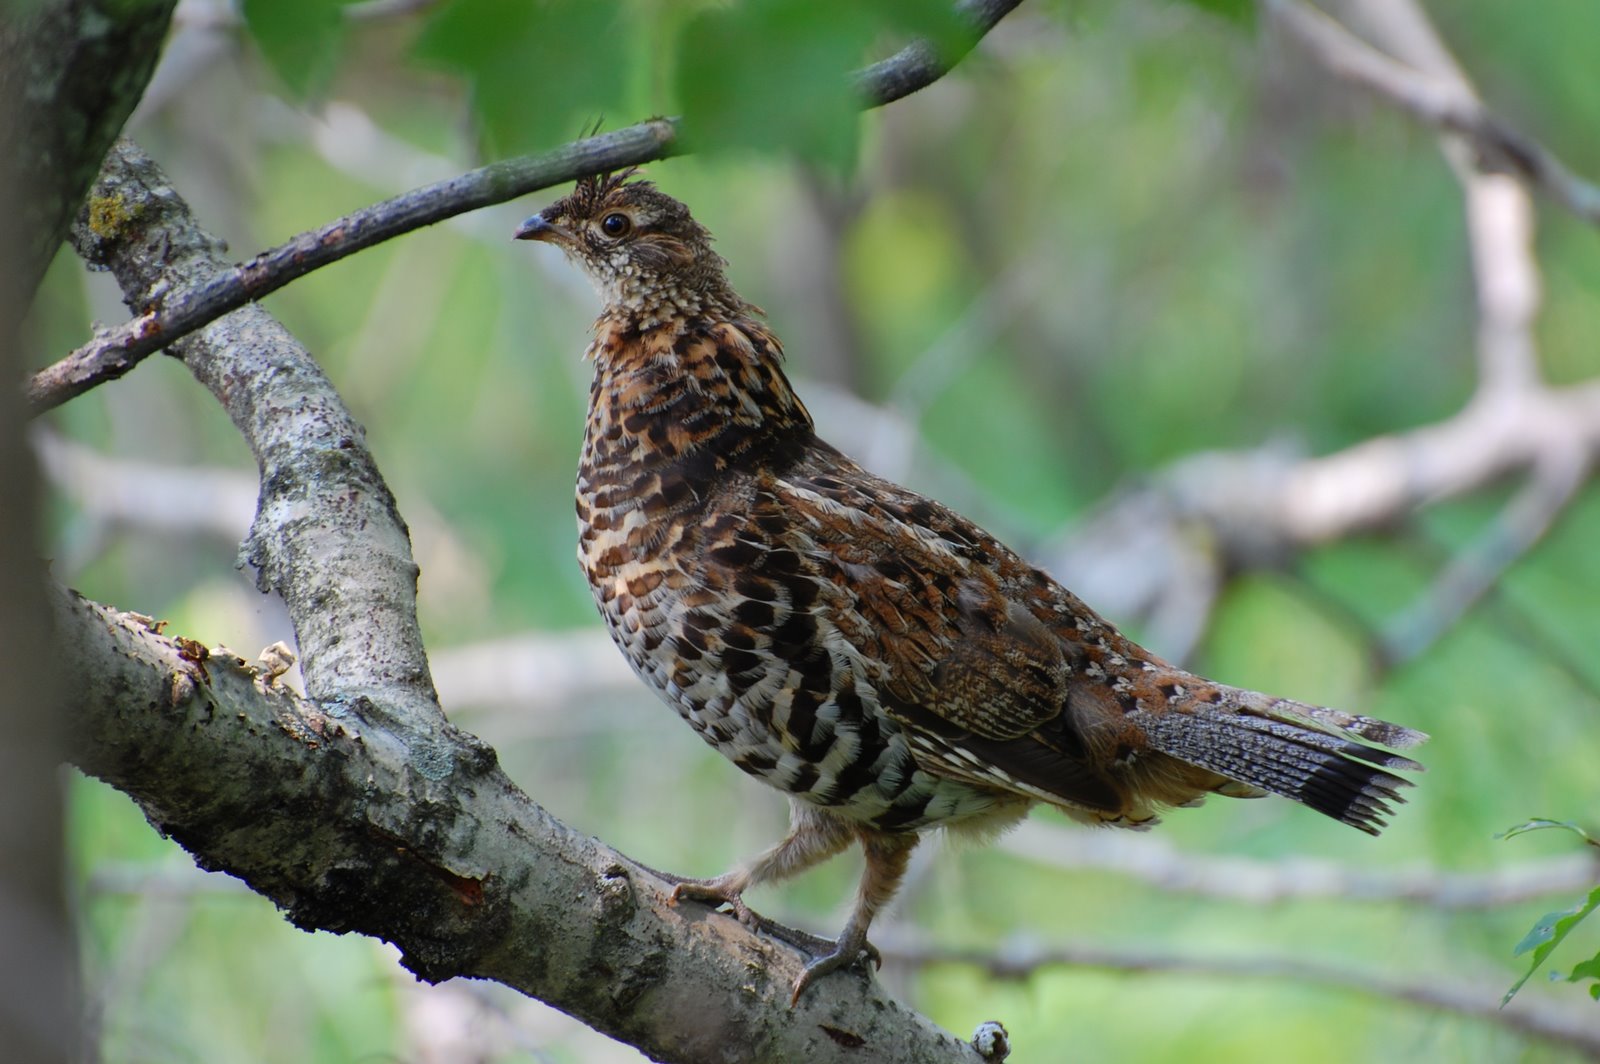
Male Ruffed Grouse are aggressively territorial throughout their adult lives, defending for their almost exclusive use a piece of woodland that is 6-10 acres in extent. Usually this is shared with one or two hens. The male grouse proclaims his property rights by engaging in a “drumming” display. This sound is made by beating his wings against the air to create a vacuum, as lightning does when it makes thunder. The drummer usually stands on a log, stone or mound of dirt when drumming, and this object is called a “drumming log.” He does not strike the log to make the noise, he only uses the “drumming log” as a stage for his display.

The drumming stage selected by a male is most likely to be about 10-12 inches above the ground, in moderately dense brush, (usually 70 to 160 stems within a 10 ft. radius) where he can maintain unrestricted surveillance over the terrain for a radius of about 60 ft. Across much of the Ruffed Grouse range there are usually mature male within sight in the forest canopy overhead.

Drumming occurs throughout the year, so long as his “log” is not too deeply buried under snow. In the spring, drumming becomes more frequent and prolonged as the cock grouse advertises his location to hens seeking a mate. Listen to an example at the top of this page.

Courtship is brief, lasting but a few minutes, then the hen wanders away in search of a nest site, and there is no further association between the male grouse and his mate – or the brood of chicks she produces. A hen may make her nest more than 1/2 mile from the log of her mate.

Nests are hollowed-out depressions in the leaf litter, usually at the base of a tree, stump or in a clump of brush. The nest is usually in a position which allows the hen to maintain a watch for approaching predators. Sometimes hens will nest under logs or in brush piles, but this is less common, and a dangerous location.

A clutch usually contains 8 to 14 buff colored eggs when complete. Eggs are laid at a rate of about one each day and a half, so it may take 2 weeks for a clutch to be completed. Then incubation, which usually commences when the last egg is laid, takes another 24 to 26 days before the eggs hatch. A nest has to be placed so that it will not be discovered by a predator during a period of at least 5 weeks.

The chicks are prosocial, which means that as soon as they have dried following hatching they are ready to leave the nest and start feeding themselves. Grouse chicks are not much larger than a man’s thumb when they leave the nest. They are surprisingly mobile and may be moving farther than 1/4 mile a day by the time they are 3 or 4 days old. They begin flying when about 5 days old, and resemble giant bumble bees in flight. The hen may lead her brood as far as 4 miles from the nest to a summer brood range during its first 10 days of life.

Although grouse broods occasionally appear on roadsides, field edges or in forest openings, these are hazardous places for young grouse to be, and broods survive best if they can remain secure in fairly uniform, moderately dense brush or sapling cover.

wawanggrouse1
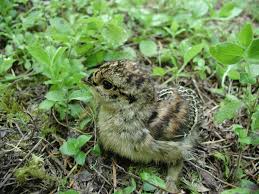
The growing chicks need a great deal of animal protein for muscle and feather development early in life. They feed heavily on insects and other small animals for the first few weeks, gradually shifting to a diet of green plant materials and fruits as they become larger. Chicks grow rapidly, increasing from about 1/2 ounce midgets when hatched to 17-20 oz. fully grown young birds 16 weeks later. That is a 38 to 46 fold increase in weight. At 17 weeks of age, a Ruffed Grouse is almost as large and heavy as it will ever be.

Biologists and others who want to age Ruffed Grouse rely upon certain peculiarities of the molt of the primary flight feathers. The booklet A Grouse in the Hand explains this aging procedure. And following the first complete molt by a 14 to 15 month old adult grouse, there are no known physical characteristics which reliably identify the age.

When about 16 to 18 weeks old, the young grouse passes out of its period of adolescence and breaks away to find a home range of its own. This is the second and last time that Ruffed Grouse are highly mobile. The young males are the first to depart, when they range out seeking a vacant drumming territory, or activity center, where they can claim a drumming log. Most young males find a suitable site within 1.8 mi. of the brood range where they grew up, although some may go as far as 4.5 mi. seeking a vacant territory. Many young cocks claim a drumming log by the time they are 20 weeks old; and once they have done so, most will spend the remainder of their lives within a 200 to 300 yard radius of that log.

Young females begin leaving the brood one or two weeks later than their brothers, and they normally disperse about three times as far. Some young hens move at least 15 miles looking for the place where they’ll spend the rest of their lives.

Occasionally a hen and her brood will remain together as late as mid-January, but this is unusual, and most groups of grouse encountered in the fall and winter are composed of unrelated individuals who gather together temporarily to share a choice food resource or piece of secure cover.

In fall and winter some inexperienced young grouse frightened by a predator or something else, crash into buildings, trees or through windows in a so-called “crazy-flight.” Sometimes they are evidently simply trying to take a short-cut when they can see through two large windows on the corner of a house. After all, young grouse in their first fall have never been confronted by something that can be seen through but not flown through, such as glass!

 WEBSITE    RATES     FISH    HUNT    CABINS    PHOTOS
TESTIMONIALS    BROCHURE    HUNT BOOKLET

Enter your email address to subscribe to this blog and receive notifications of new posts by email.


Tags: , , , , , ,

Where to Place Your Trail Cams

A trail camera won’t stumble through a bedding area, leave scent all over a trail, or exaggerate the size of a rack. And it’ll never oversleep. But your perfect little scouting buddy must be chosen wisely and placed carefully if you want to pattern that old, crafty animal you know is around. Here’s how…

CameraNO_MosaicYELLOW

The earlier version trail cameras were just a 35mm film point-and-shoot tucked in a weatherproof housing. It snapped a single picture when something triggered the sensor. After retrieving the camera, you ran to the one-hour shop to get the film developed, then thumbed through a week’s worth of pictures. More than once a stack of 36 prints revealed a handful of out-of-focus animals and a couple dozen shots of a wind-whipped brush or a drooping tree branch. That was only a few years ago.

Today, many website boasts several pages of trail cams, and even the cheapest one outperforms the original older ones. They have lenses sharp enough to count the ticks on a deer’s neck, electronic circuit boards so efficient that four AA batteries will run a unit for months, and memory cards that hold thousands of pictures you can download to your computer or delete at the touch of a button. And those are standard features on mid-priced cameras. The high-end ones will send a photo to your cellphone or laptop.

Like everything in the digital age, trail-cam technology has improved, competition has become fierce, and prices have plunged. Still, $200 is plenty of money, and matching a camera with the right features to meet your needs is critical. And even the best camera can’t take spectacular photos of a trophy buck if you don’t set it properly. But it’s not difficult to get started. These are the basics.

TrailCameras3
Wildlife biologists use trail cams to measure herd densities, buck-to-doe ratios, and the like. Your goals should be simpler: learning about the deer on your property, figuring out where to hunt them, and having fun in the process. You can pinpoint ideal spots before you buy a camera, and the locations you choose can determine what model is best for you. Here are four sites for four different periods.

Time: Late Summer
Site: Mineral lick
Goal: To start an inventory of buck numbers and quality on your property.
Setup: Find a spot with moderate to heavy deer traffic and spade up dirt in a 2-foot circle. Pour in half of an ice-cream pail of stock salt or commercial deer mineral and spade it into the loosened soil. Pour the rest on top.
Tips:
• Establish one or two licks per 80 acres. Allow deer up to a week to find them.
• Situate each lick 10 to 30 feet from a tree for mounting a camera.
• Jam a stick behind the camera’s top edge to point it down toward the lick.

500Time: Early Season
Site: Mock scrape
Goal: To find bucks after velvet shed, when they often relocate. Mocks can draw up to 90 percent of the bucks you’ll hunt.
Setup: Rake grass and forest debris 5 feet away from a tree that has a green, overhanging licking branch 5 to 7 feet above the ground. Activate with your own “product” (drink plenty of liquids) or deer urine.
Tips:
• If you are not getting clear shots of a buck, aim the camera at the licking branch. Most bucks will work it with their antlers.
• Establish multiple scrapes in each area and hang cameras only on the most active ones.

Time: Rut
Site: Funnel
Goal: To determine where resident bucks are traveling and whether traveling bucks are in the area.
Setup: Find terrain features that channel buck movement and hang a camera near fresh tracks and rubbing activity. Check camera every three to five days—the rut moves quickly.
Tips:
• Mount camera at a 45-degree angle to the trail. Bucks often move through funnels quickly; a camera set perpendicular to the trail might miss the shot.
• Scuff dirt in front of the camera with a boot. Such a mini mock will often make a moving buck pause and get “shot.”

Time: Late Season
Site: Food source
Goal: To find out where to fill a last-minute tag, and to know which bucks have survived the bulk of the hunting season.
Setup: Scout widely to find the hot food sources in your area, such as waste grainfields and clear-cuts. Place camera within 30 feet of the most heavily trafficked area. Load it with fresh batteries if you hunt in an extremely cold area.
Tips:
• Set up and check cameras at midday to avoid spooking feeding deer.
• If no trees are located near the food source, mount the camera on a tripod and camouflage it with grass or brush.

Make the Next Shot Count!

Follow our FISHING BLOG

WEB   RATES     FISH    HUNT    CABINS    PHOTOS T
ESTIMONIALS
    BROCHURE    HUNT BOOKLET

Enter your email address to subscribe to this blog and receive notifications of new posts by email.


Tags: , , , , , ,

Basic Commands for Retrievers

train 1

One of the most common mistakes amateur retriever trainers make is rushing the learning process. The temptation to get a young dog out in the field as soon as possible can be hard to resist. Born with an innate retrieving drive, the pup is already raring to go. And with hunting season only months away, you may be just as eager to start running retrieving drills.

Before you jump headlong into field work, however, make sure your dog has mastered the fundamentals of obedience. Be patient and take it slow. There are no shortcuts. To be able to perform advanced tasks, a retriever must first learn to follow basic commands. Repetition and consistency are the only sure ways to build understanding and trust.

Here are a few brief commands that will help set the stage for your retriever’s future training and hunting success:

1. Here

Some trainers use the word come instead. Whatever word you use, your dog must learn that this is an unconditional command, not a request. Get a 20- or 30-foot check cord and attach one end to your pup’s collar. Hold the other end in your hand and walk several paces away from the dog. Say the command here. If the dog does not move in your direction, begin pulling him toward you with the check cord. Be firm but not rough. Repeat this exercise several times until the dog learns to come to you without hesitation. Remove the check cord and repeat the exercise again. Praise the pup when he does well to help make this lesson as much fun as possible.

2. Sit

This command can be incorporated into your pup’s feeding regimen. Hold the food bowl in one hand and say sit while pushing down on the dog’s rear end with your other hand. When the dog sits, place the bowl in front of him on the floor. The pup will quickly learn that the reward for sitting is food, which is a great motivator.

3. Stay

You can teach stay as an extension of the sit command. While the dog is sitting, hold your hand out toward him with your palm facing outward and say stay. Walk away, wait a minute, then call the pup to you. Gradually extend the length of time the dog remains in the sitting position. If the pup breaks and runs to you without being called, take him back to the spot where he was originally sitting and start the lesson over again. Never allow your dog to think that staying put is optional. He should remain in place until released.

4. Kennel

This lesson is easy. When putting your pup in his crate, simply say kennel. Once the dog learns to associate this word with entering the friendly confines of his kennel, you can use it when loading him into a vehicle, boat, dog hide, blind, and other such places. The key is to make the crate as attractive as possible from the get-go. You can do this by placing a blanket and a treat inside to entice your puppy to enter it.

5. Heel

Your retriever should be trained to walk at your pace and not drag you down the street. That’s the purpose of the heel command. Begin walking with your pup on a lead. He should always be on your left side. When he quickens his pace and pulls ahead, say heel and pull him back toward you with the lead. Repeat this lesson each time he moves ahead of you. If you stop walking, your dog should stop and sit down beside you.

6. No

This command should be used to discourage undesirable behaviors such as chewing on furniture, jumping on people, messing in the house, and similar indiscretions. Be sure to say it loudly and emphatically. Your dog should not have any doubt about what you mean when you say no.

train5

In no time you and your retriever will be working together & what a hunting team that will be!

Follow our HUNTING BLOG

WEB   RATES     FISH    HUNT    CABINS    PHOTOS
TESTIMONIALS    BROCHURE    HUNT BOOKLET

Enter your email address to subscribe to this blog and receive notifications of new posts by email.


Tags: , , , , , ,

Big Binoculars: The Advantages

images22Back in the 1970s, an uncle once told me that one of the most useful things any big-game hunter could own was a binocular in the 15×60 range. He said he never went elk hunting without one, and because I always did everything he said, I rushed right out and bought a Zeiss porro prism glass in 15×60 and it was exactly as he said, a highly specialized but invaluable tool if the circumstances were right.  Of course, like a jerk, I sold them some years later, but recently I traded a lot of stuff and coughed up some cash and got another big glass in the same power range.

What a major binocular will do is let you see when it is very dark, and let you see in detail at long range, or in great detail at medium range. On my recent trip to Kansas, the hunter who shared the blind with me had a 10×40 binocular of the first caliber, and I had a 15×60. In practical terms, what it would do was this:

At last light, when it was too dark to shoot, if we could see a deer I could tell if it was a buck or a doe. Fifteen minutes earlier, when he could see if it was a buck or a doe I could see if it was a big buck or a little buck. Fifteen minutes before that, if he could see whether it was a big buck or a little buck, I could count the points and evaluate the rack in excruciating detail.

images33

In some cases, a spotting scope is better. If you’re glassing miles of country, there is nothing that can take the place of 40X. However, at the intermediate ranges, say, 300 to 1,000 yards, a big binocular lets you spot things faster, lets you use both eyes, and is a lot smaller and lighter than most spotting scopes. They’re not cheap, but under the right conditions, big glasses are more than worth it.

Follow our FISHING BLOG

WEB   RATES     FISH    HUNT    CABINS    PHOTOS
TESTIMONIALS    BROCHURE    HUNT BOOKLET

Enter your email address to subscribe to this blog and receive notifications of new posts by email.


Tags: , , , , , , , , ,

On Target: How to Make Your Own Arrows

While doing some of my own research, we came across a fantastic article for all of you archers out there that have wondered about manufacturing your own arrows.

This article is reproduced from Edersbows.com, take some time to check them out 🙂 

arrows

Building your own arrows allows you to save about 5 to 1 0 dollars per dozen, but there’s an even better reason for building your own. You can experiment with all the components, with the various fletching styles and shaft sizes until you find the perfect arrow for your bow and your hunting or 3-D shooting requirements.

Building arrows is easy and fun, not to mention the satisfaction you’ll gain from taking game with arrows you’ve crafted yourself. Anyone can do it – and do it well. Armed with only a few basic tools and the information offered here, you’ll have no problem turning raw shafts into top-quality hunting arrows.

Nock Installation

nock
Year’s ago nocks were all glued on, now most arrows offer pressure-fit nocks that fit snugly but are turnable. Tunable nocks are definitely the way to go. These systems will make tuning a lot easier, and they hold up to more hard shooting than will glue-on nocks.

Assuming you aren’t going to paint (crest) your arrows, nock installation is the first step in the arrow building process. Use hot melt glue or epoxy when installing bushings into aluminum. When installing them in (or over) carbon shafts, use a rubber-based epoxy such as that available from Beman or Arizona Archery Enterprises (AAE).

Regular glue-on nocks should be pressed firmly into place (without glue) until after the fletching has been attached. When the arrow is finished you can rotate the nocks to the proper orientation so the fletching clears your rest and then glue them in place. Bohning Fletch- Tite works fine for this.

Apply The Fletching

fletching
You need a fletching jig, but it doesn’t have to be fancy. I’ve had good luck with the $20 plastic Martin jig I bought more than 10 years ago. Other good ones are made by Bohning, Bitzenburger and Grayling. You have three clamp options: left helical, right helical and straight

(no helical). For hunting and 3-D shooting, right helical is the most popular choice. If you’ll be using feathers, make sure to order feathers from the same wing as the clamp (right helical takes right wing). Vanes are manufactured straight and can be used with any clamp, so you don’t have to specify left or right when ordering.

One of the best fletching adhesive I’ve used for vanes is Fast-Set Gel made by AAE. This is a super-glue product that sets up in only 10 seconds allowing you to use a single-clamp jig and still fletch a dozen arrows in mere minutes. Fast-Set Gel will work on all shaft styles except AFC’s film-dipped carbon arrows, which require a traditional cement such as Bohning’s Fletch-Tite. Of course, Fletch-Tite will also work on aluminum arrows but takes about 10 minutes per fletching to set-up before you can remove the clamp. Fletch-Tite is still the best choice for feather fletching, however.

Place your fletching in the clamp so that its back edge will be about 3/4 inch ahead of the nock taper or nock bushing on your arrow. Adjust the back of the magnet on your jig (the magnet holds the clamp in place while the glue dries) inward or outward until the tail of the fletching sits squarely on top of the arrow. Next, adjust the forward end of the magnet to achieve the desired amount of helical. Easton’s technical representatives recommend four to five degrees of helical. I use a bit more myself – probably closer to seven degrees – but this is only on large diameter aluminum arrows. On smaller diameter carbon arrows I stay closer to Easton’s standard.

When using a straight clamp, (as opposed to a helical clamp) you don’t have as much lee-way and must either install your fletching perfectly straight or with a very slight off-set.

After your fletching is installed, apply a small dab of adhesive to both ends of each for a little added insurance against tearing loose.

You have more freedom to experiment with your fletching style and degree of helical than with any other aspect of arrow building, but it’s still best to observe a few general ground-rules. When making aluminum arrows for hunting, stick with four to five inch fletching. Five inch is a bit better because (in theory at least) it offers a small amount of added stability which can make a difference when shooting broadheads.

Carbon arrows, because of their smaller diameter, work best with shorter fletching (four inch is a good starting point) or you can run into a contact problem when trying to pass long helical fletching through the narrow gap in your rest. You can also experiment with various fletching orientations, such as 70/110 degree four-fletch, (you make this change by inserting a different indexing template into your fletching jig). But the basic 120 degree, three-fletch will do just fine under almost every shooting situation.

Cutting Arrows To Length
Draw an arrow and have someone mark it about a half to 3/4 inch in front of the rest. Cutting arrows is easy with the right equipment, but with the wrong equipment it can be a real headache. For limited quantities of aluminum arrows you can get by with a small rotating pipe cutter. I’ve done it a few times, but I’ve also made some pretty rough cuts, and basically ruined some arrows, in the process. You’re far better off pooling your money with a couple of buddies and getting an electric cut-off tool. You can also take your arrows to a pro shop (that’s equipped with an electric cut-off tool) to have them sized – usually for a price.

Installing Inserts and Outserts
Inserts and outserts (outserts are used with some types of carbon arrows) shouldn’t be taken for granted. Consistent accuracy with broadheads can be difficult to achieve when these components fit loosely. Inserts and outserts should install without any free-play. Usually you don’t have too many options with outserts – you get what the arrow maker offers – but you do have options with inserts. I’ve had good luck with aluminum inserts from Easton and Saunders and composite inserts from AAE. Inserts should have a light press-fit with the inside of the shaft so that each broadhead you screw in will line up perfectly with the shaft.

Aluminum inserts used in aluminum or ACC carbon arrows should be installed with hot-melt glue. Composite inserts in aluminum work best with a rubber-based epoxy, and the same applies for aluminum into carbon (Beman ICS or Gold Tip Graphite XT arrows) or when installing metal outserts on conventional all-carbon shafts. When you’re finished you can install a broadhead and spin test your arrows to make sure the inserts are properly aligned.

Take some time to visit http://www.eders.com/ to view their catalogue of parts and equiptment to assist you in your build.

lead_materials

Armed with the information above, you could now have a weekend hobby 🙂


Follow our FISHING BLOG

WEB   RATES     FISH    HUNT    CABINS    PHOTOS
TESTIMONIALS    BROCHURE    HUNT BOOKLET

Enter your email address to subscribe to this blog and receive notifications of new posts by email.


Tags: , , , , ,

8 Ways to Harness Solar Energy

So much energy, so few solutions

1

The sun is the biggest source of renewable energy.

Solar power has become fairly pedestrian since the first photovoltaic cells came out of the lab in the 1950s. Today, utility-scale solar farms soak up the sun and photovoltaic panels dot rooftops across the world. The power generation is finding its way into transportation, too, alongside other clean-burning fuels like hydrogen. Just a few years ago, the Solar Impulse prototype plane flew nonstop without any fuel from San Francisco to New York. And companies like Toyota are looking to bring hydrogen cars mainstream.

Crazy Solar Power Plants

Crazy Solar Power Plants

“The U.S. was really the pioneer of the whole global solar photovoltaic industry,” said Juris Kalejs, an IEEE member and CTO of the Lowell, Massachusetts-based solar developer American Capital Energy. Having worked in photovoltaic technology development for more than 30 years, Kalejs has seen wild ideas come and go. The energy crisis of the 1970s spurred dozens of pie-in-the sky ideas, he said. But that hasn’t stopped people from innovating. Here’s his grounded take on highly unusual ways to harness solar power today.

Andre Broessel designed glass spherical lenses filled with water that act like solar concentrators.

The Los Angeles-based startup V3Solar made the news rounds last year with its literal spin on solar. Slick renderings showed a design for deep blue solar cells in a cone shape that could rotate. The company says they want to take photovoltaics from flat and static to 3-D and dynamic. A new video V3Solar put out this summer had more details about how its spinning mechanism could maximize energy generation.

Kalejs said he said he thought the setup could work but he was skeptical about the complexity. “It looks like something that’s a nice decorative piece you might find in a fountain,” he said. The company said it would show its prototypes to potential investors with a non-disclosure agreement.

Other designers are imagining different shapes for traditionally flat solar panels. Going rounder could mean capturing sunlight from every possible direction. Last year the Japanese optics company Kyosemi launched Sphelar Power to manufacture micro-spherical solar cell beads from discarded silicon and electrodes that are wired into a mesh. André Broessel, an architect at solar architecture company Rawlemon in Barcelona, designed glass spherical lenses filled with water that act like solar concentrators both large and small.

Kalejs called Broessel’s idea a neat one that would appeal to consumers but pointed to companies attempting a similar technology with 20-foot-diameter solar concentrators. “It’s a very tricky system to make and you need to make it on a large scale to make it cost effective,” he said.

Minuscule solar panels placed on microbes could create a chemical reaction akin to artificial photosynthesis

Minuscule solar panels placed on microbes could create a chemical reaction akin to artificial photosynthesis

Scores of scientists are working on artificial photosynthesis by developing systems that chemically convert sunlight, water and CO2 into oxygen and plant fuel. Unfortunately, photosynthesis has less than a percent efficiency versus 20 percent to 30 percent for regular solar cells, Kalejs pointed out. The risks with artificial plants and microbes are also quite high because a disease or fungus could wipe everything out.

British researchers from the University of East Anglia announced earlier this year that they’re working on artificial photosynthesis by placing minuscule solar panels on microbes in an effort to create hydrogen for fuel. Kalejs said he found their approach interesting and added that he’s attended National Science Foundation meetings where attendees discussed putting photosynthetic material on top of a solar cell. “Everybody’s been looking for a boost,” he said.

 Reusable peel-and-stick solar cells can be made easily and affixed to just about anything solid.


Reusable peel-and-stick solar cells can be made easily and affixed to just about anything solid.

Effective transparent and thin-film solar cells have been on the technology wish list for a long time. Several companies have already started manufacturing flexible solar panels but rigid ones remain more affordable and easier to produce, resulting in high quality. Earlier this year Stanford University and the U.S. National Renewable Energy Laboratory came up with reusable peel-and-stick solar cells that can be made easily and affixed to just about anything solid: toys, helmets, transistors and even business cards. The resulting power is still relatively small, though.

Kalejs cautioned that sunlight breaks down materials made with polymers, making the technology unstable. “It’s a short-life product right now,” he said. “The organic solar cells probably wouldn’t last more than a year or two, if that long.”

Bottle Charger is a way to recharge cell phones using a water bottle filled with boiling water and a mini-turbine

Bottle Charger is a way to recharge cell phones using a water bottle filled with boiling water and a mini-turbine

One person’s trash represents solar tech treasure for someone else. Last year blogger and tech writer Ryan Matsunaga posted step-by-step instructions on how to convert a water bottle into a solar lantern for $2. In February, Kenyan designers launched a Kickstarter campaign around the Bottle Charger, a way to recharge cell phones using a water bottle filled with boiling water and a mini-turbine. Although the initial prototype simply required a temperature differential, the designers hoped to integrate a small solar dish that could heat water with sunlight continuously during the day.

“I have no idea how cheap or stable it is,” Kalejs said of the Bottle Charger idea. “I guess you’d say, well if it works, use it.”

Solar-powered wearables will need to get more durable if they're going to be practical.

Solar-powered wearables will need to get more durable if they’re going to be practical.

Solar technology’s sleek lines and deep colors are tempting to designers who have incorporated solar cells into purses, necklaces, jackets and mini-dresses. That technology tends to be more high fashion than high function. Charging a phone in a jacket that has a solar power component can take hours. Solar-powered clothing companies have come and gone. Kalejs said that organic solar cell material wears out in a few years so even if the fashion looks timeless, the tech isn’t. He remembered seeing a company that turned spherical solar beads into jewelry and said he can still see how it would appeal to consumers.

Solar arrays could be installed in the open land than runs alongs roads. Oregon Department of Transportatio

Solar arrays could be installed in the open land than runs alongs roads.
Oregon Department of Transportatio

Roads and highways are a natural lure for solar technology innovators. Asphalt does a great job at absorbing and storing heat. Plus there’s so much of it around already — the infrastructure is there. Several years ago engineers and chemists at the University of Rhode Island created a project to develop ideas for harvesting solar heat from roads. Their suggestions included placing flexible photovoltaic cells on concrete highway dividers and installing water pipes in asphalt. At the same time, the company Solar Roadways wants to embed solar panels directly into roads.

Kalejs was highly skeptical of that, calling it a poor use of solar modules. However, solar modules could be put in conventional arrays beside the road, he said, as they’ve done in Oregon. There’s no shortage of land for that.

Follow our FISHING BLOG

WEB   RATES     FISH    HUNT    CABINS    PHOTOS
TESTIMONIALS    BROCHURE    HUNT BOOKLET

Enter your email address to subscribe to this blog and receive notifications of new posts by email.


Tags: , , , , , , , , ,

 
%d bloggers like this: