RSS

Category Archives: do it yourself

Wild Plants to Cure the Flu and Common Cold

Can’t make it to the drug store right now? Whatever the reason, you do have some natural medicinal options in the winter season. Look for these three plants to lessen the symptoms and shorten the duration of your next case of the cold or flu. All you need is a sharp eye and a patch of wild growth to find these common and potent medicinal’s.

Mullein 
Mullein is a native plant, which favors dry, rocky soil and full sunlight, and is found throughout North America. An easy way to spot patches of this plants in cold weather is to look for the chocolate brown skeletons of the second-year plants. Look for 4- to 6-foot-tall stalks, which often have branching flower heads that resemble the arms of a saguaro cactus.

images2KI75GRG

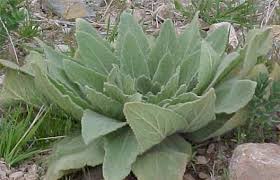
The part you want for medicine are the velvety green leaves, which can still be found in winter growing in basal rosettes on one-year-old plants. Treat head colds by crushing the leaves into boiling water and breathing the steam. This medicated vapor acts as a decongestant.
barberryBarberry
The little red berries of barberry contain a compound called berberine. This acts as an immune system booster, helping your body fight off viral attacks like the common cold and the flu. The bitter taste of the berries isn’t very inviting, but eating a handful each day you’re feeling sick can shorten the illness, much like elderberry and Echinacea will. Look for small bushes with small dangling red berries. The two native varieties of the shrubs will have thorns in sets of three growing all over the twigs. The introduced Japanese species will have single thorns growing around the twigs. All three species can be used medicinally. As an additional point of identification, check the seeds in the red berries. Each berry should contain dark, slender seeds—typically two per berry.


Yarrow

This non-native plant grows from coast to coast on sunny open ground, although it’s originally nativeyarrow to Europe. Its most common use is as a poultice for cuts and other wounds. But you can fight colds and flu with it by making a tea from the leaves. Chop up the fresh leaves and add one tablespoon to one cup of scalding hot water. Soak the leaves for 10 to 15 minutes. You can sweeten the drink if you need to, or drink it commando-style. The anti-viral compounds help your immune system through its battle, while the diaphoretic compounds will get a sweat going to help break fevers.

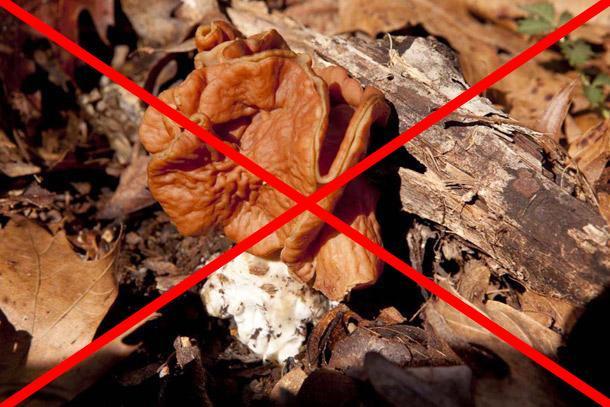
Just make sure you use a field guide or guidance from an expert for positive identification of these plants. The last thing you need to do is poison yourself while you’re already ill.

rosehipsRose Hip Benefits
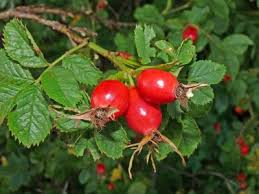
A Rose hip is the fruit of a rose. The wild dog rose is the type of rose most often cultivated for their hips. This plant grows up to ten feet tall and bears a white, very fragrant flower. Once the flower has bloomed, and all the petals have fallen off, the hip is picked and used in a wide variety of preparations. Rose hips are the best source of vitamin C; they contain 50% more vitamin C than oranges.
A single tablespoon of the pulp gives an adult more than the recommended daily allowance of 60 mg. They can be eaten raw, after being put through a blender, or soaked in water overnight and then cooked in the water for about half an hour. Because of the high vitamin C content they are an excellent immune system booster, and are often used as a supplement to prevent or treat a cold. The pulp from rose hips may be used in sauces or made into jelly.

Have you made medicine from wild plants?

Follow our FISHING BLOG

WEB   RATES     FISH    HUNT    CABINS    PHOTOS
TESTIMONIALS    BROCHURE    HUNT BOOKLET

Enter your email address to subscribe to this blog and receive notifications of new posts by email.

← Back

Thank you for your response. ✨

Email Me....


Tags: , , , , , , ,

Making Waterproof Matches

When it comes to matches, waterproof ones are best, especially in dire circumstances like a flood. Since they’re much more expensive than their pedestrian cousins, you might want to make your own.

cabdle

Use the Candle Technique
Burn a candle long enough for a pool of wax to form around the wick. Blow it out, then dip the head of your match into the wet wax, about of an inch (3 mm) up the stick. Remove the matchstick and allow the wax to dry, pinching it closed to form a water-tight seal.

Deploy the Nail Polish Ploy
Coat your matches with clear nail polish to waterproof them. Dip the head of the match and a bit of the matchstick itself into the polish, then rest the match on a counter with the head hanging off the edge to dry. Survive any wilderness situation with these critical tips.

Try the Turpentine Trick
The easiest way to waterproof your matches is simply to drop them in turpentine. Allow the matches to soak for five minutes before placing them on newspaper to dry. After twenty minutes or so, you’ll have waterproof matches that will last several months.

Follow our FISHING BLOG

WEB   RATES     FISH    HUNT    CABINS    PHOTOS
TESTIMONIALS    BROCHURE    HUNT BOOKLET

Enter your email address to subscribe to this blog and receive notifications of new posts by email.

← Back

Thank you for your response. ✨

Email Me....


Tags: , , , , , , , , ,

How to Make a Quick CAN Stove

If you suffer sticker shock after shopping for wood-burning camping stoves, you’re not alone. Why pay $60 to $100 for a titanium backpacking wood stove when you can make one out of a bean can for nothing. Sure, you could build a fire without any containment at all, but the low weight, efficiency, and minimal set-up time of a tin-can stove could make you a believer. And as long as there are sticks to burn, your stove will have fuel. Follow these easy steps, and you’ll have a lightweight bug-out-ready survival stove in no time.

1

The Gear List
To create a bean can stove, you’ll certainly need the empty can. You’ll also need a pair of tin snips. If you don’t have a pair in your tool box, borrow a pair. You’ll also need a tape measure, a pencil or marker, a drill with a ½-inch (or similar size) drill bit, and a file to remove sharp edges when you’re done. Gloves are a good idea, too,  since you’ll be working with a lot of sharp metal.

2

The Procedure
Remove the can lid completely from a 40-ounce (or similar sized) food can. You could use a smaller can, but the 40-ounce size because one-quart water bottles will nest inside the finished stove. Next, make a mark all the way around the can about 1 ½ inches below the open top. Use your tin snips, spiraling in, to cut this ring off the top of the can, but before you start, determine whether you are using right- or left-hand snips. It will be easier if you cut in the correct direction. You could leave the can full height, but I wouldn’t recommend it. A shortened stove has better balance, and the last thing you need is for your stove to tip over.

3

Next, make four equidistant marks around the mouth. Each mark will be the centerline for the four “teeth” on the top of your stove. Mark a line half an inch on either side of each of the four centerlines and draw a line around the can 1 inch down from the mouth. Using the tin snips again cut out the lines,  leaving four 1×1-inch teeth at the top of the can.

Next, drill eight equally-spaced holes around the bottom of the can wall. These will be the air intake vents. File off any sharp or rough edges from your metal work. Finally, before you start cooking food or boiling water over this stove, burn a few twigs for about ten minutes to get rid of the plastic can lining.

4

The Effectiveness
Once your stove is complete, set some tinder in the bottom and some broken twigs on the top of that. Place it in a stable, level spot and light the tinder through one of the vent holes. Place your cooking pot over the top of the stove and cook away. You will have to remove the pot every time you need to add fuel, but this is far better than trying to create stove doors for adding fuel. It also forces you to set the dangerously hot pot out of the way when refueling. This stove can burn twigs, paper, cardboard and any other solid fuel that’ll fit inside; and it boils one quart of water in about eight minutes. The finished stove weighs only 2 ½ ounces.

Follow our FISHING BLOG

WEB   RATES     FISH    HUNT    CABINS    PHOTOS
TESTIMONIALS    BROCHURE    HUNT BOOKLET

Enter your email address to subscribe to this blog and receive notifications of new posts by email.

← Back

Thank you for your response. ✨

Email Me....


Tags: , , , , , , ,

Morel Mushrooms Hunting For The Beginner

Morels are America’s mushroom, more so than any other. It may be because they’re widespread, they’re easy to identify, and they come up in the spring, giving people a reason to get out and enjoy warm weather after a long winter. Or, it could be they’re popular simply because they taste so good. Morels are so prized they sell for up to $20 a pound in grocery stores in most locations. Here’s a quick guide to finding your own. Please note that although morels are easy to identify, this a hunting guide, not a field guide. If you have any doubt about a mushroom, don’t keep it.

3

Found in much of the U.S. from late March through May, the morel is our favorite mushroom: plentiful, easy to identify, and delicious. It has colorful names like Molly Moocher, Miracle, Dry land Fish—or, my favorite, Hickory Chickens—but mostly, people just call them “mushrooms” and it’s understood that means “morels.”

Identifying Safe Morels
MushroomBroken2
MushroomBroken1donteat
Here are two morels in the wild. Notice the pits (in the top photo), the distinctive conical shape, and the way the bottom of the cap (the pitted part) is attached near the bottom of the stem. Avoid the half-free morel (bottom photo), which has a longer stem and a cap that attaches near the top, looking like an umbrella. These mushrooms can cause some people to have cramps or other forms of gastrointestinal distress.

Definitely Don’t Eat This
MushroomX_
Don’t eat this mushroom, which is a false morel and is mildly toxic. Notice that it lacks the cone shape of the real thing, and has wrinkles, not pits, on its cap.

Where to Look
Mushroom4
Morels live in and on the edge of forested areas. Look for ash, aspen, elm, and oak trees, around which morels often grow. Early in the spring as the ground is warming, you’ll find them on south-facing slopes in fairly open areas. As the season progresses, go deeper into the woods and onto north-facing slopes.

8
Well-drained, sandy soils like this creek bottom make good hunting spots as well. You’ll find the first morels of the year when daytime highs reach the 60s and lows stay above 40 degrees.

Hunting Tactics
7

Hunting morels is like bass fishing. You cover ground until you find one, then slow down and search the area carefully. Concentrate the rest of your hunt on similar areas, on the theory that you’ve found the “pattern” for the day.

Early-Season Morels
Mushroom7
The first morels of the season are small. It takes quite a few to make a meal. The acorn top and walnut husk in the hand above help show scale.

Look For Dead Trees
Mushroom8
Morels often grow around dead and dying trees. Old apple orchards make good hunting grounds. Always look around dead elm trees like this one. When a tree reaches the stage of decay where its bark is slipping off its trunk you’ll often find lots of morels around it.

Later in the Season
3
As the season progresses you find bigger, yellow morels. They taste just as good as the smaller ones, they’re easier to spot, and it doesn’t take as many to feed a hungry hunter.

Mushroom10
Soaking morels in water for a couple of hours cleans them and washes out any bugs living inside the hollow mushrooms. Some people slice them in half lengthwise for a more thorough cleaning.

Mushroom11
Here you see morels sautéing in butter. Cooking in butter brings out their rich, almost meaty flavor. If I don’t have very many, I like to scramble them into eggs with some tarragon. Batter-fried morels are also very popular.

Mushroom12

The bounty of spring, fork-ready. Serve with a breast of wild turkey or some fish fillets and it’s totally awesome!

Follow our FISHING BLOG

WEB   RATES     FISH    HUNT    CABINS    PHOTOS
TESTIMONIALS    BROCHURE    HUNT BOOKLET

Enter your email address to subscribe to this blog and receive notifications of new posts by email.

← Back

Thank you for your response. ✨

Email Me....


Tags: , , , , , , ,

Birdhouse That Looks Like a Security Camera

birdhouse-that-looks-like-a-cctv-security-camera-1093

The CCTV Birdhouse is a birdhouse that looks just like a CCTV security camera, and is sure to keep those pesky criminals away, and keep those beautiful loving birds nearby. Now you can live life large knowing that not only are you deterring thieves, rapists, and teenagers from entering your lawn, but with each “camera” you install on your house, a new family of birds gets a new home.

 The CCTV birdhouse is made from durable yet lightweight weatherproof poly resin, is hand painted, is supported by hanging it up by a rope, string, or twine of your choosing, and measures 16cm x 12cm x 25cm.

Follow our FISHING BLOG

WEBSITE    RATES     FISH    HUNT    CABINS    PHOTOS
TESTIMONIALS    BROCHURE    HUNT BOOKLET

Enter your email address to subscribe to this blog and receive notifications of new posts by email.

← Back

Thank you for your response. ✨

Email Me....


Tags: , , , , ,

Winter Camping For Beginners

Winter Camping
Winter camping can mean different things to different people.  For some, it means renting a cabin heated by a wood stove. For oth­ers, it means pack­ing snow­mo­bile trail­ers to the brim. For the more adven­tur­ous, it means grab­bing a pack and haul­ing in all the neces­si­ties to a remote loca­tion. No mat­ter how you win­ter camp, the fol­low­ing tricks are useful.

WEAR A FIRE­PROOF SHELL
If you are going to build camp­fires, either for the sake of cook­ing, warmth, or morale, make sure that your outer layer of cloth­ing is less likely to end up ruined if struck by an errant ember.  Wool is one of the best, most fire-resistant nat­ural mate­ri­als and is great for this.  Down jack­ets are down­right (no pun intended) awful, and you can lose tons of feath­ers this way.

PACK THE SNOW
Before set­ting up your tent, pack down your camp­site. If you have skis or snow­shoes, that means tramp­ing around hard until all the snow is packed.  If you’re shod only in boots this will take some time, but if you don’t do this, you run the risk of step­ping into a soft bit of snow in your tent and tear­ing the floor.

PACK AN EXTRA HAT AND GLOVES
Always carry a spare hat and a set of mit­tens. No mat­ter how dili­gent you are, no mat­ter how reli­gious you are about using idiot strings and keeper cords, you will lose a hat, and you will lose a glove.  Keep a cheap spare, or be pre­pared for frost­bite or a fore­short­ened trip.

EMBRACE THE PEE BOT­TLE.
Being cold can cause you to want to uri­nate more fre­quently, and we all know how incon­ve­nient it is to dis­robe and undo your sleep­ing bag at 0 degrees F.  For women, I highly rec­om­mend look­ing into the var­i­ous acces­sories that allow you to pee whilst stand­ing, and for both gen­ders a WELL-MARKED pee bot­tle will keep you warm and sim­plify your nightly con­ti­nence. For the love of god, don’t con­fuse your water bottle—color is not enough, make sure your bot­tle is well-marked and maybe wrapped in some duct tape.

USE THOSE STAKES
If there is snow, you can stake out your tent.  You can always make dead­men out of sticks or fallen trees, stuff sacks full of snow, buried skis, snow­shoes, poles, ice axes, or what have you.  There is no excuse for a poorly staked-out tent.  If you expect no snow and frozen con­di­tions, plenty of com­pa­nies make hard tent stakes meant to push through frozen ground, either out of tita­nium, steel, or 7075-t6 aluminum.

BRING THE RIGHT SLEEP­ING PAD
As Bear Grylls says, two lay­ers on the bot­tom are worth one on the top.  That is, you lose more heat through con­duc­tive heat loss when sleep­ing than any­thing else, so win­ter is no time to skimp on your sleep­ing pad.  Make sure you have a pad with an r value of four or more, and if you have one, throw a closed-cell foam pad under­neath. If you feel like your pad isn’t cut­ting it, stuff extra cloth­ing under­neath you, and toss your down jacket on top of your sleep­ing bag.

BOIL THE SNOW
Leave your water fil­ter at home.  Chem­i­cal fil­ters take longer to work in the cold, and mechan­i­cal fil­ters can crack and fail. Your best bet for water fil­tra­tion is boil­ing your water, as you prob­a­bly have to melt snow any­way. Don’t be suck­ered into think­ing glacial melt or fresh snow is sterile–it isn’t. Snowflakes often form around small bits of dust (nucle­ation sites) which can be bac­te­ria or viruses float­ing in the upper atmosphere.

SLEEP WITH YOUR BOOTS
Use boots with remov­able lin­ers, so you can put those lin­ers at the bot­tom of your sleep­ing bag to keep them warm.  If you only have single-layer boots, put them in a water­proof stuff sack at the bot­tom of your sleep­ing bag.  Noth­ing means morn­ing hypother­mia more than frozen boots!

CAMP BY CAN­DLE­LIGHT
A can­dle lantern safely hung on the inside of your tent (far enough away from you and the ceil­ing so as not to be a fire haz­ard) does won­ders to both warm your tent and reduce con­den­sa­tion.  Despite this, a towel for scrap­ing off con­den­sa­tion is always welcome.

EMBRACE LITHIUM
Use lithium bat­ter­ies in all your win­ter elec­tron­ics.  Not only does lithium per­form con­sis­tently down to much colder tem­per­a­tures than alka­line or NiMh bat­ter­ies, but they are lighter, last three times as long, and have a flat decay curve.

WIPE WITH CARE 
In the sum­mer, comfy leaves or soft river stones abound, but in the win­ter they’re few and far-between. While many have picked up pinecones in des­per­a­tion, the best read­ily found alter­na­tive is just plain old snow. It’s effective, ubiquitous, and leaves behind lit­tle residue.  If you do bring TP, please either pack it out or burn it. The ground is too hard for catholes and for those who have hiked along the Appalachian Trail dur­ing the first spring thaw, a mound of TP gen­er­ally sig­ni­fies a poorly hid­den scat stash.

FIGHT CON­DEN­SA­TION WITH A VBL
If you’re out more than a week, use a VBL, or vapor-barrier-liner for your sleep­ing bag.  Con­den­sa­tion from your own body can freeze within the upper layer of your sleep­ing bag where the warm air meets the freez­ing air, and over time your sleep­ing bag can become frozen solid.  While they are not as com­fort­able to sleep in, it beats hit­ting your sleep­ing bag with a ham­mer every night like some polar explor­ers have had to do.

FLIP YOUR BAG
If it’s not snow­ing, turn your sleep­ing bag inside out on top of your tent to dry dur­ing the day.  This is a great rea­son to choose win­ter sleep­ing bags with a black interior–it absorbs more solar energy and dries out faster.

FLIP YOUR WATER
If you have a large water stor­age con­tainer, turn it upside-down when stor­ing it overnight.  Ice forms from the top down, so keep­ing the spout/opening of your con­tainer fac­ing down keeps it from get­ting frozen up. This can be com­bined with insu­lat­ing the con­tainer, of course.

VASE­LINE
Cover exposed skin in Vase­line or ani­mal fats. Inuit have been doing this for years–simply slather any exposed or poten­tially exposed skin on your face, ears, neck, wrists, or hands in a thick oil and they’ll be less prone to wind­burn and frostbite.

Stay warm!
winter-camping-uintas

Follow our FISHING BLOG

WEB   RATES     FISH    HUNT    CABINS    PHOTOS
TESTIMONIALS    BROCHURE    HUNT BOOKLET

Enter your email address to subscribe to this blog and receive notifications of new posts by email.

← Back

Thank you for your response. ✨

Email Me....


Tags: , , , ,

Ozonics: How Does it Work?

DSC_0173
Thankfully, wild turkeys don’t have a sense of smell, like deer, or we’d never outfox one. However, turkeys often thrive in deer habitat. Many seemingly perfect spring gobbler set-ups have been blown by a snorting deer that entered the hunter’s scent stream. A unique device called “Ozonics” can change that by eliminating human odor. It’s especially effective in an enclosed space, such as a turkey or deer blind. This unit works in spring or fall and has captured the interest of sportsmen, yet many aren’t sure how it works. Here’s the explanation from the manufacturer.

ozonics0b00a4ed-2288-483c-8cf7-b8e2d7d42280Neutralize a mature buck’s best defense, its nose, and a hunter’s chances of success rise dramatically. Cover scents, hunting clothes washed in scent-free detergents, avoiding a buck’s core area during the prime time to hunt because the wind isn’t right… Hunters are obsessed with scent, and for good reason. A deer’s nose is truly its best sense.

1041It’s not often a new hunting product revolutionizes the sport. Ozonics is just such a product. O1041zonics is the only scent-control product that deals with your human scent zone. Simply, there is nothing else like it. Ozonics is an in-the-field ozone generator. An Ozonics Unit electronically changes oxygen into ozone, which destroys your human scent zone. Ozonics blankets your scent zone with scent-destroying ozone propelled by a quiet fan. The ozone is unstable, so it will bond with your scent molecules, rendering them indistinguishable to the nose of a deer.Ozonics should be positioned 6 to 10 inches above you and angled downward. Use a wind tracker to detect wind direction, and then aim Ozonics downwind. Heavy ozone molecules generated by the Ozonics Unit fall through your scent zone. The ozone concentration is heaviest in the direction Ozonics is facing and closer to the unit. This is why knowing wind direction is important. Reducing your scent profile means more ozone reaches your scent stream.

Best of all, Ozonics is guaranteed. If you do not experience a dramatic reduction in the number of downwind deer that bust you, Ozonics will refund your money in the same calendar year as purchase.

Follow our FISHING BLOG

WEB   RATES     FISH    HUNT    CABINS    PHOTOS
TESTIMONIALS    BROCHURE    HUNT BOOKLET

Enter your email address to subscribe to this blog and receive notifications of new posts by email.

← Back

Thank you for your response. ✨

Email Me....


Tags: , , , , , ,

Winter Camping For Beginners

Winter camping can mean different things to different people.  For some, it means renting a cabin heated by a wood stove. For oth­ers, it means pack­ing snow­mo­bile trail­ers to the brim. For the more adven­tur­ous, it means grab­bing a pack and haul­ing in all the neces­si­ties to a remote loca­tion. No mat­ter how you win­ter camp, the fol­low­ing tricks are useful.

WEAR A FIRE­PROOF SHELL
If you are going to build camp­fires, either for the sake of cook­ing, warmth, or morale, make sure that your outer layer of cloth­ing is less likely to end up ruined if struck by an errant ember.  Wool is one of the best, most fire-resistant nat­ural mate­ri­als and is great for this.  Down jack­ets are down­right (no pun intended) awful, and you can lose tons of feath­ers this way.

PACK THE SNOW
Before set­ting up your tent, pack down your camp­site. If you have skis or snow­shoes, that means tramp­ing around hard until all the snow is packed.  If you’re shod only in boots this will take some time, but if you don’t do this, you run the risk of step­ping into a soft bit of snow in your tent and tear­ing the floor.

PACK AN EXTRA HAT AND GLOVES
Always carry a spare hat and a set of mit­tens. No mat­ter how dili­gent you are, no mat­ter how reli­gious you are about using idiot strings and keeper cords, you will lose a hat, and you will lose a glove.  Keep a cheap spare, or be pre­pared for frost­bite or a fore­short­ened trip.

EMBRACE THE PEE BOT­TLE.
Being cold can cause you to want to uri­nate more fre­quently, and we all know how incon­ve­nient it is to dis­robe and undo your sleep­ing bag at 0 degrees F.  For women, I highly rec­om­mend look­ing into the var­i­ous acces­sories that allow you to pee whilst stand­ing, and for both gen­ders a WELL-MARKED pee bot­tle will keep you warm and sim­plify your nightly con­ti­nence. For the love of god, don’t con­fuse your water bottle—color is not enough, make sure your bot­tle is well-marked and maybe wrapped in some duct tape.

USE THOSE STAKES
If there is snow, you can stake out your tent.  You can always make dead­men out of sticks or fallen trees, stuff sacks full of snow, buried skis, snow­shoes, poles, ice axes, or what have you.  There is no excuse for a poorly staked-out tent.  If you expect no snow and frozen con­di­tions, plenty of com­pa­nies make hard tent stakes meant to push through frozen ground, either out of tita­nium, steel, or 7075-t6 aluminum.

BRING THE RIGHT SLEEP­ING PAD
As Bear Grylls says, two lay­ers on the bot­tom are worth one on the top.  That is, you lose more heat through con­duc­tive heat loss when sleep­ing than any­thing else, so win­ter is no time to skimp on your sleep­ing pad.  Make sure you have a pad with an r value of four or more, and if you have one, throw a closed-cell foam pad under­neath. If you feel like your pad isn’t cut­ting it, stuff extra cloth­ing under­neath you, and toss your down jacket on top of your sleep­ing bag.

BOIL THE SNOW
Leave your water fil­ter at home.  Chem­i­cal fil­ters take longer to work in the cold, and mechan­i­cal fil­ters can crack and fail. Your best bet for water fil­tra­tion is boil­ing your water, as you prob­a­bly have to melt snow any­way. Don’t be suck­ered into think­ing glacial melt or fresh snow is sterile–it isn’t. Snowflakes often form around small bits of dust (nucle­ation sites) which can be bac­te­ria or viruses float­ing in the upper atmosphere.

SLEEP WITH YOUR BOOTS
Use boots with remov­able lin­ers, so you can put those lin­ers at the bot­tom of your sleep­ing bag to keep them warm.  If you only have single-layer boots, put them in a water­proof stuff sack at the bot­tom of your sleep­ing bag.  Noth­ing means morn­ing hypother­mia more than frozen boots!

CAMP BY CAN­DLE­LIGHT
A can­dle lantern safely hung on the inside of your tent (far enough away from you and the ceil­ing so as not to be a fire haz­ard) does won­ders to both warm your tent and reduce con­den­sa­tion.  Despite this, a towel for scrap­ing off con­den­sa­tion is always welcome.

EMBRACE LITHIUM
Use lithium bat­ter­ies in all your win­ter elec­tron­ics.  Not only does lithium per­form con­sis­tently down to much colder tem­per­a­tures than alka­line or NiMh bat­ter­ies, but they are lighter, last three times as long, and have a flat decay curve.

WIPE WITH CARE 
In the sum­mer, comfy leaves or soft river stones abound, but in the win­ter they’re few and far-between. While many have picked up pinecones in des­per­a­tion, the best read­ily found alter­na­tive is just plain old snow. It’s effective, ubiquitous, and leaves behind lit­tle residue.  If you do bring TP, please either pack it out or burn it. The ground is too hard for catholes and for those who have hiked along the Appalachian Trail dur­ing the first spring thaw, a mound of TP gen­er­ally sig­ni­fies a poorly hid­den scat stash.

FIGHT CON­DEN­SA­TION WITH A VBL
If you’re out more than a week, use a VBL, or vapor-barrier-liner for your sleep­ing bag.  Con­den­sa­tion from your own body can freeze within the upper layer of your sleep­ing bag where the warm air meets the freez­ing air, and over time your sleep­ing bag can become frozen solid.  While they are not as com­fort­able to sleep in, it beats hit­ting your sleep­ing bag with a ham­mer every night like some polar explor­ers have had to do.

FLIP YOUR BAG
If it’s not snow­ing, turn your sleep­ing bag inside out on top of your tent to dry dur­ing the day.  This is a great rea­son to choose win­ter sleep­ing bags with a black interior–it absorbs more solar energy and dries out faster.

FLIP YOUR WATER
If you have a large water stor­age con­tainer, turn it upside-down when stor­ing it overnight.  Ice forms from the top down, so keep­ing the spout/opening of your con­tainer fac­ing down keeps it from get­ting frozen up. This can be com­bined with insu­lat­ing the con­tainer, of course.

VASE­LINE
Cover exposed skin in Vase­line or ani­mal fats. Inuit have been doing this for years–simply slather any exposed or poten­tially exposed skin on your face, ears, neck, wrists, or hands in a thick oil and they’ll be less prone to wind­burn and frostbite.

Stay warm!

Prefer traditional warm weather camping without snow?  Check us out!

2014_Brochure(307x400)

Follow our FISHING BLOG

WEB   RATES     FISH    HUNT    CABINS    PHOTOS
TESTIMONIALS    BROCHURE    HUNT BOOKLET

Enter your email address to subscribe to this blog and receive notifications of new posts by email.

← Back

Thank you for your response. ✨

Email Me....


Tags: , , , ,

Building A Smoke House

9c

Building a smoke house the old fashion way is a method that has been used for generations. Many people today like to smoke their own meat not only to give it flavor but also to preserve it longer.

The size of your smoker will depend on what you plan to use it for. Whether you want it to just smoke a few fish, smoke sausage every now and then or smoke an entire animal at one time, will help you determine the size of your smoker

1

Beginning:

This slideshow requires JavaScript.

When it comes to flavor of the meat, people through the years have made up their own recipe of brine to rub over the meat before smoking it.

How To Build A Smoke House

9b

The Building Process:

This slideshow requires JavaScript.

Building a smoke house, there are a few things that should be considered when building your smoke house. It is not important to spend a small fortune for material for the construction. Reclaimed wood will work just fine. You may want a smoker big enough to walk in with shelves to lay the meat on along with hocks from the rafters to hang the meat.

You will want to vent the building to allow the smoke to travel freely through the building.

6d

The Firebox Process:

This slideshow requires JavaScript.

Building a smoke house, a very important factor  is to situate your fire box  down hill from the smoke house. This will allow the smoke to travel up hill into the smoker much easier. All that is required for a fire box is a fire box made from brick or even an old barrel with the smoke piped into the smoker will work just fine by having the fire box away from the smoker, the meat will not dry out as much as if it were right in the smoker.

1a

The Smoking Process:

This slideshow requires JavaScript.

To also help in the flavoring of the meat, by using different kinds of wood chips in the fire box will create different smoke changing the flavor in the meat.

Follow our FISHING BLOG

WEB   RATES     FISH    HUNT    CABINS    PHOTOS
TESTIMONIALS    BROCHURE    HUNT BOOKLET

Enter your email address to subscribe to this blog and receive notifications of new posts by email.

← Back

Thank you for your response. ✨

Email Me....


Tags: , , , , , , , , , , , ,

Stop Adding Fat to Your Game Meat

While my Wyoming elk tag has so far gone unfilled, my friend Tess was luckier, tagging her first elk in a Nebraska cornfield not long ago. A heat wave prompted us to spend all day Sunday butchering and last night we put about 20 lbs. of trimmings through the grinder.

I’ve been processing my own (and others) deer and elk for about a dozen years and view adding some type of fat to ground venison as a necessary evil. I prefer ground pork, adding anywhere from 10 to 20 percent. Due to a calculating error on my part (I was told there would be no math!), Tess’ grind ended up at about 25 percent pork, a bit more than she preferred.

Ground_Elk_0910_004
This math problem set me to wondering why hunters take a healthy source of protein and fatten it up? That’s like someone on a diet taking a carrot stick and dipping it in ranch dressing. Quick research shows no clear consensus on what or how much fat to add. Some hunters swear by 50/50, others just 10 percent. Some like pork, others beef tallow. Some add bacon ends and pieces.

Certainly, there’s a rationale to adding fat, including enhancing flavor because, hey, we all know fat tastes good. Fat also keeps meat from drying out when you fry it and helps patties from falling apart. But is there a better, healthier alternative? Yes, depending on how you’re planning to cook it.

Burgers on the grill are probably how much of the ground venison in America makes it to the table. I’ll be the first to admit, making a good burger without fat sounds impossible. The fat not only makes a burger juicy, it also helps it stay in patty form. Next time you have some 100 percent ground venison you want to throw on the grill, trying adding an egg and some breadcrumbs to serve as a binder. I’ve also heard of using steel-cut oats, diced onion, shredded potato and even powdered milk.

When frying ground venison for tacos, chili or spaghetti, cook it without fat. The spices should cover any gamy flavor you or your family might object to. (If not, find a new butcher to process your deer or learn to do it yourself. Since I started DIY processing 12 years ago, I’ve never had gamy game meat.) If the dry texture turns you off, try frying it in a little bit of olive oil, or add moisture as the venison browns in the form of stock, tomato juice or other flavored liquid.

As you can see, there are lots of alternatives to adding fat to your ground venison. What about you? How do you keep your low-fat game meat low fat? – David Draper, Wild Chef Blogger

Follow our FISHING BLOG

WEB   RATES     FISH    HUNT    CABINS    PHOTOS
TESTIMONIALS    BROCHURE    HUNT BOOKLET

Enter your email address to subscribe to this blog and receive notifications of new posts by email.

← Back

Thank you for your response. ✨

Email Me....


Tags: , , , , , , , , ,