RSS

Tag Archives: Wawang Lake

Boater’s Get HEFTY Fine For Harassing Swimming Moose

Article by Canadian Press

A real warning to all of you that come to view wildlife in its natural surroundings.  Respect their space and zoom in with your lens instead of vehicle or boat!

moose_swimming-2-620x338
Two boaters have been fined a total of $2,500 for harassing a cow moose swimming in a northwestern Ontario lake.

A Dryden man and his Albertan relative both pleaded guilty to the offence in Ontario Court of Justice and the boat has been seized.

Ontario’s Ministry of Natural Resources said it received complaints about boaters harassing a swimming moose in Eagle Lake in Dryden on July 29, 2013. Court heard that conservation officers responded to the scene in Outlet Bay of Eagle Lake, where witnesses provided a video showing a boat circling a swimming moose.

After circling the moose, the boat went to shore and returned with three other adult passengers. The boat repeatedly drove in tight circles around the swimming moose, preventing it from going to shore and then a passenger jumped out of the boat and onto the back of the swimming moose.

The man was on the moose “a couple seconds” before the animal bolted into the woods, said Michael Prepp, an enforcement manager with the MNR.

There’s no indication the moose was hurt, Prepp noted on Tuesday, Oct. 1 in a phone interview from Dryden. “We think that it got away and that it was fine,” he said.

Moose-related infractions are rare, he added. ”When we were doing a search of our offence database looking for similar offences for comparable penalties, there were very few.”

The boat will be returned to its owner once the fine is paid.

The MNR says moose populations are carefully managed in the province and some are under pressure across many parts of northwestern Ontario.

Moose will try to escape from predators, including humans, the ministry says, adding that a moose that cannot escape an attack can suffer extreme physical exhaustion and stress, including death.

Follow our FISHING BLOG

WEB   RATES     FISH    HUNT    CABINS    PHOTOS
TESTIMONIALS    BROCHURE    HUNT BOOKLET

Enter your email address to subscribe to this blog and receive notifications of new posts by email.

← Back

Thank you for your response. ✨

Email Me....

 
Leave a comment

Posted by on May 16, 2015 in moose, Wawang Lake Resort


Tags: , , , , , , ,

Big Mistakes NOT to Make in Your Bear Stand

Part of the thrill of the hunt, is the anticipation knowing that with every second that ticks by, you are one second closer to harvesting your trophy black bear. What happens when those seconds turn into hours and then into days? Being under prepared to be in your stand for extended periods of time can be frustrating, and worse yet, can prevent you from achieving a successful hunt.

bearstand

 It would be awesome if we knew when and where the harvest was going to take place, but that wouldn’t be hunting then, would it?  Having a plan in your bear stand can make your hunt much more enjoyable. Things to consider: weather, bugs, boredom and nature calls.

Weather – Avid hunters know that fall weather can change in a heart beat. It can go from warm, to cold, windy and raining in the blink of an eye. Having the right clothes in your back pack can make the best of a somewhat undesirable situation.

Bugs – can be a huge annoyance in the great outdoors. Especially when you are forced to sit still for extended periods of time. Avoid bug sprays when bear hunting… PERIOD! A new, unfamiliar scent, along with an intuitive feeling that something isn’t right, will keep trophy bears from over coming fear and committing to your bait. Bug jackets and bug nets are a must. (Oh, on side note, make sure you practice shooting with your bug net on). Regarding the portable propane bug eliminators, we highly advise against them as it is a new scent that can be detected by a bear easily and may quickly deter them.

Boredom – Nothing will end your hunt faster than impatience and constant movement in your stand. If you are like most guys who can’t sit still for more than 30minutes at a time, you must bring something with to occupy your mind. I personally use a book. I have also seen guys use those portable, pocket video games. Regardless of what you use, make sure you sit sill and only utilize things that will be quiet and non light reflective.

Nature Calls – Ever been in the stand when all of the sudden you have to take a pee? Sucks, doesn’t it? I don’t know how many times I have had this happen to me, yet somehow I always forget to bring a container along. Put a portable urinal on your packing list. Doing so will make the difference between shooting that monster and taking it’s offspring or nothing at all.  NEVER eliminate off of or near your stand!  There is nothing more offensive and frightening to a bear than knowing a human is directly near by.

This slideshow requires JavaScript.

Remember, being prepared to sit that stand can mean the difference between a very successful harvest or having to return and start all over again!

Follow our FISHING BLOG

WEB   RATES     FISH    HUNT    CABINS    PHOTOS
TESTIMONIALS    BROCHURE    HUNT BOOKLET

Enter your email address to subscribe to this blog and receive notifications of new posts by email.

← Back

Thank you for your response. ✨

Email Me....


Tags: , , , ,

How to Sharpen a Knife

Here is a great video on how CJ Buck, President and CEO of Buck Knives sharpens a knife.  Knowing how to properly sharpen a piece of equipment can not only save time but keep you from permanently damaging your knives as well.

Follow our FISHING BLOG

WEB   RATES     FISH    HUNT    CABINS    PHOTOS T
ESTIMONIALS
    BROCHURE    HUNT BOOKLET

Enter your email address to subscribe to this blog and receive notifications of new posts by email.

← Back

Thank you for your response. ✨

Email Me....


Tags: , , , , , , , ,

Calling In A Bull Moose Video

There’s a lot of prep that goes into a moose hunt, so don’t blow a shot at one of these majestic beasts because you can’t call it in. Check out the video below from Ontario Out of Doors for some great tips to help get you ‘in tune’ for when the time comes.

Follow our FISHING BLOG

WEB   RATES     FISH    HUNT    CABINS    PHOTOS
TESTIMONIALS    BROCHURE    HUNT BOOKLET

Enter your email address to subscribe to this blog and receive notifications of new posts by email.

← Back

Thank you for your response. ✨

Email Me....


Tags: , , , , , , ,

Wildlife on Ice

wildside2For many of us, winter means changing our wardrobes, cranking up the heat and cutting back on outdoor activities. For forest wildlife, especially in the north, no season has a greater impact than winter. Those animals that can’t flee south must kick into deep-freeze survival mode or perish.

Some small insects such as orb weaver spiders, mantises and most butterflies die with the first frosts. But they leave freeze-resistant progeny as their legacy. In the case of butterflies, that usually means larvae (caterpillars) or pupae in their protective “wrappers.” But some butterflies, including the mourning cloak, hibernate in a sheltering crag or crack. Unlike orb weavers, other types of spiders hibernate beneath rocks or under tree bark, where wandering flocks of watchful chickadees, nuthatches and brown creepers may find them.

Toads and terrestrial frogs such as peepers try to dig or shelter in places that protect them from hard freezes, including cracks in logs or thick leaf litter. But even a hard freeze usually will not kill a temperate-area frog. Breathing and heartbeats may stop, but with a thaw, thanks to elevated blood glucose, the frogs come “back” to life. Turtles often dig down into the mud, and their metabolisms slow to a crawl.

Even birds that we assume are always warm and active have coldweather adaptations. Chickadees, for example—the most common small songbirds wintering in northern woods—may enter a “regulated hypothermia” while they sleep, their body temperatures dipping to conserve precious energy.

Chipmunks will hibernate but emerge during warm spells, while the restless red squirrel changes its schedule from early to late morning, even tunneling through snow to transport snipped conifer cones to its bulk storage area, known as a midden.

wildside1So, much of your property’s wildlife may be out of view this time of year but with the exception of migratory birds and monarch butterflies most of it remains, just on some form of “pause.”

This time of year, some of the best things you can do for wildlife are simple—often involving doing nothing at all. Here are some tips:

• Leave dead meadow stalks standing until later winter thaws come. Meadow plants shelter, among other things, butterfly caterpillars and pupae and mantis egg cases. From fall into winter, their seedheads nourish overwintering songbirds, gamebirds and rodents that in turn feed foxes, owls, hawks and other creatures.

• Hold off on clearing logs, if possible. Logs and snags (dead trees) are always important components of a diversified wildlife habitat, and the shelter they provide during winter is crucial. If you remove this resource during cold weather, you might harm hibernating wildlife.

• Leave dense conifer stands to provide cover for owls, rabbits, grouse and other hardy active critters while other cover is sparse.

wildside3• Keep bird feeders topped up. This will provide you with hours of entertainment, and you also will be helping supplement birds’ diets at the toughest time of year. If you want to feed a wide variety of birds, offer not only mixed seeds but also black oil sunflower, thistle and suet. Raisins and mealworms may bring in bluebirds, thrashers and mockingbirds. Also, you could buy a birdbath or pond heater to provide water during the coldest days.

• Hold off on cleaning up nestboxes, as these will provide shelter for birds, rodents and invertebrates during cold weather. Then, in late winter (early March in many areas), clean the boxes out just before bluebirds and other cavity nesters start seeking nest sites.

• Leave brushpiles, which provide dense shelter that can be hard to come by in winter. Wrens, rabbits, sparrows and other creatures seek these out. Bigger brush piles may shelter quail and pheasants at the field-forest edge.

• Refrain from removing leaf litter. Thick leaf litter is like a thermal blanket for hibernating salamanders, frogs and invertebrates— especially when piled around stumps and logs.

Sometimes it feels like winter will never end. But before you know it, frog calls, bird songs and the buzzing and chirping of insects will once again fill the air. For now, though, you can find comfort knowing your forest provides safe havens for a variety of resting wildlife.

Follow our FISHING BLOG

WEB   RATES     FISH    HUNT    CABINS    PHOTOS
TESTIMONIALS    BROCHURE    HUNT BOOKLET

Enter your email address to subscribe to this blog and receive notifications of new posts by email.

← Back

Thank you for your response. ✨

Email Me....


Tags: , , , , , , , ,

3 Guys, 3 Bears…One Awesome Trip!

3 Guys, 3 Bears…One Awesome Trip!

There is nothing more fun for a hunter than taking a long road trip with the guys and getting away from it all. The difference between the average ‘getting away from it all’ and a hunter’s ‘getting away from it all’ is that the hunter’s version often times includes a stand and some great harvest stories. This rang true for Dave, Tim and Jason. On September the 7th they arrived at my front door with weapons in hand and excitement in their eyes. Though it was Dave’s second hunt with us, it was both Tim and Jason’s first time hunting a bear. Dave had acquainted them with what to expect and the basics of our operation and much to the boy’s excitement, we were providing them all with baits that seemed to be jam packed with bruin. The first night came with all guys coming to camp empty handed but Dave letting us know that his bait was just a Bear Highway….they were everywhere! Tim had heard a bear and Jason had yet to have any sign of.

The following night had proven fruitful to both Dave and Tim, taking their trophies earlier in the dusk hours. Jason had heard several sounds around him but had yet to spot. He was fine with that though as the following day was his birthday and he felt that a birthday bear would be that much more fitting. The next morning as the boys began to prepare their bears, Jason prepped and began that drive to his stand. Thoughts raced through is head as to what his day would hold and how he was going to handle harvesting that bear.  Early that evening, I spotted the truck pulling in, my heart was wild with anticipation….had he gotten his birthday bear? As Jason emerged, his face was pulled with a frustrated look and the color was drained. “I missed!” was all he said. After a few minutes of silence, Jason filled me in on the adventure. “I was just opening my pb and j and having a bite. I saw a set of ears pop up and slowly put the sandwich on my lap. I lifted my gun just as the bear emerged to my right and he stood and sniffed the air…I think he wanted my sandwich! He dropped and began to lick the tree directly broadside and I fired……the bullet went low and right below. No hit but just hit the ground. I have NO IDEA what happened! The bear took off like a bat out of hell and that was it. I sat for about thirty minutes and had to get out of there. I am so frustrated that I know I couldn’t shoot proper a second time. Tomorrow I am taking my .270.” SAM_0016 (640x480) With that we both agreed that this could happen to anyone and that it’s better than wounding and wasting a bear. I knew tomorrow he would have a different plan. The next day Jason came in for his coffee and sat quiet. The thought of the day’s play could be read in his eyes and it was obvious that today he woke up with serious intention.  Dave and Tim decided to load the boat and spend the day kicking back while Jason set out as tightly wound as he could be. The day wore on and not a truck in sight. As the night fell, Jason arrived with a tired, defeated look in his eyes. “Nothing. I didn’t see a thing today. It was a long day.” I knew that the events of the day prior had made today seem much longer but I knew that his determination hadn’t left. The following morning, Jason met with Terry and they came up with the new game plan. It was a variation of the original but the outcome was planned the same….Come home with a bear! As Jason left for the day, we all settled back into our daily routines, me in the lodge, Tami back to marketing and Terry back out to the baiting. At 3:12pm a black truck made a hasty entrance to the resort and straight over to cabin 6. Jason was back! He was energized as he exited the truck and fists pumped the sky! “I got it! It’s down!” With a couple of high fives and congratulations I could just see the pride in his eyes. He had finished the group with 100% success rate! As he tied the tell-tale orange flag for the other two on the lake to see, he began to load the truck with retrieval supplies. As they all arrived back with Jason’s bear, the camaraderie was thick. Each were successful and each just as happy for each other as themselves.

When a hunter ‘gets away from it all’ it’s what they come away with afterwards that counts!

Follow our FISHING BLOG

WEB   RATES     FISH    HUNT    CABINS    PHOTOS TESTIMONIALS    BROCHURE    HUNT BOOKLET

Enter your email address to subscribe to this blog and receive notifications of new posts by email.

← Back

Thank you for your response. ✨

Email Me....


Tags: , , , , , , ,

Wild Game Recipe: Rabbit Sott’olio

rabbitsottolioEmploying an old Italian method of preserving meats and vegetables called sott’olio, submerge rabbits in oil and slow-cooks them until the meat is tender and rich. Then dress the warm meat in a salad for a perfect counterbalance. The only difficult part of this recipe is pouring that much oil into a pot—but it’s worth it. Be sure to fish the garlic out of the oil for later: Spread the cloves on toasted bread for a killer snack.

Ingredients
– 2 whole wild rabbits, cleaned
– About 3 quarts vegetable oil
– About 1 quart, plus
– 1 Tbsp., plus 1⁄4 cup, olive oil
– 2 whole heads garlic, broken into individual unpeeled cloves
– 6 sprigs fresh thyme
– 1⁄3 cup, plus 1⁄4 cup,
– red wine vinegar
– 1 red onion, sliced
– 2 carrots, peeled and chopped into 1⁄2-inch pieces
– 4 cups baby arugula
– 1⁄4 cup pine nuts, lightly toasted
– 1⁄4 cup Parmigiano Reggiano cheese, shaved or grated
– Salt and freshly ground pepper, to taste

Directions:
1. Preheat the oven to 300 degrees. Rub the rabbits with salt and pepper and place in a Dutch oven. Pour in about three parts vegetable oil to one part olive oil, enough to fully submerge the rabbits. Add the garlic and thyme, and cover the Dutch oven. (A sheet of aluminum foil underneath the lid is a good idea.) Place in the oven and cook for about 11⁄2 hours, or until the meat is tender and falling off the bone. Let cool.

2. Meanwhile, combine the 1⁄3 cup red wine vinegar in a small saucepan with 1⁄3 cup water, and bring to a boil over high heat. Put the red onion slices in a bowl, and pour the vinegar mixture over the onions. Stir, add salt and pepper, then allow the onions to pickle at room temperature.

3. Heat 1 Tbsp. olive oil over low heat in a saucepan, and add the carrots. Cook, stirring occasionally, for 6 to 8 minutes, or until the carrots are tender but not mushy. Add salt and pepper, and reserve.

4. Make a vinaigrette: Put the remaining 1⁄4 cup red wine vinegar in a bowl and gradually whisk in 1⁄4 cup olive oil, until the oil and vinegar are thoroughly integrated. Add salt and pepper.

5. When the rabbits are cool, remove the meat from the bones and reserve.

6. To serve, reheat the rabbit meat in a pan with some of the oil, over low heat, just to warm through. In a large mixing bowl, gently toss the arugula with the red onions (drained), carrots, pine nuts, cheese, and about 3 Tbsp. vinaigrette. Divide the salad among four plates, and top with the rabbit, adding a few more shavings of cheese and salt and pepper as desired. Serves 4

Follow our FISHING BLOG

WEB   RATES     FISH    HUNT    CABINS    PHOTOS
TESTIMONIALS    BROCHURE    HUNT BOOKLET

Enter your email address to subscribe to this blog and receive notifications of new posts by email.

← Back

Thank you for your response. ✨

Email Me....


Tags: , , , , , , , , ,

Shoot it! : A picture is worth a thousand words!

Shoot it! : A picture is worth a thousand words!

Wawang has always been synonymous with great trophies.  We have also be recognized as one of the most photographed filled brag book holders amongst our peers.  Believe me, when you have this much to be proud of, you want the world to see it 🙂

This slideshow requires JavaScript.

It is for this reason that we announce that we can now be found on Instagram!  With so many photos of successful fishing and hunting, it just makes sense to share it with the world.

We have always lived by a principal here: Show me, don’t tell me!
Join us and see what we can show you…..because remember, what you show, shows what you know!


Follow our FISHING BLOG

WEB   RATES     FISH    HUNT    CABINS    PHOTOS
TESTIMONIALS    BROCHURE    HUNT BOOKLET

Enter your email address to subscribe to this blog and receive notifications of new posts by email.

← Back

Thank you for your response. ✨

Email Me....


Tags: , , , , , , , , , , , ,

On Target: How to make your own arrows

While doing some of my own research, we came across a fantastic article for all of you archers out there that have wondered about manufacturing your own arrows.

This article is reproduced from Edersbows.com, take some time to check them out 🙂 

arrows

Building your own arrows allows you to save about 5 to 1 0 dollars per dozen, but there’s an even better reason for building your own. You can experiment with all the components, with the various fletching styles and shaft sizes until you find the perfect arrow for your bow and your hunting or 3-D shooting requirements.

Building arrows is easy and fun, not to mention the satisfaction you’ll gain from taking game with arrows you’ve crafted yourself. Anyone can do it – and do it well. Armed with only a few basic tools and the information offered here, you’ll have no problem turning raw shafts into top-quality hunting arrows.

Nock Installation

nock
Year’s ago nocks were all glued on, now most arrows offer pressure-fit nocks that fit snugly but are turnable. Tunable nocks are definitely the way to go. These systems will make tuning a lot easier, and they hold up to more hard shooting than will glue-on nocks.

Assuming you aren’t going to paint (crest) your arrows, nock installation is the first step in the arrow building process. Use hot melt glue or epoxy when installing bushings into aluminum. When installing them in (or over) carbon shafts, use a rubber-based epoxy such as that available from Beman or Arizona Archery Enterprises (AAE).

Regular glue-on nocks should be pressed firmly into place (without glue) until after the fletching has been attached. When the arrow is finished you can rotate the nocks to the proper orientation so the fletching clears your rest and then glue them in place. Bohning Fletch- Tite works fine for this.

Apply The Fletching

fletching
You need a fletching jig, but it doesn’t have to be fancy. I’ve had good luck with the $20 plastic Martin jig I bought more than 10 years ago. Other good ones are made by Bohning, Bitzenburger and Grayling. You have three clamp options: left helical, right helical and straight

(no helical). For hunting and 3-D shooting, right helical is the most popular choice. If you’ll be using feathers, make sure to order feathers from the same wing as the clamp (right helical takes right wing). Vanes are manufactured straight and can be used with any clamp, so you don’t have to specify left or right when ordering.

One of the best fletching adhesive I’ve used for vanes is Fast-Set Gel made by AAE. This is a super-glue product that sets up in only 10 seconds allowing you to use a single-clamp jig and still fletch a dozen arrows in mere minutes. Fast-Set Gel will work on all shaft styles except AFC’s film-dipped carbon arrows, which require a traditional cement such as Bohning’s Fletch-Tite. Of course, Fletch-Tite will also work on aluminum arrows but takes about 10 minutes per fletching to set-up before you can remove the clamp. Fletch-Tite is still the best choice for feather fletching, however.

Place your fletching in the clamp so that its back edge will be about 3/4 inch ahead of the nock taper or nock bushing on your arrow. Adjust the back of the magnet on your jig (the magnet holds the clamp in place while the glue dries) inward or outward until the tail of the fletching sits squarely on top of the arrow. Next, adjust the forward end of the magnet to achieve the desired amount of helical. Easton’s technical representatives recommend four to five degrees of helical. I use a bit more myself – probably closer to seven degrees – but this is only on large diameter aluminum arrows. On smaller diameter carbon arrows I stay closer to Easton’s standard.

When using a straight clamp, (as opposed to a helical clamp) you don’t have as much lee-way and must either install your fletching perfectly straight or with a very slight off-set.

After your fletching is installed, apply a small dab of adhesive to both ends of each for a little added insurance against tearing loose.

You have more freedom to experiment with your fletching style and degree of helical than with any other aspect of arrow building, but it’s still best to observe a few general ground-rules. When making aluminum arrows for hunting, stick with four to five inch fletching. Five inch is a bit better because (in theory at least) it offers a small amount of added stability which can make a difference when shooting broadheads.

Carbon arrows, because of their smaller diameter, work best with shorter fletching (four inch is a good starting point) or you can run into a contact problem when trying to pass long helical fletching through the narrow gap in your rest. You can also experiment with various fletching orientations, such as 70/110 degree four-fletch, (you make this change by inserting a different indexing template into your fletching jig). But the basic 120 degree, three-fletch will do just fine under almost every shooting situation.

Cutting Arrows To Length
Draw an arrow and have someone mark it about a half to 3/4 inch in front of the rest. Cutting arrows is easy with the right equipment, but with the wrong equipment it can be a real headache. For limited quantities of aluminum arrows you can get by with a small rotating pipe cutter. I’ve done it a few times, but I’ve also made some pretty rough cuts, and basically ruined some arrows, in the process. You’re far better off pooling your money with a couple of buddies and getting an electric cut-off tool. You can also take your arrows to a pro shop (that’s equipped with an electric cut-off tool) to have them sized – usually for a price.

Installing Inserts and Outserts
Inserts and outserts (out serts are used with some types of carbon arrows) shouldn’t be taken for granted. Consistent accuracy with broadheads can be difficult to achieve when these components fit loosely. Inserts and ouserts should install without any free-play. Usually you don’t have too many options with outserts – you get what the arrow maker offers – but you do have options with inserts. I’ve had good luck with aluminum inserts from Easton and Saunders and composite inserts from AAE. Inserts should have a light press-fit with the inside of the shaft so that each broadhead you screw in will line up perfectly with the shaft.

Aluminum inserts used in aluminum or ACC carbon arrows should be installed with hot-melt glue. Composite inserts in aluminum work best with a rubber-based epoxy, and the same applies for aluminum into carbon (Beman ICS or Gold Tip Graphite XT arrows) or when installing metal outserts on conventional all-carbon shafts. When you’re finished you can install a broadhead and spin test your arrows to make sure the inserts are properly aligned.

Take some time to visit http://www.eders.com/ to view their catalogue of parts and equipment to assist you in your build.

lead_materials

Armed with the information above, you could now have a weekend hobby 🙂

Follow our FISHING BLOG

WEB   RATES     FISH    HUNT    CABINS    PHOTOS
TESTIMONIALS    BROCHURE    HUNT BOOKLET

Enter your email address to subscribe to this blog and receive notifications of new posts by email.

← Back

Thank you for your response. ✨

Email Me....


Tags: , , , , ,

8 Ways to Harness Solar Energy

So much energy, so few solutions

1

The sun is the biggest source of renewable energy.

Solar power has become fairly pedestrian since the first photovoltaic cells came out of the lab in the 1950s. Today, utility-scale solar farms soak up the sun and photovoltaic panels dot rooftops across the world. The power generation is finding its way into transportation, too, alongside other clean-burning fuels like hydrogen. Just a few years ago, the Solar Impulse prototype plane flew nonstop without any fuel from San Francisco to New York. And companies like Toyota are looking to bring hydrogen cars mainstream.

Crazy Solar Power Plants

Crazy Solar Power Plants

“The U.S. was really the pioneer of the whole global solar photovoltaic industry,” said Juris Kalejs, an IEEE member and CTO of the Lowell, Massachusetts-based solar developer American Capital Energy. Having worked in photovoltaic technology development for more than 30 years, Kalejs has seen wild ideas come and go. The energy crisis of the 1970s spurred dozens of pie-in-the sky ideas, he said. But that hasn’t stopped people from innovating. Here’s his grounded take on highly unusual ways to harness solar power today.

Andre Broessel designed glass spherical lenses filled with water that act like solar concentrators.

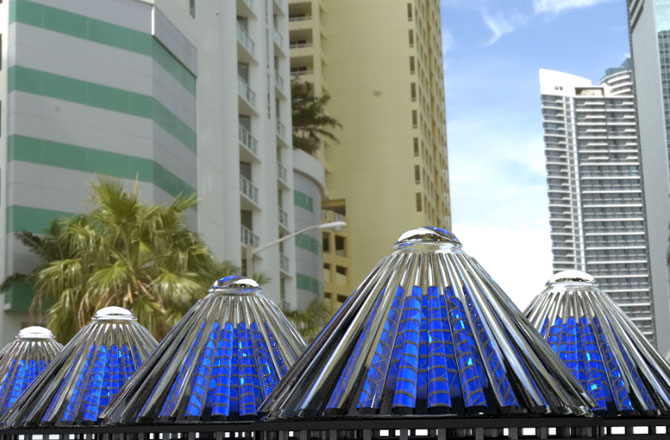
The Los Angeles-based startup V3Solar made the news rounds last year with its literal spin on solar. Slick renderings showed a design for deep blue solar cells in a cone shape that could rotate. The company says they want to take photovoltaics from flat and static to 3-D and dynamic. A new video V3Solar put out this summer had more details about how its spinning mechanism could maximize energy generation.

Kalejs said he said he thought the setup could work but he was skeptical about the complexity. “It looks like something that’s a nice decorative piece you might find in a fountain,” he said. The company said it would show its prototypes to potential investors with a non-disclosure agreement.

Other designers are imagining different shapes for traditionally flat solar panels. Going rounder could mean capturing sunlight from every possible direction. Last year the Japanese optics company Kyosemi launched Sphelar Power to manufacture micro-spherical solar cell beads from discarded silicon and electrodes that are wired into a mesh. André Broessel, an architect at solar architecture company Rawlemon in Barcelona, designed glass spherical lenses filled with water that act like solar concentrators both large and small.

Kalejs called Broessel’s idea a neat one that would appeal to consumers but pointed to companies attempting a similar technology with 20-foot-diameter solar concentrators. “It’s a very tricky system to make and you need to make it on a large scale to make it cost effective,” he said.

Minuscule solar panels placed on microbes could create a chemical reaction akin to artificial photosynthesis

Minuscule solar panels placed on microbes could create a chemical reaction akin to artificial photosynthesis

Scores of scientists are working on artificial photosynthesis by developing systems that chemically convert sunlight, water and CO2 into oxygen and plant fuel. Unfortunately, photosynthesis has less than a percent efficiency versus 20 percent to 30 percent for regular solar cells, Kalejs pointed out. The risks with artificial plants and microbes are also quite high because a disease or fungus could wipe everything out.

British researchers from the University of East Anglia announced earlier this year that they’re working on artificial photosynthesis by placing minuscule solar panels on microbes in an effort to create hydrogen for fuel. Kalejs said he found their approach interesting and added that he’s attended National Science Foundation meetings where attendees discussed putting photosynthetic material on top of a solar cell. “Everybody’s been looking for a boost,” he said.

 Reusable peel-and-stick solar cells can be made easily and affixed to just about anything solid.


Reusable peel-and-stick solar cells can be made easily and affixed to just about anything solid.

Effective transparent and thin-film solar cells have been on the technology wish list for a long time. Several companies have already started manufacturing flexible solar panels but rigid ones remain more affordable and easier to produce, resulting in high quality. Earlier this year Stanford University and the U.S. National Renewable Energy Laboratory came up with reusable peel-and-stick solar cells that can be made easily and affixed to just about anything solid: toys, helmets, transistors and even business cards. The resulting power is still relatively small, though.

Kalejs cautioned that sunlight breaks down materials made with polymers, making the technology unstable. “It’s a short-life product right now,” he said. “The organic solar cells probably wouldn’t last more than a year or two, if that long.”

Bottle Charger is a way to recharge cell phones using a water bottle filled with boiling water and a mini-turbine

Bottle Charger is a way to recharge cell phones using a water bottle filled with boiling water and a mini-turbine

One person’s trash represents solar tech treasure for someone else. Last year blogger and tech writer Ryan Matsunaga posted step-by-step instructions on how to convert a water bottle into a solar lantern for $2. In February, Kenyan designers launched a Kickstarter campaign around the Bottle Charger, a way to recharge cell phones using a water bottle filled with boiling water and a mini-turbine. Although the initial prototype simply required a temperature differential, the designers hoped to integrate a small solar dish that could heat water with sunlight continuously during the day.

“I have no idea how cheap or stable it is,” Kalejs said of the Bottle Charger idea. “I guess you’d say, well if it works, use it.”

Solar-powered wearables will need to get more durable if they're going to be practical.

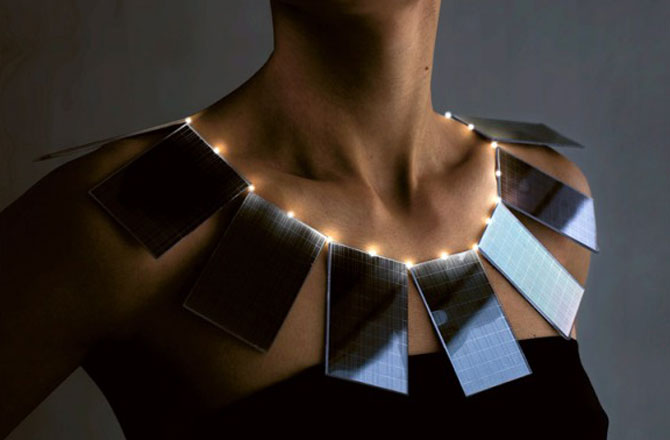
Solar-powered wearables will need to get more durable if they’re going to be practical.

Solar technology’s sleek lines and deep colors are tempting to designers who have incorporated solar cells into purses, necklaces, jackets and mini-dresses. That technology tends to be more high fashion than high function. Charging a phone in a jacket that has a solar power component can take hours. Solar-powered clothing companies have come and gone. Kalejs said that organic solar cell material wears out in a few years so even if the fashion looks timeless, the tech isn’t. He remembered seeing a company that turned spherical solar beads into jewelry and said he can still see how it would appeal to consumers.

Solar arrays could be installed in the open land than runs alongs roads. Oregon Department of Transportatio

Solar arrays could be installed in the open land than runs alongs roads.
Oregon Department of Transportatio

Roads and highways are a natural lure for solar technology innovators. Asphalt does a great job at absorbing and storing heat. Plus there’s so much of it around already — the infrastructure is there. Several years ago engineers and chemists at the University of Rhode Island created a project to develop ideas for harvesting solar heat from roads. Their suggestions included placing flexible photovoltaic cells on concrete highway dividers and installing water pipes in asphalt. At the same time, the company Solar Roadways wants to embed solar panels directly into roads.

Kalejs was highly skeptical of that, calling it a poor use of solar modules. However, solar modules could be put in conventional arrays beside the road, he said, as they’ve done in Oregon. There’s no shortage of land for that.

Follow our FISHING BLOG

WEB   RATES     FISH    HUNT    CABINS    PHOTOS
TESTIMONIALS    BROCHURE    HUNT BOOKLET

Enter your email address to subscribe to this blog and receive notifications of new posts by email.

← Back

Thank you for your response. ✨

Email Me....


Tags: , , , , , , , , ,