RSS

Tag Archives: Wawang Lake

Check Out Our NEW Hunt Booklet!

 Working hard to provide quality for each individual  hunter is how we operate our hunts
and is what keeps  our hunters coming back year after year.

Hunt Booklet

Follow our FISHING BLOG

WEB   RATES     FISH    HUNT    CABINS    PHOTOS
TESTIMONIALS    BROCHURE    HUNT BOOKLET

Enter your email address to subscribe to this blog and receive notifications of new posts by email.

← Back

Thank you for your response. ✨

Email Me....


Leave a comment

Posted by on September 2, 2015 in black bear, grouse, Wawang Lake Resort, wolf


Tags: , , , , ,

Unusual but amazing moose antler trophies

With the regular rack mount being the most common, it has become popular to put a spin on an old favorite!

This slideshow requires JavaScript.

Follow our HUNTING BLOG

WEB   RATES     FISH    HUNT    CABINS    PHOTOS
TESTIMONIALS    BROCHURE    HUNT BOOKLET

Enter your email address to subscribe to this blog and receive notifications of new posts by email.

← Back

Thank you for your response. ✨

Email Me....

 
Leave a comment

Posted by on September 1, 2015 in hunting, moose, Wawang Lake Resort


Tags: , , , , , ,

Building and Emergency helter in the field

With the season upon us, being in the field is commonplace.  In the event of an emergency or in climate weather

Understanding how to create effective wilderness survival shelters is one of the most important outdoor skills. From keeping you protected from the elements to providing a place to rest, wilderness shelters serve a key role in survival situations. Not only do they provide for physical needs, but also help create a sense of home in the wilderness. Though each season and environment presents its own challenges, there are several universal principles for creating effective wilderness survival shelters:

Location
The most important aspect of making wilderness shelters is choosing a good location. A good location is one that 1) provides easy access to ample building materials such as dead sticks, leaves, and grasses; and is 2) away from major hazards such falling branches, pooling water, and insect nests. You also want a location that has a large enough flat area to allow you to lie down and sleep comfortably.

Size
A common mistake when building wilderness survival shelters is to build them too large. Not only does it take more materials, effort, and time to construct, but often ends up being cold due to the amount of space on the inside. Effective wilderness shelters are often small on the inside – just large enough to fit your body to conserve body heat.

Type

The debris hut is an extremely versatile wilderness survival shelter. It can be built in almost any habitat and does not require tools or special equipment. Creating an effective shelter is one of the most important priorities in a survival situation. Most lost persons perish from hypothermia, which may have been easily avoided had they constructed a simple shelter.

The debris hut is constructed using sticks and any available debris, such as leaves, moss, ferns, bark, etc… The key to a good shelter is to insulate yourself from all of the forms of heat loss. Your body can lose heat through direct contact with the ground, wind, and simply radiating off of your body. Therefore, your shelter needs to provide insulation and protection from all of these elements.

A completed debris shelter is like a gigantic water-resistant sleeping bag, insulated by debris and held together by sticks. To construct a debris hut:

debris hut basics

1.) Select a location that provides ample building materials (sticks and debris) that is safe from falling branches, pooling water, and other hazards.

2.) Prop up a sturdy 8-foot pole-like branch on a stump or crook of a tree. This ridge pole should be sturdy enough to support your weight. The size of the space underneath the ridge pole should be just large enough to fit your body plus six inches of debris on all sides.

3.) Lay shorter stick along the length of the ridge pole on both sides, leaving room for a doorway. These shorter sticks are called ribbing. The ribbing sticks should touch the ground roughly six inches outside of where your body would lay.

completed debris hut

4.) Add smaller sticks on top of and perpendicular to the ribbing sticks. These latticework sticks will keep the outer debris from falling inside the shelter.

5.) Pile large amounts of leafy debris on top, as well as inside. Use your driest, softest debris on the inside closest to your body. When complete, there should be at least three feet of debris piled up on top and on all sides of the shelter.

6.) You can lay more sticks on top to keep the wind from blowing the debris away if it is a windy day.

7.) A door plug can be created by stuffing a shirt full of leaves.

Crawl inside, being sure to burrow into the leaves, so that there is a mattress of leaves insulating you from the ground and on all sides. Though nothing like the warmth of your own bed, a debris hut will allow you to survive the night.


Tags: , , , , ,

The dangers of dry firing your bow

Dry-firing your bow is something you will want to avoid at all costs. To help minimize your chances of dry-firing a bow you should always draw a bow with an arrow in it, and aim it at a target. This way if you do accidentally release the string there is an arrow in it and you have a target to stop the arrow. Also if you are just trying out a bow be sure to draw with an anti-dry-fire release. When in a group of people it is very easy to become side tracked and forget to load your bow with an arrow. It’s always good to double check before you draw your bow


bowtarget


Dry firing a bow is the act of shooting a bow without an arrow. While this may seem harmless to some of us who are just starting out I assure you that this can be one of the most costly mistakes you can make.

The fact of the matter is that it can happen to anyone beginner or expert for many different reasons. Whether it be from ignorance, distractions, or accidental misfire of a release it happens all the time. So the question is what do you do if you accidentally dry-fire your bow.

There are a few outcomes that could happen when a bow is dry-fired, the first is that is that it will appear that nothing has happened to any of your bow. The second scenario is that your string breaks however everything else stays intact. The third possibility is your bowstring, and cables could snap resulting in your limbs breaking and potential debris flying all over the place. This is basically the worst case scenario and can at times be irreparable.

No matter what scenario your bow falls into after being dry-fired, the first thing you will need to do is to get a magnifying glass and a bright light and look over the limbs especially near the cams for any cracking, or splintering. If you find that one of both limbs have cracks or splinters in them then you will have to replace the limbs before you are able to shoot again. Failing to do so will likely cause will render the bow unusable and/or injury.

bowillustration

In any of the other cases where the string breaks and/or the bow limbs shatter, you will first go get medical attention if you need it and then you will need to bring your bow in to a bow repair shop and you will have to replace the limbs,string, and any other broken parts(axles,cams,wheels etc.).

After checking for cracks and splinters in the limbs, take a look at the cams/wheels to make sure that they have not been bent or cracked, again if they are you will need to replace them as soon as possible before you are able to shoot. Next if you were lucky enough to have your string still intact, you will need to check the whole thing for badly frayed portions, cut strands, and badly damaged areas, especially near the axles.
If everything checks out and you were unable to find anything wrong with your bow then you are lucky, and you have 2 options, your first option is to draw the bow(with an arrow) and shoot it. Make note of any weird noises, or vibrations. If you aren’t the risky type then you can bring it into a bow repair shop and they will have the tools and resources to be able to better inspect it for damages.

In closing, dry firing a bow may seem innocent, but in turn can be detrimental and even dangerous. Take your time to ensure longevity of your equipment for years to come and better success rates!

Follow our FISHING BLOG

WEB   RATES     FISH    HUNT    CABINS    PHOTOS
TESTIMONIALS    BROCHURE    HUNT BOOKLET

Enter your email address to subscribe to this blog and receive notifications of new posts by email.

← Back

Thank you for your response. ✨

Email Me....

 
2 Comments

Posted by on August 22, 2015 in archery, bow, Wawang Lake Resort


Tags: , , , , , ,

DIY: Survival Cook Stove out of a Tin Can

This is a how-to on how to make a survival cook stove instead of spending $25 to buy one online. It is a simple projecting that requires an old can, a pair of scissors, and a knife. Be careful and pay attention to his excellent instructions! Watch this video survival training tutorial and learn how to build a cook stove out of a tin can.

Follow our FISHING BLOG

WEB   RATES     FISH    HUNT    CABINS    PHOTOS
TESTIMONIALS    BROCHURE    HUNT BOOKLET

Enter your email address to subscribe to this blog and receive notifications of new posts by email.

← Back

Thank you for your response. ✨

Email Me....


Tags: , , , , , ,

An illustrated Guide to the Best Game Meat Cuts

There are plenty of hunters out in the field bringing home dinner and we figured we would share some great guides on the best cuts and how to get them from your harvest!  Click on each picture to enlarge for greater detail 🙂

This diagram is the basic overview of the quarters and can be applied to deer, moose, elk and caribou.

illustrated deer

This second diagram is a more in depth cut selection and is coded for the sections as well.  Again, this can be applied to deer, moose, elk and caribou.

deerchart

Ensure before you properly care for your game in all stages of meat preparation to give not only longevity to the meat, but reduce the risk of cross contamination of any bacteria that could not only spoil the meat but could also make you very sick.

Happy hunting!

Follow our FISHING BLOG

WEB   RATES     FISH    HUNT    CABINS    PHOTOS
TESTIMONIALS    BROCHURE    HUNT BOOKLET

Enter your email address to subscribe to this blog and receive notifications of new posts by email.

← Back

Thank you for your response. ✨

Email Me....

 
Leave a comment

Posted by on August 19, 2015 in game, recipe, Wawang Lake Resort


Tags: , , , , , , , , , , , , , , ,

Field Judging Black Bear

Here is an excerpt from a fantastic article written by Carl of BCHuntingBlog.  This is always a popular question we are asked and this article gives the same advice (with photos) as we have given for many decades 🙂

Field judging Black Bears can sometimes be difficult even for the most experienced of bear hunters.  The animal you are judging is usually completely black aside from color phase bears, they have thick fur and the shadows they create can be deceiving.  With that said there are a few methods you can have at your disposal to help you determine if the bear is a shooter or not.

So how can you improve your skills at judging trophy black bear size in the field?

Let’s Get Started.

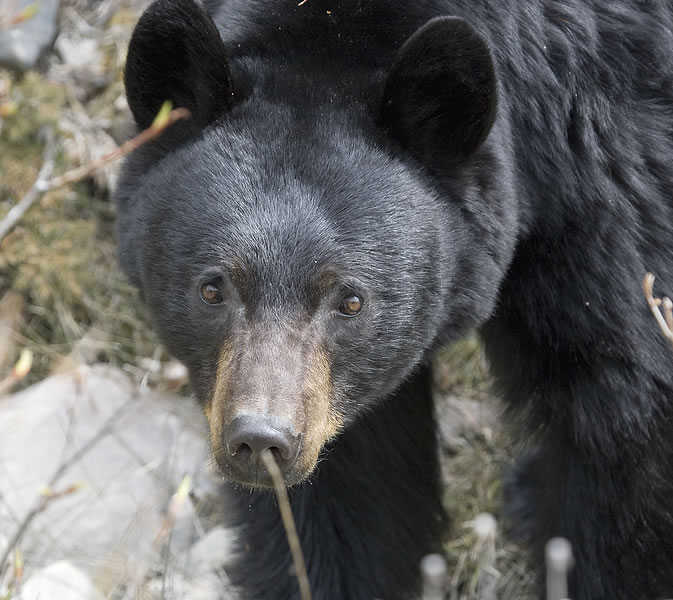
Check Out The Bears Head:

Big Bears:  Will have a very large, blocky looking head.  Their ears will look small, and almost off to the side of their skull a little.  On really big boars you might even see a crease down the center of their forehead, if that’s the case, it’s a good bear.  Other features to look for on a bears head would be scarring around the face, boars have ferocious fights, so it’s not uncommon for them to have plenty of battle scars around their muzzle, eyes and ears and these are helpful clues.

Small Bears:  Will have a small, narrow head, almost dog like.  Their ears will appear to be much larger and defined.  Almost like “Mickey Mouse” is a common description among many experienced bear hunters.

Check Out The Bears Behavior:

Big Bears:  Big dominant boars, behave like big dominant boars.  And they usually won’t be in much of a hurry unless they know you’re there and you’ve spooked him.  When big boars walk they will sometimes have a big swagger to their stride, much more so then a bear who’s on the submissive end of the spectrum.  When I shot my first Island Black Bear we watched him stand up on two legs and scratch his back on a tree for a couple minutes, without a care in the world.  When big boars decide to move they move deliberately, there is no indecision in their movements which can be noticed in younger, startled and confused bears.  Because they are dominant, the big boars will usually have a bit of a schedule and will often be caught feeding in the same places, at the same times of day.  They can do this because they are the boss!

Small Bears:  Are very cautious, they will get out of  your way quickly (so will a big old boar too if he’s spooked).  They will usually always be more alert then a dominant bear because they have to be, or they could become dinner.  Smaller bears will often seek the safety of a tree when in trouble or they just won’t stop running until they hit the coast.  When small bears run, they will appear much more agile then a larger bear.  They will will look more like a big dog running, then a lumbering old boar.

*Tip – When you’re observing a bear, and he/she doesn’t appear to be spooked, sit there and watch them for 1/2 hour or so.  Bears are pretty fascinating creatures when you watch them do their thing, and by observing you’ll learn more about them and that makes the hunt more fun.

Check Out The Bears Body:

Big Bears:  Sometimes the big boys are called “belly draggers” for a reason, and it’s possible for our bears to get this big.  Big Boars may appear to be so big, you can’t see underneath their body when they are moving around.  That’s a big bear!  If the bear you’re looking at appears to have long legs, it’s probably because he has a smaller body in proportion.  Big bears will have very muscular looking arms and legs, especially their front shoulders/neck area.

Small Bears:  Can you picture the size of a really large breed dog? OK.  That’s about the size of an “average” Island Black Bear.  An average Island Bear will weigh 150-250lbs.  An large 6′+ boar could likely weigh 300+ and the big bears do look much different as you can see in the photos.

What Are Some Additional Signs Of A Big Bear?

If it’s a big bear you’re after then you need to pay attention to the sign you see around you.  Tracks and Scat are very good indicators as to the potential size of a bear, and will let you know if a particular bear is frequenting an area.

Judging Bear Size From Tracks:

This method was shown to me by my Father who was a big game guide for nearly 30 years.  It has since been shown to me by several taxidermists and many more experienced bear hunters than I so I believe in this method.

If you can find fresh bear tracks in an area, maybe mud or soft sand (common where we hunt spring bear on the Island) measure the distance across the front pad and simply add 1.  This will give you a rough “square” of the bear.   So if you measure the bear track and it came out at 5″inches across, you would add 1 and could guesstimate that bear was roughly a 6′ foot bear.

I have tried this method on many of our harvested black bears and I have to say it’s pretty damn close!  The only problem with this method is you need to find the bear that left the track!

Judging Bear Size From Scat:

Spend a couple days bear hunting and you’ll observe several dozen or so piles of bear scat scattered across the road.  Not only can they help you see what the bears are eating but they can give you a pretty good indicator as to the size of the bear that left it.  Here’s a tip for you.  It’s not necessarily the size of the pile… It’s the diameter of the nuggets!  A really BIG bear has a really big butt and it’s not uncommon for them to leave scat the diameter of a beer can behind!  If you look at 10 piles of bear scat and then come across the one left by the big kahuna trust me… You’ll Know!

If you discover an area that has BIG tracks and some BIG (large diameter) scat, then it might be worth hunting that area a little harder.  Big Island Black Bears don’t have enormous ranges and unless you’ve spooked them heavily they will keep coming back to the same places to feed.

Hopefully you found article helpful and through experience you’ll become a much better bear hunter.  Because of their abundance it’s pretty easy to rack up experience if you’ve got the time to put a couple weekends in every year and then the patience to watch and observe what goes on around you.  Pay attention to the sign, and have a good time out there!

WEBSITE    RATES     FISH    HUNT    CABINS    PHOTOS
TESTIMONIALS    BROCHURE    HUNT BOOKLET

Enter your email address to subscribe to this blog and receive notifications of new posts by email.

← Back

Thank you for your response. ✨

Email Me....


Tags: , , , ,

Folding Portable Charcoal Grill

folding-portable-grill-thumb

The X-Grill is a portable charcoal grill that you can fold up and haul anywhere with ease, and is great for those long hikes you take by yourself, while hunting or even on the beach.

Just unfold it, throw in some charcoal, and grill some weiners while you take in the ambience of nature.

Made from durable electro-plated iron construction the folding charcoal grill folds up to just 1 inch in thickness when collapsed. The portable X-Grill comes with a chrome plated tri-fold cooking grate, along with a charcoal grate, and measures 21 inches x 21 inches x 9 inches when fully set up.


Follow our FISHING BLOG

WEBSITE    RATES     FISH    HUNT    CABINS    PHOTOS
TESTIMONIALS    BROCHURE    HUNT BOOKLET

Enter your email address to subscribe to this blog and receive notifications of new posts by email.

← Back

Thank you for your response. ✨

Email Me....

 
Leave a comment

Posted by on August 15, 2015 in Camping, hunting, Wawang Lake Resort


Tags: , , , , , , , ,

Moose Fajitas


moose

Mexican food is even better when made with game meat. Here’s a great way to stretch out some tender steaks and accentuate the wonderful rich flavours only game can bring to the table. This recipe works well with any venison. Serves 4 (2 to 3 fajitas per person).

Serves: 4

Ingredients

  • 1 to 1½ lb moose steak
  • 1 cup fajita sauce
  • ¼ cup canola oil
  • Salt and black pepper, to taste
  • 2 cloves garlic, minced
  • 2 yellow onions, thinly sliced
  • 2 sweet red, green or yellow peppers, thinly sliced
  • 12 flour tortillas

Preparation

  • Trim all fat from steak. Slice thinly across the grain into 1×2-inch strips. Marinate in fajita sauce for several hours or overnight in refrigerator.
  • Preheat oven to 350°F. Remove meat from marinade (keep marinade). Heat 2 tablespoons of oil in a cast iron skillet over high heat. Add meat and brown, taking care not to overcook. After 4 to 5 minutes, add fajita sauce marinade and season with salt and pepper. Simmer for 5 minutes or until sauce thickens slightly.
  • In a separate pan, sauté garlic, onions and peppers in 2 tablespoons of oil over medium heat. Season with salt and pepper. Meanwhile, warm tortillas in a covered dish in oven.
  • Fill one platter with moose strips and another with vegetables. Serve tortillas in the warming dish, along with small bowls of grated Monterey Jack cheese, tomato, salsa, sour cream and guacamole.
  • For the glassMexican beer is a natural choice for this summer feast; hearty red wines such as Zinfandel or Spanish vintages are also good.

Follow our FISHING BLOG

WEBSITE    RATES     FISH    HUNT    CABINS    PHOTOS
TESTIMONIALS    BROCHURE    HUNT BOOKLET

Enter your email address to subscribe to this blog and receive notifications of new posts by email.

← Back

Thank you for your response. ✨

Email Me....


Leave a comment

Posted by on August 14, 2015 in moose, recipe, Wawang Lake Resort


Tags: , , , , , , ,

Need a Do-Over With Your Shot?

It’s rare for any hunter to walk away from a field or reflect on a hunt and not think about whether a shot could have been better.  Whether with a bow, crossbow or firearm, there are times when we hesitate. A little voice – instinct, caution, doubt? – throws up a hurdle.

ShotSimulator
Sometimes we adjust and avoid the hurdle. Other times we pull up short and don’t leap. We don’t take the shot.And, unfortunately, there are times when we know the hurdle is there but take the shot anyway. We’re confident in our abilities and that of our bow, crossbow or gun. Some might call that experience. Some might say it’s recklessness or unethical.

We probably all can look back and wrestle with at least one shot that might have been risky, even if things turned out well after taking it and the deer, bear or moose is on the ground.  Part of our duty as hunters is to strive to maximize our abilities with whatever weapon we use.

We practice, tune our bows, hit the range with our guns. We try to find the right combination of arrows and broad heads or the ammunition that works best with our rifles, muzzleloaders, handguns or shotguns.  One way to improve our knowledge and experience is with Deer & Deer Hunting’s “Shot Simulator” software.  If you’ve ever been curious about where your bullet, slug or arrow has entered a deer’s body and what happened, here’s how to find out.  The Shot Simulator software is designed to provide you with outstanding animation of a deer’s body and internal bones, muscles and organs.

imagesA15UZWSYWith the Shot Simulator, you can position the animated deer in numerous positions – how it was when you shot, or how you saw a buck or doe and didn’t shoot – and then learn which organs were hit.  Didn’t like what you saw? Position it differently and do it again. You can not only position the deer, but also your shot from a tree stand or ground level.  If you’re a stand hunter but only climb about 15 feet, you can see the difference in that height versus 25 feet or on the ground.  The animation allows you to move the deer around and then remove the hide, skin and bones to see what happened.  Then, you can punch in the trailing guide to find out what happens next.  Should you follow the game immediately?  Wait a while? Just for your knowledge, you could take the shots on the computer that you’d definitely pass up in real life and then see what would happen.

It’s an educational tool that could help you glean more knowledge and help make you a better hunter. Shot Simulator also is a great teaching tool for young hunters, too.  They’re curious about what happens and this is a great way to augment their in-field learning.

Follow our FISHING BLOG

WEBSITE    RATES     FISH    HUNT    CABINS    PHOTOS
TESTIMONIALS    BROCHURE    HUNT BOOKLET

Enter your email address to subscribe to this blog and receive notifications of new posts by email.

← Back

Thank you for your response. ✨

Email Me....


Tags: , , , , , , ,