
Follow our FISHING BLOG
WEB RATES FISH HUNT CABINS PHOTOS
TESTIMONIALS BROCHURE HUNT BOOKLET
Follow our FISHING BLOG
WEB RATES FISH HUNT CABINS PHOTOS
TESTIMONIALS BROCHURE HUNT BOOKLET

SO, you’ve opted for a lung shot. Good choice. But where exactly you should place your bullet depends on your quarry, as the following tips reveal. (Please refer to the organ legend) Sometimes you only get one chance to bring down a big-game animal. Here are 7 ways to help make sure it truly counts.

Again, lung shots are your best bet. Trace the back of the front leg up to about one-third of the way into the chest. The lungs on a bear are positioned a little more forward than on an ungulate, so you don’t have as much leeway if you shoot back of your aiming point. For the shoulder/heart shot, which is popular for anchoring bears in their tracks, follow the centerline of the front leg up to the one-third point of the body. Be careful not to shoot low or forward, or you’ll quickly have a wounded animal on your hands.
WOUNDED and lost big game animals are part of the somber side of hunting. None of us is comfortable with the subject, but if you have any measurable hunting experience, you’ve undoubtedly seen examples. Maybe you’ve even lost an animal or two yourself.


It’s a certainty that as long as there’s hunting, game will be wounded and not recovered. In such situations, it’s just as certain that the bullet didn’t hit the animal in the right place. Why exactly can be blamed on any number of variables, but in most cases it’s safe to say the shot should never have been taken in the first place.
As hunters, our most important priority is to do everything possible to ensure a clean, quick, humane kill-it’s our moral obligation every time we head afield. Here are some important considerations in making that happen.
BULLET PLACEMENT
Much has been written and discussed about selecting the best rifle, cartridge, bullet and optics for hunting specific species under various conditions. Most of this advice is sage indeed, helping hunters learn about and understand the limitations of their equipment. But when it comes to a quick kill, the single most important factor is bullet placement. A .243 in the heart or lungs of even the largest big-game animal, for example, is more certain to result in its demise than a .500 Nitro Express in its leg. Just think of hunting legend Karamojo Bell. It was his fanaticism over bullet placement coupled with an understanding of his quarry’s anatomy-that allowed him to tale down so many elephants with his meager .275 Rigby, a cartridge equivalent to today’s 7×5 7.

MARKSMANSHIP
The first step in ensuring accurate bullet placement comes with the decision to squeeze the trigger. Before you hit the switch, you must have an extremely high expectation of putting the bullet right where you want it, and that means understanding your own limitations as a marksman. I’ve never been much impressed by tales of 450-yard kill shots on deer or other game. While such shots are possible, not many hunters can make them with any consistency. With few exceptions, I shudder when I hear hunters talking about their long shots-much like a gambling addict bragging about his one win, for each tale of success there are likely tenfold as many unspoken failures.
The longest shot I’ve ever taken was with a 7mm Rem. Mag. on a five-point bull elk in B.C.’s Muskwa Valley. It was 360 yards away. I had a solid rest, a reasonable amount of time and a mild, though gusting, wind. The bull was dead when we got to him, having never moved. Despite that, I’m not sure I’d take the same shot today if it were presented. Perhaps I no longer feel the need to, as I might have back when I was a much less seasoned hunter. Experience has taught me that too much can go wrong in such a situation-not to mention the fact few animals can travel as far, or as quickly, as an ells can when wounded.

Jon Hanson – Tiffin, IA 440 lb. black bear
No, I’m far more impressed by the hunter who tells me he snuck in to within 75 yards of a herd of elk, or never shoots at running game or at any animal beyond 150 yards. This is the hunter I admire, for he clearly understands that undisturbed game and cool-handed marksmanship should be the rule, not the exception. This is the hunter who believes that 20 bullets can equal 20 deer, and he’ll wait to shoot only when he’s extremely confident of accurately placing a bullet.
HEAD & NECK SHOTS
So, where on an animal should we try to place our bullet to ensure a one-shot, clean kill? There’s no denying the surest fatal shot is to the brain or spinal column. Either will put an animal down almost instantly, and result in very little ruined meat. Under most circumstances, however, this is not a shot I would recommend. For starters, the brain is a relatively small target, and even a narrow miss can result in a broken jaw, lost eye or other similar wound that condemns an animal to a most unpleasant, slow death. I once shot an antelope sporting a fresh bullet wound through the bridge of its nose. Whether the hunter who first hit it was aiming for the brain, I can’t say for sure, but the buck was clearly laboring, almost choking on blood, and would have suffered considerably had I not come across it.
Neck shots are equally uncertain, as the spinal cord must be severed to ensure instant death. Miss by even a little bit, and you’ve probably got an animal with a muscular wound from which it will likely recover, but not without considerable agony. In the worst-case scenario, you may sever the trachea-the animal will likely escape, but suffer a lingering demise. When neck shots don’t connect directly with the spinal column, an animal will often drop to the ground almost immediately but quickly recover and run off. If you shoot an animal in the neck whether by design or by accident-it’s therefore important to keep a close eye on it until you’ve confirmed it’s down for keeps.


Head and neck shots do have their place in the right circumstances, but they should only be taken at close range by capable shooters who know their quarry’s anatomy. They’re also acceptable in the rare event of an emergency, when a dangerous animal needs to be brought down in a hurry.
SHOULDER SHOTS
Some hunters prefer shoulder shots because they will disable game while also inflicting fatal damage to the heart or lungs. Even when no collateral damage occurs, a broken shoulder, or two, will bring down an animal, rendering it helpless. In my opinion, this shot should be reserved for dangerous game, particularly bears. While some hunters use shoulder shots on larger animals such as moose and elk, I find the resulting dispersal of bullet and bone fragments ruins too much meat. Having shot a whitetail through the shoulder last year, I can speak first-hand of the meat that was wasted. Another thing to keep in mind when considering the shoulder shot is that if you shoot too high or too far in front, you’ve got either a clean miss or an animal with agonizing wounds. And if you shoot too low, you’ve got an animal with a broken leg that can still escape, only to later succumb to its wounds or predators.
 HEART SHOTS
The heart shot gets a lot of attention, though I suspect most hunters don’t actually realize just how low in the chest the heart lies in big game. While no doubt fatally damaged if hit, the heart offers a small target, and is often covered by the upper leg. There’s little room for error: too far forward and you’ve got a non-fatal brisket shot; too low and you’ve hit muscle or broken a leg, with no expectation of quickly recovering the animal. And if your bullet strikes too far back, you’ve got a gutshot animal. The only practical room for error is if you shoot high and take out the lungs. While many believe the heart shot is almost instantly fatal, most experienced hunters will tell you that a heart-shot animal typically travels farther before collapsing than one that has been lung-shot.
LUNG SHOTS
I believe the lung shot is the appropriate shot for 90 per cent of the big-game hunting situations in Canada. First and foremost, a bullet through the lungs results in an almost certain one-shot kill. In most cases, the animal won’t drop on the spot, but seldom will it travel more than 100 yards or so before falling over; the damage a modern bullet does to the lungs is that devastating.
 The lungs also offer a relatively large target, bigger than any other assuredly fatal zone on a game animal. This allows for a fair margin of error. Shoot low, and you’ll take out the heart; a bit high and you’ll sever the spinal column. Too far forward and you have a debilitating shoulder shot. Only when you shoot too far back do you have a problem-animals shot in the paunch typically suffer lingering deaths, and if you do happen to recover one, you’ve got a heckuva mess on your hands when it comes to field-dressing it. If you shoot just a little too far back, however, you may get lucky and strike the liver. Animals hit in this vital organ tend not to go too far before lying down.
The lungs on a game animal generally cover about two-thirds of its chest area when viewed broadside, more or less in the centre and a little toward the bottom. A professional hunter in Africa once told me he thought North American hunters tended to shoot dead centre in the chest of an animal; he believed the more effective shot was to the top of the lower third of the chest. He may well have been right, but 1 still maintain that allowing as much room for error as possible is the wisest thing most of us can do. As such, when my quarry is broadside, I generally aim for the centre of the chest, just behind the shoulder. Often, an animal will not react immediately to a lung shot, causing some hunters to think they’ve missed when they’ve actually made an excellent shot. I remember one moose I shot three times in the span of about 10 seconds. It didn’t take two steps during that time, and I couldn’t understand how I could be missing such a big target. The animal dropped soon after the third shot, however, and when I skinned it out, a salad plate would have covered all three holes in its chest and lungs. (For species-specific tips on lung shots, see “Top targets” on page 48.)
SHOOTING ANGLES
While we all prefer broadside shots, as often as not we face shooting opportunities from an angle. You still want your bullet to enter the chest cavity, however, so it’s important to visualize the path your bullet must take. With an animal quartering toward you, your target should be somewhere between the base of the neck and the point of the facing shoulder. If an animal is facing you directly, the centre base of the neck is the preferred target. The more difficult shot to visualize is when an animal is quartering away. Take your shot with the intention of breaking the far side shoulder and you’ll generally send your bullet through the desired lung region. Be aware that the tendency in this situation is to shoot too far back, resulting in an unwanted paunch shot. I recommend not shooting when animals are quartering away at extreme angles or facing directly away from you. While we all know the old “Texas heart shot” through the behind can be fatal, the odds are your bullet will break up or deflect on contact with bones, impeding its ability to get into the vital organs. I know some may disagree, but this is one shot I simply won’t take, and I advise others to follow suit. If you absolutely must tale this shot, at least be sure to use a well-constructed bullet designed for maximum weight retention and penetration. Remember, when it comes to shot placement, the goal isn’t simply a freezer full of meat it’s also to get the job done quickly and efficiently.
Follow our FISHING BLOG
WEB RATES FISH HUNT CABINS PHOTOS
TESTIMONIALS BROCHURE HUNT BOOKLET

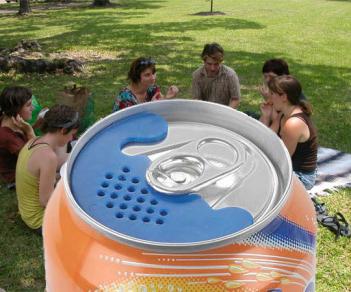
The bug screen for cans will protect your sugary soda can or beer from terrible aids carrying mosquitos and bees from hopping inside your can and spreading viruses, creating choking hazards, and causing girl like screams form occurring.
To use the screens, simply place it on your can under the opener ring, and you are ready to do some bug free drinking.
The bug screen for cans comes in a 12 pack of screens, half of which are sized for soda cans, the other half are sized for beer cans. The bug screen for cans are washable and reusable, and can even be used with straws.
Follow our FISHING BLOG
WEBSITE RATES FISH HUNT CABINS PHOTOS
TESTIMONIALS BROCHURE HUNT BOOKLET

It’s rare for any hunter to walk away from a field or reflect on a hunt and not think about whether a shot could have been better. Whether with a bow, crossbow or firearm, there are times when we hesitate. A little voice – instinct, caution, doubt? – throws up a hurdle.

Sometimes we adjust and avoid the hurdle. Other times we pull up short and don’t leap. We don’t take the shot.And, unfortunately, there are times when we know the hurdle is there but take the shot anyway. We’re confident in our abilities and that of our bow, crossbow or gun. Some might call that experience. Some might say it’s recklessness or unethical.
We probably all can look back and wrestle with at least one shot that might have been risky, even if things turned out well after taking it and the deer, bear or moose is on the ground. Part of our duty as hunters is to strive to maximize our abilities with whatever weapon we use.


We practice, tune our bows, hit the range with our guns. We try to find the right combination of arrows and broad heads or the ammunition that works best with our rifles, muzzleloaders, handguns or shotguns. One way to improve our knowledge and experience is with Deer & Deer Hunting’s “Shot Simulator” software. If you’ve ever been curious about where your bullet, slug or arrow has entered a deer’s body and what happened, here’s how to find out. The Shot Simulator software is designed to provide you with outstanding animation of a deer’s body and internal bones, muscles and organs.
 With the Shot Simulator, you can position the animated deer in numerous positions – how it was when you shot, or how you saw a buck or doe and didn’t shoot – and then learn which organs were hit. Didn’t like what you saw? Position it differently and do it again. You can not only position the deer, but also your shot from a tree stand or ground level. If you’re a stand hunter but only climb about 15 feet, you can see the difference in that height versus 25 feet or on the ground. The animation allows you to move the deer around and then remove the hide, skin and bones to see what happened. Then, you can punch in the trailing guide to find out what happens next. Should you follow the game immediately? Wait a while? Just for your knowledge, you could take the shots on the computer that you’d definitely pass up in real life and then see what would happen.
It’s an educational tool that could help you glean more knowledge and help make you a better hunter. Shot Simulator also is a great teaching tool for young hunters, too. They’re curious about what happens and this is a great way to augment their in-field learning.
Follow our FISHING BLOG
WEBSITE RATES FISH HUNT CABINS PHOTOS
TESTIMONIALS BROCHURE HUNT BOOKLET

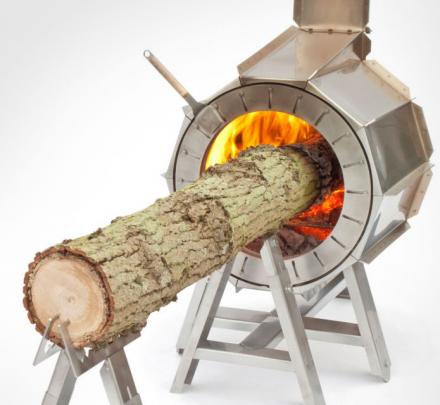
The Spruce Stove is an outdoor furnace that allows you to burn an entire tree at a time. Designed by Dutch designers Roel de Boer and Michiel Martens, the dutch stove allows you to continuously push the trunk of the tree more and more into the fire as it burns, as it holds the log up level to the fire using wheeled arms that allow you to easily slide it in.


To start the fire, simply use kindling, amber, small twigs, etc, and once the fire gets going simply push the end of the tree trunk into the fire, use the adjustable diaphragm to allow for more oxygen or less oxygen depending on what the fire needs. Once your fire starts to die down, simply push a few more inches of the trunk into the fire. When you want to stop the fire just stop pushing the log in.


The Spruce Stove is made from stainless steel, can easily withstand the heat of the fire as well as the weather, comes in three different models, weighs 110lbs, and measures 1.9 feet wide x 7.7 feet tall x 2.6 feet deep. Now you just need go chop down a few trees.

Follow our FISHING BLOG
WEBSITE RATES FISH HUNT CABINS PHOTOS
TESTIMONIALS BROCHURE HUNT BOOKLET


The CCTV Birdhouse is a birdhouse that looks just like a CCTV security camera, and is sure to keep those pesky criminals away, and keep those beautiful loving birds nearby. Now you can live life large knowing that not only are you deterring thieves, rapists, and teenagers from entering your lawn, but with each “camera” you install on your house, a new family of birds gets a new home.


Follow our FISHING BLOG
WEBSITE RATES FISH HUNT CABINS PHOTOS
TESTIMONIALS BROCHURE HUNT BOOKLET


Ingredients
Basic Bannock Mix
1 cup flour (white or a mixture of white and whole wheat)
1 tsp. baking powder
1/4 tsp. salt
1/4 cup dry milk powder
1 tbsp. shortening
Make the mix at home ahead of time. Sift dry ingredients, and cut shortening in with a pastry cutter or two knives until you have a granular, corn meal-like mixture. Package in zip-lock freezer bags. Double bag it if you’re going to be on a long trip. I’ve found that you can make large batches at once and make enough bannock mix for a trip in about fifteen minutes. Just make sure you sift the dry ingredients well, so you don’t get leavening problems.
Directions
Baking bannock is relatively simple once you get the hang of it. Your first ones will be dark and maybe burnt on the outside and gooey on the inside. Don’t despair, just pretend it’s a jelly donut and try again. The key is a consistent heat. While flames don’t indicate a bad cooking fire, red glowing fires from hardwood are best.
1. Start with a small cast iron frying pan and oil it well.
2. Pour some water into the bag and squoosh it around in the bag (squooshing is a technical term). Because the water and baking powder form carbon dioxide to make the bread light, the faster you go from mixing to skillet, the lighter your bannock will be. There will be lumps, of course, but we call them flavor bursts. I say “some water” because how much you add depends on the humidity and of course, personal taste. You don’t want it any thinner than a muffin consistency. If you’ve never baked a muffin, think spackle. You can distribute the dough with a poke of a finger or a stick or a spoon if you’re the civilized sort. Remember, it’s always easier to add water than take it out, right?
3. Squeeze the mix out of the bag and onto the warmed pan (not scalding hot — if the oil is smoking, it’s way too hot). The pan can be warmed over the fire if you have a grate, or leaned against a few logs near the heat source. It shouldn’t hiss or sizzle like a pancake batter…that means things are too hot. Cool it off and be patient. The bread will start to rise slowly.
4. Your bannock will start to look loaf-like. At this point you’ll want to flip your loaf. A little shake of the pan and flick of the wrist can turn it over, but a spatula is fair game too. At this point, just keep turning it. You’ll know when it’s done. It’ll look a lot like the picture here.
If you have a lid, you can try to cook your bannock dutch oven-style and put coals onto your skillet lid. Otherwise, you can turn it over to cook the top (carefully!) or else when the bottom is done, prop the pan up against a log with the top facing the fire. This is a great method of “semi-reflector-oven”. It also makes a lighter bannock.

Follow our FISHING BLOG
WEBSITE RATES FISH HUNT CABINS PHOTOS
TESTIMONIALS BROCHURE HUNT BOOKLET

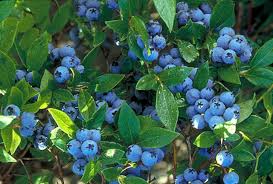 Blueberries are an important food source throughout the black bear range. The most commonly eaten berries in our area of northwestern Ontario are blueberries and raspberries. Many other berries are eaten, but they have shorter seasons, are scarce, or are less preferred.
The period when blueberries are abundant in our area is short & mainly in August-making that period critically important in the black bear’s annual cycle of events. Efficient feeding during that time is critically important to winter survival, growth, and reproductive success. Researchers found that bears in NW Ontario end mating activities before the critical feeding period and focus on feeding for the remainder of the summer.
Black bears are efficient berry-eaters, consuming up to 30,000 berries a day in a good year. They gather berries quickly, using their sensitive, mobile lips and swallowing them whole. The berries enter a two-part stomach, which grinds the pulp off the seeds.


 The seeds pass through the digestive tract unbroken and able to germinate, making black bears important seed dispersers. Each summer, they spread the seeds of their favorite berries all over their home ranges.
Black Bear around Wawang Lake gain weight most rapidly during July and August when berries are abundant. When the berries run out in September, there is little else to eat. The bear usually seek out their dens in September or October. The longer period of food abundance enables bears to achieve more growth and reach maturity more quickly than bear. Bear in NW Ontario typically produce their first litters at 4 to 5 years of age.
Berries contain anti-oxidants, and the seeds of some species contain vitamin B-17, considered an anti-cancer compound by some scientists. Although cancer occurs in captive bear, it has never been reported in wild bear.
RECIPES

Blueberry Pancakes

Gluten FREE Blueberry Pie
Follow our FISHING BLOG
WEBSITE RATES FISH HUNT CABINS PHOTOS
TESTIMONIALS BROCHURE HUNT BOOKLET


The squirrel bungee feeder is a feeding device that you can attach a corn on the cob, a hunk of raw steak, or a potato to and as the squirrel goes to grab it they will be bungeed down as if they were attached to a bungee cord so that we can laugh at them as they struggle with their weight problems.


Watch the race between the arrow and the car……..interesting results! NICE car GREAT archer!
Follow our FISHING BLOG
WEBSITE RATES FISH HUNT CABINS PHOTOS
TESTIMONIALS BROCHURE HUNT BOOKLET


