RSS

Category Archives: bow hunting

Pay Attention to Detail

Scent can be your biggest ally or your worst enemy

wawanglakebear
Black Bear are attracted to the aroma of a free meal, but if they catch a whiff of you, you can often kiss them good-bye for a day or two.   Keep your clothing and footwear as scent-free as possible. Be alert at all times while hunting your bait. You will most often see bear before you hear them. With padded feet they move with calculated precision. Remember, when they come into a bait station they know the treats were left by humans.

Shot Placement

Regardless of your choice of weapon, whether it is a gun or bow, learning when and where to shoot can mean the difference between an expedited kill, or, the outcome of tracking a wounded animal. We advise our hunters to wait until the bear is preoccupied with the bait and is facing away while standing broadside or quartering away. Bears are extremely tough, so a double lung or heart shot are always your best option therefore taking your time will be important.

wawangshotplacement

When archery hunting, bows must meet the following specifications.

Crossbows: Draw length must be at least (11.8 in.);

  • Draw weight must be at least (119 lbs.);
  • Bolt head must be at least (0.9 in.) at the widest point; and,
  • there must be at least two cutting edges of straight, sharp, un-serrated, barbless steel.

Re-curve Bow:    Draw weight must be at least (48.5 lbs.) at draw length of (27.6 in.) or less;

  • Arrow length must be at least (23.6 in.);
  • Broad head must be at least (0.9 in. at the widest point; and,
  • There must be at least two cutting edges of straight, sharp, un-serrated, barbless steel.

For bow hunting Black Bear we recommend a compound bow with a draw weight of no less than 50 pounds and a 100 grain broad head

Recommended Knowledge base
www.mnr.gov.on.ca/en/Business/FW/Publications/MNR E001275P.html

For rifle hunting black bear we recommend using nothing less than a .270 caliber.
Other recommended calibers: 7mm magnum; .308; .30-06.  NO 30-30’s

Firearm Information www.rcmp-grc.gc.ca/cfp-pcaf/index.htm

The bottom line – baiting is a proven strategy for attracting a wary game animal with a voracious appetite. It involves much more than just tossing out a few tasty morsels. There is a right way and a wrong way to do it and our experienced guides take pride in their skills and knowledge. Keen attention to detail and listening to the guide is the key to your success.

In order to ensure the highest possible success to our hunters we take only an average 14 hunters a year. Should we have an increase in bear sighting throughout the spring and summer we may take a few more hunters but our first obligation is to ascertain a healthy black bear population together with satisfied hunters for years to come.

Most importantly, remember baiting is a ton of work and takes weeks on our part for each hunter. From collecting legal paper work to buying and picking up the ingredients, materials along with travelling for miles and then finally establishing and maintaining each site daily prior to your hunt. It requires foresight and commitment on our part and we do this because of our passion for the outdoors and careful management of our Black Bear.

Follow our FISHING BLOG

WEBSITE    RATES     FISH    HUNT    CABINS    PHOTOS
TESTIMONIALS    BROCHURE    HUNT BOOKLET

Enter your email address to subscribe to this blog and receive notifications of new posts by email.

← Back

Thank you for your response. ✨

Email Me....


Tags: , , , , , , , , ,

STAY CALM

If you’ve had any trouble in the past “keeping it together” when shooting at game,
right now is the time to find a cure.

bow-hunting-wawang-lake

Countless of hunters who practice shooting regularly, months before the season opens, and they still have trouble closing the deal when Mr. Big shows himself. Getting excited is fine — excitement is a big part of why we hunt — but there is a big difference between getting excited and falling apart. We owe it to ourselves to perform under pressure. Even more, we owe it to the game we hunt to stay calm enough to make good shots and clean kills.

Below are six steps that have helped hunters stay cool at the moment of truth.

  1. Practice, Practice, Practice Nearly all bow hunters practice their shooting, but many fail to practice properly. To many average bow hunters, practice means flinging 20 to 30 arrows once or twice a week. This is not considered practice. When preparing for a hunt, practice every possible shot sequence, just as if you were actually hunting. That means shoot a 3D target from every possible angle while wearing camouflage, and shoot from any position that might become a possibility during the hunt. You want to be prepared for all contingencies.

Also practice at distances considerably farther than you will shoot on animals. A typical whitetail shot is closer than 30 yards, but practice regularly to shoot out to 80 and even 100 yards. That kind of practice will leave you very confident for any shots closer than 40 yards.

Lack of confidence is the biggest reason some people get shaken at the shot. They just keep thinking they may not make that shot. There are two things to offer those who lack confidence. One, restrict shots to your comfortable shooting range. Two, practice enough different scenarios that when an animal steps into your shooting lane, you’ll have no doubts about making the shot because you’ve already done it dozens of times in practice.

  1. Run & Shoot Now that sounds kind of dangerous, but it’s not meant in a literal sense.  During practice sessions, sprint anywhere from 60 to 100 yards, then pick up your bow and try to put a kill shot on a 3D target. This simulates the adrenaline rush you get when shooting at game. Some people may think it sounds crazy, but, it builds confidence like no other drill. You don’t have to do this every time you practice, but do it often enough to build confidence in your ability to shoot accurately when your heart is racing — whether from running or from watching a buck walk within range.
  2. Flex Those Muscles! When you see a big buck coming down the trail and your heart rate skyrockets, tense every muscle in your body while holding your breath. Then, after five or six seconds, let your muscles relax, and exhale. Do this several times as needed.

This is especially helpful during frigid hunts, when your muscles are stiff and your circulation is poor. It helps improve blood flow, regulate body temperature, settle your heart rate, and relax your muscles, all of which will calm you down to make a good shot. This muscle-tensing tactic has will help keep your cool on numerous animals.

  1. Focus On The Sweet Spot Once you decide to shoot an animal, you have no need to look anywhere other than the hair, scale, or feather you want to hit. Keying in on that certain spot keeps you calm and focused.   Some people miss when they focus on the headgear because they are looking with their mind’s eye at a beautiful shoulder mount gracing the wall above the fireplace. Don’t worry about the headgear while the critter is alive. You will have years to stare at it — if you focus on the vitals before and during the shot.

bow-hunting-wawang-lake (5)

You tend to aim where you are looking. Look at those wide antlers coming your way, and you might put an arrow right through the center of them. Instead, concentrate on the vitals, and that’s where you’ll put your arrow.

  1. Close Your Eyes This isn’t always an option, but when it is, it works. The longer some people look at an animal they want to shoot, the more stage fright they develop. If that’s you, closing your eyes or looking up at the sky will allow you to clear your mind and reorganize your thoughts.

Some people can perform on a moment’s notice, but, others prefer to have some time to evaluate the situation and to analyze every move before actually making it.   If too much time transpires and the nerves start taking over, close your eyes to regain focus before the animal gets within bow range.

  1. The Inner Voices Although you might not have demons and angels on your shoulders taunting you one way or the other, you certainly have inner voices that control your mind when you’re face to face with your prey. Listen to the positive voices and let them build you up.   Feeding your mind with positive thoughts will weed out the negative ones that flow through the minds of so many bow hunters. Doubt is where many archers fail at crunch-time. To eliminate doubt, talk to yourself — positively.

bow-hunting-wawang-lake (2)

WEBSITE    RATES     FISH    HUNT    CABINS    PHOTOS
TESTIMONIALS    BROCHURE    HUNT BOOKLET

Enter your email address to subscribe to this blog and receive notifications of new posts by email.

← Back

Thank you for your response. ✨

Email Me....


Tags: , , , , , , , , ,

Sharpen your bow skill during the off season!


bow1

We practice with our bows all summer long, but after opening day its easy to get wrapped up in the hunting and forget about practicing. But even if you’re spending your time in the field and can’t hit the archery range every day, you can still keep your edge. Shooting in hunting situations is obviously different from target shooting. In the real world, weather conditions, shot angles, brush and other obstacles can impact your shot. Also, when the time comes to take a shot during a hunting situation you’re usually either stiff and cold from sitting in a treestand or sucking wind from running up a hill. All this combined with the fact that you must make a clean shot with the first arrow makes it all the more important to keep your shooting skills sharp. Here are a couple tips.

Practice Drawing
One of the biggest challenges to making a “cold shot” is that often the muscles I use for properly drawing my bow are stiff. The simplest way to cure this is to periodically pick a target, draw your bow, aim, hold, and let down your draw. This keeps you loosened up, plus drawing and aiming without actually shooting helps you focus on the target.


Practice Shooting

Although just drawing and aiming will help a lot, the single biggest help is to actually shoot while out hunting. A common practice among traditional shooters is to carry one or two blunt pointed arrows in your quiver so that you can stump shoot in your down time. Stump shooting is fantastic for keeping you warmed up, but unlike just drawing, actually completing your shots will bring your release into play, as well as give you all sorts of angles and situations to practice.

Small game is even better than stumps (grouse and rabbits taste a lot better too). Grouse can be deceivingly tough to hit. You want to aim for the base of the neck or the head. Sometimes they flush at the shot, but grouse will go in the direction that their head is pointing, so if you use a snaro point, you can either take their head off or hit them in the body as they flush. The best thing about grouse is they often give you extremely challenging shots, and if you can become consistent at taking them, you will be ready for the big game (make sure to check your local regulations before taking any small game with a bow).


Follow our FISHING BLOG

WEB   RATES     FISH    HUNT    CABINS    PHOTOS
TESTIMONIALS    BROCHURE    HUNT BOOKLET

Enter your email address to subscribe to this blog and receive notifications of new posts by email.

← Back

Thank you for your response. ✨

Email Me....


Tags: , , , , , , , , ,

How to Size a Black Bear

……… WHEN SIZING UP A BEAR

WawangLakeBear
A big bear swaggers and walks with attitude. He doesn’t jump at every sound like a small bear will.  A big bear doesn’t have to; he believes he’s got nothing to fear. Once you’ve spotted your bear on the bait site, it’s time to get serious about analyzing how that bear is behaving.

It is important to note that long before you judge the size of the bear, you must judge the sex of that bear and here are some things to take into consideration:

A big, old sow will have all, or more correctly, almost all of the physical characteristics of a big, old boar. She’ll have the nasty looking face that’s seen one too many years in the ring, the potbelly and the sway back.

Watch to see if the bear stands on his hind legs and rubs his back on a tree, that’s a boar.  If it walks along and straddles small trees, wiping its scent on that tree, it’s a boar.  If it stands up and breaks saplings over its shoulder, it’s a boar.  If it encounters another bear and gives chase, it’s a boar and if it is following a smaller bear, it’s a boar.

SCALE:  There is one last general appearance tip to judging black bear that makes the top three in importance, and that is scale.   A big bear looks big . . . but so does a closer, smaller bear.   Here’s a help tip on how to gauge more accurately.  If the bear is 150 yards away but the hunter thinks the bear is 200 yards away, the hunter will overestimate the bear’s relative size by somewhere near 25 percent.   In other words, the hunter is in for a serious case of ground shrink when he walks up to his bear.  TIP:  Let the bear get as close to you as possible and preferably on the bait itself.   The closer the bear, the less chance there is of misjudging the distance to relative size.

SPECIFIC TIPS FOR JUDGING BLACK BEARS: If the bear fails any one of the above general conditions, then it’s advisable to pass up on it or let the bear walk. It’s tough and you could be wrong, but at least there isn’t a dead small bear lying on the ground.   Call it a personal aversion to guilt.

BODY SHAPE:    Bigger bear are older bears, and like most of us, they don’t have the svelte bodies they once did. They tend to look “heavy” and out of shape. Remember, they monopolize the best feed and habitat, and therefore exert less energy to live.

HEAD SHAPE:   A big bear (boar) will have a deeper, wider and longer snout than a smaller bear or a female. His ears will appear to be wide apart and small. If he is aware of you and looking your way, his ears won’t stand up on top of his head like a dog’s ears, they’ll seem to be aimed out to the side of his head. A big bear will have well developed “bulging” muscles on the top of his head.


WawangBear2

LEGS:   A big bear will have massively developed front shoulders. His shoulders will look big and burly. A sow’s wrist will pinch in directly above the foot. Not so with a boar. The lower forearm, wrist and the foot on a big boar are all the same width. A big bear often appears to have shorter legs because the body is so much thicker, but keep in mind that the best-scoring bears for the records book are often the lankier looking, longer-bodied bears.

There are bear that have meatier heads; bear that look great and are great trophies, but that don’t score well.  There are others that have short skulls, block- headed beasts that look impressive, but that don’t score well at all and there are lanky, skinny bears with donkey faces that score like the devil, but that a hunter seriously looking for  a  records book bear wouldn’t walk across the street for. Black bear morphology is just too darn diversified to make a science out of judging.

The best way to hunt for a record boar is to simply shoot the bear that looks good to you and that hopefully  you’ll  appreciate all the time and effort you put in for the hunt.  If it’s got a nice hide, be happy with your animal. If it has long claws and weighs a ton, good for you and congratulations. If it isn’t as big as  you’d like, don’t fret, you’re not alone and the rug on your wall will still look great. If it happens to be one of those rare few bears that has grown a skull that qualifies for the record books, thank your guide for the good fortune that made that bear come to the bait site.

To easily judge, remember:

  • Check out the ear size in relation to the head
  • Mickey Mouse ears means a small bear.
  • Watch to see if the belly is low to the ground
  • Legs that appear short means big bear.

Watch the bear’s behavior around the bait – small bears will be skittish and afraid of a larger bruin in the area.

Look for a log around the bait and use it as a reference, check to see the length and height of the log before climbing into your stand. When the bear enters the bait site use the size of the log to help determine the overall size of the bear.

SKULL MEASURING

WawangSkull

Hope this information helps develop your judging skill on your next hunt, and,  good luck out in the field.

For further information, or, to book your next bear hunt please contact us at:
1-888-534-9217 or EMAIL

 WEBSITE    RATES     FISH    HUNT    CABINS    PHOTOS
TESTIMONIALS    BROCHURE    HUNT BOOKLET

Enter your email address to subscribe to this blog and receive notifications of new posts by email.

← Back

Thank you for your response. ✨

Email Me....


Tags: , , , , , , , , , ,

Disabled Archer – Heals Other Wounded Soldiers

Jeff Fabry is one of the world’s best archers. He’s a five-time Special Games world champion, a three-time Paralympic medalist and he’s aiming for gold at the 2012 Olympics in London this summer.

3

What makes his talent unique is that Fabry, who has only one arm, has mastered the art of firing arrows with his teeth. Your dentist might advise against it, but Fabry, who will compete on the U.S. Paralympics Team in London, says his chompers are holding up just fine.


“I’ve been doing this for 13 years and my teeth still look and feel the same the first day I started. Everything is going good, luckily,” Fabry said.

But the road to firing arrows with precision was not a straight one. At 15, Fabry lost his arm and a leg in a motorcycle accident.

“My buddies were out hitting the hills hunting and I was stuck at home and I was like, no, I don’t like this, so I figured out a way to shoot and it happened to be with my teeth,” he said.

Fabry pulls the arrow back by biting on a mouthpiece that he made from a nylon dog leash.

“It was trial and error to find what I considered to be the perfect mouthpiece, where I could be proficient,” he said.

Fabry is sharing his passion with our armed forces. He teaches the sport he loves to members of the Wounded Warriors Project, the nonprofit whose mission is to help injured service members cope in civilian society.

“What I’m really proud of is being able to work with our vets who are coming back from the sandbox with different disabilities,” he said.

Jim Castaneda, a member of the Wounded Warriors, said he is thankful that Fabry introduced him to the sport. While serving in the Navy and stationed in the Philippines, Castaneda suffered a traumatic brain injury and a stroke.

“It’s changed my life completely … I found something that I can do and I really enjoy it and love something now,” Castaneda said.

“I’m not just sitting there anymore, like watching my life go by and feeling sorry for myself. Now I’m actually getting up and doing something for myself and trying something else.”

That kind of feedback is a bull’s-eye for Fabry.

1

“That makes me feel good about myself,” Fabry said. “I got hurt before I could join the military, and this is kind of a way that I can give back to my country by helping our heroes.”

Will Wilson, who works for Navy Safe Harbor, the Navy’s Wounded Warrior Program, says Fabry is a coach and mentor for his team.

5

“Jeff is absolutely fantastic. He has a great demeanor and is able to communicate clear and concise direction,” Wilson said.

Follow our FISHING BLOG

WEB   RATES     FISH    HUNT    CABINS    PHOTOS
TESTIMONIALS    BROCHURE    HUNT BOOKLET

Enter your email address to subscribe to this blog and receive notifications of new posts by email.

← Back

Thank you for your response. ✨

Email Me....


Tags: , , , , , , , , , ,

Maximizing Your Hunting Time With Trail Cameras

camera
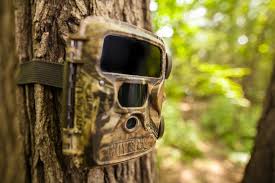
Over the last five years, probably no other “gadget” has changed the way we scout more than the trail camera. For many of us, running trail cameras is a hobby in itself, bringing a whole new excitement to our deer hunting efforts. Much more than just something to pass time, however, running trail cameras can give you a unique insight into the patterns of deer on your hunting properties and really tip the odds in your favor for harvesting a mature whitetail. Let’s take a look at the features to look for when purchasing a trail camera, and how to get the maximum benefit from the camera once you have made your purchase.

As the popularity of these scouting tools has grown, so has the number of companies offering their own line of cameras. The features on these cameras cover such a wide spectrum that choosing the right one for you can be a daunting and sometimes confusing task. While this article isn’t meant to tell you WHICH camera to buy, it IS meant to help you sort through some of the most common differences among the various trail cameras to help you narrow down your search.

RESOLUTION
The resolution of a trail camera is a measure of the image size that the camera creates. So a 5.0 megapixal trail camera will give you a much larger image – and therefore more detail – than one with 3.0 megapixals. Which resolution you choose really depends on how important it is to have a large, crisp image. If you are only concerned with having a general idea of what deer are in the area and when they are traveling through, then about any resolution offered on today’s cameras will suffice. If you want a larger, more detailed image to print off for your friends, then you may want to shoot for something with at least 3.0 megapixels.

BATTERY TYPE & LIFE
In my mind, this is one of the most important considerations when choosing a trail camera, as it will have a huge effect on the cost of maintaining the camera. I have seen some “cheap” trail cameras that burn through six C-sized batteries in a week, and suddenly the “cheap” camera gets VERY expensive! Others claim to operate up to a year on eight AA batteries. So before you go buying a camera based on price alone, keep in mind the battery life, as it may be the most expensive choice you could make in the long run.

TRIGGER SPEED
Another important feature is the trigger speed of the camera, which is simply how long it takes the trail camera to shoot a picture once something has “triggered” the motion sensor. A faster trigger speed can be the difference between having a great shot of that trophy buck and just having a picture of a deer’s butt as it walks out of the frame. If you plan on placing your trail cameras over feeders or a mineral lick, then trigger speed will not be as much of an issue as it would if hung along a trail.

FLASH TYPE
This is almost a moot point, since most trail cameras today have gone to infrared flash. An infrared flash, as opposed to the incandescent flash found standard on most consumer cameras, is less likely to spook deer, uses less battery life, and is less likely to be detected by other humans (i.e. thieves!). While I’ve gotten plenty of pictures of big, mature whitetails with an incandescent flash trail camera, there is no doubt that some animals are spooked by the bright flash. If you can afford the infrared flash, the benefits certainly outweigh the small increase in cost.

OTHER FEATURES
While we have covered some of the most important features to consider when buying a new trail camera, there are many more options that could impact your decision. One of these options is the size of the unit. Size varies greatly amongst trail cameras, and some companies are now producing models that are as small as your hand. Other models go as far as being able to send the pictures it takes directly to your email or cell phone, so the only time you have to check them is when the batteries need replacing. How’s that for convenience?

Before you head out to buy your next trail camera, take a minute to think about how it will be used and what features are most important to you. This will make the task of narrowing down your choices much easier when you start the shopping process.

camera2

MAXIMIZING TRAIL CAMERA USE
Once you have waded through all the details, made your decision and laid down your hard earned money on a trail camera, all that’s left is to hang that thing on a tree, right? Let’s take a look at some ways you can be sure you are using your camera to its potential this season and getting the most bang for your buck.

DRAW THEM IN
One of the easiest ways to maximize the effectiveness of your trail camera and insure that you see a good representation of what is in your hunting area is to use some type of attractant to lure the deer into camera range. Probably the most common attractant used across the country is shelled corn – it’s cheap, readily available, and the deer love it. For the purpose of getting trail camera pictures, there is no need to invest in an expensive feeder; just simply spread 100 pounds on the ground in an eight to ten-foot circle area where you want to hang your camera. For safety reasons, do not place the corn in large piles or in an area that holds moisture, as this can result in molding that can cause disease in both deer and turkey. Depending on deer density and other available food sources, this should get you five to ten days worth of pictures. Be patient, as it may take a few days for the deer to really key in on the corn and for you to start getting good pictures. Once they find it, though, it won’t last long!

Before you start dumping corn on your favorite hunting property, check your local game laws regarding baiting. If corn or other “feed” is prohibited, but would still like to attract deer to your camera location, then you may want to consider creating a mineral lick. You can buy one of the many commercial mixes available today, or simply create your own by mixing 50 lbs of trace mineral, 50 lbs of feed mix salt, and 10 lbs of dicalcium phosphate. Break the soil up with a shovel in the area where you want to create your lick and work your mix into the soil. Once the lick gets a good rain on it, it shouldn’t take long for the deer to find it and start paying regular visits.

KEEP IT MOBILE
Unless you are hunting a really small property, or you have the money to invest in lots of trail cameras, then you are going to need to move your cameras around to really get a good idea of what the deer are doing on your hunting property. Don’t get caught in the trap of leaving your camera in the same spot all season. This will not only limit your ability to pattern the deer, but it may keep you from discovering that trophy buck that could be hanging out on the other side of the property!

images40V5Z2FA2By experience, two weeks seems to be enough time to get a good representation of what deer are in the area, without your camera spending too much time in one location. You can always bring the camera back to the same spot at a later time, but the idea is to cover as much of your hunting area as possible.

KEEP GOOD RECORDS
Once you have moved your camera around your property and gotten plenty of pictures to look at, the real work has just begun. Now is the time to sort through the pictures, identifying as many unique animals as you can, analyzing what camera sites each deer is visiting and the times that they were there. This should start to give you an idea of the travel patterns on the property, as well as potential stand locations.

This season, make sure you use these tips to get the most out of your trail cameras, and the next picture you get of that monster buck may be the one with you behind him holding his antlers, OR, even that BIG bear 🙂

Follow our FISHING BLOG

WEB   RATES     FISH    HUNT    CABINS    PHOTOS
TESTIMONIALS    BROCHURE    HUNT BOOKLET

Enter your email address to subscribe to this blog and receive notifications of new posts by email.

← Back

Thank you for your response. ✨

Email Me....


Tags: , , , , , , , , , , ,

Easy Fix To Prevent Bow String Damage

Carrying a crossbow cross-country puts the string at risk. This is especially true if you’re headed to a tree stand in the dark, where any branch can snag the string or cables and quickly ruin a much-anticipated hunt.

Capture

 Many hunters have this problem on their hunts whether black bear hunts, elk hunting, deer hunting, etc.  Your bow is more at risk in mornings that are still dark in order to get out to your stand and especially if you need to hike uphill through thick pine forests, over dead-falls, twisted tree tops, and other obstacles that threatened to damage your bow string.

If you anticipate encountering obstacles like this on your next hunt try the Limb Saver sling for your bow, it will make carrying it over your shoulder much more comfortable.   And during a hunt as you duck under branches and squeezed between tree trunks, you never really know what was happening to the string over your shoulder. Then one day it happens.  After one morning’s hike, you see that the string was frayed from tree branch damage.

Capture2

A partial solution is to re-wax your bow string with Limbsaver String Protectant, which reduced the risk of fraying.

Secondly, your hunting jacket should fit over the bow, meaning that you could zip up the jacket with the sling exposed.

Use a Limb saver Kodiak Lite compound bow sling made specifically for crossbows. Its wide, no-slip strap made the carry secure and comfortable. In this way, the entire bow-string, scope, and bolts were protected.

Follow our FISHING BLOG

WEB   RATES     FISH    HUNT    CABINS    PHOTOS
TESTIMONIALS    BROCHURE    HUNT BOOKLET

Enter your email address to subscribe to this blog and receive notifications of new posts by email.

← Back

Thank you for your response. ✨

Email Me....


Tags: , , , , , , , ,

Getting in Shape for Hunting Season

stretching-web-1024x682

A great article Melissa Bachman

Hunting takes a lot of preparation and if you want to be successful there are things you can be doing year-round to help when fall finally arrives.  You may be wondering, well its awhile before the hunting season what can I possibly do to prepare now?  The food plots are in and the tree stands are set?  Well there’s another big part of the equation that could probably use a little work, and that’s YOU!

There are two very important things that every hunter should have on their year round to do list, stay in shape and practice shooting!

Hunting is just like anything else, the more you are willing to put in, the more you will get back.  This is true with both practicing, and staying in shape so why kill two birds with one stone?

Sure, when it comes to practicing any kind of shooting is good.  But think of the real world situation and how you will be feeling once you finally get to full draw.  Probably sweaty, out of breath, and shaking like a leaf!  I don’t know what you can do about the last, but I try to make the sweaty and out of breathe a reality when I practice.

We’re all short on time, so why not combine the two and get even better results in half the time.  I start by spending at least 15 minutes stretching.  Many people think stretching is a waste of time, but you want your muscles flexible to prevent injuries while hunting. Do not skip this step!

Once I’ve stretched, I usually go for a 2-mile run up and down the hills near my home.  After the jog, I grab my bow and shoot around 50 arrows at my target placed 40-60 yards out.  I prefer shooting longer distances as a rule, because once I am confident at 60-yards, 20 seems like a piece of cake.

Jogging-web-1024x682

Shooting while you’re tired is important; in fact it’s very similar to basketball.  I was never taught to practice free throws when you enter the gym; instead you shoot them at the end when you’re dead tired.  This is the real world simulation as to how it would be the last two minutes of the game during crunch time. Hunting is no different.  You’ve waited all year for this hunt.  You’ve climbed half way up the mountain and finally you’re at full draw, all your practice will now pay off.  Your instincts will take over, your breathing will calm, and your arrow will hit its mark.  Isn’t that the way you want your big hunt to play out this fall?

Not only will the workout make you a better real world shooter it will also make your hunt a much more enjoyable experience.  Here are five reasons getting in shape for hunting season will help and shape your hunt this fall.

bow-at-full-draw-web-1024x682

#1. If you’re hunting public land you will be able to get in further than other out of shape hunters, giving you a better chance at success.

#2. You will have a more enjoyable hunt and not be gasping for air and desperately hoping for a break every five minutes.

#3. Being in shape on a guided hunt will help you significantly because the guides will make their plan according to where the game is, not by where you can or can’t get to.

#4. Increase your percentage on making a good shot, because you will be less out of breath and already practiced in this situation.

#5. By being in shape you will have more energy on your hunts and in your everyday life.  In fact, it may help you live longer to enjoy more hunts in the future!!  Not such a bad of a deal after all…

situp-web-e1310358294897-1024x742

Follow our FISHING BLOG

WEB   RATES     FISH    HUNT    CABINS    PHOTOS
TESTIMONIALS    BROCHURE    HUNT BOOKLET

Enter your email address to subscribe to this blog and receive notifications of new posts by email.

← Back

Thank you for your response. ✨

Email Me....


Tags: , , , , , , ,

On Target: How to Make Your Own Arrows

While doing some of my own research, we came across a fantastic article for all of you archers out there that have wondered about manufacturing your own arrows.

This article is reproduced from Edersbows.com, take some time to check them out 🙂 

arrows

Building your own arrows allows you to save about 5 to 1 0 dollars per dozen, but there’s an even better reason for building your own. You can experiment with all the components, with the various fletching styles and shaft sizes until you find the perfect arrow for your bow and your hunting or 3-D shooting requirements.

Building arrows is easy and fun, not to mention the satisfaction you’ll gain from taking game with arrows you’ve crafted yourself. Anyone can do it – and do it well. Armed with only a few basic tools and the information offered here, you’ll have no problem turning raw shafts into top-quality hunting arrows.

Nock Installation

nock
Year’s ago nocks were all glued on, now most arrows offer pressure-fit nocks that fit snugly but are turnable. Tunable nocks are definitely the way to go. These systems will make tuning a lot easier, and they hold up to more hard shooting than will glue-on nocks.

Assuming you aren’t going to paint (crest) your arrows, nock installation is the first step in the arrow building process. Use hot melt glue or epoxy when installing bushings into aluminum. When installing them in (or over) carbon shafts, use a rubber-based epoxy such as that available from Beman or Arizona Archery Enterprises (AAE).

Regular glue-on nocks should be pressed firmly into place (without glue) until after the fletching has been attached. When the arrow is finished you can rotate the nocks to the proper orientation so the fletching clears your rest and then glue them in place. Bohning Fletch- Tite works fine for this.

Apply The Fletching

fletching
You need a fletching jig, but it doesn’t have to be fancy. I’ve had good luck with the $20 plastic Martin jig I bought more than 10 years ago. Other good ones are made by Bohning, Bitzenburger and Grayling. You have three clamp options: left helical, right helical and straight

(no helical). For hunting and 3-D shooting, right helical is the most popular choice. If you’ll be using feathers, make sure to order feathers from the same wing as the clamp (right helical takes right wing). Vanes are manufactured straight and can be used with any clamp, so you don’t have to specify left or right when ordering.

One of the best fletching adhesive I’ve used for vanes is Fast-Set Gel made by AAE. This is a super-glue product that sets up in only 10 seconds allowing you to use a single-clamp jig and still fletch a dozen arrows in mere minutes. Fast-Set Gel will work on all shaft styles except AFC’s film-dipped carbon arrows, which require a traditional cement such as Bohning’s Fletch-Tite. Of course, Fletch-Tite will also work on aluminum arrows but takes about 10 minutes per fletching to set-up before you can remove the clamp. Fletch-Tite is still the best choice for feather fletching, however.

Place your fletching in the clamp so that its back edge will be about 3/4 inch ahead of the nock taper or nock bushing on your arrow. Adjust the back of the magnet on your jig (the magnet holds the clamp in place while the glue dries) inward or outward until the tail of the fletching sits squarely on top of the arrow. Next, adjust the forward end of the magnet to achieve the desired amount of helical. Easton’s technical representatives recommend four to five degrees of helical. I use a bit more myself – probably closer to seven degrees – but this is only on large diameter aluminum arrows. On smaller diameter carbon arrows I stay closer to Easton’s standard.

When using a straight clamp, (as opposed to a helical clamp) you don’t have as much lee-way and must either install your fletching perfectly straight or with a very slight off-set.

After your fletching is installed, apply a small dab of adhesive to both ends of each for a little added insurance against tearing loose.

You have more freedom to experiment with your fletching style and degree of helical than with any other aspect of arrow building, but it’s still best to observe a few general ground-rules. When making aluminum arrows for hunting, stick with four to five inch fletching. Five inch is a bit better because (in theory at least) it offers a small amount of added stability which can make a difference when shooting broadheads.

Carbon arrows, because of their smaller diameter, work best with shorter fletching (four inch is a good starting point) or you can run into a contact problem when trying to pass long helical fletching through the narrow gap in your rest. You can also experiment with various fletching orientations, such as 70/110 degree four-fletch, (you make this change by inserting a different indexing template into your fletching jig). But the basic 120 degree, three-fletch will do just fine under almost every shooting situation.

Cutting Arrows To Length
Draw an arrow and have someone mark it about a half to 3/4 inch in front of the rest. Cutting arrows is easy with the right equipment, but with the wrong equipment it can be a real headache. For limited quantities of aluminum arrows you can get by with a small rotating pipe cutter. I’ve done it a few times, but I’ve also made some pretty rough cuts, and basically ruined some arrows, in the process. You’re far better off pooling your money with a couple of buddies and getting an electric cut-off tool. You can also take your arrows to a pro shop (that’s equipped with an electric cut-off tool) to have them sized – usually for a price.

Installing Inserts and Outserts
Inserts and outserts (outserts are used with some types of carbon arrows) shouldn’t be taken for granted. Consistent accuracy with broadheads can be difficult to achieve when these components fit loosely. Inserts and outserts should install without any free-play. Usually you don’t have too many options with outserts – you get what the arrow maker offers – but you do have options with inserts. I’ve had good luck with aluminum inserts from Easton and Saunders and composite inserts from AAE. Inserts should have a light press-fit with the inside of the shaft so that each broadhead you screw in will line up perfectly with the shaft.

Aluminum inserts used in aluminum or ACC carbon arrows should be installed with hot-melt glue. Composite inserts in aluminum work best with a rubber-based epoxy, and the same applies for aluminum into carbon (Beman ICS or Gold Tip Graphite XT arrows) or when installing metal outserts on conventional all-carbon shafts. When you’re finished you can install a broadhead and spin test your arrows to make sure the inserts are properly aligned.

Take some time to visit http://www.eders.com/ to view their catalogue of parts and equiptment to assist you in your build.

lead_materials

Armed with the information above, you could now have a weekend hobby 🙂


Follow our FISHING BLOG

WEB   RATES     FISH    HUNT    CABINS    PHOTOS
TESTIMONIALS    BROCHURE    HUNT BOOKLET

Enter your email address to subscribe to this blog and receive notifications of new posts by email.

← Back

Thank you for your response. ✨

Email Me....


Tags: , , , , ,

How to Make Your Own Scent-Free Deodorant

Think organic deodorant isn’t for you? It’s actually perfect for deer hunters, because it battles sweat and odor, and gives off no unnatural scent of its own. Buy ingredients in bulk and make three 2.5-ounce sticks—a season’s worth—for only $2 each. Here’s how.

scentstick

What You’ll Need

● 1⁄4 cup coconut oil
● 2 Tbsp. shea butter
● 2 Tbsp. cocoa butter
● 1⁄4 cup beeswax pellets
● 3 capsules 400-IU Vitamin E
● 21⁄4 tsp. baking soda
● 1⁄4 cup organic arrowroot powder
● 2 capsules Vitacost Probiotic 10-20

The Brew 
Heat a small saucepan of water and remove just before boiling. Combine coconut oil, shea butter, cocoa butter, and beeswax pellets in a mason jar, and place it in the hot water, double-boiler style, until melted. (Warning: If you’ve ever had a severe reaction to a bee sting, don’t handle beeswax.) Leave the jar in the bath and add the Vitamin E capsules, baking soda, arrowroot powder, and probiotics, which introduce good bacteria into the skin to battle the bad stuff that causes BO Stir gently until mixed well.

The Cure
Pour the warm mixture into empty, used stick-deodorant containers, new containers (sold online), or lined muffin tins, and let harden overnight. Then, perform your own sniff test: The only scent noticed is a trace of beeswax.

Follow our FISHING BLOG

WEB   RATES     FISH    HUNT    CABINS    PHOTOS
TESTIMONIALS    BROCHURE    HUNT BOOKLET

Enter your email address to subscribe to this blog and receive notifications of new posts by email.

← Back

Thank you for your response. ✨

Email Me....


Tags: , , , , , , ,