RSS

Tag Archives: Wawang Lake Resort

Bargain vs. Premium Ammo

You get what you pay for. That’s an adage we generally believe in. But does it hold up with respect to ammunition? We set out to answer that question by testing the accuracy of a variety of value-priced .308 hunting ammo against more costly stuff.

ammo1

Methodology
Using three .308 rifles in the test—one hunting rig and two precision rifles that we knew would be ringers.

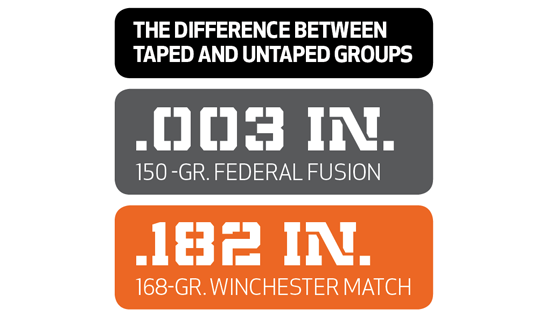
We put a number of budget and premium loads through all three rifles over the course of one day, ensuring the results wouldn’t be influenced by different environmental conditions. We also used a standard 5-shot-group protocol, and shot two groups with each load at 100 yards. As a control to establish a baseline level of accuracy for each rifle, we also shot 5-shot groups using Federal’s Gold Medal load with 175-grain Sierra BTHPs.

Using the baseline match load to calculate a ratio for each hunting load by dividing the size of the hunting-load groups into the size of the match-load groups. The closer to 1 that ratio is, the better the hunting load performed. None of the hunting loads outshot the match load, so all these ratios were greater than one.

Results
The outcome was interesting. The best hunting ammo was Hornady’s American Whitetail 150-grain Interlock SP. Compared to the baseline groups with the match ammo, this budget-priced load ($19.29 for a box of 20) shot nearly as well as the match ammo in all three rifles and had an impressive 1.41 average ratio. Federal’s Fusion, another bargain ammo ($21.49 for a box of 20) was second best among the loads, with an average ratio of 2.02.

The only expensive load that delivered consistent performance in all three rifles was Federal’s 165-grain Trophy Bonded Tip ($34.49 per box), The two Winchester loads had nearly identical levels of performance, though again, the less expensive 180-grain BST (2.11 ratio average) outshot the more expensive 150-gr. XP3 (2.81 ratio average).

ammo2

It’s worth noting when purchasing premium ammo that the promise of greater accuracy is certainly implied because it uses better quality components, but that much of its benefit is based on the idea that it will perform better on game.

Conclusion
It pays to try different loads in several different bullet weights in your rifles. Investing money to find an accurate load is the cheapest way to get the most from your rig.

Follow our FISHING BLOG

WEB   RATES     FISH    HUNT    CABINS    PHOTOS
TESTIMONIALS    BROCHURE    HUNT BOOKLET

Enter your email address to subscribe to this blog and receive notifications of new posts by email.

← Back

Thank you for your response. ✨

Email Me....


Tags: , , , , , , , , ,

ID the Morel – Spring’s Best Mushroom

When the spring gobbler season and shed hunting is in full swing, you’ll probably spending a lot of time in the woods looking at the ground for antlers and turkey sign. Something else you ought to be on the lookout for is a weird little pitted thing that looks like a small, lumpy, brown brain. This time of year, that organism is most likely a common morel mushroom, a popular item of spring foragers. Here’s how to properly identify this delectable fungus.

mush

ID a Morel
The common morel (Morchella esculenta) is a prized wild mushroom that grows in forests and shady areas, primarily in April and May. These mushrooms are usually 2 to 4 inches tall. The tan, gray, or brownish colored head with irregular pitting is well camouflaged against leaf litter. If you cut the mushroom completely in half, it should be entirely hollow inside. Look carefully for the cone-shaped head to be fully fused to the stalk at the lower end.

mush2If the head is only attached at the top, and hangs like a skirt, you are probably looking at a false morel, which can be very poisonous. False morels (the genera Verpa and Gyromitra) usually grow in the summer and fall, which are great times to avoid anything resembling a morel. Another way to properly ID an edible morel is to make a spore print, which, for a common morel is yellowish. Here’s how do that.

Make a Spore Print
1. Handle your foraged mushrooms carefully, and assume that any unidentified mushroom is deadly. Get the whole thing if possible, but the cap is the part you need for spore prints.

2. Wrap each individual mushroom in wax paper or a piece of aluminum foil for transport. Plastic bags will make them sweat, and putting multiple mushrooms in a bag can create confusion.

3. Place the mushroom cap gills-down on a piece of white paper and set a cup or bowl over it. Allow it to sit several hours or, better yet, overnight.

4. Remove the cover and lift the mushroom cap. Observe the color of the spores that were deposited, and use that color for identification. Some mushrooms deposit white spores, which are hard to see on the white paper. Set a strong flashlight beside the paper, shining across the surface, to assist in your identification of pure white spores. Check this color against several guides, and double-check the mushroom’s structures against similar mushrooms to ensure that you have the right mushroom ID.

How is the morel hunting in your area so far this spring? Have you ever had a bad run-in with a misidentified mushroom?

Follow our FISHING BLOG

WEB   RATES     FISH    HUNT    CABINS    PHOTOS
TESTIMONIALS    BROCHURE    HUNT BOOKLET

Enter your email address to subscribe to this blog and receive notifications of new posts by email.

← Back

Thank you for your response. ✨

Email Me....


Tags: , , , , , , ,

Wild Plants to Cure the Flu and Common Cold

Can’t make it to the drug store right now? Whatever the reason, you do have some natural medicinal options in the winter season. Look for these three plants to lessen the symptoms and shorten the duration of your next case of the cold or flu. All you need is a sharp eye and a patch of wild growth to find these common and potent medicinal’s.

Mullein 
Mullein is a native plant, which favors dry, rocky soil and full sunlight, and is found throughout North America. An easy way to spot patches of this plants in cold weather is to look for the chocolate brown skeletons of the second-year plants. Look for 4- to 6-foot-tall stalks, which often have branching flower heads that resemble the arms of a saguaro cactus.

images2KI75GRG

The part you want for medicine are the velvety green leaves, which can still be found in winter growing in basal rosettes on one-year-old plants. Treat head colds by crushing the leaves into boiling water and breathing the steam. This medicated vapor acts as a decongestant.
barberryBarberry
The little red berries of barberry contain a compound called berberine. This acts as an immune system booster, helping your body fight off viral attacks like the common cold and the flu. The bitter taste of the berries isn’t very inviting, but eating a handful each day you’re feeling sick can shorten the illness, much like elderberry and Echinacea will. Look for small bushes with small dangling red berries. The two native varieties of the shrubs will have thorns in sets of three growing all over the twigs. The introduced Japanese species will have single thorns growing around the twigs. All three species can be used medicinally. As an additional point of identification, check the seeds in the red berries. Each berry should contain dark, slender seeds—typically two per berry.


Yarrow

This non-native plant grows from coast to coast on sunny open ground, although it’s originally nativeyarrow to Europe. Its most common use is as a poultice for cuts and other wounds. But you can fight colds and flu with it by making a tea from the leaves. Chop up the fresh leaves and add one tablespoon to one cup of scalding hot water. Soak the leaves for 10 to 15 minutes. You can sweeten the drink if you need to, or drink it commando-style. The anti-viral compounds help your immune system through its battle, while the diaphoretic compounds will get a sweat going to help break fevers.

Just make sure you use a field guide or guidance from an expert for positive identification of these plants. The last thing you need to do is poison yourself while you’re already ill.

rosehipsRose Hip Benefits
A Rose hip is the fruit of a rose. The wild dog rose is the type of rose most often cultivated for their hips. This plant grows up to ten feet tall and bears a white, very fragrant flower. Once the flower has bloomed, and all the petals have fallen off, the hip is picked and used in a wide variety of preparations. Rose hips are the best source of vitamin C; they contain 50% more vitamin C than oranges.
A single tablespoon of the pulp gives an adult more than the recommended daily allowance of 60 mg. They can be eaten raw, after being put through a blender, or soaked in water overnight and then cooked in the water for about half an hour. Because of the high vitamin C content they are an excellent immune system booster, and are often used as a supplement to prevent or treat a cold. The pulp from rose hips may be used in sauces or made into jelly.

Have you made medicine from wild plants?

Follow our FISHING BLOG

WEB   RATES     FISH    HUNT    CABINS    PHOTOS
TESTIMONIALS    BROCHURE    HUNT BOOKLET

Enter your email address to subscribe to this blog and receive notifications of new posts by email.

← Back

Thank you for your response. ✨

Email Me....


Tags: , , , , , , ,

Black Bear – Shooting the 1st Bear You See

Often, the number one of objective of a spring bear hunt is to simply bring home a bear.

330

The first bear you see, however, will most likely be a juvenile or a lesser bear. You can shoot that bear and have the rest of the week to relax at camp, but why not wait for a more mature bear that will achieve more of the management goals of the region and make you happier in the long run?

154

Don’t shoot the first bear you see. Take the chance that you’ll get another opportunity.

Follow our FISHING BLOG

WEB   RATES     FISH    HUNT    CABINS    PHOTOS
TESTIMONIALS    BROCHURE    HUNT BOOKLET

Enter your email address to subscribe to this blog and receive notifications of new posts by email.

← Back

Thank you for your response. ✨

Email Me....


Tags: , , , , , , , ,

Making Waterproof Matches

When it comes to matches, waterproof ones are best, especially in dire circumstances like a flood. Since they’re much more expensive than their pedestrian cousins, you might want to make your own.

cabdle

Use the Candle Technique
Burn a candle long enough for a pool of wax to form around the wick. Blow it out, then dip the head of your match into the wet wax, about of an inch (3 mm) up the stick. Remove the matchstick and allow the wax to dry, pinching it closed to form a water-tight seal.

Deploy the Nail Polish Ploy
Coat your matches with clear nail polish to waterproof them. Dip the head of the match and a bit of the matchstick itself into the polish, then rest the match on a counter with the head hanging off the edge to dry. Survive any wilderness situation with these critical tips.

Try the Turpentine Trick
The easiest way to waterproof your matches is simply to drop them in turpentine. Allow the matches to soak for five minutes before placing them on newspaper to dry. After twenty minutes or so, you’ll have waterproof matches that will last several months.

Follow our FISHING BLOG

WEB   RATES     FISH    HUNT    CABINS    PHOTOS
TESTIMONIALS    BROCHURE    HUNT BOOKLET

Enter your email address to subscribe to this blog and receive notifications of new posts by email.

← Back

Thank you for your response. ✨

Email Me....


Tags: , , , , , , , , ,

How to Make a Quick CAN Stove

If you suffer sticker shock after shopping for wood-burning camping stoves, you’re not alone. Why pay $60 to $100 for a titanium backpacking wood stove when you can make one out of a bean can for nothing. Sure, you could build a fire without any containment at all, but the low weight, efficiency, and minimal set-up time of a tin-can stove could make you a believer. And as long as there are sticks to burn, your stove will have fuel. Follow these easy steps, and you’ll have a lightweight bug-out-ready survival stove in no time.

1

The Gear List
To create a bean can stove, you’ll certainly need the empty can. You’ll also need a pair of tin snips. If you don’t have a pair in your tool box, borrow a pair. You’ll also need a tape measure, a pencil or marker, a drill with a ½-inch (or similar size) drill bit, and a file to remove sharp edges when you’re done. Gloves are a good idea, too,  since you’ll be working with a lot of sharp metal.

2

The Procedure
Remove the can lid completely from a 40-ounce (or similar sized) food can. You could use a smaller can, but the 40-ounce size because one-quart water bottles will nest inside the finished stove. Next, make a mark all the way around the can about 1 ½ inches below the open top. Use your tin snips, spiraling in, to cut this ring off the top of the can, but before you start, determine whether you are using right- or left-hand snips. It will be easier if you cut in the correct direction. You could leave the can full height, but I wouldn’t recommend it. A shortened stove has better balance, and the last thing you need is for your stove to tip over.

3

Next, make four equidistant marks around the mouth. Each mark will be the centerline for the four “teeth” on the top of your stove. Mark a line half an inch on either side of each of the four centerlines and draw a line around the can 1 inch down from the mouth. Using the tin snips again cut out the lines,  leaving four 1×1-inch teeth at the top of the can.

Next, drill eight equally-spaced holes around the bottom of the can wall. These will be the air intake vents. File off any sharp or rough edges from your metal work. Finally, before you start cooking food or boiling water over this stove, burn a few twigs for about ten minutes to get rid of the plastic can lining.

4

The Effectiveness
Once your stove is complete, set some tinder in the bottom and some broken twigs on the top of that. Place it in a stable, level spot and light the tinder through one of the vent holes. Place your cooking pot over the top of the stove and cook away. You will have to remove the pot every time you need to add fuel, but this is far better than trying to create stove doors for adding fuel. It also forces you to set the dangerously hot pot out of the way when refueling. This stove can burn twigs, paper, cardboard and any other solid fuel that’ll fit inside; and it boils one quart of water in about eight minutes. The finished stove weighs only 2 ½ ounces.

Follow our FISHING BLOG

WEB   RATES     FISH    HUNT    CABINS    PHOTOS
TESTIMONIALS    BROCHURE    HUNT BOOKLET

Enter your email address to subscribe to this blog and receive notifications of new posts by email.

← Back

Thank you for your response. ✨

Email Me....


Tags: , , , , , , ,

Packing List

1

2Follow our FISHING BLOG

WEB   RATES     FISH    HUNT    CABINS    PHOTOS
TESTIMONIALS    BROCHURE    HUNT BOOKLET

Enter your email address to subscribe to this blog and receive notifications of new posts by email.

← Back

Thank you for your response. ✨

Email Me....


Tags: , , , , , , , ,

Tracking Black Bear

imagesY2AQPWJM

The goal of all hunters is a quick, humane kill where the animal drops in it’s tracks and is dead within seconds. But in a pursuit that has as many variables as hunting, sometimes things don’t quite go according to plan. However, game can be tracked and recovered with the right skills and with patience.

First of all, you need to wait the right amount of time after the shot before tracking a wounded animal. I’ve heard estimates of waiting 30 minutes for a hit in the vitals and 5-8 hours for a gut shot. Waiting overnight might be even better on very poorly hit animals, however for black bear the temps may not allow for this as the meat might spoil.

imagesB582SF66You don’t want to push an animal. Be patient and wait it out. If you push a wounded animal, and he gets adrenaline flowing, the odds are against you finding that animal.

You need to mark the exact spot where the animal was when it was hit. This will save you much time in searching for blood. Also mark the position where you took your shot from in case you have to return to it to regain that perspective. Once you find the trail that the animal took after the hit you should try and identify where you hit that animal. Dark blood can indicate a liver or muscle wound; bright red blood with bubbles in it is a good sign and indicates a hit in the lungs; green liquid or bits of food matter in the blood indicates a gut shot.

Take it slow and mark blotches of blood with flagging tape every 25-50 yards to trace the trail from afar to determine overall direction the animal took. Just remember to go back and pick up the tape when you’re done. You should walk to the side of the trail so as to not disturb the sign. If you lose the trail and can’t find more blood, start fanning out and walking circles from the last place you had blood.

2013-10-12-birch-012When tracking a wounded animal it is easy to get caught up in just looking at the ground, trying to find that next speck of blood. You should be aware of what is 100 yards out in front of you as well and be ready for a killing shot if the animal should get up in front of you.

If you take it slow, be quiet and be thorough, finding wounded animals can be done on a consistent basis. Follow these tips to help find the game that you might have not put the best shot on.

DDW-Bear-Hunt-086

Follow our FISHING BLOG

WEB   RATES     FISH    HUNT    CABINS    PHOTOS
TESTIMONIALS    BROCHURE    HUNT BOOKLET

Enter your email address to subscribe to this blog and receive notifications of new posts by email.

← Back

Thank you for your response. ✨

Email Me....


Tags: , , , , , , ,

Muzzle Affect Accuracy – With or Without?

tapeIf you hunt in rainy places, you probably know about electrical tape, the basis of vigorous debate in almost any camp.

The tape, stuck over the muzzle, is used to keep precipitation and debris out of the rifle’s bore. But many hunters argue that the protective layer throws off your bullet’s impact point. Others say the flimsy barrier won’t deflect the bullet.

Which is it?

After testing the accuracy of two bullet types fired from the same .308 bench rest rifle, first without tape over its muzzle and then with electrical tape covering the bore. The results of eight 5-shot groups: Tape does not significantly degrade accuracy. Just as important, the tape also did not shift the rifle’s point of aim.

If you tape your muzzle to keep out the elements, you needn’t worry about shooting through it.

difference

Follow our FISHING BLOG

WEB   RATES     FISH    HUNT    CABINS    PHOTOS
TESTIMONIALS    BROCHURE    HUNT BOOKLET

Enter your email address to subscribe to this blog and receive notifications of new posts by email.

← Back

Thank you for your response. ✨

Email Me....


Tags: , , , , , , ,

Get More Early-Season Birds

It weave left, slip right, then disappear through the auburn treetops. It’s not often you get such a clear look at an escaping grouse during the early weeks of the season, but there I was, frozen as the bird slipped through the prettiest shooting lane I’d see on the entire trip. I never pulled the trigger.

ruffed-grouse-flying-down-from-limb-timothy-flanigan

The embarrassing reality of this scenario is that I’d been caught off guard. It was my first grouse hunt, and I wasn’t prepared for the surprise of the flush. That was a tough lesson, but it wasn’t the only one I learned during that trip to the hallowed grouse of NW Ontario’s Boreal Forest. Here are some more hits and misses that, if you’ll consider before you reach the woods, should help you bag more early-season birds.


1.  Being Aggressive

There’s no place for methodical shooting when hunting grouse. There’s no time for the shot to develop, as with long, loping shots on the sporting clays course. Grouse are fast, and they live in dense cover. But you don’t have to be a snap shooter to be successful. You just have to be aggressive. You should have nothing on your mind but finding that bird. The sooner you see it, the sooner you can move for it. Visualize beating the bird to the treetops with your gun.

2.  Going Off Trail
We started our morning busting brush but by midday got lazy and stayed on old logging roads & trails. The result was a half dozen points in cover that we couldn’t reach in time. Our hunt picked up tremendously in the afternoon, when we got back in the brush.

OLYMPUS DIGITAL CAMERA

3.  Misjudging Range
Twice I flushed grouse that I thought were out of range, although they were visible, only to realize afterward that they were makeable shots. Part of the fault was how I prepared. Before the trip I had practiced mostly fast, outgoing targets thrown from a few yards in front of me—textbook fast-flushing bird presentations. I was visualizing those shots in the field, and when birds flushed from farther away, I had the impression they were out of range.  Be sure to practice at longer ranges.

4.  Starting With The Gun Up
A solid ready position is a key to hitting fast-flying birds. It gets your body and eyes ready to make a quick, efficient move. When you moved in on birds with the stock up under your armpit and the barrel pointed forward, you will shoot much better.

5.  Relaxing After The Flush
Grouse might not covey up like quail, but they do often travel in close proximity to each other, especially where there’s a good food source. I saw this first-hand when we flushed three pairs of grouse over the course of a day. So when a bird flushes out of range or doesn’t offer a shot, don’t drop your guard. Be ready for another bird to flush.

Evening_Flight-_Ruffed_Grouse_large

Follow our FISHING BLOG

WEB   RATES     FISH    HUNT    CABINS    PHOTOS
TESTIMONIALS    BROCHURE    HUNT BOOKLET

Enter your email address to subscribe to this blog and receive notifications of new posts by email.

← Back

Thank you for your response. ✨

Email Me....


Tags: , , , , , ,