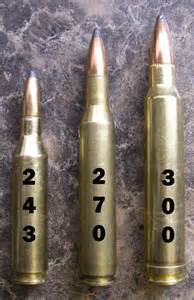
When it comes to choosing the right caliber on your next hunt here’s a chart to print out for reference.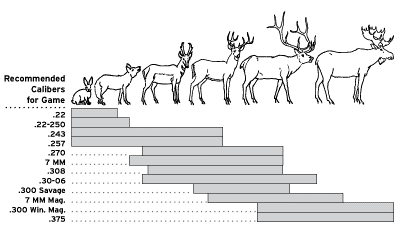
WEBSITE RATES FISH HUNT CABINS PHOTOS
TESTIMONIALS BROCHURE HUNT BOOKLET
When it comes to choosing the right caliber on your next hunt here’s a chart to print out for reference.
WEBSITE RATES FISH HUNT CABINS PHOTOS
TESTIMONIALS BROCHURE HUNT BOOKLET

Dry-firing your bow is something you will want to avoid at all costs. To help minimize your chances of dry-firing a bow you should always draw a bow with an arrow in it, and aim it at a target. This way if you do accidentally release the string there is an arrow in it and you have a target to stop the arrow. Also if you are just trying out a bow be sure to draw with an anti-dry-fire release. When in a group of people it is very easy to become side tracked and forget to load your bow with an arrow. It’s always good to double check before you draw your bow

Dry firing a bow is the act of shooting a bow without an arrow. While this may seem harmless to some of us who are just starting out I assure you that this can be one of the most costly mistakes you can make.
The fact of the matter is that it can happen to anyone beginner or expert for many different reasons. Whether it be from ignorance, distractions, or accidental misfire of a release it happens all the time. So the question is what do you do if you accidentally dry-fire your bow.
There are a few outcomes that could happen when a bow is dry-fired, the first is that is that it will appear that nothing has happened to any of your bow. The second scenario is that your string breaks however everything else stays intact. The third possibility is your bowstring, and cables could snap resulting in your limbs breaking and potential debris flying all over the place. This is basically the worst case scenario and can at times be irreparable.
No matter what scenario your bow falls into after being dry-fired, the first thing you will need to do is to get a magnifying glass and a bright light and look over the limbs especially near the cams for any cracking, or splintering. If you find that one of both limbs have cracks or splinters in them then you will have to replace the limbs before you are able to shoot again. Failing to do so will likely cause will render the bow unusable and/or injury.

In any of the other cases where the string breaks and/or the bow limbs shatter, you will first go get medical attention if you need it and then you will need to bring your bow in to a bow repair shop and you will have to replace the limbs,string, and any other broken parts(axles,cams,wheels etc.).
After checking for cracks and splinters in the limbs, take a look at the cams/wheels to make sure that they have not been bent or cracked, again if they are you will need to replace them as soon as possible before you are able to shoot. Next if you were lucky enough to have your string still intact, you will need to check the whole thing for badly frayed portions, cut strands, and badly damaged areas, especially near the axles.
If everything checks out and you were unable to find anything wrong with your bow then you are lucky, and you have 2 options, your first option is to draw the bow(with an arrow) and shoot it. Make note of any weird noises, or vibrations. If you aren’t the risky type then you can bring it into a bow repair shop and they will have the tools and resources to be able to better inspect it for damages.


In closing, dry firing a bow may seem innocent, but in turn can be detrimental and even dangerous. Take your time to ensure longevity of your equipment for years to come and better success rates!


Follow our FISHING BLOG
WEB RATES FISH HUNT CABINS PHOTOS
TESTIMONIALS BROCHURE HUNT BOOKLET

While reading some great hunting articles last night, I came across a very overlooked topic. This is an article written by Tyrrell Hearn and is a great quick snippet on basic hunter safety tricks!

Over the years we have all heard of hunting accidents and how bad they can be. Hunting safety should be paramount in the mind on any hunter, especially those using high-powered rifles. It goes without saying that guns are designed to take life quickly and effectively, making it imperative that you treat them as such. If you are a hunter, here are a couple tips to keep you safe this season.

Blind placement– Keep in mind that there are people around you who may also be hunting in the mornings and evenings. Be mindful of other known hunting groups in your area. Having a chat with them about the direction of their firing lanes so everyone is up to date on their neighbor’s new hunting spots is a great way to stay safe.
Less powerful bullets– It is always a draw to buy the highest grain bullet for your guns, however, higher grain equals a faster and longer bullet trajectory. Pick something a little smaller but effective for the game you are targeting.

Hollow points– Buy hollow point bullets. Full Metal Jacketed bullets are not legal to hunt with in most areas anyway. Hollow or soft tipped bullets will break up even if they are only hitting brush and small trees. Lessening your chance of a bullet traveling way past your target.

Safety orange– Wear your safety gear so that even at a distance, the most novice of hunter will not mistake you for an animal.
Stay safe, think ahead, and have a great hunting season!
Follow our FISHING BLOG
WEB RATES FISH HUNT CABINS PHOTOS
TESTIMONIALS BROCHURE HUNT BOOKLET

While doing some research, I came across a fantastic article that outlines the starting point for any new hunter. We have all been there, wanting to do but not knowing where to start…..here is a fantastic push off point
Sean McCosh (DuckBuckGoose) – PHJ ProStaff – Cincinnati, OH
Want to learn how to hunt but don’t know where to start? You’re not alone. There are thousands of people who have recently become interested in hunting, many of which have never even shot a gun.

For many, that’s because we’ve been experiencing a food renaissance in America. People are becoming aware of the downsides and potential health risks associated with commercially raised meat and highly processed foods. As result, there is a renewed interest in getting back to basics and consuming locally harvested “real food” that you hunt, grow or gather yourself. As a lifelong hunter, I welcome this resurgence and the new hunters that come with it – because the more people who hunt, the more interested voters we have to fight for our right to hunt and help us protect important wildlife habitat for the future generations. Plus, as hunters, we love to share our passion for hunting and the outdoors with others…it’s in our nature. My bet is, once you discover the excitement, satisfaction, connectedness to nature and sustenance that hunting offers, you’ll want to share your passion for it too.
Hunter Safety Course
I was lucky. My Dad, my grandfather and my uncles were all hunters. They taught me from an early age the principles of gun safety, how to shoot a gun and to be an ethical hunter. I was blessed to have that opportunity, but if you didn’t, not to worry. Chances are your state offers (and probably even requires) a hunter safety course for new hunters. I took the Ohio hunters safety course when I was a kid and, although it was a long time ago, I can still remember being enthralled by the class and excited to take the test at the end, so I could finally get my hunting license and hunt alongside my Dad. If you are not sure what the laws are in your state, here is listing of the hunter education requirements for various states. In my opinion, the classes are interesting and fun and can teach the basics of everything from firearm safety to outdoor skills, to animal anatomy and public vs. private property rights laws.
Upon taking a hunting course, you’ll soon discover that there’s much more to hunting than simply walking in the woods and shooting an animal. You may be surprised that a very a diverse cross-section of the population is take hunting courses – ranging from young kids who come from a family of hunters, to recent immigrants, to “seasoned” foodies who are finally ready to see exactly where their food comes from. If you want to get a head start and take an online hunter education course before you take your state’s official course (if offered and required) you can do so online at this site from the International Hunter Education Association. In addition to what you learn in these courses, you can also learn a lot by signing up for ProHuntersJournal.com and picking the brains of hunters in our community. It is 100% free, so if you’re not a member, click here to join now.
Choosing a Gun and Shooting Practice
Again, I was lucky. My Dad was a knowledgeable hunter who knew exactly what I needed to get started hunting and when I was ready to progress to “the next level” by moving up to a bigger gun or a more challenging hunt. But if you are an adult just getting into hunting, the first thing you have to do is decide what animal or animals you want to hunt, because that will determine what sort of gun (or possibly bow) you’ll be using. Once you determine this, I suggest reaching out to an experienced hunter of your chosen game, to get their advice. If you know someone who hunts, there’s a good chance they will be willing to take you under their wing and maybe even let you borrow a gun after a little training. If you don’t know anyone who hunts these animals, not to worry. As I mentioned, hunters love to bring new people into the sport and share advice, so try reaching out to hunters in online message board areas of sites like this one, or by talking to a trustworthy sales person at a reputable sporting goods store or outfitter. If you go into a store to look at guns, you may want to approach it simply as a fact-finding mission at first, and make that clear to the sales person. Since guns and hunting gear can be expensive, a good first step could be to call up a shooting or hunting club near you and ask if they have the type of hunting gun you’re interested in available to rent, and if they offer shooting lessons. That way you can learn more about the gun and see if you like shooting before you jump in with both feet and spend hundreds of dollars.
Whichever gun you choose, you will need to practice gun safety always and practice your marksmanship often, to become an ethical hunter. These points cannot be stressed enough. I’d rather not shoot an animal at all than to shoot it poorly and run the risk of badly injuring but not killing it. The ethical hunter strives to be a great marksman and practices accordingly.
When I was first learning how to hunt, my Grandpa would often say… “Don’t point your gun at anything you don’t plan on shooting and don’t shoot anything you don’t plan on eating”. Of course the “eating” part didn’t apply to target practice, but there’s a whole lot of wisdom packed into that simple lesson of his.
Learning How to Hunt
There is no substitute for experience when it comes to hunting. So, if you don’t have experience yourself, try to borrow it. Approach the sport with a hunger for knowledge, a childlike curiosity and an open mind. If you do, and you are not afraid to ask questions, my bet is you can quickly find a mentor that will help you learn the basics, answer the many questions you might have and maybe even take you hunting.
My friend Jason is a phenomenal duck and goose caller. One morning this past season he was hunting our duck blind with another friend who is literally a world-class caller and has won several goose calling competitions and titles. As Jason was backing his duck boat into the water that pre-dawn morning, they saw a couple of new hunters clumsily attempting to put their tiny skiff in the water also, on what to them was an unfamiliar lake. It didn’t take long for Jason to realize that these guys didn’t know what they were doing, and that they were literally risking their lives by attempting to cross the icy waters of the lake in that tiny, overloaded boat. So, instead of lecturing them about what they were doing wrong, he simply walked up and invited these guys to join him in his blind. After all, they had plenty of extra room (and he didn’t feel like rescuing them from the icy waters when there were ducks to be hunted). Quickly realizing Jason was an experienced hunter, these two guys gladly joined. Their willingness to learn would be richly rewarded.
I was on the phone with Jason throughout that day to give and get field reports. Their hunt started out slow with very few ducks in the area. But, it ended up being a massive migration day for Canada geese. Realizing that, Jason ended up pulling most of his duck decoys and changing his decoy spread to set up primarily for geese. As huge flocks of geese started to come onto the lake, he and his championship goose caller friend put on a real calling clinic for these new hunters, which resulted in a 4 man limit of geese on their first “real” waterfowl hunt. Jason said the look on their faces was priceless when they realized the situation they had fallen into by being open to learning from more experienced hunters.
If you can’t find experienced hunters in your own social circles, reach out to your local division of wildlife office and ask them if they can point you to any local resources. Many Division of Wildlife or Natural Resources officers are hunters themselves and are very willing to share information to help you be successful. Another strategy is to contact the local chapter of wildlife conservation organizations like: The National Wild Turkey Federation, The Quality Deer Management Association, Ducks Unlimited, Delta Waterfowl, Rocky Mountain Elk Foundation or Pheasants Forever. The type of organization you choose to call will obviously depend on the game animal you want to pursue and where you live, but you’ll find that local volunteers for these organizations are passionate about hunting, and about bringing new hunters into their organizations. They can be a tremendous resource.
There’s one last point I need to make about learning from experience. Once you learn the basics by leveraging the experiencing of others, you’ll quickly start to realize that you’ll be learning something new on every single hunt, based on your own experience. This is one of the most rewarding aspects to hunting, because no matter how long you’ve been hunting, with every trip to the woods, every day on the water and with every animal encounter, you’ll start to pick up insights that will help you make better future decisions and make you a smarter hunter.
After the Shot
For many new hunters, the question of “what do I do with an animal once I shoot it?” is their biggest source of trepidation about getting into hunting. Well, it is a great question and there’s more to it than meets the eye. Your first challenge is to successfully recover the downed game. Once you shoot an animal, recovering it needs to become your first priority (after safety, of course). I’ve seen hunters get hopped up on adrenaline and side tracked by seeing more ducks in the air, or other deer approaching – causing them to take their focus off of animals they had already shot. This can lead to lost game, which is never a good thing and one of the most unfortunate situations in hunting. 
How you recover an animal depends on the species. For big game like deer, elk or bear, it is best to give the animal time to expire before you pursue it. If you make a great shot, sometimes you’ll see the animal go down and expire within your view, but it doesn’t always happen that way. There may be tracking involved, which is just another fun and challenging part of the hunting experience. If you’re hunting small game or fowl, you can and usually should go after them right away, to recover them wherever they dropped. Sometimes a quick follow up shot is needed to quickly and ethically kill the animal.
Once you recover a big game animal like a deer, you’ll need to tag it – which basically just means you put a tag with your name and some basic information about the harvest of the animal onto the animal itself. This is a legal requirement in most, if not all states in the U.S.
Then, whether it is big game or small, you’ll eventually need to clean and process the animal. For big game, like a deer, you will likely need to field dress or “gut” the deer out in the field. This serves two purposes. First, it helps cool down the body cavity more quickly, which helps preserve the quality of the meat. Secondly, it removes a lot of weight from the animal, which will help you drag it out of the woods to your vehicle more easily.
As for the question of how-to field dress a deer, how to clean a duck or any other animal, thankfully we live in an information age where practically everything you need to know can be found on the internet. That is, if you don’t have a friend or family member to show you first-hand. From field dressing to plucking to processing, a simple search on Google or YouTube will deliver links to dozens of videos that can help walk you through the process.
When I shot my first deer with a shotgun as a teenager, I was fortunate to have a family friend help me field dress it. Then I took it to a meat processor to butcher it. But when I finally took up (and fell in love with) bow hunting years later, I had no one around to show me what to do when I killed my first doe. Fortunately, I was prepared and had a step-by-step guide to field dressing printed from the web and put it in a plastic bag in my backpack – so I’d be ready if I was fortunate enough to harvest an animal. Good preparation is a hugely important part of successful hunting.
Getting Started Starts Now
When I decided to take up bow hunting, I was inspired by simply shooting a friend’s old compound bow at a local archery range. There was something about taking aim and releasing that arrow that resonated with something deep inside of me. Simply by shooting his bow, I realized that even though I’d never hunted with one, I was in-fact a bow hunter. So that day at the archery range I set a goal. I said to myself and to my friend, “I am going to buy a bow of my own, practice and kill a deer with it next season”. Mind you, although I was a long-time small-game and bird hunter, I had never hunted with a bow. My goal was to figure it all out…the equipment, the strategies and how to prepare for a hunt in ways that would help make me successful. So that’s what I did. Since then I’ve taken about twenty deer with a bow. I’ve fed my family with several of those deer and donated others to local food pantries or others in need. I am a bow hunter. A sportsman. A provider. And it all started with simple, clearly stated goal.
What’s your game? What’s your goal? It is time to get started!
Follow our FISHING BLOG
WEB RATES FISH HUNT CABINS PHOTOS
TESTIMONIALS BROCHURE HUNT BOOKLET


Sometimes the thrill of the hunt gets escalated that much more! This is one of the most adrenaline filled hunts we have seen in years. This hunt was filmed in the Yukon and was executed with great skill…while we promote hunting, we suggest unless you have the skill necessary, do not try this out in the field 🙂
Are you an Ontario resident with a tag for 15A or 15B? We have centrally located accommodations. Book early to avoid disappointment!

Follow our FISHING BLOG
WEB RATES FISH HUNT CABINS PHOTOS
TESTIMONIALS BROCHURE HUNT BOOKLET


Our hunts accommodations ONLY for Ontario Resident Moose Hunters.
If your looking for a great hunting area that has a high population of moose then look no farther than Wawang Lake Resort as we’re in the middle of the best moose hunting area in all of NW Ontario.
At Wawang Lake we offer comfortable accommodations to Resident Ontario Moose Hunters only. Presently we don’t have any tags available and unable to take any non-resident hunters during the Moose Hunt season.


Things Moose Hunters Should Consider:
Crossbows
• Draw length must be al least (11.8 in.)
• Draw weight must be at least (119 lbs.)
• Bolt head must be at least (0.9 in.) at the widest point, and there must be at least two cutting edges of straight, sharp, un-serrated, barbless steel.
Longbows
• Draw weight must be at least (48.5 lbs.) at draw length of (27.6 in.) or less.
• Arrow length must be at least (23.6 in.).
• Broad head must be at least (0.9 in.) at the widest point, and there must be at
least two cutting edges of straight, sharp, un-serrated, barbless steel.
Rifle
We suggest using at the minimum one of the following:
300 Magnum
30-06
7MM Magnum with bullet weights in the 180 grain range
A rim-fire rifle, a shotgun smaller than 20 gauge when loaded with shot, or any shotgun loaded with shot smaller than SG or No. 1 buck cannot be used for hunting Moose.


Hunters should also have a compass or hand held G.P.S., as well as a good pair of binoculars, thermos, flashlight, lighter, warm clothing, good quality rain gear, waterproof insulated boots, gloves/mitts, long underwear. Two-way portable radios are also recommended. Fall hunting weather can be warm & dry to cold, wet and snowy within a few hours; so it is best to be prepared for all variables.
We trust that this information will prove to be useful in planning your next Big Game Hunt in beautiful, exciting NW Ontario. We invite you to enjoy our ‘True Wilderness Hospitality’ while participating in a remote hunting experience.
WEBSITE RATES FISH HUNT CABINS PHOTOS
TESTIMONIALS BROCHURE HUNT BOOKLET

Game carts are a great idea if you hunt in remote areas where a deer must be brought out whole. But dragging 150 pounds of venison in the container is a real chore, especially uphill.

This Car-Go-Cart is a huge help in this department because it attaches to any 2″ trailer hitch receiver and will allow you to transport a deer or other game without having to lift it into the bed of a truck or make a mess of your SUV.

Additionally, the cart is perfect for camping trips, carrying coolers of ice, storing wood-cutting tools, and a host of other projects. The Car-Go-Cart is available through the QDMA website. Check out this video, which shows how easy it is to set up.
Follow our FISHING BLOG
WEB RATES FISH HUNT CABINS PHOTOS
TESTIMONIALS BROCHURE HUNT BOOKLET

It cant go without saying that this year’s batch of hunters fortitude has been tested over and over. With weather that seems to be taunting them by cold raining one day and jumping to 80+ degrees and sunny the next, these guys have been putting in the hours and time after time have in most cases been rewarded.
On Saturday, Dave, Tim and Jason made the long drive up from Iowa to try their best to outsmart a couple bruin and get a day or two of fishing in. Optimism high and clouds beginning to hang low, the stands began to be assembled for the drive to the baits.
Each man had a different weapon but all agreed that failure was not an option. The first day was a shorter than normal sit of only 4 hours and all were thankful that it was a restful sit as they had a long drive before and had sat long enough 🙂
The men arrived back in camp late after a dark trip through the woods. Dave was ecstatic to let me know that his bait had proven effective and he had spotted an average sized bear that he had decided to pass on and Tim and Jason both had heard but not spotted activity.
The next day, the three went out, excitement and weapons in hand. The weather had cooled down and was determined to hold that mercury low for the day. The boys had layered and knew it would be a good, long, cool day. The day wore on for us here at the lodge as we completed one task after another waiting for the telltale early truck arrival signalling a downed bear. As we waited and watched, the clock ticked on. The sun had already set and the boys were already 30 minutes passed the expected arrival. We would give them 30 more minutes before setting out to ‘track’ our hunters. As the minutes dragged on, I had begun to assemble my gear, ready for the drive out with Terry.
At 11:20 pm, a set of headlights pulled through the trees and the truck slowed to a stop in front of my door. I emerged to a truck full of smiles, not only had Dave taken his boar of 368lb glory, but Tim had taken his as well!!
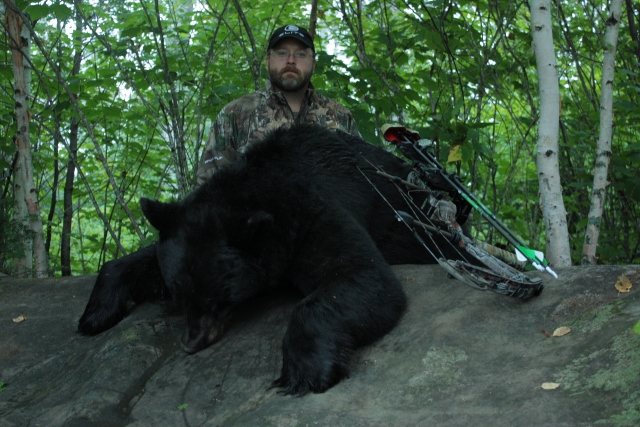
As we iced the bears down for the night, I had the chance to go over the hunt with both hunters, as a returning hunter to Wawang, Dave was so excited to tell me about all the bears he saw on ‘the bear highway’ today. He couldn’t help but beam when he told me about the sow and cubs that came for two visits that day as well as the mid sizer that came in between. He said that with all the action on the bait, it was very simple to decipher the size of his boar. He was clear that it had trumped everything else that had come for a visit and was so proud to share the pictures. “There were just bear everywhere I looked!” he repeated.
")
")
")
")
")
")
")
")
")
")
")
Smiles all around, Tim spoke up about his hunt and was proud of his harvest, though it wasn’t as big a bear as Dave’s, the tell white half chevron of white on the chest that made a winking emoticon made it very simple for me to dub this boy ‘Winky’ . Both had prime hides and will make for not only fantastic stories but beautiful mounts to be enjoyed for year after year.

Jason was so proud of both of his hunting buddies and is determined to add to the celebration list too!
Follow our FISHING BLOG
WEB RATES FISH HUNT CABINS PHOTOS
TESTIMONIALS BROCHURE HUNT BOOKLET

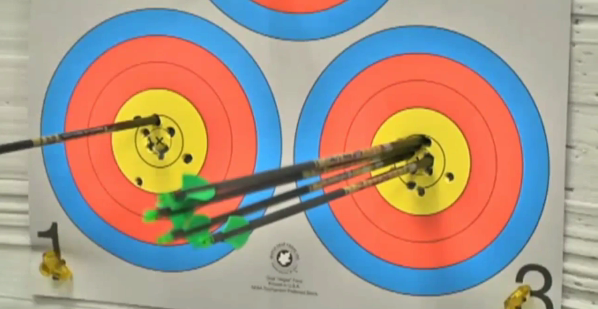
Jeff Fabry is one of the world’s best archers. He’s a five-time Special Games world champion, a three-time Paralympic medalist and he’s aiming for gold at the 2012 Olympics in London this summer.

What makes his talent unique is that Fabry, who has only one arm, has mastered the art of firing arrows with his teeth. Your dentist might advise against it, but Fabry, who will compete on the U.S. Paralympics Team in London, says his chompers are holding up just fine.
But the road to firing arrows with precision was not a straight one. At 15, Fabry lost his arm and a leg in a motorcycle accident.
“My buddies were out hitting the hills hunting and I was stuck at home and I was like, no, I don’t like this, so I figured out a way to shoot and it happened to be with my teeth,” he said.


Fabry pulls the arrow back by biting on a mouthpiece that he made from a nylon dog leash.
“It was trial and error to find what I considered to be the perfect mouthpiece, where I could be proficient,” he said.
Fabry is sharing his passion with our armed forces. He teaches the sport he loves to members of the Wounded Warriors Project, the nonprofit whose mission is to help injured service members cope in civilian society.
“What I’m really proud of is being able to work with our vets who are coming back from the sandbox with different disabilities,” he said.
Jim Castaneda, a member of the Wounded Warriors, said he is thankful that Fabry introduced him to the sport. While serving in the Navy and stationed in the Philippines, Castaneda suffered a traumatic brain injury and a stroke.
“It’s changed my life completely … I found something that I can do and I really enjoy it and love something now,” Castaneda said.
“I’m not just sitting there anymore, like watching my life go by and feeling sorry for myself. Now I’m actually getting up and doing something for myself and trying something else.”
That kind of feedback is a bull’s-eye for Fabry.
“That makes me feel good about myself,” Fabry said. “I got hurt before I could join the military, and this is kind of a way that I can give back to my country by helping our heroes.”
Will Wilson, who works for Navy Safe Harbor, the Navy’s Wounded Warrior Program, says Fabry is a coach and mentor for his team.

“Jeff is absolutely fantastic. He has a great demeanor and is able to communicate clear and concise direction,” Wilson said.
Follow our FISHING BLOG
WEB RATES FISH HUNT CABINS PHOTOS
TESTIMONIALS BROCHURE HUNT BOOKLET

 Over the last five years, probably no other “gadget” has changed the way we scout more than the trail camera. For many of us, running trail cameras is a hobby in itself, bringing a whole new excitement to our deer hunting efforts. Much more than just something to pass time, however, running trail cameras can give you a unique insight into the patterns of deer on your hunting properties and really tip the odds in your favor for harvesting a mature whitetail. Let’s take a look at the features to look for when purchasing a trail camera, and how to get the maximum benefit from the camera once you have made your purchase.
As the popularity of these scouting tools has grown, so has the number of companies offering their own line of cameras. The features on these cameras cover such a wide spectrum that choosing the right one for you can be a daunting and sometimes confusing task. While this article isn’t meant to tell you WHICH camera to buy, it IS meant to help you sort through some of the most common differences among the various trail cameras to help you narrow down your search.
RESOLUTION
The resolution of a trail camera is a measure of the image size that the camera creates. So a 5.0 megapixal trail camera will give you a much larger image – and therefore more detail – than one with 3.0 megapixals. Which resolution you choose really depends on how important it is to have a large, crisp image. If you are only concerned with having a general idea of what deer are in the area and when they are traveling through, then about any resolution offered on today’s cameras will suffice. If you want a larger, more detailed image to print off for your friends, then you may want to shoot for something with at least 3.0 megapixels.
BATTERY TYPE & LIFE
In my mind, this is one of the most important considerations when choosing a trail camera, as it will have a huge effect on the cost of maintaining the camera. I have seen some “cheap” trail cameras that burn through six C-sized batteries in a week, and suddenly the “cheap” camera gets VERY expensive! Others claim to operate up to a year on eight AA batteries. So before you go buying a camera based on price alone, keep in mind the battery life, as it may be the most expensive choice you could make in the long run.
TRIGGER SPEED
Another important feature is the trigger speed of the camera, which is simply how long it takes the trail camera to shoot a picture once something has “triggered” the motion sensor. A faster trigger speed can be the difference between having a great shot of that trophy buck and just having a picture of a deer’s butt as it walks out of the frame. If you plan on placing your trail cameras over feeders or a mineral lick, then trigger speed will not be as much of an issue as it would if hung along a trail.
FLASH TYPE
This is almost a moot point, since most trail cameras today have gone to infrared flash. An infrared flash, as opposed to the incandescent flash found standard on most consumer cameras, is less likely to spook deer, uses less battery life, and is less likely to be detected by other humans (i.e. thieves!). While I’ve gotten plenty of pictures of big, mature whitetails with an incandescent flash trail camera, there is no doubt that some animals are spooked by the bright flash. If you can afford the infrared flash, the benefits certainly outweigh the small increase in cost.
OTHER FEATURES
While we have covered some of the most important features to consider when buying a new trail camera, there are many more options that could impact your decision. One of these options is the size of the unit. Size varies greatly amongst trail cameras, and some companies are now producing models that are as small as your hand. Other models go as far as being able to send the pictures it takes directly to your email or cell phone, so the only time you have to check them is when the batteries need replacing. How’s that for convenience?
Before you head out to buy your next trail camera, take a minute to think about how it will be used and what features are most important to you. This will make the task of narrowing down your choices much easier when you start the shopping process.

MAXIMIZING TRAIL CAMERA USE
Once you have waded through all the details, made your decision and laid down your hard earned money on a trail camera, all that’s left is to hang that thing on a tree, right? Let’s take a look at some ways you can be sure you are using your camera to its potential this season and getting the most bang for your buck.
DRAW THEM IN
One of the easiest ways to maximize the effectiveness of your trail camera and insure that you see a good representation of what is in your hunting area is to use some type of attractant to lure the deer into camera range. Probably the most common attractant used across the country is shelled corn – it’s cheap, readily available, and the deer love it. For the purpose of getting trail camera pictures, there is no need to invest in an expensive feeder; just simply spread 100 pounds on the ground in an eight to ten-foot circle area where you want to hang your camera. For safety reasons, do not place the corn in large piles or in an area that holds moisture, as this can result in molding that can cause disease in both deer and turkey. Depending on deer density and other available food sources, this should get you five to ten days worth of pictures. Be patient, as it may take a few days for the deer to really key in on the corn and for you to start getting good pictures. Once they find it, though, it won’t last long!
Before you start dumping corn on your favorite hunting property, check your local game laws regarding baiting. If corn or other “feed” is prohibited, but would still like to attract deer to your camera location, then you may want to consider creating a mineral lick. You can buy one of the many commercial mixes available today, or simply create your own by mixing 50 lbs of trace mineral, 50 lbs of feed mix salt, and 10 lbs of dicalcium phosphate. Break the soil up with a shovel in the area where you want to create your lick and work your mix into the soil. Once the lick gets a good rain on it, it shouldn’t take long for the deer to find it and start paying regular visits.
KEEP IT MOBILE
Unless you are hunting a really small property, or you have the money to invest in lots of trail cameras, then you are going to need to move your cameras around to really get a good idea of what the deer are doing on your hunting property. Don’t get caught in the trap of leaving your camera in the same spot all season. This will not only limit your ability to pattern the deer, but it may keep you from discovering that trophy buck that could be hanging out on the other side of the property!
 By experience, two weeks seems to be enough time to get a good representation of what deer are in the area, without your camera spending too much time in one location. You can always bring the camera back to the same spot at a later time, but the idea is to cover as much of your hunting area as possible.
KEEP GOOD RECORDS
Once you have moved your camera around your property and gotten plenty of pictures to look at, the real work has just begun. Now is the time to sort through the pictures, identifying as many unique animals as you can, analyzing what camera sites each deer is visiting and the times that they were there. This should start to give you an idea of the travel patterns on the property, as well as potential stand locations.
This season, make sure you use these tips to get the most out of your trail cameras, and the next picture you get of that monster buck may be the one with you behind him holding his antlers, OR, even that BIG bear 🙂
Follow our FISHING BLOG
WEB RATES FISH HUNT CABINS PHOTOS
TESTIMONIALS BROCHURE HUNT BOOKLET


