 Follow our FISHING BLOG Link to our: HUNT BOOKLET

WEB RATES FISH HUNT CABINS PHOTOS
TESTIMONIALS BROCHURE HUNT BOOKLET
Follow our FISHING BLOG Link to our: HUNT BOOKLET
WEB RATES FISH HUNT CABINS PHOTOS
TESTIMONIALS BROCHURE HUNT BOOKLET


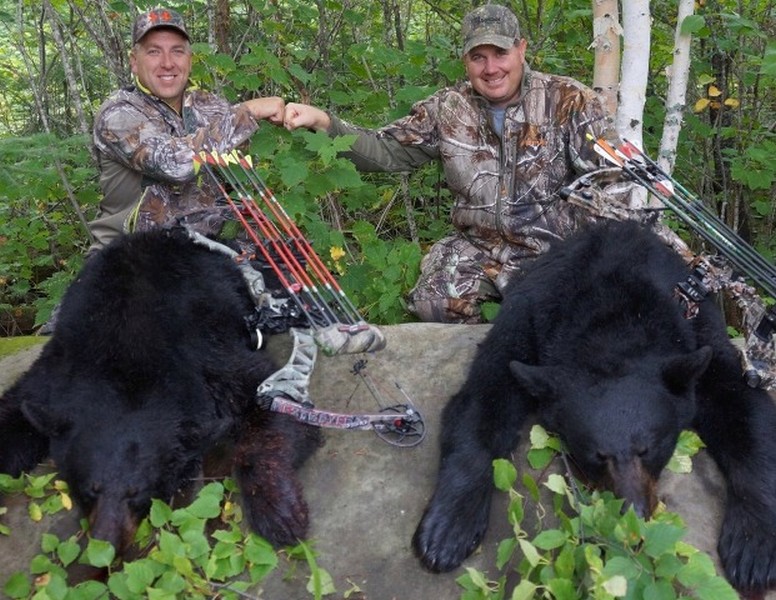
The most underrated hunt is for trophy-class fall black bears. There’s this misconception out there that hunters can just walk up on them. That’s just false. They’re one of the toughest trophy animals to spot and stalk in North America. Get on the record-book bruins with this killer nine-step plan.
1. Find Mature Timber
You have to locate three ingredients to get into big bears, Werner says. First, old-growth timber for denning, then food and water. Look for 10- to 50-acre parcels with these three features.
2. Scout it for Sign
Look for big branches broken off trees, claw marks in bark, and rubbed-out bark stubbled with bear hair. Ideally, you’ll also find fresh tracks on the ground measuring 6 inches wide or better.
3. Check for Scat
It comes out green but oxidizes very quickly, turning black almost immediately. The greener it is inside, the fresher.

4. Focus on Blueberries and Rose Hips
Bears go into a feeding frenzy in early October. Climb a nearby ridge and monitor the food source with binocs or a spotting scope.
5. Trust your Eyes
Bears feeding heavily will eat for about a third of the day and sleep the rest. The bears you glassed will show.
6. Judge the Bear
When you see a bear, determine if it’s worth going after. If one ear width separates the ears, it’s small; two ear widths, medium. Three means it’s a shooter. READ: How to Size a Black Bear
7. Note the Wind
Bears don’t see or hear well, but their nose is 50 times better than a bloodhound’s. There is no earthly way to beat their nose. The wind must be perfect.
8. Start the Stalk
Follow a route that plays the wind and approaches the bear from behind. If the bear alerts in your direction, stop and wait. Only move forward when the bear goes back to feeding and looks relaxed.


9. Make a Clean Kill
Never take a long shot, because anything less than a double-lung hit makes recovery a coin toss. Because of the nature of hunting large predators, guys get very excited. So you have to practice enough so the shot is second nature. But when it all finally comes together, there’s nothing better.
Follow our FISHING BLOG
WEB RATES FISH HUNT CABINS PHOTOS
TESTIMONIALS BROCHURE HUNT BOOKLET


Follow our FISHING BLOG
WEB RATES FISH HUNT CABINS PHOTOS
TESTIMONIALS BROCHURE HUNT BOOKLET


Follow our FISHING BLOG
WEB RATES FISH HUNT CABINS PHOTOS T
ESTIMONIALS BROCHURE HUNT BOOKLET

 Being Afraid of the Dark
Sounds silly, but don’t let it fool you. It is an ungrounded fear and one people need to overcome in order to have a successful black bear hunt; especially if you are hunting for a trophy. It can be very intimidating leaving a bear stand, by yourself, in the middle of the dark when you know with 110% certainty that there are active black bear in the area. You’d be off your rocker if you weren’t a little apprehensive. When you are hunting into the twilight hours, and getting ready to depart your stand, remember this, since 1883, in North American there have only been 30 reported black bear fatalities, most of which occurred during non-hunting activities. That means in 125 years, there has only been 30 fatal black bear attacks and subsequent deaths. With the 100’s of thousands of hunters that take to the woods every year, that puts the odds of being attacked by a black bear inconceivably in your favor. Hunting until you can’t see anymore gives you better odds when pursuing that trophy black bear of a life time. Most BIG black bears are taken within a half hour from dusk, when the smart animals feel most secure eating from an unnatural food source. Stay in your stand as late as you can, and the odds of shooting a monster increase tenfold.
And should there still be bears on your bait when your ready to leave your stand (although this rarely happens), shining a light or a sudden loud noise will send these skittish critters running for miles. Black bears, in their natural setting, are extremely fearful of humans, and would rather turn tail and run then face an unknown advisory.
Recovering Your Harvested Bear
Many people take to the bear stand, rightfully so, with excitement and anticipation of a successful hunt. Myself included, I get like a little child full of excitement when hunting these magnificent creatures. While most hunters will do a tremendous amount of prep work prior to the hunt, few prepare for what happens after the hunt.Bears rarely pile up on the bait or in an open area with easy access. Instead, these hearty creatures are famous for taking a double lung shot and running for miles, deep into thick woods and cedar swaps.Having a plan on how to recover your trophy will put you light years ahead of most black bear hunters when it comes to a successful hunt. Planning should include how to track and more importantly flag the path the animal takes. What to do if it starts to rain or gets dark. Who will help you track the animal and once found, how will you get it out? And how to protect the meat from spoiling on a warm fall night.
Weather
Avid hunters know that fall weather can change in a heart beat. It can go from warm, to cold, windy and raining in the blink of an eye. Having the right clothes in your back pack can make the best of a somewhat undesirable situation.
 Bugs
Bugs
can be a huge annoyance in the great outdoors. Especially when you are forced to sit still for extended periods of time. Avoid bug sprays when bear hunting… PERIOD! A new, unfamiliar scent, along with an intuitive feeling that something isn’t right, will keep trophy bears from over coming fear and committing to your bait. Bug jackets and bug nets are a must. (Oh, on side note, make sure you practice shooting with your bug net on, more about that later). Regarding the portable propane bug eliminators. I have seen hunters use them with success. In fact, in 2008 there was a beautiful 350lbs sow taken while a hunter used one, however my vote is not in on them.
Boredom
Nothing will end your hunt faster than impatience and constant movement in your stand. If you are like most guys who can’t sit still for more than 30minutes at a time, you must bring something with to occupy your mind. I personally use a book. I have also seen guys use those portable, pocket video games. Regardless of what you use, make sure you sit sill and be quiet!
Natural Calls – Ever been in the stand when all of the sudden you have to take a pee? Sucks, doesn’t it? I don’t know how many times I have had this happen to me, yet somehow I always forget to bring a container along. Put a portable urinal on your packing list. Doing so will make the difference between shooting that monster and taking it’s offspring.
Follow our FISHING BLOG
WEB RATES FISH HUNT CABINS PHOTOS T
ESTIMONIALS BROCHURE HUNT BOOKLET

SO, you’ve opted for a lung shot. Good choice. But where exactly you should place your bullet depends on your quarry, as the following tips reveal. (Please refer to the organ legend) Sometimes you only get one chance to bring down a big-game animal. Here are 7 ways to help make sure it truly counts.

Again, lung shots are your best bet. Trace the back of the front leg up to about one-third of the way into the chest. The lungs on a bear are positioned a little more forward than on an ungulate, so you don’t have as much leeway if you shoot back of your aiming point. For the shoulder/heart shot, which is popular for anchoring bears in their tracks, follow the centerline of the front leg up to the one-third point of the body. Be careful not to shoot low or forward, or you’ll quickly have a wounded animal on your hands.
WOUNDED and lost big game animals are part of the somber side of hunting. None of us is comfortable with the subject, but if you have any measurable hunting experience, you’ve undoubtedly seen examples. Maybe you’ve even lost an animal or two yourself.


It’s a certainty that as long as there’s hunting, game will be wounded and not recovered. In such situations, it’s just as certain that the bullet didn’t hit the animal in the right place. Why exactly can be blamed on any number of variables, but in most cases it’s safe to say the shot should never have been taken in the first place.
As hunters, our most important priority is to do everything possible to ensure a clean, quick, humane kill-it’s our moral obligation every time we head afield. Here are some important considerations in making that happen.
BULLET PLACEMENT
Much has been written and discussed about selecting the best rifle, cartridge, bullet and optics for hunting specific species under various conditions. Most of this advice is sage indeed, helping hunters learn about and understand the limitations of their equipment. But when it comes to a quick kill, the single most important factor is bullet placement. A .243 in the heart or lungs of even the largest big-game animal, for example, is more certain to result in its demise than a .500 Nitro Express in its leg. Just think of hunting legend Karamojo Bell. It was his fanaticism over bullet placement coupled with an understanding of his quarry’s anatomy-that allowed him to tale down so many elephants with his meager .275 Rigby, a cartridge equivalent to today’s 7×5 7.
MARKSMANSHIP
The first step in ensuring accurate bullet placement comes with the decision to squeeze the trigger. Before you hit the switch, you must have an extremely high expectation of putting the bullet right where you want it, and that means understanding your own limitations as a marksman. I’ve never been much impressed by tales of 450-yard kill shots on deer or other game. While such shots are possible, not many hunters can make them with any consistency. With few exceptions, I shudder when I hear hunters talking about their long shots-much like a gambling addict bragging about his one win, for each tale of success there are likely tenfold as many unspoken failures.
The longest shot I’ve ever taken was with a 7mm Rem. Mag. on a five-point bull elk in B.C.’s Muskwa Valley. It was 360 yards away. I had a solid rest, a reasonable amount of time and a mild, though gusting, wind. The bull was dead when we got to him, having never moved. Despite that, I’m not sure I’d take the same shot today if it were presented. Perhaps I no longer feel the need to, as I might have back when I was a much less seasoned hunter. Experience has taught me that too much can go wrong in such a situation-not to mention the fact few animals can travel as far, or as quickly, as an ells can when wounded.

Jon Hanson – Tiffin, IA 440 lb. black bear
No, I’m far more impressed by the hunter who tells me he snuck in to within 75 yards of a herd of elk, or never shoots at running game or at any animal beyond 150 yards. This is the hunter I admire, for he clearly understands that undisturbed game and cool-handed marksmanship should be the rule, not the exception. This is the hunter who believes that 20 bullets can equal 20 deer, and he’ll wait to shoot only when he’s extremely confident of accurately placing a bullet.
HEAD & NECK SHOTS
So, where on an animal should we try to place our bullet to ensure a one-shot, clean kill? There’s no denying the surest fatal shot is to the brain or spinal column. Either will put an animal down almost instantly, and result in very little ruined meat. Under most circumstances, however, this is not a shot I would recommend. For starters, the brain is a relatively small target, and even a narrow miss can result in a broken jaw, lost eye or other similar wound that condemns an animal to a most unpleasant, slow death. I once shot an antelope sporting a fresh bullet wound through the bridge of its nose. Whether the hunter who first hit it was aiming for the brain, I can’t say for sure, but the buck was clearly laboring, almost choking on blood, and would have suffered considerably had I not come across it.
Neck shots are equally uncertain, as the spinal cord must be severed to ensure instant death. Miss by even a little bit, and you’ve probably got an animal with a muscular wound from which it will likely recover, but not without considerable agony. In the worst-case scenario, you may sever the trachea-the animal will likely escape, but suffer a lingering demise. When neck shots don’t connect directly with the spinal column, an animal will often drop to the ground almost immediately but quickly recover and run off. If you shoot an animal in the neck whether by design or by accident-it’s therefore important to keep a close eye on it until you’ve confirmed it’s down for keeps.


Head and neck shots do have their place in the right circumstances, but they should only be taken at close range by capable shooters who know their quarry’s anatomy. They’re also acceptable in the rare event of an emergency, when a dangerous animal needs to be brought down in a hurry.
SHOULDER SHOTS
Some hunters prefer shoulder shots because they will disable game while also inflicting fatal damage to the heart or lungs. Even when no collateral damage occurs, a broken shoulder, or two, will bring down an animal, rendering it helpless. In my opinion, this shot should be reserved for dangerous game, particularly bears. While some hunters use shoulder shots on larger animals such as moose and elk, I find the resulting dispersal of bullet and bone fragments ruins too much meat. Having shot a whitetail through the shoulder last year, I can speak first-hand of the meat that was wasted. Another thing to keep in mind when considering the shoulder shot is that if you shoot too high or too far in front, you’ve got either a clean miss or an animal with agonizing wounds. And if you shoot too low, you’ve got an animal with a broken leg that can still escape, only to later succumb to its wounds or predators.
 HEART SHOTS
The heart shot gets a lot of attention, though I suspect most hunters don’t actually realize just how low in the chest the heart lies in big game. While no doubt fatally damaged if hit, the heart offers a small target, and is often covered by the upper leg. There’s little room for error: too far forward and you’ve got a non-fatal brisket shot; too low and you’ve hit muscle or broken a leg, with no expectation of quickly recovering the animal. And if your bullet strikes too far back, you’ve got a gutshot animal. The only practical room for error is if you shoot high and take out the lungs. While many believe the heart shot is almost instantly fatal, most experienced hunters will tell you that a heart-shot animal typically travels farther before collapsing than one that has been lung-shot.
LUNG SHOTS
I believe the lung shot is the appropriate shot for 90 per cent of the big-game hunting situations in Canada. First and foremost, a bullet through the lungs results in an almost certain one-shot kill. In most cases, the animal won’t drop on the spot, but seldom will it travel more than 100 yards or so before falling over; the damage a modern bullet does to the lungs is that devastating.
 The lungs also offer a relatively large target, bigger than any other assuredly fatal zone on a game animal. This allows for a fair margin of error. Shoot low, and you’ll take out the heart; a bit high and you’ll sever the spinal column. Too far forward and you have a debilitating shoulder shot. Only when you shoot too far back do you have a problem-animals shot in the paunch typically suffer lingering deaths, and if you do happen to recover one, you’ve got a heckuva mess on your hands when it comes to field-dressing it. If you shoot just a little too far back, however, you may get lucky and strike the liver. Animals hit in this vital organ tend not to go too far before lying down.
The lungs on a game animal generally cover about two-thirds of its chest area when viewed broadside, more or less in the centre and a little toward the bottom. A professional hunter in Africa once told me he thought North American hunters tended to shoot dead centre in the chest of an animal; he believed the more effective shot was to the top of the lower third of the chest. He may well have been right, but 1 still maintain that allowing as much room for error as possible is the wisest thing most of us can do. As such, when my quarry is broadside, I generally aim for the centre of the chest, just behind the shoulder. Often, an animal will not react immediately to a lung shot, causing some hunters to think they’ve missed when they’ve actually made an excellent shot. I remember one moose I shot three times in the span of about 10 seconds. It didn’t take two steps during that time, and I couldn’t understand how I could be missing such a big target. The animal dropped soon after the third shot, however, and when I skinned it out, a salad plate would have covered all three holes in its chest and lungs. (For species-specific tips on lung shots, see “Top targets” on page 48.)
SHOOTING ANGLES
While we all prefer broadside shots, as often as not we face shooting opportunities from an angle. You still want your bullet to enter the chest cavity, however, so it’s important to visualize the path your bullet must take. With an animal quartering toward you, your target should be somewhere between the base of the neck and the point of the facing shoulder. If an animal is facing you directly, the centre base of the neck is the preferred target. The more difficult shot to visualize is when an animal is quartering away. Take your shot with the intention of breaking the far side shoulder and you’ll generally send your bullet through the desired lung region. Be aware that the tendency in this situation is to shoot too far back, resulting in an unwanted paunch shot. I recommend not shooting when animals are quartering away at extreme angles or facing directly away from you. While we all know the old “Texas heart shot” through the behind can be fatal, the odds are your bullet will break up or deflect on contact with bones, impeding its ability to get into the vital organs. I know some may disagree, but this is one shot I simply won’t take, and I advise others to follow suit. If you absolutely must tale this shot, at least be sure to use a well-constructed bullet designed for maximum weight retention and penetration. Remember, when it comes to shot placement, the goal isn’t simply a freezer full of meat it’s also to get the job done quickly and efficiently.
Follow our FISHING BLOG
WEB RATES FISH HUNT CABINS PHOTOS
TESTIMONIALS BROCHURE HUNT BOOKLET

It’s rare for any hunter to walk away from a field or reflect on a hunt and not think about whether a shot could have been better. Whether with a bow, crossbow or firearm, there are times when we hesitate. A little voice – instinct, caution, doubt? – throws up a hurdle.

Sometimes we adjust and avoid the hurdle. Other times we pull up short and don’t leap. We don’t take the shot.And, unfortunately, there are times when we know the hurdle is there but take the shot anyway. We’re confident in our abilities and that of our bow, crossbow or gun. Some might call that experience. Some might say it’s recklessness or unethical.
We probably all can look back and wrestle with at least one shot that might have been risky, even if things turned out well after taking it and the deer, bear or moose is on the ground. Part of our duty as hunters is to strive to maximize our abilities with whatever weapon we use.


We practice, tune our bows, hit the range with our guns. We try to find the right combination of arrows and broad heads or the ammunition that works best with our rifles, muzzleloaders, handguns or shotguns. One way to improve our knowledge and experience is with Deer & Deer Hunting’s “Shot Simulator” software. If you’ve ever been curious about where your bullet, slug or arrow has entered a deer’s body and what happened, here’s how to find out. The Shot Simulator software is designed to provide you with outstanding animation of a deer’s body and internal bones, muscles and organs.
 With the Shot Simulator, you can position the animated deer in numerous positions – how it was when you shot, or how you saw a buck or doe and didn’t shoot – and then learn which organs were hit. Didn’t like what you saw? Position it differently and do it again. You can not only position the deer, but also your shot from a tree stand or ground level. If you’re a stand hunter but only climb about 15 feet, you can see the difference in that height versus 25 feet or on the ground. The animation allows you to move the deer around and then remove the hide, skin and bones to see what happened. Then, you can punch in the trailing guide to find out what happens next. Should you follow the game immediately? Wait a while? Just for your knowledge, you could take the shots on the computer that you’d definitely pass up in real life and then see what would happen.
It’s an educational tool that could help you glean more knowledge and help make you a better hunter. Shot Simulator also is a great teaching tool for young hunters, too. They’re curious about what happens and this is a great way to augment their in-field learning.
Follow our FISHING BLOG
WEBSITE RATES FISH HUNT CABINS PHOTOS
TESTIMONIALS BROCHURE HUNT BOOKLET


The Flint Laces are a pair of shoe laces that you can use in case of an emergency to start a fire with if you are otherwise incapable of starting one. Maybe you forgot your matches at home, maybe it just rained and all your matches are wet, or maybe you’re stranded in the woods without a match or a lighter and you’ve lost your manhood and just can’t make a fire using your own two hands.

Each flint lace contains a hidden piece of ferro rod that is capped with rubber. Simply scrape the rubber from the rod, strike it against a knife or some steel (assuming you have some), and you will be toasting your buns on a nice hot fire in no time.


The flint laces are completely normal shoe laces other than containing a fire starter rod, they are made from type III 7 strand 550 paracord, contain 4 separate rods (1 on each end of each shoelace), come in sizes 36-108, and are perfect for when you’re planning on getting lost and stranded while hiking or camping.


Follow our FISHING BLOG
WEBSITE RATES FISH HUNT CABINS PHOTOS
TESTIMONIALS BROCHURE HUNT BOOKLET

Beartooth a case to use on your smartphone that essentially turns your phone into a walkie talkie to be used when your phone is out of range of cell service.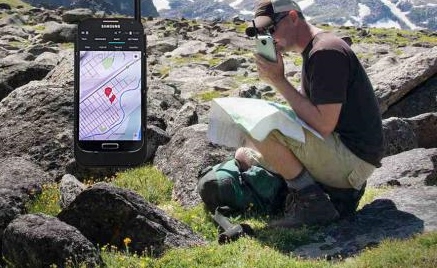
The device will allow you to make texts and phone calls with other Beartooth users over a radio signal, and even allows you to get your geo-location to be used with a map. The radio device will even encrypt your text messages using a 128-bit encryption to keep your data safe.


The Beartooth phone case radio features individual or group messaging, an SOS broadcasting that that will broadcast your position at user defined intervals for emergencies, as well as hold extra battery storage for your phone right in the case.


The radio will reach the standard length of most walkie talkies (around 2 miles), comes with a 2000 mAh battery that will double the battery life of your phone, and will operate in the 151-154Mhz (VHF) and 462-467Mhz (UHF) frequency ranges. Price and availability for the device is to be determined, but production is said to begin in 2015.
Follow our FISHING BLOG
WEBSITE RATES FISH HUNT CABINS PHOTOS
TESTIMONIALS BROCHURE HUNT BOOKLET

 Pictured here is perhaps the most popular position of the feet when it comes to shooting; the “Open Stance”. It is easy to perform and opens up the shooter to the target resulting in less interference with clothing from the bowstring.
Despite the fact that you may be shooting the most highly tuned bow, adorned with top of the line accessories, if your shooting form is bad your accuracy will likely be worse. Shooting with good form requires mastering a number of processes. However, once these processes are understood and learned, shooting with proper form will be as easy as walking across the floor; it will become second nature.
Before incorporating the following steps into your shot routine, be sure that you are shooting a well tuned bow set at the appropriate draw length.
Proper Shooting Stance
Where you place your feet during the shot process can have a great bearing on where your arrow strikes. By nature, your body has a natural centering point. If your feet are not positioned properly you might find yourself being pulled away from this centering point. As a result, the body will fight to return to this location. Unfortunately, this can occur during the shot which will impede accuracy.
Resist the urge to grip your bow. Instead, let your fingers naturally drop around the handle and riser. This will eliminate unwanted tension and bow torque making your shots more accurate.
Most bow hunting experts will suggest an open stance which starts by positioning your toes 90 degrees to the target, and then taking a half-step backward with the foot that is closest to the target. This stance will essentially place the chest more toward the target and allow for greater bowstring clearance along the bow arm and chest.
However, this stance may not be for everyone. In order to find your perfect stance, enlist the help of a friend and simply close your eyes and draw your bow while facing a archery target with a wide back  wall, anchoring as you normally would. With your eyes still closed, move your body and feet around until you find the most comfortable position. Then, open your eyes and note the direction of your aim.
Let down the bow and reference the position of your feet by pointing an arrow straight at the aiming spot. You have just found your stance.
 Correct Bow Grip
When it comes to gripping the bow you want to do so in such a way that hand torque is not promoted. In other words, you want your grip to be as torque-free as possible. To do this, you first need to find the best location for the grip to contact your hand. This can easily be accomplished with a simple test.
First, take your bow hand and hold it out as if you were going to grip the bow; keeping it slightly open and rigid to imitate pressure being applied to it. Next, take your thumb from your other hand and push it into your bow hand at different locations. You will notice that every location you push with your thumb causes your bow hand to move or collapse—-except one. That one spot is where you want to place the pressure of the bows grip while at full draw.
Your bow arm shoulder should be down and in a “locked” position while at full draw. This makes it more difficult to flex the bow arm causing shot-ruining muscle tension.
This location is typically where the bones in the forearm butt up against the base of the palm. It is a bone-to-bone contact point and is the most reliable, torque-resistant location in which to place the bow grip.
When grabbing the bow, place a small amount of tension on the string, just enough to feel it in your bow hand. Then position the grip into the area you discovered by pressing your thumb into your palm. Now you are ready to draw the bow. Just remember, upon reaching full draw, your bow hand should remain relaxed with your fingers falling down or dangling around the front of the riser.
Drawing the Bow
This may seem like a trivial facet to good shooting, but drawing the bow properly incorporates all of the essential muscles needed in order to shoot with good form; mainly, the back muscles. One of the easiest ways to do this is to think of your drawing arm elbow as having a hook in it. When drawing the bow, start with your elbow about as high as your jaw line. Then, imagine someone has a string attached to the hook that is in your elbow. Now, think about them pulling your elbow straight back as you draw your bow. Instead of puling with your biceps, you will notice that you are actually drawing the bow by using the larger muscles of the upper back; specifically, the rhomboid muscles. This will allow you to relax the rest of your body and pull through the shot using only your back.
 Bow-Arm Position
A steady aim equals comfortable shooting and tighter arrow groups. A relaxed bow hand is the key to this. To acquire this it is imperative that your drawing side shoulder be down and in a locked position during the shot. Positioning the shoulder in such a manner will greatly reduce muscle tension which is the root of poor aiming. Before drawing the bow, lean slightly toward the target, then start the drawing process. This will place the shoulder in a low, locked, “bone to bone” position.
Anchor Position
Consistency is the cornerstone to good shooting. The best location to anchor your bowhand is somewhere along the jawbone that provides the most stable platform. In other words, choose a spot that allows your hand, knuckles, etc. to rest solidly as you release the trigger of your release or let go of the bowstring.
A good tip is to locate this spot with your eyes closed, without looking through the peep sight. Then, once your anchor point has been established, with your head in a natural, upright position, you can open your eyes and adjust the peep sight to your eye, instead of adjusting your eye to the peep sight.
The bottom line is to find an easy-to-repeat anchor point; one that will be consistent and second nature when shooting under pressure or any other time.
 If good shooting form and posture are present, your body should resemble the letter “T” when viewed from behind. Hunter shown wearing Lost Camo.
Establishing T-Form
The easiest way to confirm that proper draw length and comfortable shooting posture are being used is to look for the “T-Form” as the archer is at full draw. This is easily recognized while looking at the shooter from behind. When doing so, his/her body will represent the shape of a “T”.
The torso should be vertically straight, with a direct line running up and down through the spinal column. The horizontal line in the “T” should run from the bow-side elbow, through the shoulders, and across to the drawing elbow. The trick to establishing this “T” form is to make sure that your drawing elbow isn’t too high or too low. Ideally, it should be about the same height as your ears while at full draw. This will promote the use of back muscles to draw and execute the shot.
Include these simple steps into your shouting routine and watch as your accuracy improves and your confidence soars not only on the 3D archery range, but in the field as well.
Follow our FISHING BLOG
WEBSITE RATES FISH HUNT CABINS PHOTOS
TESTIMONIALS BROCHURE HUNT BOOKLET


