RSS

Category Archives: Black Bear Hunts

Getting in Shape for Hunting Season

stretching-web-1024x682

A great article Melissa Bachman

Hunting takes a lot of preparation and if you want to be successful there are things you can be doing year-round to help when fall finally arrives.  You may be wondering, well its awhile before the hunting season what can I possibly do to prepare now?  The food plots are in and the tree stands are set?  Well there’s another big part of the equation that could probably use a little work, and that’s YOU!

There are two very important things that every hunter should have on their year round to do list, stay in shape and practice shooting!

Hunting is just like anything else, the more you are willing to put in, the more you will get back.  This is true with both practicing, and staying in shape so why kill two birds with one stone?

Sure, when it comes to practicing any kind of shooting is good.  But think of the real world situation and how you will be feeling once you finally get to full draw.  Probably sweaty, out of breath, and shaking like a leaf!  I don’t know what you can do about the last, but I try to make the sweaty and out of breathe a reality when I practice.

We’re all short on time, so why not combine the two and get even better results in half the time.  I start by spending at least 15 minutes stretching.  Many people think stretching is a waste of time, but you want your muscles flexible to prevent injuries while hunting. Do not skip this step!

Once I’ve stretched, I usually go for a 2-mile run up and down the hills near my home.  After the jog, I grab my bow and shoot around 50 arrows at my target placed 40-60 yards out.  I prefer shooting longer distances as a rule, because once I am confident at 60-yards, 20 seems like a piece of cake.

Jogging-web-1024x682

Shooting while you’re tired is important; in fact it’s very similar to basketball.  I was never taught to practice free throws when you enter the gym; instead you shoot them at the end when you’re dead tired.  This is the real world simulation as to how it would be the last two minutes of the game during crunch time. Hunting is no different.  You’ve waited all year for this hunt.  You’ve climbed half way up the mountain and finally you’re at full draw, all your practice will now pay off.  Your instincts will take over, your breathing will calm, and your arrow will hit its mark.  Isn’t that the way you want your big hunt to play out this fall?

Not only will the workout make you a better real world shooter it will also make your hunt a much more enjoyable experience.  Here are five reasons getting in shape for hunting season will help and shape your hunt this fall.

bow-at-full-draw-web-1024x682

#1. If you’re hunting public land you will be able to get in further than other out of shape hunters, giving you a better chance at success.

#2. You will have a more enjoyable hunt and not be gasping for air and desperately hoping for a break every five minutes.

#3. Being in shape on a guided hunt will help you significantly because the guides will make their plan according to where the game is, not by where you can or can’t get to.

#4. Increase your percentage on making a good shot, because you will be less out of breath and already practiced in this situation.

#5. By being in shape you will have more energy on your hunts and in your everyday life.  In fact, it may help you live longer to enjoy more hunts in the future!!  Not such a bad of a deal after all…

situp-web-e1310358294897-1024x742

Follow our FISHING BLOG

WEB   RATES     FISH    HUNT    CABINS    PHOTOS
TESTIMONIALS    BROCHURE    HUNT BOOKLET

Enter your email address to subscribe to this blog and receive notifications of new posts by email.

← Back

Thank you for your response. ✨

Email Me....


Tags: , , , , , , ,

Big Binoculars: The Advantages

images22Back in the 1970s, an uncle once told me that one of the most useful things any big-game hunter could own was a binocular in the 15×60 range. He said he never went elk hunting without one, and because I always did everything he said, I rushed right out and bought a Zeiss porro prism glass in 15×60 and it was exactly as he said, a highly specialized but invaluable tool if the circumstances were right.  Of course, like a jerk, I sold them some years later, but recently I traded a lot of stuff and coughed up some cash and got another big glass in the same power range.

What a major binocular will do is let you see when it is very dark, and let you see in detail at long range, or in great detail at medium range. On my recent trip to Kansas, the hunter who shared the blind with me had a 10×40 binocular of the first caliber, and I had a 15×60. In practical terms, what it would do was this:

At last light, when it was too dark to shoot, if we could see a deer I could tell if it was a buck or a doe. Fifteen minutes earlier, when he could see if it was a buck or a doe I could see if it was a big buck or a little buck. Fifteen minutes before that, if he could see whether it was a big buck or a little buck, I could count the points and evaluate the rack in excruciating detail.

images33

In some cases, a spotting scope is better. If you’re glassing miles of country, there is nothing that can take the place of 40X. However, at the intermediate ranges, say, 300 to 1,000 yards, a big binocular lets you spot things faster, lets you use both eyes, and is a lot smaller and lighter than most spotting scopes. They’re not cheap, but under the right conditions, big glasses are more than worth it.

Follow our FISHING BLOG

WEB   RATES     FISH    HUNT    CABINS    PHOTOS
TESTIMONIALS    BROCHURE    HUNT BOOKLET

Enter your email address to subscribe to this blog and receive notifications of new posts by email.

← Back

Thank you for your response. ✨

Email Me....


Tags: , , , , , , , , ,

How to Make Your Own Scent-Free Deodorant

Think organic deodorant isn’t for you? It’s actually perfect for deer hunters, because it battles sweat and odor, and gives off no unnatural scent of its own. Buy ingredients in bulk and make three 2.5-ounce sticks—a season’s worth—for only $2 each. Here’s how.

scentstick

What You’ll Need

● 1⁄4 cup coconut oil
● 2 Tbsp. shea butter
● 2 Tbsp. cocoa butter
● 1⁄4 cup beeswax pellets
● 3 capsules 400-IU Vitamin E
● 21⁄4 tsp. baking soda
● 1⁄4 cup organic arrowroot powder
● 2 capsules Vitacost Probiotic 10-20

The Brew 
Heat a small saucepan of water and remove just before boiling. Combine coconut oil, shea butter, cocoa butter, and beeswax pellets in a mason jar, and place it in the hot water, double-boiler style, until melted. (Warning: If you’ve ever had a severe reaction to a bee sting, don’t handle beeswax.) Leave the jar in the bath and add the Vitamin E capsules, baking soda, arrowroot powder, and probiotics, which introduce good bacteria into the skin to battle the bad stuff that causes BO Stir gently until mixed well.

The Cure
Pour the warm mixture into empty, used stick-deodorant containers, new containers (sold online), or lined muffin tins, and let harden overnight. Then, perform your own sniff test: The only scent noticed is a trace of beeswax.

Follow our FISHING BLOG

WEB   RATES     FISH    HUNT    CABINS    PHOTOS
TESTIMONIALS    BROCHURE    HUNT BOOKLET

Enter your email address to subscribe to this blog and receive notifications of new posts by email.

← Back

Thank you for your response. ✨

Email Me....


Tags: , , , , , , ,

Tips on Choosing The Best Field Knife

It doesn’t matter how many knives you have at home. The one you reach for when you’re in the woods—to gut a deer, cut brush, carve a fuzz stick—that’s your field knife, your everyday companion. There’s no one perfect model, but here’s how to pick the ideal features for you.
1) Fixed or Folder?

Field-Knife-2 Field-Knife-5
The traditional choice, a fixed-blade knife is stronger than most folders. With no moving parts, it’s virtually fail-safe, and cleaning is as easy as wiping off grime and wiping on oil. If you need a deep belly for skinning big game, fixed is the primary choice due to the challenge of storing a wide folding blade inside its handle. A folder, on the other hand, makes everyday carry simple: Just pop it in your pocket. The increasing popularity of pocket-clip folders has spawned huge innovation in materials and designs, so the options are breathtaking. Bottom line: Fixed or folder, you can’t lose. But you have to choose.
2) Steel Yourself

Field-Knife-3_0
Basic steel is just iron and carbon. But there are hundreds of alloys. The least you need to know is that the more carbon, the harder the blade and the better it holds an edge—but too much can make a blade brittle. Also, adding chromium prevents rust (stainless steel usually has at least 12 percent), but it can soften the steel. It’s a balancing act. Here’s a breakdown:

Non-Stainless Steel: It rusts easily but makes a great blade if you take care. High-carbon examples (1095, D2) really hold an edge. A few are both hard and tough (A2, CPM 3V, 8670M).

​Stainless Steel: If you want low maintenance, this is the way to go. But low-carbon versions (18/8, 420, 440, 440A, AUS-6) can be too soft to get or keep a fine edge. More carbon or a harder alloy is better (440B and C, AUS-8 and 10, 8Cr14MoV, 154CM).

Powdered Steels: The newest stainless alloys (S30V, Elmax, M390) are made of powderlike granules that are heated to form very hard steels that take a wicked edge. They pretty much have it all—​­corrosion resistance, hardness, and strength. Naturally, you pay for it.

3) Get the Point

Field-Knife-4
Most field knives have a drop point or clip point, either of which may be combined with a deeper belly for skinning. The drop point is ideal for field dressing game without slicing innards. Its thicker tip also helps with separating joints and with heavy camp chores. If your hunting knife will double as a fish cleaner and camp-kitchen slicer, the finer clip point is the better choice, and it’s fine for gutting game as long as you’re careful with the tip.

4) Find the Grind

Field-Knife-5
Likewise, most field knives hew to one of two grinds: hollow or flat. A hollow-ground blade has a concave shape, as if material has been scooped out of the blade’s thickness. It’s easy to resharpen and best for shallow cuts, such as field dressing, cutting hide, and simple camp chores. A flat-ground blade is the more common choice; it is tougher, holds its edge better, and excels at deeper cuts, working around sinew and bone, and chopping food at camp.

Now that you know what to look for, check out our field knife gear test to see which brands of fixed and folder blades are worth their metal.

Follow our FISHING BLOG

WEB   RATES     FISH    HUNT    CABINS    PHOTOS T
ESTIMONIALS
    BROCHURE    HUNT BOOKLET

Enter your email address to subscribe to this blog and receive notifications of new posts by email.

← Back

Thank you for your response. ✨

Email Me....


Tags: , , , , , , ,

Field Dressing a Black Bear

With the bear hunt just around the corner, we will cover the basics 🙂  Pictures have been withheld due to graphic nature.

Instructions

imagesFG3W4IGS 1. Clear an area surrounding the black bear. Make the area large enough to allow room to move around and roll the animal away from the entrails. The lowest part of the ground should be reserved for the entrails. Move the bear onto its back. Spread the rear legs and either have your partners hold them apart or secure them with ropes. Repeat with the front legs.

  1.  2. Insert one of your knives in the cavity at the base of the bear’s throat. Cut the blood vessels with a deep, crosswise motion to open the jugular vein and bleed the animal. Move the bear so the blood will flow away from it and clear the ground as needed.
  2. Cut the skin in a straight line from the breastbone — located just below the rib cage — to the base of the bear’s jaw. Cut the muscles along this area to the bone to expose the throat and windpipe. From the same starting point, cut the skin in a straight line down to the anus. Some areas require hunters to leave the genitals for sex identification; cut around the genitals slightly to preserve them.
  3. Split the breastbone.  This can be done with a bone saw, hack saw or a couple of axes.  If you choose to use axes, hold one axe against the breastbone and hammer it with the other axe; this will break the bone from the base of the rib cage up to and through the top ribs. Open the chest by pulling the front legs apart. Cut the windpipe and gullet close to the head. Lay them in the chest cavity for later.
  4. Cut through the abdominal muscles; start at the base of the rib cage. Take care not to puncture the intestines, the stomach or the bladder; doing so could taint the meat. Sever the muscles down to the pelvic bone. Enlist your partners to hold open the bear so you can work more smoothly.
  5. Break the pelvic bone by using the same technique implemented the breastbone. Do not cut the urinary tract as it may contaminate the meat. Start on one side of the chest cavity and use your knife to cut the diaphragm from the chest wall. Start at the base of the ribs and slice as far back into the cavity as possible. Have your partners pull the organs to the side so you can see and cut more easily. Repeat the process on the other side of the black bear.
  6. Cut the intestines and rectum from the split pelvic bone to where the rectum meets the muscle tissue at the anus. Cut a circle in the skin at the base of the tail; cut 1 to 2 inches from the anus. Cut the muscles to the top of the pelvic bone to free the anus and rectum. Pull the lower intestine, rectum and anus away from the cavity and hold clear. You must not puncture or cut the urinary tract or intestines.
  7. Hold the parts, roll the black bear away and allow the intestines and stomach to spill onto the ground. Grab the windpipe to pull the lungs and heart out onto the ground. Cut any remaining diaphragm tissue to free the organs. Complete the field dressing by draining as much blood from the bear as possible and wiping the body cavity with cloth rags to clean. Do not use water. At this point your main concern becomes to cool the cavity and prepare for transport which can be done by propping the cavity open with a tree branch.
    2 bear sized 

    Proper field care will ensure less weight and trouble with removal and transportation from the hunt site.

     For more information on black bear hunting, visit us at http://www.wawangresort.com

    Follow our FISHING BLOG

    WEB   RATES     FISH    HUNT    CABINS    PHOTOS
    TESTIMONIALS    BROCHURE    HUNT BOOKLET

    Enter your email address to subscribe to this blog and receive notifications of new posts by email.

    ← Back

    Thank you for your response. ✨

    Email Me....


Tags: , , , , , , ,

Muzzleloader For Beginners

Each year more hunters are discovering the thrill of muzzleloader hunting. There are several advantages to a muzzleloader hunt over traditional rifle hunting. In the Western states in particular, there are special muzzleloader seasons that traditionally coincide with the peak of the elk rut. Licenses are limited, so there are few hunters in the woods. Depending on the location and the skill of the caller, bulls can be bugled in to close ranges. All in all, it makes for a very exciting hunt.

2However, there is a learning curve to becoming a proficient muzzleloader hunter, and chances are, you’ll make every mistake in the book at least once. You’ll see some mighty fine bulls get away from a situation where it would be “meat in the pot” with a high-powered scoped rifle.

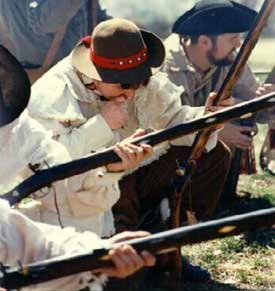
For those who are unfamiliar with muzzleloaders, allow me to explain. Muzzleloaders are the weapons that Davy Crockett and Daniel Boone carried afield with them during their bear hunts, Indian fights, and battles. Today there are two basic types of muzzleloaders used for hunting—primitive and in-line. Both are based upon the premise that the shooter pours powder down the end of the gunbarrel, then rams a slug or ball down on top of it to load the gun.

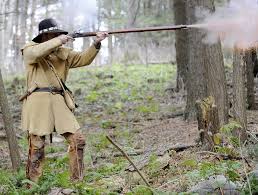
Primitive muzzleloader aficionados must choose between either a flintlock or a caplock ignition system. A flintlock is the more primitive technology, popular from the time of the Revolutionary War through the early 1800’s. The hammer of the gun holds a piece of flint wrapped in fine leather. Below the hammer is a frizzen, a swinging metal plate. Below the frizzen is the pan, into which the shooter pours a small amount of fine black powder. When the shooter pulls the trigger, the hammer strikes the frizzen, the frizzen folds back, and sparks are showered into the black powder in the pan. The ignited powder in the pan shoots a tongue of flame into the barrel of the gun via a small port. In turn, this flame ignites the black powder that has been poured into the barrel. The powder explodes, forcing the ball that has been seated on top of it to shoot out the barrel.

This process sounds cumbersome, and it is. Ignition is not instantaneous. Flintlock shooters have to hold steady for a second or more while an explosion occurs under their eyes. The possibility for error is very real.

cl
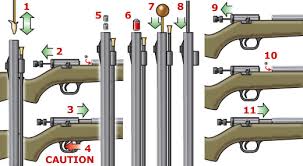
The more modern of the primitive technologies is the caplock design. Caplock muzzleloaders use the same basic concept of funneling flame into a port in the barrel, but the ignition is accomplished through a small nipple seated under the gun’s hammer. A small copper cap with a tiny bit of nitroglycerine is placed atop the nipple. When the hammer falls, the cap shoots a tiny spurt of flame through the nipple and into the port in the barrel, igniting the powder inside and shooting the ball out the barrel. Ignition is much more rapid than the flintlock.

In the last decade or two, several companies have noticed the resurgence of muzzleloading popularity. In response, they have crafted rifles that adhere to many states’ definitions of muzzleloader technology, i.e., a ball is rammed down the barrel and it can only be loaded with one round at a time. However, these are not primitive weapons. There are various ignition systems to discharge the load in the barrel, including shotgun primers and specially manufactured discs that are loaded directly behind the charge in the barrel. These are called “in-line” muzzleloaders. These rifles look more like high-powered rifles with a ramrod than something Daniel Boone might have carried on a bear hunt. Many in-line shooters use pelletized powder that can be dropped into the barrel in 50-grain increments and saboted copper-jacketed bullets that are built much like a high-powered rifle bullet with a plastic sleeve to allow ramming it down the barrel. Many of them are mounted with scopes and other optical sights.

Muzzleloader calibers range from old .36 and .40 caliber flintlock squirrel rifles to .68 caliber muskets used for warfare. Most flintlock and caplock guns today are .50 or .54 caliber, with an occasional .58 caliber rifle. The minimum size elk rifle is .50 caliber, and .54 certainly hits harder. The biggest in-line muzzleloaders are .50 caliber, with the occasional .45 caliber rifle used for deer and smaller game.

So, if you’re going muzzleloader hunting, you must make an immediate decision: is your goal simply to be in the woods with fewer people around, or would you like to stalk an animal with the additional challenge of carrying a rifle based on 1830’s technology? If your goal is to maximize your chances with the best available technology, then get your hands on an in-line muzzleloader. If the mystique of hunting like Jeremiah Johnson or John Colter appeals to you, then look into buying a caplock or flintlock rifle.

muzzleloader_guide_1

Whichever route you take, shooting a muzzleloader demands practice and patience. If you choose an in-line rifle, thinking that you can accurately shoot an animal out to 175 or 200 yards using pelletized powder, saboted bullets, and a scope, think again. First, you’re still obligated to use iron sights. Few riflemen these days are skilled enough to consistently hit targets at 200 yards with iron sights, and scopes are illegal in most Western states. Secondly, the data provided by the rifle manufacturers that suggest an 11-inch bullet drop at 200 yards are using saboted bullets and pelletized powder, both of which are illegal in most Western states. Thirdly, even if you can hit the kill zone on an elk at 200 yards with black powder and iron sights, the bullet will have lost much of its down-range energy and the chances of only wounding the elk are great. Combine that with a minimum 20-second reloading time (if you’re fast and your hands aren’t shaking with buck fever) and you’ve got a lose/lose situation. An elk can cover a tremendous amount of territory in 20 seconds, and I HATE tracking wounded elk. I recommend limiting your shots to a maximum range of 100 yards, no matter what rifle you’re carrying. After all, the whole point of muzzleloader hunting is to be more skilful hunter and to stalk within closer ranges.

The caplock Hawken. When I’m hunting with the caplock Hawken, you must have a game plan organized down to the finest detail.  Sight in the rifle until you can put three shots in a Skoal can at 100 yards.  Clean the barrel meticulously to rid it of the corrosive black powder fouling. Prepare the powder flask and possibles bag with measures of powder and bullets.  Practice speed loading at the range so that you can get off a quick (twenty second!) follow-up shot. Before setting out to hunt, load the rifle meticulously and check your gear.

imagesIIA88EY1

There are three basic kinds of bullets to use in a muzzleloader: the above-mentioned plastic-sleeved sabots, lead slugs, and lead round balls. Round balls are loaded by seating the ball on top of a greased patch of cloth on the muzzle, then ramming it home with the ramrod. Slugs are coated with grease, started down the muzzle, and then rammed home.

untitled

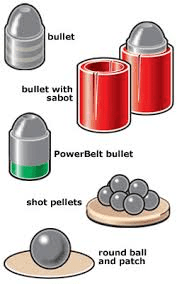
The problem with round balls is that they’re usually significantly lighter than a Minie-type slug, and don’t travel as far or hit as hard.   A typical .50-caliber round ball weighs 150 grains, while a typical buffalo bullet or Minie-type slug weighs 350-380 grains. I’ve shot a pile of elk using Thompson-Center 370-grain Maxi-ball slugs, and they each went down like they had been hit by a truck.

Keep in mind, however, that certain muzzleloader barrels are cut with a slow twist for shooting round balls, and others are rifled with a fast twist for shooting slugs. Make sure that you research the rifle and match it with the appropriate hunting load before you purchase so that your rifle is most accurate for the type of shooting you plan to do.imagesJN6SJJ3E

Most rifles have a “sweet spot” where they shoot very accurately with a certain load. Loading a rifle with more powder may indeed generate more muzzle velocity and knockdown power, but it may also cause it to lose its accuracy. For my caplock, I’ve learned that 90 grains of powder makes it shoot very accurately up to 100 yards and it still kicks pretty darned hard. It develops plenty of energy at that rate to dump an elk with one shot. The maximum load for most muzzleloaders is 120 grains of powder, though the experts say that black powder doesn’t explode like smokeless powder and you really can put a lot of powder in a gun with no adverse consequences. I still wouldn’t recommend it, though. Please note, however, that any amount of smokeless powder will explode almost any muzzleloader because of the high pressures generated.

Hunters can prevent their powder getting wet by covering the muzzle of the rifle with plastic wrap secured by a rubber band, and also by sealing the nipple’s connection to the breech of the gun with modeling putty.

If you think the possibility exists that your powder may have gotten wet, there are still ways to make the rifle go off. With a nipple wrench, you can remove the nipple, dig out a few grains of wet powder, replace it with a few grains of dry powder, and away you go again. If it won’t make a difference in your hunting, fire the gun. If it won’t fire, try several caps until it goes off. In humid places like Alabama, hunters all fire their rifles at the end of each day of hunting. Towards sunset, you can hear a ragged salute of gunfire as each hunter discharges his load.

images

On an elk hunt, the excitement is in getting close to the game. A rutting bull usually has only one thing on his mind, and when a big bull responds to a bugle with a challenge of his own, well…it just doesn’t get more exciting than that. Armed like one of the mountain men of the 1830’s, knowing that you’ve got just one chance to put a killing shot in him, knowing that you’ve got to be patient and wait for the ideal shot, it makes hunting with a high-powered rifle seem just a little unfair.

Follow our FISHING BLOG

WEB   RATES     FISH    HUNT    CABINS    PHOTOS
TESTIMONIALS    BROCHURE    HUNT BOOKLET

Enter your email address to subscribe to this blog and receive notifications of new posts by email.

← Back

Thank you for your response. ✨

Email Me....


Tags: , , , , ,

Benefits of Practicing to Hold a Full Draw

archery123

If you practice shooting your bow all spring and summer by casually flinging arrows at a target from 30, 40, and 50 yards, you should be full prepared to shoot a tight group into a 3D target by the fall.

But if you want to get yourself hunt-ready, you have to practice for hunting scenarios: sitting, kneeling, shooting quickly, and holding at full draw. This video is all the proof you need.

This moose hunter was able to keep his cool and make a good shot … but just barely.

Follow our FISHING BLOG

WEB   RATES     FISH    HUNT    CABINS    PHOTOS
TESTIMONIALS    BROCHURE    HUNT BOOKLET

Enter your email address to subscribe to this blog and receive notifications of new posts by email.

← Back

Thank you for your response. ✨

Email Me....


Tags: , , , , , , , , , , ,

4 Ladder Stands To Consider

Whether you hunt with a bow or a rifle, want to hide in the treetops or stay closer to the ground, one of these four ladder stands has you covered. A hunting buddy and I started with six models and after a full day of setting up, climbing, sitting, and tearing down chose these four favorites. Here are our picks for an all-around stand, a bow stand, a best bargain, and a gun stand.

All-Around

Ladder-1_0

Ol Man 15′ Bowlite

Specs 15′ high • 25″ x 171⁄2″ platform • 45 lb.

What’s SpeciaL With its mesh seat and narrow ladder, my test partner, a veteran New York hunter, thought the streamlined Bowlite was the best of the test. Two points of contact to the tree made it the most secure by far, and it proved the fastest to assemble.

Bottom Line Easy to build, comfortable, and rock solid. We docked points only for the narrow ladder, which allowed just one foot per rung—not good for XL hunters ($150; olmanoutdoors.com).


Bow

Ladder2

Rivers Edge Bowman

Specs 19′ high • 24″ x 17″ platform • 64 lb.

What’s SpeciaL Tall, with a big 17 inches between rungs, the Bowman is a young person’s treestand. The large platform and skyscraper height is ideal for maneuvering and drawing on deer undetected. Yet we felt it needed a second (not included) ratchet strap to feel secure.

Bottom Line With almost 2 square feet of platform 19 feet up, this is a killer bow stand, but the pins were noisy ($170; huntriversedge.com).


Budget

Ladder-3

Summit Crush Series Solo Performer

Specs 151⁄2′ high • 19″ x 121⁄2″ platform • 40 lb.

What’s SpeciaL For just one Benjamin you get this light, easy-to-set-up, comfortable, do-it-all option. The ladder assembles with bolts and lock nuts, so it’s deathly quiet compared with the others in the test, which use locking pins. But the platform feels small.

Bottom Line Lots of value, plus it’s the lightest and quietest system in the test. Another $30 gets you a backrest and shooting rail ($100; summitstands.com).


Gun

Ladder-4

Big Game NextGen Stealth DX

Specs 15′ high • 25″ x 181⁄2″ platform • 55 lb.

What’s Special Big Game hit the sweet spot of price and performance with the Stealth DX. The ladder is wide, with short 13-inch spacing between the rungs for easy climbing, even in the heavy clothing typical of gun season. There’s a cushy backrest and an adjustable shooting rail.

Bottom Line A comfortable all-day sitter that can be found online for well below the list price. We would have liked the gun rest to elevate a little higher ($220; biggametreestands.com).

Follow our FISHING BLOG

WEB   RATES     FISH    HUNT    CABINS    PHOTOS
TESTIMONIALS    BROCHURE    HUNT BOOKLET

Enter your email address to subscribe to this blog and receive notifications of new posts by email.

← Back

Thank you for your response. ✨

Email Me....


Tags: , , , , , ,

Improve the Effectiveness of Trail Cams

The easiest way to enter the bow hunting season with false expectations about early season success is to use cameras wrong—or at least—lazily. Taking your camera out to the edge of a food plot or a soybean field, hanging it, and then checking it every week or two may feel like you’re scouting correctly, however you’re probably under-utilizing these new-age tools.

ravine-crossings_1

Instead, consider hanging your cameras to answer questions about deer movement. For example, it’s Whitetail 101 to know that deer are going to use prime food sources throughout the summer. How they get to and from those food sources, where they bed, where they water, and where they browse are all questions that are far more difficult to answer. And they are perfect for scouting cameras.

Aside from taking inventory and getting some sweet pics of velvet-racked bucks, setting cameras in easy spots doesn’t do you much good as a hunter. Cameras hung on places that aren’t easily observable will tell you things that can lead to quality fall hunting spots, which is the goal. They’ll also tell you whether the deer use those places at all, which is like pre-fishing for a bass tournament and eliminating dead water until a pattern or hotspot emerges.

visual-follow-up_1

If you plan to run cameras next summer, start thinking about where you’re going to place them now. Although a subtle trail in a wooded finger leading to an alfalfa field or clover plot might not be as exciting as hanging the camera directly on the field edge, it might just tell you when and where a mature buck likes to travel before and after he eats. That’s a good step toward getting an arrow into him, especially since he is likely to reduce daytime movement once he sheds his velvet.

Follow our FISHING BLOG

WEB   RATES     FISH    HUNT    CABINS    PHOTOS
TESTIMONIALS    BROCHURE    HUNT BOOKLET

Enter your email address to subscribe to this blog and receive notifications of new posts by email.

← Back

Thank you for your response. ✨

Email Me....


Tags: , , , , , ,

Tree Stand Preparation

The satisfaction one gets out of any endeavor is usually proportional to what one puts into it. Preparation leads to confidence, and confidence leads to success. And nothing prepares us for a hunt like a do-it-yourself attempt. Not only will you gain a lot more satisfaction from the hunt, you’ll also acquire a learning experience you can use for the rest of your life, and even pass down.

6One of the most important aspects of the right tree for a tree stand is an entrance/exit that will create as little disturbance as possible. In almost all cases, we are better off hunting undisturbed animals that are moving with some predictability. This is a fundamental truth.

A low-impact entrance/exit is vital, and the smart hunter must consider sight, sound, and scent during their approach and departure. Let’s use an example of each in illustration.

  • Often, your stand placement is just off the crest of a ridgeline. Human nature is for old logging/skid roads to follow the crest of the ridge because it makes sense for ease of travel for humans and equipment. But it doesn’t make sense for the deer.
  • Although not always the case, game will usually shy away from being sky lined on a ridge top. They’ll tend to walk parallel to the crest on the downwind side. It sometimes depends on the angle of the terrain and visibility (density), but usually they will prefer just far enough off to the side so their silhouette is less obvious, and where they can see downhill just as well as if they were on the crest. You’ll also notice their passage will tend to be on the downwind side of the crest. Think about it — they can see downhill and can scent-check areas upwind, and still not be silhouetted.

We, as hunters, must do the same thing. When entering a stand site along a ridgeline, it’s easy to walk the logging road on the top. This is fine when it’s dark (another advantage of stand approach before light). But when it’s already light, or in the afternoon, you’re usually better off picking your way in by walking parallel to the crest.

Walk in on a logging road, try to walk in the “tire track” of the downwind side. For example, say the logging road is running north/south and the wind is coming from the west. You walk in the east tire track so the wind carries your residual ground scent off the road. This ensures any deer that happen to be walking the road later will be less likely to smell your passage.

In addition to this, if you use a scent drag on approach, you will notice it will benefit you even more so. Tie a scent-soaked rag to a short cord off a four-foot switch (or your bow tip), and drag it down the west tire track while you walk the east (downwind) track.

Because most hunters tend to sweat, carry extra clothing/gear in a backpack. When you get to within 100 yards or so of the stand,  stop and put the layered jacket, facemask, gloves, and safety harness on. It’s an obvious advantage having your scent on your final approach blowing away from the direction you think the deer will be coming/going.

bear4To ensure a silent approach, rake out a footpath to the stand. For those of you who have hunted bear over a bait site, you may have noticed that when multiple bears are hitting the bait, they will approach it via specific footprints.


This is a dominant/subordinate situation. A subordinate bear knows if he is caught by a dominant bear on his approach to the bait, he will likely get his butt kicked. And it could even be a fatal mistake. Therefore, if you look closely around the bait site, you may find distinct, separate footprint/pad marks that bears will actually place their pads in, in order to guarantee a silent entry. Do the same thing when approaching the stand site.

After the foliage drops, you’ll often have dry leaves covering the ground. Walking through dry leaves silently is hopeless. If there is any cadence/rhythm to your gait, it’s almost impossible to keep your entrance/exit covert. At this point leaving your ambush silently is just about as important as entering it silently, and in both cases use the “bear trick” to my advantage.

  • After the majority of leaves drop, face the fact that you will be disturbing the area and go for it. Time your entrance for midday, knowing what you’ll gain will be worth it in the long run. You can use a regular garden rake with the stiff teeth, but a garden hoe actually works better, because you won’t have to constantly clean leaves from the teeth. Clear away the leaves every couple of feet in order to place your boots on solid ground rather than six inches of leaves.

Yes, continued foliage dropping will fill in the raked spots somewhat, but you can just kick them away with your boot tip if needed. Quiet foot placement is especially important on quiet days, or if you are within hearing distance and/or sight of a known bedding area.

You’ll know it was all worth it when after quietly entering and settling in you see the flick of an ear and notice a deer bedded within eyesight. That probably won’t happen on a calm day if you don’t pre-rake your approach.

Break out the trusty ratchet belt hand pruners to open and clear the understory of brushy twigs, both from where the deer will be walking as well as your own approach. An opening through the brush will shift the deer to the path of least resistance, and they will adapt to it in short order. At the same time, you want to eliminate brush and twigs in my entrance path to reduce scent retention and the noise clothing may create as you pass by.

sunset bear

On approaching a stand setup, try not to cross the main travel pattern you’re hunting. Sometimes there are situations where you have to do that. In these cases, plan your approach to the stand right in a precut shooting lane. That way if the deer cuts your entrance trail on approach and stops to smell your minimal ground scent, at least he is standing in a shooting lane.

Some of this may be hard to follow along with unless you are actually shown. The bottom line is there will be a lot of satisfaction for your efforts. Not only will you watch a deer react exactly as you wanted and intended him to, but your efforts will hopefully shift his movement to a position where you almost can’t miss the shot. And that alone will boost your bow hunting success rates tremendously.

Follow our FISHING BLOG

WEB   RATES     FISH    HUNT    CABINS    PHOTOS
TESTIMONIALS    BROCHURE    HUNT BOOKLET

Enter your email address to subscribe to this blog and receive notifications of new posts by email.

← Back

Thank you for your response. ✨

Email Me....


Tags: , , , , , ,