Imagine heading in and running for your regular fare and WHAMO! you find a bear cub in your celery!! I guess I am not as worried about the cub as I am to know where his mama is….maybe she is just picking up a carton of milk?
Tag Archives: Wawang Lake Resort


Moose burgers….amazing! Enough said!
One of our favorite summer foods, moose hamburgers!
When having a gathering of friends on the weekend, you could cook up barbequed burgers for everybody. I don’t know about you and your friends but a friendly gathering around the BBQ and campfire is something we love to do. We are fortunate to live in the country away from the city core so on occasion our gatherings will include a campfire. Sitting around the fire is a great way to relax and get caught up with the goings on with your friends… Don’t you think?
Everyone loves Summer Barbeques, and Moose Hamburgers on the grill are no exception so we thought we would share how to cook moose hamburgers. We added a Pasta and Potato Salad and were set.

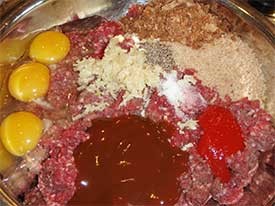
How to Make Moose Burgers
Ingredients (makes 16 patties):
- Moose Mince (3 pounds)
- 6 Cloves Garlic – pressed
- 3 Eggs
- 1/2 Cup Bread Crumbs
- 1/2 Cup Bread Crust Crumbs
- 3/4 cup Barbeque Sauce
- 1 Tsp Salt
- 1/2 Tsp Fresh Ground Pepper
- 1/2 Cup Hot Chilli Sauce (just enough for flavor not enough to offend anyone)
Directions:
- Pre-heat Barbeque
- Combine all ingredients in large bowl
- Thoroughly mix
- Make patties by taking about 3/4 cup of moose meat mixture and flatten. Place on a piece of wax paper for ease of removal. Continue until all moose meat has been used.
- Cook you patties until the moose meat juice starts to pool on the surface of the patties. Turn the patties over and complete the cooking process. Follow the chart below for recommend temperatures for cooking moose meat hamburgers.
We like to put all of our patties on a large tray and then place them in the freezer until I am ready to use them. It doesn’t matter if they freeze, if all the time you have is for them to get a little stiff… that’s OK. It helps to keep the patties together while cooking.
If you don’t use all your patties at once place a piece of waxed paper between each one and then let them freeze for future use. For longer storage, once frozen we put our moose hamburger patties into freezer bags for easy access. If you want to grind your own moose meat get a quality grinder to do the job. Any leftover meat from the previous year can easily be ground.
Hint: Moose Meatloaf Recipe
You can always take the same mixture from the moose hamburgers and place it into a loaf pan… voila… easy moose meatloaf!
Add your favourite dressings and voila you have the makings for a perfect meal!
We added leaf lettuce, sliced tomatoes, sauteed mushrooms, sauteed onion, mozzarella cheese and our own special sauce.
Special Sauce
- Mayonnaise
- Hamburger Relish
- Ketchup
Mix equal portions of mayonnaise and hamburger relish, add about one quarter of your mixture in ketchup. Example: 1/2 cup mayo, 1/2 cup relish, 1/4 cup ketchup. Internal Temperature for Cooked Moose Meat
- Internal temperature of 125-135 = Rare
- Internal temperature of 135-140 = Medium Rare
- Internal temperature of 145-150 = Medium
- Internal temperature of 160 = Well Done
- Internal temperature of above 170 = Don’t Bother… Hahahaha!
Nutritional value of Moose Meat
Moose meat is naturally low in fat, and because it comes from the wild it contains no harmful chemicals or hormones. Moose meat is so low in fat that you often have to add some to prevent it from being dry. When we process our moose meat we do not add any fat to our mince, choosing instead to add fat when cooking as needed.
Enjoy
Share this:

A Path to Enlightenment: Vegetarian Turned Hunter
While doing some research into game preparation, I came across this fantastic article that highlighted one persons transition from vegetarian to hunter and why…..what a great perspective!
A Path to Enlightenment: Vegetarian Turned Hunter
November 25, 2013 By Michelle Bodenheimer

The author’s family harvests chukar, pheasant, quail and other game birds rather than purchasing chicken from the supermarket.
They say, “You are what you eat.”
Many years ago, I reached an age of enlightenment and began to think about the food I was putting in my mouth. Where did it come from? How was it harvested? What was in the food I consumed? Up until that point, the answers were simple. Food came from the supermarket. I wasn’t yet a vegetarian.
I will never forget the day in Health Studies class when we discussed the chemicals and hormones injected into beef; I discovered how veal is produced; I studied how chicken is “plumped up” for market. I was disgusted and swore I would never eat meat again. These were the days before “free range” and “organic” were part of everyday American vocabulary.
At that moment I became one of the thousands of carefree young adults joining on the vegetarian bandwagon… with no idea where I was headed.
It was years later when I met my (now) husband, Todd, that I again thought about my diet. Set up on a blind date we had little in common- other than that fact that we both thought about where our food had come from. I was a vegetarian. Todd was a hunter. It did not concern me that Todd “killed Bambi”. I knew he consumed the meat he harvested. The more time I spent with Todd, the more I realized he was on to something. The meat in his diet was free range, hormone free, organic. I was intrigued.

Crawfish anyone?
With time, Todd taught me how to hunt and helped me enhance my childhood fishing skills. It was not long before I caught my first salmon. I shot my first grouse. I stalked my first elk. I learned to can, dehydrate, freeze and smoke food for preservation. I filled my freezer and I knew exactly where my food had come from.
My love and appreciation for hunting has evolved over the years. Hunting has became more than filling the freezer, it has become my focus, my purpose, and my being. Through my harvests I have found myself. I have deepened my appreciation for nature and become increasingly grateful for the bounty Mother Nature has to provide. I have also become more aware of my need to be a conservationist and an activist for wildlife and habitat. As I take from Mother Nature, I must give back.
Today I am defined as a hunter, a provider, and a conservationist. I eat, therefore, I am… and I am a hunter.
How does your hunting define you?
Share this:

Pan-Roasted Venison with Creamy Baked Potato and Celeriac
A fantastic recipe from one of the best chefs around, Jamie Oliver!! Enjoy!
Venison is a fantastic lean dark meat. You can swap the celeriac for parsnips, Jerusalem artichokes or even fennel, but you must keep the … ratio of potatoes in there so it tastes delish. More

- Total Time:
- 1 hr 40 min
- Prep:
- 25 min
- Cook:
- 1 hr 15 min
- Yield:
- 4 servings
- Level:
- Intermediate
- Total Time:
- 1 hr 40 min
- Prep:
- 25 min
- Cook:
- 1 hr 15 min
- Yield:
- 4 servings
- Level:
- Intermediate
Ingredients
- 4 tablespoons butter, melted, plus a couple extra knobs, divided
- 2 pounds potatoes, peeled
- 1 small celeriac, peeled and halved
- Sea salt and freshly ground black pepper
- 1 pint heavy cream
- 1 clove garlic, peeled and finely chopped
- 1/2 a small bunch fresh sage, leaves picked and roughly chopped
- 4 ounces freshly grated Parmesan, divided
- 10 juniper berries, crushed with the side of a knife
- 3 sprigs fresh rosemary, leaves picked and chopped
- 2 .2 pounds venison loin in 1 large piece, trimmed
- Olive oil
- 1 bulb garlic, unpeeled
- Water
- 1 wineglass of good-quality red wine, like Pinot Noir
Directions
Preheat the oven to 350 degrees F and butter a large, shallow baking dish.
Slice the potatoes and celeriac into disks just under 1-inch thick. Place the slices into a large pan, cover with cold water, season with salt and pepper and bring to the boil. Simmer for 5 minutes, then drain in a colander and allow the vegetables to steam dry for a minute or so. Put back into the pan with the cream, chopped garlic, sage, half the Parmesan and a good pinch of salt and pepper. Mix together, then tip into the buttered baking dish and spread out evenly. Pour any mixture left in the pan over the top. Sprinkle over the remaining Parmesan, cover tightly with aluminum foil and cook in the preheated oven for 35 to 40 minutes until golden brown.
Combing the juniper berries and rosemary, add a pinch of salt and pepper, then sprinkle over a board. Rub the venison all over with olive oil before rolling it across the board and pressing it into the flavorings. Heat an ovenproof frying pan over a high heat and add a glug of olive oil. Sear the venison for a couple of minutes on all sides, then remove the pan from the heat. Add the smashed garlic bulb and any leftover flavorings from the chopping board. Shake everything together, pour in a splash of water to cool things down and place in the oven. Cook according to your liking – about 8 minutes will give you medium venison.
When the potatoes are cooked, take them out of the oven, remove the foil and sprinkle over the remaining Parmesan. Return the dish to the oven, uncovered, and bake for another 10 to 15 minutes until bubbling and golden.
Take the venison out of the oven and let it rest on a plate, covered loosely with foil. Pour away any excess fat. Squash the garlic cloves with a fork and discard the skins. Mix the garlic with the herbs in the pan and place on the heat. Pour in the red wine, simmer until it has reduced by half and then add the butter. Stir with a wooden spoon, scraping up all the sticky meaty goodness from the bottom. As soon as the sauce comes together, take the pan off the heat, correct the seasoning and stir in another knob of butter. Carve the venison into desired-thickness. Pour any resting juices from the plate back into the pan, then pour your gravy through a sieve over the meat and serve with the potato and celeriac bake.
Share this:

Plane VS Bear: A tie!!
So the outback of Alaska is as unforgiveable as it comes for weather and wildlife but imagine being the hunter and guide dropped into a stake camp only to come back and find this!!

Well, thankfully, the group just happened to have some meager supplies and a little bit of luck and VOILA!!

And you thought that duct tape was only good for fixing cars 😉
Share this:


Wolf vs Bear: A documentary
We at Wawang live in the densely populated wilderness of the boreal forest. Though we don’t have grizzlies, we do have an extremely thick population of both black bear and wolves…..this is what it looks like behind the vail of leaves without the touch of man.
Share this:
How to have a problem-free cold-weather hunt
With all the talk of such freezing temperatures, it is no wonder most of us are a lot less eager to suit up and get out hunting. Here is a great article written by By Ken Bailey on how to prepare for a comfortable, cold day hunt!

In late-November whitetail hunt many years back, I stumbled upon a dream buck lying out in a hayfield. Perhaps he was tired from chasing does, but since I pegged him at about 180 Boone & Crockett points, it wasn’t the time to question my good fortune. I laid my rifl e across a fencepost, found the sweet spot in the scope and squeezed the trigger. You wouldn’t believe how loud an unexpected click sounds in the still, frozen air. Unsure of what had just happened, I ejected the cartridge, pushed in another and squeezed again. Another loud click. At that, the buck jumped to his feet and bounded off while I cursed aloud. The culprit, as it turned out, was a frozen firing pin spring. Here’s how to avoid this happening to you, along with some other tips for a problem-free cold-weather hunt.
Mind the moisture
So, why did my rifle misfire? It’s a common problem, really. Condensation forms on the metal when the firearm is brought in from the cold, then slides into the action and barrel. When you take the gun back outside, the moisture freezes and locks up the action or firing pin.
To prevent this, leave your rifle out in the cold—whether in a locked vehicle or other protected location—if it’s safe to do so. If you have no option but to bring the gun inside, store it muzzle down and dry it thoroughly once it has stopped sweating. Snow can also play havoc with the action and muzzle of your fi rearm, so scrupulously brush off any that accumulates. To ensure snow doesn’t get in the barrel, cover the crown with a strip of electrical tape—it won’t have any impact on the ballistics. As with the problem of condensation, any snow left on your gun will melt when you bring it inside, then turn to ice when you head back out.
Lose the lubricants
I’m vigilant about cleaning and lubricating my fi rearms: a well-oiled rifle ensures consistent friction-free cycling. But lubricants can lose their viscosity in frigid temperatures, and begin to freeze in extreme situations. That can result in slow or inoperable triggers and firing pins.
The good news is, modern firearms are designed to work perfectly fine without lubrication, especially if high-volume shooting, which can lead to heat buildup and increased friction, is not required. So, if you’re going to be hunting in sub-zero temperature, cleanse your action of all lubricants. There are many commercial degreasers on the market, but virtually any solvent, or even gasoline, will work well.
To begin, remove and disassemble your bolt, for this is where years of grease, oil, dirt and general crud can accumulate. This includes inside the firing pin spring. Once you’ve soaked the components in a degreaser, simply wipe them dry and reassemble the gun. If you’re of the notion that you absolutely must use a lubricant, look for one of the modern concoctions rated for -40°C or colder.
Dress for the occasion
Two years ago on a Newfoundland moose hunt, I got caught unprepared when the tail end of a hurricane caused the temperature to plummet 30 degrees. I was forced to put on nearly every stitch of clothing I had with me, most of which wasn’t designed to be worn together.
I really should have known better— when hunting in regions where extreme cold is possible, even if it’s not in the forecast, go prepared for the worst. That means layering your clothing from top to bottom. Wear a base layer that wicks moisture away from your skin; underwear made of polypropylene is a good choice. Cotton absorbs moisture, so avoid it at all costs.
Mid-layers are designed to insulate, so you’ll want several layers to accommodate a wide range of temperatures and activity levels. Popular materials include wool or the various iterations of fleece. Your outer layer should protect you against wind, snow and freezing rain, so the shell must be wind and waterproof. Be sure it includes a hood.
All your clothing should fit comfortably but not tightly. Select sizes such that each layer fits well over the layer below it. And when it comes to covering your feet, head and hands, moisture wicking materials, insulation and protection from the elements are equally important. Now, bring on the cold!


