RSS

Tag Archives: archery

The Dangers of Dry Firing Your Bow

Dry-firing your bow is something you will want to avoid at all costs. To help minimize your chances of dry-firing a bow you should always draw a bow with an arrow in it, and aim it at a target. This way if you do accidentally release the string there is an arrow in it and you have a target to stop the arrow. Also if you are just trying out a bow be sure to draw with an anti-dry-fire release. When in a group of people it is very easy to become side tracked and forget to load your bow with an arrow. It’s always good to double check before you draw your bow


bowtarget

Dry firing a bow is the act of shooting a bow without an arrow. While this may seem harmless to some of us who are just starting out I assure you that this can be one of the most costly mistakes you can make.

The fact of the matter is that it can happen to anyone beginner or expert for many different reasons. Whether it be from ignorance, distractions, or accidental misfire of a release it happens all the time. So the question is what do you do if you accidentally dry-fire your bow.

There are a few outcomes that could happen when a bow is dry-fired, the first is that is that it will appear that nothing has happened to any of your bow. The second scenario is that your string breaks however everything else stays intact. The third possibility is your bowstring, and cables could snap resulting in your limbs breaking and potential debris flying all over the place. This is basically the worst case scenario and can at times be irreparable.

No matter what scenario your bow falls into after being dry-fired, the first thing you will need to do is to get a magnifying glass and a bright light and look over the limbs especially near the cams for any cracking, or splintering. If you find that one of both limbs have cracks or splinters in them then you will have to replace the limbs before you are able to shoot again. Failing to do so will likely cause will render the bow unusable and/or injury.

bowillustration

In any of the other cases where the string breaks and/or the bow limbs shatter, you will first go get medical attention if you need it and then you will need to bring your bow in to a bow repair shop and you will have to replace the limbs,string, and any other broken parts(axles,cams,wheels etc.).

After checking for cracks and splinters in the limbs, take a look at the cams/wheels to make sure that they have not been bent or cracked, again if they are you will need to replace them as soon as possible before you are able to shoot. Next if you were lucky enough to have your string still intact, you will need to check the whole thing for badly frayed portions, cut strands, and badly damaged areas, especially near the axles.
If everything checks out and you were unable to find anything wrong with your bow then you are lucky, and you have 2 options, your first option is to draw the bow(with an arrow) and shoot it. Make note of any weird noises, or vibrations. If you aren’t the risky type then you can bring it into a bow repair shop and they will have the tools and resources to be able to better inspect it for damages.

In closing, dry firing a bow may seem innocent, but in turn can be detrimental and even dangerous. Take your time to ensure longevity of your equipment for years to come and better success rates!

Follow our FISHING BLOG

WEB   RATES     FISH    HUNT    CABINS    PHOTOS
TESTIMONIALS    BROCHURE    HUNT BOOKLET

Enter your email address to subscribe to this blog and receive notifications of new posts by email.

← Back

Thank you for your response. ✨

Email Me....

 
Leave a comment

Posted by on October 21, 2015 in archery, bow, Wawang Lake Resort


Tags: , , , , , ,

A Better Bow Hunter: Aim to Hit

The traits that separate elite bow hunters from the masses are attention to detail and rigorous training. These are year-round archers, and here’s how they push themselves to become deadly hunters.

ODL0814_HUN02

1. Be Challenged
As creatures of habit, we’re guilty of practicing at distances at which we can comfortably stack arrows in an impressive -fashion—typically 20 yards. However, extending your practice distance well beyond your comfort zone accomplishes several things. First, it forces you to tighten your form, since miscues are multiplied as distance increases.

Greater practice distances also force you to identify and correct imperfections lest you continue to splash arrows about the range. This year, if space allows, double your practice comfort zone. You’ll find that when “short” shot opportunities present themselves, they’ll be chip shots.

2. Be Strong
Drawing a bow requires a certain degree of physical strength. Leveling a fiber-optic pin confidently on an animal is difficult, if not impossible, when your arms are trembling uncontrollably.

Sadly, archers who pull out their bow a week prior to the season aren’t physically prepared to attempt an ethical bow hunting shot. The right repetition makes you both strong and accurate.

3. Be Angular
Animals rarely present the perfect broadside shot. But how many of us practice any other angle? Whether you shoot a block or a 3D target, practice a variety of shot angles.

Shooting non-perpendicular angles adds another physical and mental dimension to the shot execution, because the bull’s-eye changes geometrically. When practicing, move about the range, varying your relationship to the target face until you’re proficient in every possible angle.

4. Be Accurate
Many archers think the only way to practice judging distance is with a bow in hand, but the opportunities are everywhere, including grocery stores and parking lots. Mentally measure an object in the distance and pace it off to check your guesstimate. Or stroll through the woods with a rangefinder. Stop occasionally and put an eye on a bush, branch, or rock. Give yourself a few seconds to estimate the real estate, and then check it against the laser. After a few trips, you’ll become amazingly accurate at taping distances with little more than a keen eye.

5. Be Crepuscular
Shot opportunities often present themselves in low light, whether the first or last of the day. Try shooting three or four arrows in this tough light. By doing so, you’ll have a real appreciation for what to expect when visibility is less than ideal in the field.

6. Be Blind-Ready
Ground blinds now outsell tree stands, as they offer a portability and versatility that tree stands simply cannot. However, if you’ve never practiced from one, you’ll be unpleasantly surprised when you try to lob a shot from inside its tight confines. Limited drawing distance, extremely small windows (which narrow the shot field), and dark interiors challenge even the best bow hunters. A word to the wise: Pop your ground blind up and practice shooting from it prior to toting it into the field.

Follow our FISHING BLOG

WEB   RATES     FISH    HUNT    CABINS    PHOTOS
TESTIMONIALS    BROCHURE    HUNT BOOKLET

Enter your email address to subscribe to this blog and receive notifications of new posts by email.

← Back

Thank you for your response. ✨

Email Me....


Tags: , , , , , , , , ,

Mauled by a Bear

This outdoorsman encountered the worst nightmare the wild can conjure. But thanks to smarts, willpower, and a little luck, he survived, and the lesson learned that could save your life. With survival analysis by Keith McCafferty

survival1

THE MAULING

On Sept. 26, Brent Prokulevich, 49, was bowhunting by himself for moose in Western Ontario when he was charged by a 300-pound black bear. As told to Colin Kearns.

I flew into the outpost camp on Saturday. My buddy Paul Patiuk and his son Kyle had been there for a few days already and would be guiding moose hunters for the next few days. The plan was for me to hunt on my own on Sunday and Monday in a spot Paul had scouted for me. Then on Tuesday, when their clients had left, we’d hunt together. One of the first things I asked Paul and Kyle when I reached camp was if there were bears in the area. They told me there weren’t any.

I saw no moose during my Sunday hunt, but I did get a cow to call back. I decided to leave my scent rag out overnight, hoping the scent would fill the area. The conditions when I returned in the boat Monday morning were perfect. A fog hung in the cool air, and the wind had died so my calls carried a long way.

In front of me was a dried-up beaver pond littered with dead poplars, leaving me with a clear shot if a moose wandered in. I got into position and readied my bow and arrows. I made my first cow call at 7 a.m. and followed up every 15 minutes until 8:30. That’s when I heard movement in the willows, 33 yards away. As soon as I saw the top of the animal’s back, I knew: S - - t. It’s a flipping bear.

He was big, about 300 pounds. He didn’t see me at first but when he did, our eyes connected immediately. “Get! Get! Get!” I yelled. But he never budged—until he came at me.

This isn’t happening. I grabbed my bow. This can’t be happening. I nocked the arrow. This is happening. I fired a prayer at 8 yards.

I raised my left arm and he locked onto it. We fell to the ground. He had me on my back, but when he let go of my arm I managed to get up to my knees. Then I heard this crunch on my neck. The bite to my arm I hadn’t really felt. This one to the neck, though, I felt. I kept yelling, and at one point I had a flash of my 17-year-old son, Brady. I’m a single dad and I’ve been raising him since day one. I wasn’t going to leave him to live by himself. Something in me snapped. I’m not dying like this!

 survival2
I couldn’t reach my knife, so I grabbed the other arrow and began stabbing the bear in his head, over and over. He let go of my neck and clamped on the back of my shoulder. Then, somehow, I knocked him right on his ass.

There was blood everywhere. My first arrow had entered his chest and must’ve exited through the bottom of his belly because his guts were spilling out. The two of us just sat there for a moment, staring at each other. He swiped at my right arm, then he turned and walked 15 yards before he sat back down. I was going to put another shot in him, but my bow was busted. So I got the hell out of there.

I jumped in the boat and drove around looking for help. But after about 15 minutes with no luck, I turned back toward camp. That’s when I saw the plane landing at camp. When I reached the dock I told Kevin, the pilot, what had happened. He left a note for Paul and Kyle, then we took off. We arrived at the hospital 30 minutes later. I walked into the ER and said to a nurse, “I’ve been attacked by a bear.”

The shoulder bite was a half inch from puncturing a lung, and the neck bite almost hit my spinal cord. But no bones were broken, and the puncture wounds are healing well.
I’m looking forward to hunting again. I’ve taken a couple of walks in the bush recently, which has been nice, but I find I’m looking over my shoulder more often. Every time I hear a little snap.

Survival Analysis
In the matter of risking encounters with bears, bowhunters start with three strikes against them. First, they hunt in early fall, when bears undergo hyperphagia, a period of mad foraging before hibernation that increases the potential for crossed paths. Second, by donning camo, using cover scent, and sneaking quietly through brush and timber, archers spike the odds of chance encounters within the critical 50-yard range, at which bears are more likely to attack. And third, by using lure scents and calling like animals that bears regard as prey, hunters actually encourage unwanted attention.

Prokulevich did the right thing by fighting the black bear. Playing dead is only effective at discouraging grizzlies, and then only under certain circumstances. But he probably could have avoided the attack altogether if he’d had pepper spray on his belt. Under the best of circumstances, arrows offer meager defense—and bullets aren’t much better. In most documented bear attacks, only three seconds elapse between the start of the charge and contact with the person. Do you really think you can raise a rifle, flip the safety, aim, and fire in that window? But you can flick the safety tab and depress the trigger of pepper spray in an instant. Plus, it works. In a study conducted by bear researcher Thomas Smith of hundreds of bear attacks, pepper spray deterred a charge in 92 percent of cases. Bullets deterred a charge only 66 percent of the time, and it required an average of four bullets to stop the bear.  (Be sure to check with local authorities on the legal uses of pepper spray in areas you intend to hunt)

 Stay Safe and Hunt Safe on Your Next Outdoor Hunting Adventure!

Follow our FISHING BLOG

WEB   RATES     FISH    HUNT    CABINS    PHOTOS
TESTIMONIALS    BROCHURE    HUNT BOOKLET

Enter your email address to subscribe to this blog and receive notifications of new posts by email.

← Back

Thank you for your response. ✨

Email Me....


Tags: , , , , , , , , , , ,

Develop Proper Archery Form


SONY DSCPictured here is perhaps the most popular position of the feet when it comes to shooting; the “Open Stance”. It is easy to perform and opens up the shooter to the target resulting in less interference with clothing from the bowstring.

Despite the fact that you may be shooting the most highly tuned bow, adorned with top of the line accessories, if your shooting form is bad your accuracy will likely be worse. Shooting with good form requires mastering a number of processes. However, once these processes are understood and learned, shooting with proper form will be as easy as walking across the floor; it will become second nature.

Before incorporating the following steps into your shot routine, be sure that you are shooting a well tuned bow set at the appropriate draw length.SONY DSC

Proper Shooting Stance
Where you place your feet during the shot process can have a great bearing on where your arrow strikes. By nature, your body has a natural centering point. If your feet are not positioned properly you might find yourself being pulled away from this centering point. As a result, the body will fight to return to this location. Unfortunately, this can occur during the shot which will impede accuracy.

Resist the urge to grip your bow. Instead, let your fingers naturally drop around the handle and riser. This will eliminate unwanted tension and bow torque making your shots more accurate.

There are 3 basic stance positions to consider. They are as follows.
  • Squared Stance:  Feet are in-line with one another, drawing a line perpendicular to the target.
  • Closed Stance:  Front foot is forward from the front of the body
  • Open Stance:  Front foot is slightly pointing toward the target.The best stance, regardless of which you choose, should be comfortable and solid. This starts by placing your feet about shoulders-width apart with your body weight distributed between the midsection and rear of your feet.

Most bow hunting experts will suggest an open stance which starts by positioning your toes 90 degrees to the target, and then taking a half-step backward with the foot that is closest to the target. This stance will essentially place the chest more toward the target and allow for greater bowstring clearance along the bow arm and chest.

However, this stance may not be for everyone. In order to find your perfect stance, enlist the help of a friend and simply close your eyes and draw your bow while facing a archery target with a wide back 1wall, anchoring as you normally would. With your eyes still closed, move your body and feet around until you find the most comfortable position. Then, open your eyes and note the direction of your aim.

When it comes to hauling back the bowstring, don’t rely on the small bicep muscles of the arm. Instead, use the larger, more stable muscles of the upper back and shoulder. Not only can these muscles pull more weight, they are also steadier and fatigue less quickly.

Let down the bow and reference the position of your feet by pointing an arrow straight at the aiming spot. You have just found your stance.

SONY DSCCorrect Bow Grip
When it comes to gripping the bow you want to do so in such a way that hand torque is not promoted. In other words, you want your grip to be as torque-free as possible. To do this, you first need to find the best location for the grip to contact your hand. This can easily be accomplished with a simple test.

First, take your bow hand and hold it out as if you were going to grip the bow; keeping it slightly open and rigid to imitate pressure being applied to it. Next, take your thumb from your other hand and push it into your bow hand at different locations. You will notice that every location you push with your thumb causes your bow hand to move or collapse—-except one. That one spot is where you want to place the pressure of the bows grip while at full draw.

Your bow arm shoulder should be down and in a “locked” position while at full draw. This makes it more difficult to flex the bow arm causing shot-ruining muscle tension.

This location is typically where the bones in the forearm butt up against the base of the palm. It is a bone-to-bone contact point and is the most reliable, torque-resistant location in which to place the bow grip.

When grabbing the bow, place a small amount of tension on the string, just enough to feel it in your bow hand. Then position the grip into the area you discovered by pressing your thumb into your palm. Now you are ready to draw the bow. Just remember, upon reaching full draw, your bow hand should remain relaxed with your fingers falling down or dangling around the front of the riser.

Drawing the Bow
This may seem like a trivial facet to good shooting, but drawing the bow properly incorporates all of the essential muscles needed in order to shoot with good form; mainly, the back muscles. One of the easiest ways to do this is to think of your drawing arm elbow as having a hook in it. When drawing the bow, start with your elbow about as high as your jaw line. Then, imagine someone has a string attached to the hook that is in your elbow. Now, think about them pulling your elbow straight back as you draw your bow. Instead of puling with your biceps, you will notice that you are actually drawing the bow by using the larger muscles of the upper back; specifically, the rhomboid muscles. This will allow you to relax the rest of your body and pull through the shot using only your back.

SONY DSCBow-Arm Position
A steady aim equals comfortable shooting and tighter arrow groups. A relaxed bow hand is the key to this. To acquire this it is imperative that your drawing side shoulder be down and in a locked position during the shot. Positioning the shoulder in such a manner will greatly reduce muscle tension which is the root of poor aiming. Before drawing the bow, lean slightly toward the target, then start the drawing process. This will place the shoulder in a low, locked, “bone to bone” position.

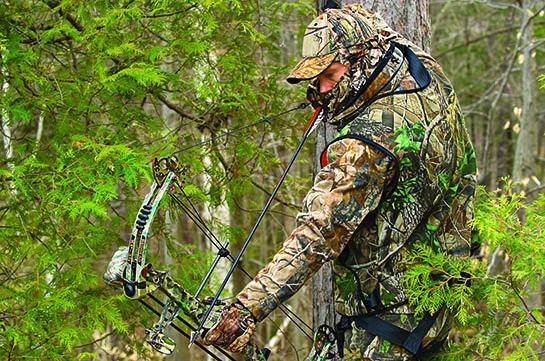
When it comes to where you place your release-hand, choose and area along the face/jaw-line that is easily repeatable and consistent; your shooting will likewise follow. Hunter shown wearing Lost Camo.

Anchor Position
Consistency is the cornerstone to good shooting. The best location to anchor your bowhand is somewhere along the jawbone that provides the most stable platform. In other words, choose a spot that allows your hand, knuckles, etc. to rest solidly as you release the trigger of your release or let go of the bowstring.

A good tip is to locate this spot with your eyes closed, without looking through the peep sight. Then, once your anchor point has been established, with your head in a natural, upright position, you can open your eyes and adjust the peep sight to your eye, instead of adjusting your eye to the peep sight.

The bottom line is to find an easy-to-repeat anchor point; one that will be consistent and second nature when shooting under pressure or any other time.

TIf good shooting form and posture are present, your body should resemble the letter “T” when viewed from behind. Hunter shown wearing Lost Camo.

Establishing T-Form
The easiest way to confirm that proper draw length and comfortable shooting posture are being used is to look for the “T-Form” as the archer is at full draw. This is easily recognized while looking at the shooter from behind. When doing so, his/her body will represent the shape of a “T”.

The torso should be vertically straight, with a direct line running up and down through the spinal column. The horizontal line in the “T” should run from the bow-side elbow, through the shoulders, and across to the drawing elbow. The trick to establishing this “T” form is to make sure that your drawing elbow isn’t too high or too low. Ideally, it should be about the same height as your ears while at full draw. This will promote the use of back muscles to draw and execute the shot.

Include these simple steps into your shouting routine and watch as your accuracy improves and your confidence soars not only on the 3D archery range, but in the field as well.

Follow our FISHING BLOG

WEBSITE    RATES     FISH    HUNT    CABINS    PHOTOS
TESTIMONIALS    BROCHURE    HUNT BOOKLET

Enter your email address to subscribe to this blog and receive notifications of new posts by email.

← Back

Thank you for your response. ✨

Email Me....


Tags: , , , , , , , ,

Determining Your Dominant Eye

untitled
Most people have a visual preference for one eye or the other, often without realizing it. This is known as eye dominance. Before choosing a bow, it’s important to know which eye is dominant.

Eye dominance can be weak or strong, and has nothing to do with hand dominance. For example, you might be right-handed but left-eye dominant. Studies show about two-thirds of people are right-eye dominant, one-third are left-eye dominant and a small percentage favor neither eye.

Some Easy Steps to Test Eye Dominance:
Go where you can see an object that’s at least 10 to 20 feet away.
Clasp your hands together, make a circle between them about 1 inch in diameter, and extend your hands to arm’s length.

archery-how-to-determine-your-dominant-eye222
Keeping both eyes open, use the circle to visually frame the object.
While making sure you keep the object framed, pull your hands slowly back to your face.
Your hands will draw naturally to your dominant eye.
In rare cases, new archers will not have a dominant eye. When this happens, it’s best to use the dominant hand to draw the bow.

eyedom1

Follow our FISHING BLOG

WEB   RATES     FISH    HUNT    CABINS    PHOTOS
TESTIMONIALS    BROCHURE    HUNT BOOKLET

Enter your email address to subscribe to this blog and receive notifications of new posts by email.

← Back

Thank you for your response. ✨

Email Me....


Tags: , , , , , ,

Bear Facts to Success

imagesS12UAEG6Simple Fact: The more effort you put into masking your scent, the bigger the Black Bears coming into your target zone will be.

All experienced Black Bear Outfitters have their little tricks to make their bear hunters hunt more enjoyable and also help with their success. If you are new to bear hunting you should know what you are up against. Every hunter wants a big trophy bear and this article should bring you a little closer to that goal, but remember, to thoroughly follow the advice of your outfitter, if you’ve chosen one, and, above all else:  DO NOT DEVIATE from the routine they have already established.

Black Bear hunting to the outfitter is about luring bears to a target zone for their hunting guests by baiting with food the bears like such as high-carbohydrate foods. Bread, pasta and other high starch content foods are rare in nature but it’s what the bears want most so they can quickly store fat for the winter. It’s also about setting up stands at strategic spots where big bears have been scouted. Black Bear hunting for the hunter is all about stealth, with the two biggest factors being sound and most of all, smell.

Black Bear’s Sense of Smell: Olfactory Receptors

imagesN9DAOG1VThe Black Bear has the best sense on smell of any land walking mammal on Earth. It’s really hard for a human to comprehend how well a bear can smell as we basically have to stick our nose in the pot to smell the sauce. Comparing the amount of Olfactory Receptors between a human and a Black Bear is mind boggling.

Olfactory Receptors are microscopic bulbs on the end of nerves in a mammal’s nose. The more you have the better your sense of smell is.

  • Humans:
    6,000,000 Olfactory Receptors (6 million)
  • Blood Hounds:
    1,800,000,000 Olfactory Receptors (1.8 billion)
  • Black Bear:
    12,600,000,000,000 Olfactory Receptors (12.6 Trillion)

A Black Bear can smell 2100 times better than a human. In addition the Jacobson’s organ in their mouth can taste the air, adding to their brains perception. A mature Black Bear can smell your breakfast from 20 miles away if the wind is right. Big mature bears can smell better than smaller younger bears as their noses are larger and more developed. Bears also know what unnatural smells are and associate them with a human presence. This can explain why Black Bear hunters that are not fanatical about the way they smell rarely see big trophy bears. There are procedures you can do to minimize unnatural smells to keep the bears concentrating on the bait that the outfitter has put out for them.  It is wise to check with your outfitter before applying anything new to the bait station that they normally don’t use.

1) Before your bear hunting trip; pick a couple of sets of clothes that you will only wear at the tree stand while hunting. Wash your clothes with scent-free detergent and when done, run them though the wash twice again with no detergent so they are well rinsed. This will ensure your clothes are scent free. If you live in the city and have chlorinated city water then go to a pet store and buy a small bottle of Aquarium Water Conditioner and add ½ oz. to the last rinse cycle you do with your clothes. The water conditioner will neutralize the chlorine in the water and keep the chlorine smell out of your clothes. Remember, they can smell 2100 times better than you so don’t feel silly getting fanatical. Then pack the clothes in a plastic bag to keep them scent free. If you consistently use fabric softener in your clothes dryer it’s best to hang your clothes up to dry because residual clothes softener might go on your clothes. If you are a smoker, do not smoke while wearing your hunting clothes.

Before we go to the next points you should be aware that Black Bears love the smell of mint. If you go on a camping trip in any of Ontario’s provincial parks the wardens will tell you not to keep mint toothpaste or mint gum in your tent because the bears will smell it and go after it. The bears craving for mint can be used to your advantage.

2) Think Mint: Go to one of those hippy tree-hugger heath stores and buy mint soap. The morning before the hunt take a shower using the mint soap. Brush your teeth with mint toothpaste. Chew mint gum while in the tree stand and if you really want to go all the way, have a glass of mint tea before the hunt and even keep a few bags of mint tea in your pockets. This will help cover up any scent.

3) Smoking: If you are a smoker and you smoke in the tree stand you are basically wasting your time if you expect a big trophy bear to come within sight. Wind direction can give you a little luck but it’s not something you should count on. It’s best to wear a nicotine patch while in the tree stand and if you need to; chew mint gum to keep your mind off smoking. Remember to brush your teeth and wash your hands and stop smoking before you put your scent free hunting clothes on.   This would also apply to cigars and chewing tobacco as well.

IMG_6110 - Copy

Black Bear Hearing:

The shape of Black Bear’s ears is mainly responsible for their great hearing. When detecting sound based on volume a bear’s hearing is about four times that of a human. However, a bear can hear a much broader frequency range; both higher and lower frequencies. Rubbing of cloth or twisting of your tree stand can produce sounds that the bear can hear and the hunter cannot. Big old male bears develop a crowned head and their ears move out to the sides giving them stereoscopic hearing, which allows them to pinpoint the origin of the sounds they hear. This is another reason why big old bears are harder to get.

With this in mind try to stay absolutely still. If you have to move; move very slowly. Take some nose drops before the hunt and if you have a cold or allergies. If your throat is dry and itchy bring some mint flavored lozenges with you. You can also oil the joints of your tree stand to make them a little quieter.

Black Bear Sight:

During the day a Black Bear basically has the same site as a human but older bears tend to be near sighted. As a result they cannot focus on things from a long distance. When one of an animal’s senses becomes diminished their brain rewires itself to compensate by making other senses more acute. This is known as neural placidity. As a bear gets older they become near sighted so the brain compensates by being more sensitive to color differentiation. If the bear sees colors it thinks are unnatural and he sees those colors move the game is up. Bears cannot see the same range of colors as a human. Hunter orange looks gray to them. But they can see dull reds and yellows as well into the blue/green cool color spectrum. This is why there are many different forms of camouflage clothing.

Picking the right Camouflage:

You need to talk to the outfitter when you book your hunt and ask what kind of plants will be at the tree stands. If the hunt is taking place in the southern range of Ontario’s bear hunting country during the fall you may have a mix of coniferous and deciduous trees, thus you will need a camouflage that represents pine needles, pine bark and colored fall foliage. If you are father north in an area with only pine trees you will need a camouflage that represents pine bark and pine needles, which means dark brown and green. You need to blend into the scenery so their bear cannot see any unnatural color pattern.

Black Bears are nocturnal. They have a reflective layer in the back of the eye called the tarpetum lucidum. Just because you can’t see them does not mean they cannot see you. Since dusk is the hottest bear hunting time it’s also when you should concentrate the most on being quiet and motionless.

Bear Size:

In most cases, big ears mean a smaller bear. A small ear is usually a bigger bear. Once a bear reaches three years old (approx. 100 lbs.), the bear starts to grow into its ears. The ears and eyes don’t grow as much as they do in the first three years. Sometimes if a bear has a hard year with food, the ears will look bigger because the bear is thinner. Read our article:  How to Size a Black Bear

Cubs:

When a sow is with cubs, 90% of the time the cubs are in the lead. The cubs will make more noise than a single bear. Most of the time, adult bears make little or no noise.

Sow:

You can’t shoot a sow with cubs in the Ontario spring hunt, and in the fall we continue this policy on our BMA – DO NOT SHOOT SOWS with cubs.. So make 100% sure you know what you are shooting at. Take a really good look around to make sure there are no cubs. A sow’s ears are usually closer together, as a male bear’s cranium grows wider on top and the ears look farther apart. They also look smaller, which is really an illusion.

These tips and techniques are just a guide line for some things to consider and think about. Ultimately the outfitter is the person you need to discuss the different factors with. Bear hunting can be quite different in different regions.

CHECK OUT OUR FISHING BLOG

WEBSITE    RATES     FISH    HUNT    CABINS    PHOTOS
TESTIMONIALS    BROCHURE    HUNT BOOKLET

Enter your email address to subscribe to this blog and receive notifications of new posts by email.

← Back

Thank you for your response. ✨

Email Me....


Tags: , , , , , , , , , ,

Tree Stand Safety

tree_stand_tips_wawanglakeAlways be cautious using a tree stand.   As hunters begin to set up tree stands as part of their preparation, safety is still rule number one whether you are scouting a location, trimming shooting lanes and putting up your tree stand, even on a trial basis, use the same precautions you would during hunting season.

Use a lineman-style belt in addition to a full-body harness when first putting a tree stand in place.  This minimizes the chance of falls and potential injury,  and,  always select a healthy, straight tree for placement.

Other recommendations:
Never carry anything as you climb — use a haul line to raise and lower equipment.

  • Maintain three points of contact when climbing.
  • Follow manufacturer instructions.
  • Don’t exceed manufacturer’s maximum height settings.
  • Have an emergency signal device with you.
  • Tell someone where you plan to go.

As with any piece of equipment, tree stands need inspection before use.

Replace:

  • Rusted bolts
  • Frayed straps or, if needed, buy a new tree stand.

Leaving a tree stand up from one season to the next has some inherent problems that outweigh any convenience. When a tree stand is exposed to the elements due to long-term placement, it may have damaged straps, ropes and attachment cords — any of which may potentially lead to breakage and failure.


WEBSITE    RATES     FISH    HUNT    CABINS    PHOTOS
TESTIMONIALS    BROCHURE    HUNT BOOKLET

Enter your email address to subscribe to this blog and receive notifications of new posts by email.

← Back

Thank you for your response. ✨

Email Me....


Tags: , , , , , ,

The importance of knowing your bowstrings!

Archers are very specific about the bow they use, the sites they mount and the release they settle on, but often overlooked is the actual bow string.  They are as vital to your performance as that of the arrow or even the bow itself.  But the question is, how do you select your bowstrings? And how do you know which ones to opt for? Having to answer these questions might become a bit of a challenge, but with some of these helpful guidelines it just might get easier for you.

1.THE 4 GENERAL THINGS YOU NEED TO LOOK FOR

The best kinds of bowstrings have four qualities you need to know about.

  • They are lightweight
  • They are strong
  • They are highly resistant to abrasion
  • They are moisture-resistant

 2.YOU HAVE TO KNOW WHAT MATERIAL YOUR BOWSTRINGS ARE MADE OF

Modern bowstrings are made of different kinds of synthetic fibers, and knowing what they are can be to your advantage.

  • Dacron: a polyester material that is strong, high-stretch and can last for years. But it’s an outmoded fiber, so wooden bows, older bows and recurve bows, are its best suit. A bowstring made out of Dacron is safe to use on any bow, but results will surely vary.
  •  Kevlar and Vectran: these fibers are made out of polymer. They have a limited-stretch so its arrow speed is faster than Dacron. Kevlar bowstrings, however, can only last for about 1000 shots, and they are known to break without warning.  These materials are not fit for modern compound bows.
  •  HMPE (High- modulus-polyethylene): this fiber is a blend of Spectra and Dyneema. It’s lightweight, faster than any of the materials aforementioned, strong, and long lasting. It is the perfect fit for high-performance recurve bows and modern compound bows.

 3.WHAT KIND OF WAX YOU SHOULD USE

Whether your bowstring is of superior quality or not, it will fray at one point or another. But if you wax it frequently, you can delay the time in which your bowstring wears out and is completely out of use. I can’t emphasis more on just how important it is to wax your bowstring. But what kind of wax should you use? I have a couple of pointers here, but if you have more, then please do feel free to share it with us.

Beeswax: If you are using a traditional bowstring, which is made out of plant fibers and animal material, then you should opt for beeswax.

Silicone based wax:  Most modern bowstrings come pre-waxed, but no lubricant has ever lasted forever, right? So the second the string starts to feel dry, you have to give it a light coating.  Silicone based waxes are ideal for modern bowstrings; it penetrates the material and lubricates the interior as well as the surface of the string. Some of the most commonly used and perhaps the best kinds of synthetic waxes are Dalton High-Speed Bow Wax Conditioner and Bohning Silicone Wax.

Remember, this may seem like a trivial detail but it could be the difference between success and a fruitless hunt! Thank you Martin Douglas of Legendary Archery for the great information!

Follow our FISHING BLOG

WEB   RATES     FISH    HUNT    CABINS    PHOTOS
TESTIMONIALS    BROCHURE    HUNT BOOKLET

Enter your email address to subscribe to this blog and receive notifications of new posts by email.

← Back

Thank you for your response. ✨

Email Me....

 
Leave a comment

Posted by on September 7, 2015 in archery, bow, how to, Wawang Lake Resort


Tags: , , , , ,

An adrenaline filled archery moose hunt!

images


Sometimes the thrill of the hunt gets escalated that much more!  This is one of the most adrenaline filled hunts we have seen in years.  This hunt was filmed in the Yukon and was executed with great skill…while we promote hunting, we suggest unless you have the skill necessary, do not try this out in the field 🙂

Are you an Ontario resident with a tag for 15A or 15B?  We have centrally located accommodations.  Book early to avoid disappointment!

BOOK NOW

moosehuntersjpg

Follow our FISHING BLOG

WEB   RATES     FISH    HUNT    CABINS    PHOTOS
TESTIMONIALS    BROCHURE    HUNT BOOKLET

Enter your email address to subscribe to this blog and receive notifications of new posts by email.

← Back

Thank you for your response. ✨

Email Me....


Tags: , , , , , , , , ,

The dangers of dry firing your bow

Dry-firing your bow is something you will want to avoid at all costs. To help minimize your chances of dry-firing a bow you should always draw a bow with an arrow in it, and aim it at a target. This way if you do accidentally release the string there is an arrow in it and you have a target to stop the arrow. Also if you are just trying out a bow be sure to draw with an anti-dry-fire release. When in a group of people it is very easy to become side tracked and forget to load your bow with an arrow. It’s always good to double check before you draw your bow


bowtarget


Dry firing a bow is the act of shooting a bow without an arrow. While this may seem harmless to some of us who are just starting out I assure you that this can be one of the most costly mistakes you can make.

The fact of the matter is that it can happen to anyone beginner or expert for many different reasons. Whether it be from ignorance, distractions, or accidental misfire of a release it happens all the time. So the question is what do you do if you accidentally dry-fire your bow.

There are a few outcomes that could happen when a bow is dry-fired, the first is that is that it will appear that nothing has happened to any of your bow. The second scenario is that your string breaks however everything else stays intact. The third possibility is your bowstring, and cables could snap resulting in your limbs breaking and potential debris flying all over the place. This is basically the worst case scenario and can at times be irreparable.

No matter what scenario your bow falls into after being dry-fired, the first thing you will need to do is to get a magnifying glass and a bright light and look over the limbs especially near the cams for any cracking, or splintering. If you find that one of both limbs have cracks or splinters in them then you will have to replace the limbs before you are able to shoot again. Failing to do so will likely cause will render the bow unusable and/or injury.

bowillustration

In any of the other cases where the string breaks and/or the bow limbs shatter, you will first go get medical attention if you need it and then you will need to bring your bow in to a bow repair shop and you will have to replace the limbs,string, and any other broken parts(axles,cams,wheels etc.).

After checking for cracks and splinters in the limbs, take a look at the cams/wheels to make sure that they have not been bent or cracked, again if they are you will need to replace them as soon as possible before you are able to shoot. Next if you were lucky enough to have your string still intact, you will need to check the whole thing for badly frayed portions, cut strands, and badly damaged areas, especially near the axles.
If everything checks out and you were unable to find anything wrong with your bow then you are lucky, and you have 2 options, your first option is to draw the bow(with an arrow) and shoot it. Make note of any weird noises, or vibrations. If you aren’t the risky type then you can bring it into a bow repair shop and they will have the tools and resources to be able to better inspect it for damages.

In closing, dry firing a bow may seem innocent, but in turn can be detrimental and even dangerous. Take your time to ensure longevity of your equipment for years to come and better success rates!

Follow our FISHING BLOG

WEB   RATES     FISH    HUNT    CABINS    PHOTOS
TESTIMONIALS    BROCHURE    HUNT BOOKLET

Enter your email address to subscribe to this blog and receive notifications of new posts by email.

← Back

Thank you for your response. ✨

Email Me....

 
2 Comments

Posted by on August 22, 2015 in archery, bow, Wawang Lake Resort


Tags: , , , , , ,