RSS

Category Archives: hunting

The Best Shot Placement for Black Bear

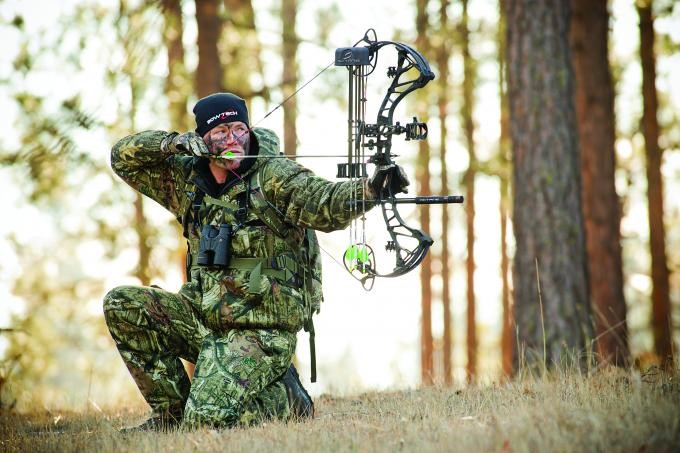
SO, you’ve opted for a lung shot. Good choice. But where exactly you should place your bullet depends on your quarry, as the following tips reveal. (Please refer to the organ legend) Sometimes you only get one chance to bring down a big-game animal. Here are 7 ways to help make sure it truly counts.

  • Avoid the head-the target is too small and you’ll ruin the best part of your fireplace rug. You’ll also render your bear ineligible for official scoring.
  • As for spine or neck shots, it can be difficult to visualize exactly where to find the spinal column thanks to the bear’s long hair and thick body.bear-target

Again, lung shots are your best bet. Trace the back of the front leg up to about one-third of the way into the chest. The lungs on a bear are positioned a little more forward than on an ungulate, so you don’t have as much leeway if you shoot back of your aiming point. For the shoulder/heart shot, which is popular for anchoring bears in their tracks, follow the centerline of the front leg up to the one-third point of the body. Be careful not to shoot low or forward, or you’ll quickly have a wounded animal on your hands.

WOUNDED and lost big game animals are part of the somber side of hunting. None of us is comfortable with the subject, but if you have any measurable hunting experience, you’ve undoubtedly seen examples. Maybe you’ve even lost an animal or two yourself.

It’s a certainty that as long as there’s hunting, game will be wounded and not recovered. In such situations, it’s just as certain that the bullet didn’t hit the animal in the right place. Why exactly can be blamed on any number of variables, but in most cases it’s safe to say the shot should never have been taken in the first place.

As hunters, our most important priority is to do everything possible to ensure a clean, quick, humane kill-it’s our moral obligation every time we head afield. Here are some important considerations in making that happen.

BULLET PLACEMENT
Much has been written and discussed about selecting the best rifle, cartridge, bullet and optics for hunting specific species under various conditions. Most of this advice is sage indeed, helping hunters learn about and understand the limitations of their equipment. But when it comes to a quick kill, the single most important factor is bullet placement. A .243 in the heart or lungs of even the largest big-game animal, for example, is more certain to result in its demise than a .500 Nitro Express in its leg. Just think of hunting legend Karamojo Bell. It was his fanaticism over bullet placement coupled with an understanding of his quarry’s anatomy-that allowed him to tale down so many elephants with his meager .275 Rigby, a cartridge equivalent to today’s 7×5 7.

wawangbear2 (550x417)

MARKSMANSHIP
The first step in ensuring accurate bullet placement comes with the decision to squeeze the trigger. Before you hit the switch, you must have an extremely high expectation of putting the bullet right where you want it, and that means understanding your own limitations as a marksman. I’ve never been much impressed by tales of 450-yard kill shots on deer or other game. While such shots are possible, not many hunters can make them with any consistency. With few exceptions, I shudder when I hear hunters talking about their long shots-much like a gambling addict bragging about his one win, for each tale of success there are likely tenfold as many unspoken failures.

The longest shot I’ve ever taken was with a 7mm Rem. Mag. on a five-point bull elk in B.C.’s Muskwa Valley. It was 360 yards away. I had a solid rest, a reasonable amount of time and a mild, though gusting, wind. The bull was dead when we got to him, having never moved. Despite that, I’m not sure I’d take the same shot today if it were presented. Perhaps I no longer feel the need to, as I might have back when I was a much less seasoned hunter. Experience has taught me that too much can go wrong in such a situation-not to mention the fact few animals can travel as far, or as quickly, as an ells can when wounded.

Jon Hanson - Tiffin, IA 440 lb. black bear

Jon Hanson – Tiffin, IA 440 lb. black bear

No, I’m far more impressed by the hunter who tells me he snuck in to within 75 yards of a herd of elk, or never shoots at running game or at any animal beyond 150 yards. This is the hunter I admire, for he clearly understands that undisturbed game and cool-handed marksmanship should be the rule, not the exception. This is the hunter who believes that 20 bullets can equal 20 deer, and he’ll wait to shoot only when he’s extremely confident of accurately placing a bullet.

HEAD & NECK SHOTS
So, where on an animal should we try to place our bullet to ensure a one-shot, clean kill? There’s no denying the surest fatal shot is to the brain or spinal column. Either will put an animal down almost instantly, and result in very little ruined meat. Under most circumstances, however, this is not a shot I would recommend. For starters, the brain is a relatively small target, and even a narrow miss can result in a broken jaw, lost eye or other similar wound that condemns an animal to a most unpleasant, slow death. I once shot an antelope sporting a fresh bullet wound through the bridge of its nose. Whether the hunter who first hit it was aiming for the brain, I can’t say for sure, but the buck was clearly laboring, almost choking on blood, and would have suffered considerably had I not come across it.

Neck shots are equally uncertain, as the spinal cord must be severed to ensure instant death. Miss by even a little bit, and you’ve probably got an animal with a muscular wound from which it will likely recover, but not without considerable agony. In the worst-case scenario, you may sever the trachea-the animal will likely escape, but suffer a lingering demise. When neck shots don’t connect directly with the spinal column, an animal will often drop to the ground almost immediately but quickly recover and run off. If you shoot an animal in the neck whether by design or by accident-it’s therefore important to keep a close eye on it until you’ve confirmed it’s down for keeps.

Head and neck shots do have their place in the right circumstances, but they should only be taken at close range by capable shooters who know their quarry’s anatomy. They’re also acceptable in the rare event of an emergency, when a dangerous animal needs to be brought down in a hurry.

SHOULDER SHOTS
Some hunters prefer shoulder shots because they will disable game while also inflicting fatal damage to the heart or lungs. Even when no collateral damage occurs, a broken shoulder, or two, will bring down an animal, rendering it helpless. In my opinion, this shot should be reserved for dangerous game, particularly bears. While some hunters use shoulder shots on larger animals such as moose and elk, I find the resulting dispersal of bullet and bone fragments ruins too much meat. Having shot a whitetail through the shoulder last year, I can speak first-hand of the meat that was wasted. Another thing to keep in mind when considering the shoulder shot is that if you shoot too high or too far in front, you’ve got either a clean miss or an animal with agonizing wounds. And if you shoot too low, you’ve got an animal with a broken leg that can still escape, only to later succumb to its wounds or predators.

images539SD7BZHEART SHOTS
The heart shot gets a lot of attention, though I suspect most hunters don’t actually realize just how low in the chest the heart lies in big game. While no doubt fatally damaged if hit, the heart offers a small target, and is often covered by the upper leg. There’s little room for error: too far forward and you’ve got a non-fatal brisket shot; too low and you’ve hit muscle or broken a leg, with no expectation of quickly recovering the animal. And if your bullet strikes too far back, you’ve got a gutshot animal. The only practical room for error is if you shoot high and take out the lungs. While many believe the heart shot is almost instantly fatal, most experienced hunters will tell you that a heart-shot animal typically travels farther before collapsing than one that has been lung-shot.

LUNG SHOTS
I believe the lung shot is the appropriate shot for 90 per cent of the big-game hunting situations in Canada. First and foremost, a bullet through the lungs results in an almost certain one-shot kill. In most cases, the animal won’t drop on the spot, but seldom will it travel more than 100 yards or so before falling over; the damage a modern bullet does to the lungs is that devastating.

images5VJ79DJ0The lungs also offer a relatively large target, bigger than any other assuredly fatal zone on a game animal. This allows for a fair margin of error. Shoot low, and you’ll take out the heart; a bit high and you’ll sever the spinal column. Too far forward and you have a debilitating shoulder shot. Only when you shoot too far back do you have a problem-animals shot in the paunch typically suffer lingering deaths, and if you do happen to recover one, you’ve got a heckuva mess on your hands when it comes to field-dressing it. If you shoot just a little too far back, however, you may get lucky and strike the liver. Animals hit in this vital organ tend not to go too far before lying down.

The lungs on a game animal generally cover about two-thirds of its chest area when viewed broadside, more or less in the centre and a little toward the bottom. A professional hunter in Africa once told me he thought North American hunters tended to shoot dead centre in the chest of an animal; he believed the more effective shot was to the top of the lower third of the chest. He may well have been right, but 1 still maintain that allowing as much room for error as possible is the wisest thing most of us can do. As such, when my quarry is broadside, I generally aim for the centre of the chest, just behind the shoulder. Often, an animal will not react immediately to a lung shot, causing some hunters to think they’ve missed when they’ve actually made an excellent shot. I remember one moose I shot three times in the span of about 10 seconds. It didn’t take two steps during that time, and I couldn’t understand how I could be missing such a big target. The animal dropped soon after the third shot, however, and when I skinned it out, a salad plate would have covered all three holes in its chest and lungs. (For species-specific tips on lung shots, see “Top targets” on page 48.)

SHOOTING ANGLES
While we all prefer broadside shots, as often as not we face shooting opportunities from an angle. You still want your bullet to enter the chest cavity, however, so it’s important to visualize the path your bullet must take. With an animal quartering toward you, your target should be somewhere between the base of the neck and the point of the facing shoulder. If an animal is facing you directly, the centre base of the neck is the preferred target. The more difficult shot to visualize is when an animal is quartering away. Take your shot with the intention of breaking the far side shoulder and you’ll generally send your bullet through the desired lung region. Be aware that the tendency in this situation is to shoot too far back, resulting in an unwanted paunch shot. I recommend not shooting when animals are quartering away at extreme angles or facing directly away from you. While we all know the old “Texas heart shot” through the behind can be fatal, the odds are your bullet will break up or deflect on contact with bones, impeding its ability to get into the vital organs. I know some may disagree, but this is one shot I simply won’t take, and I advise others to follow suit. If you absolutely must tale this shot, at least be sure to use a well-constructed bullet designed for maximum weight retention and penetration. Remember, when it comes to shot placement, the goal isn’t simply a freezer full of meat it’s also to get the job done quickly and efficiently.

Follow our FISHING BLOG

WEB   RATES     FISH    HUNT    CABINS    PHOTOS
TESTIMONIALS    BROCHURE    HUNT BOOKLET

Enter your email address to subscribe to this blog and receive notifications of new posts by email.

← Back

Thank you for your response. ✨

Email Me....


Tags: , , , , , , , , , , , ,

How to Pattern a Shotgun + Video

Shotgun patterns are measured at 40 yards for all gauges, except .410 bore. .410’s are patterned at 30 yards. Patterning is a simple process, but time consuming due to all the counting required. Here is the correct way to pattern a shotgun.pattern2

  1. Set a big piece of blank paper on a frame 40 yards from the muzzle. (Butcher’s paper cut into 48″ squares works well.)
  2. Shoot at the center of the paper.
  3. Draw a 30″ diameter circle around the center of the resulting pattern, so that it encloses the greatest number of holes.
  4. Count the pellet holes in the circle. (It helps to mark the holes with a magic marker as you count them, so you don’t lose your place.)
  5. Cut open an identical, unfired shell and count the pellets in the shell. (The actual number of pellets may vary from the theoretical number based on shot size and weight, so it is best to count them.)
  6. Calculate the percentage of pellets that hit in the 30″ circle. (Divide the number of holes by the number of shot in the unfired shell.)

That is it; you have now officially patterned your shotgun. Of course, every shot varies, so ideally you should repeat the process 10 times and average the results. (Analogous to shooting a group with a rifle, rather than just one shot.) Your shotgun’s pattern percentage will vary if you change the shot size, the amount of shot in the shell or the hardness of the shot, so you need to pattern all the loads you actually shoot in a given gun.

Pattern percentages will usually (but not always!) go up if you increase the hardness of the shot, decrease the weight of the shot charge, buffer the shot inside the shell, or decrease the muzzle velocity of the shot charge. Pattern percentages will typically do down if you use softer shot, increase the weight of the shot charge or increase the muzzle velocity of the load. These generalizations primarily apply to traditional lead shot, your gun may vary.

pattern1The percentage of pellet strikes that constitutes what choke varies, depending on the source. These percentages are typical:

  • Full Choke: 70% or higher
  • Improved Modified: 65%
  • Modified: 55-60%
  • Skeet No. 2: 55-60%
  • Quarter Choke: 50%
  • Improved Cylinder: 45%
  • Skeet No. 1: 35-40%
  • Cylinder: 35-40%


Follow our FISHING BLOG

WEB   RATES     FISH    HUNT    CABINS    PHOTOS
TESTIMONIALS    BROCHURE    HUNT BOOKLET

Enter your email address to subscribe to this blog and receive notifications of new posts by email.

← Back

Thank you for your response. ✨

Email Me....


Tags: , , , , , , , ,

TIPS for Hunting Grouse Without a Dog + video

Ruffed grouse (colloquially called partridge) are the premier upland game bird of northern Ontario and are both delicious and incredibly difficult to hunt. They often dwell in the kind of thick, previously logged, new-growth forest habitat that is nearly impossible to walk through and offers a wall of brushy cover that can make spotting and hitting birds a tall order.

grouse (3)

A hunter with a well- trained canine companion can level the playing field somewhat due to the fact that a good dog can sniff out birds and give the hunter a slight edge. Unfortunately, not everyone is in a position to give a hunting dog the proper home and training it needs and are thus stuck hunting solo. All is not lost, however, and the following tips will improve a hunter’s chances of bagging a few grouse without the aid of a dog.

1. Locate Food Sources

Omnivorous ruffed grouse have a varied diet that includes insects, snails, slugs, mushrooms, and the leaves and buds of trees (usually poplar), but they have a particular affinity for the various fruits that are common to their habitat.

Other fruits that may attract grouse include choke cherries, blackberries (if they are still present at the start of hunting season), and the fruit of hawthorn trees or “haws”.

grouse

2. Stick to the beaten path

Whenever it is possible, safe, and legal to do so, it makes sense for a grouse hunter to stick to established trails and decommissioned logging roads. The primary reason for holding to roads and trails is that these travel ways provide grouse with a convenient source of dust and pebbles. The birds dust themselves to control parasites, and eat small pebbles to aid in the breakdown of food stored in their gizzards. It follows that grouse often stay within easy striking distance of a path or road. Areas where a food source, such as a stand of apple trees or poplar saplings, is immediately adjacent to gravel path or road typically yield a lot of grouse.

Trails and roads also facilitate easy movement through the thick, brushy, and nearly unwalkable new-growth forests that comprise typical ruffed grouse habitat.

3. On rainy days, take to the pines

Grouse, much like any other terrestrial animal in existence, don’t like to be rained on and will seek shelter during inclement weather. This shelter often takes the form of such coniferous trees as balsams and spruces. Stands of pines that are in close proximity to food sources are particularly good places to look for grouse on wet weather days.

4. Keep one eye on the ground and the other on the trees

An easy error to make while hunting grouse is to keep eyes only on the ground. While ruffed grouse are primarily ground-dwelling birds, they do spend an appreciable amount of time perched in trees. A hunter concentrating on spotting birds on the ground will likely miss birds perched in tress and vice versa.

grouse (2)

5. Catch them sitting still

Ruffed grouse are an incredibly difficult bird to wing shoot, especially without the help of a dog to provide advanced warning or a bird’s presence. Not only do grouse take flight in a manner that results in a sudden blur of motion and thunderous wing beats likely to startle an unaware hunter, but the birds are also adept at quickly taking cover by putting trees and thick brush between them and the muzzle of a shotgun. By the time a hunter, surprised by a bird, shoulders his or her gun, disengages the safety, and gets on target, the bird will likely be gone. That’s not to say those hunting sans dog will never hit a flying grouse, it’s just that spotting the birds before they take flight is a surer way to put meat on the grill.

Spotting grouse before they fly is a skill in and of itself as their natural camouflage is just shy of perfect. A good way to spot them is to look for movement rather than trying to recognize their outline on the forest floor. A grouse moves in a very awkward, jerking motion, similar to that of a chicken. This distinctive movement will often give away a bird’s position.

Occasionally, ruffed grouse will also give away their position with sound. The noise that ruffed grouse are perhaps best known for is their characteristic drumming that sounds similar to a distant lawnmower engine starting and stalling. This sound will make a hunter aware of a bird’s presence in a general area, but it is difficult to use it to pinpoint an exact location.  Another sound emitted by grouse is a kind of high-pitched, raspy clucking.  Grouse will occasionally make this clucking sound when distressed a few seconds prior to taking off, thereby giving a hunter advanced warning of its presence in the immediate area.

6. Walk slow, pause often

This last piece of advice is perhaps the single most important.  Most of us have become conditioned to walk through our day to day lives as quickly as we possibly can. This mindset is perfect when navigating the local supermarket, but it will lead to certain failure on a hunt.

Rather than walking quickly and continuously, it is important to move at what at first will seem like a snail’s pace, and to pause every few steps to thoroughly scan the woods. Walking in this manner will not only result in the spotting of more game, but will also result in a hunter noticing other interesting details about the woods that would be missed when hiking at forced march speeds. Noticing such details as a vibrantly colored mushroom, a hawk or eagle circling high overhead, or even just a really cool looking tree are as important to the experience of hunting as bagging game.

Follow our FISHING BLOG

WEB   RATES     FISH    HUNT    CABINS    PHOTOS
TESTIMONIALS    BROCHURE    HUNT BOOKLET

Enter your email address to subscribe to this blog and receive notifications of new posts by email.

← Back

Thank you for your response. ✨

Email Me....


Tags: , , , , , ,

Need a Do-Over With Your Shot?

It’s rare for any hunter to walk away from a field or reflect on a hunt and not think about whether a shot could have been better.  Whether with a bow, crossbow or firearm, there are times when we hesitate. A little voice – instinct, caution, doubt? – throws up a hurdle.

ShotSimulator
Sometimes we adjust and avoid the hurdle. Other times we pull up short and don’t leap. We don’t take the shot.And, unfortunately, there are times when we know the hurdle is there but take the shot anyway. We’re confident in our abilities and that of our bow, crossbow or gun. Some might call that experience. Some might say it’s recklessness or unethical.

We probably all can look back and wrestle with at least one shot that might have been risky, even if things turned out well after taking it and the deer, bear or moose is on the ground.  Part of our duty as hunters is to strive to maximize our abilities with whatever weapon we use.

We practice, tune our bows, hit the range with our guns. We try to find the right combination of arrows and broad heads or the ammunition that works best with our rifles, muzzleloaders, handguns or shotguns.  One way to improve our knowledge and experience is with Deer & Deer Hunting’s “Shot Simulator” software.  If you’ve ever been curious about where your bullet, slug or arrow has entered a deer’s body and what happened, here’s how to find out.  The Shot Simulator software is designed to provide you with outstanding animation of a deer’s body and internal bones, muscles and organs.

imagesA15UZWSYWith the Shot Simulator, you can position the animated deer in numerous positions – how it was when you shot, or how you saw a buck or doe and didn’t shoot – and then learn which organs were hit.  Didn’t like what you saw? Position it differently and do it again. You can not only position the deer, but also your shot from a tree stand or ground level.  If you’re a stand hunter but only climb about 15 feet, you can see the difference in that height versus 25 feet or on the ground.  The animation allows you to move the deer around and then remove the hide, skin and bones to see what happened.  Then, you can punch in the trailing guide to find out what happens next.  Should you follow the game immediately?  Wait a while? Just for your knowledge, you could take the shots on the computer that you’d definitely pass up in real life and then see what would happen.

It’s an educational tool that could help you glean more knowledge and help make you a better hunter. Shot Simulator also is a great teaching tool for young hunters, too.  They’re curious about what happens and this is a great way to augment their in-field learning.

Follow our FISHING BLOG

WEBSITE    RATES     FISH    HUNT    CABINS    PHOTOS
TESTIMONIALS    BROCHURE    HUNT BOOKLET

Enter your email address to subscribe to this blog and receive notifications of new posts by email.

← Back

Thank you for your response. ✨

Email Me....


Tags: , , , , , , ,

Flint Laces: Shoe Laces That Can Start a Fire

flint-laces-shoe-laces-that-can-start-a-fire-thumb

The Flint Laces are a pair of shoe laces that you can use in case of an emergency to start a fire with if you are otherwise incapable of starting one. Maybe you forgot your matches at home, maybe it just rained and all your matches are wet, or maybe you’re stranded in the woods without a match or a lighter and you’ve lost your manhood and just can’t make a fire using your own two hands.

flint-laces-shoe-laces-that-can-start-a-fire-9435
Each flint lace contains a hidden piece of ferro rod that is capped with rubber. Simply scrape the rubber from the rod, strike it against a knife or some steel (assuming you have some), and you will be toasting your buns on a nice hot fire in no time.

The flint laces are completely normal shoe laces other than containing a fire starter rod, they are made from type III 7 strand 550 paracord, contain 4 separate rods (1 on each end of each shoelace), come in sizes 36-108, and are perfect for when you’re planning on getting lost and stranded while hiking or camping.


Follow our FISHING BLOG

WEBSITE    RATES     FISH    HUNT    CABINS    PHOTOS
TESTIMONIALS    BROCHURE    HUNT BOOKLET

Enter your email address to subscribe to this blog and receive notifications of new posts by email.

← Back

Thank you for your response. ✨

Email Me....


Tags: , , , , , , , , ,

Bow Hunting – Packing Tips

Al_2

Over the past two decades hunting backpacks have grown in popularity and size. Not only cubic inches, but number of pockets and where we can strap things. Don’t be sucked into the thought that you have to fill each and every pocket or empty space with something. Instead, make a list of items you think you’ll need for your outing by reviewing the possible scenarios that may occur. For example, if you are just planning a day hunt you may jot down a considerably short list, whereas if you are hunting for a few days you will be carrying a bit more gear.

Years ago a simple camouflage backpack was used with a large holding area and one pocket. Some hunters went out in the field with just a bow, a peanut butter sandwich in their pocket and a knife. Nowadays it’s good policy to prepare a couple packs that to utilize for different hunts. The following is what goes into these packs on a hunting trip, but,  keep in mind that you should customize your pack essentials according to what your adventure will be. You will be surprised at how much extra ‘stuff’ you really don’t need.The first is the Badlands Hybrid pack that is used on most of short day trips like small game or turkey hunts. Pack calls and essentials and you’ll still have room left over. On longer hunts pack a Badlands 2200 which allows more room for extra clothing or food for longer excursions.  Making sure the essentials are in your pack for a bow hunting adventure can be rather simple. In order to bow hunt, you have to find an area where you can take a quality shot.

You have to find a good area to hunt and you need to get there. You also have to have a pack that is tough, not too heavy, and has ample space to pack out an animal should you be fortunate enough to harvest one. Some areas can be thick vegetation so you need to be aware of the terrain and weather of where you will be headed. Pack your gear for each and every trip to be sure you have everything you might need and a little extra should you find yourself stranded. You should do some research and find a good pack that will fit your needs and more importantly fit you.  Here are the essentials that you should take on every hunt.

These essentials should be a constant each time you venture into the forest.

Al_1Water – Always plan to have enough to drink throughout the day. Also plan on sipping, not guzzling so you don’t waste the resource. Before you leave on your hike, locate a water source on a map and prepare to refill along the way.  Put an extra bottle in the bottom of your pack in case your hydration system runs out. Then you know you at least have one bottle left. Also, leave a 2 liter bottle of water in your vehicle (preferably in a cooler) so you have something cool to drink when you reach it.

Food/Snacks – Have fun with what you eat on the trail!  Take almonds, some energy gel, trail bars like Granola bars, and, be sure to pack a sandwich. For some, and, for those who like it, there is something about eating a peanut butter and honey sandwich on top of a peak that just makes it that much better. Try to stay away from most other sweets on the trail like candy bars or snacks that could leave you feeling sluggish.

First-Aid Kit – Pack a kit yourself or better yet, buy one of the Adventure Medical Kits Sportsmans Kit available at most stores. It is a great kit and the one you should carry on each and every trip. A word of advice to everyone is to open the kit and know what is in there before you leave your house check it over. If you think something is missing, add it. One of the items you should always sure to pack is moleskin. You can never tell when it might be needed to cushion a blister or protect your feet. Having that moleskin was invaluable.  Be sure to include other items like QuikClot and a tick remover. You may never needed them and they could’ve been left at home, but  don’t mind a little extra weight when it comes to safety.

SPOT Locator – Having a locator beacon on your in case in the event you might get lost is added security.  It allows your family to track you via computer when your on a hunt. They can see exactly where you are, the terrain, and if you are stationary or moving. The best part is that is if you get lost or need medical assistance you can press a button and have them dispatched to your location. It is highly recommended to review the features to see if you plan on hiking more than a couple miles in or if you plan to be out for a few days.  Having a space blanket is a great idea in case you get stranded and need to keep warm. If you need to use it you will probably be miserable, but it will help keep you alive.

Compass – Know how to use it.

Map – A topographical map of the area I am hunting.  Some of the items that should be packed, but not necessary really don’t need an explanation:

Whistle, Lighter, Headlamp/Flashlight, Knife and Paracord.

As mentioned earlier, for different hunts there will be a different set of items you will have in your pack. It may take some testing on your part to see what you need, don’t need, and what weighs the least. No matter what, whatever you pack, get out there and enjoy yourself.

Follow our FISHING BLOG

WEBSITE    RATES     FISH    HUNT    CABINS    PHOTOS
TESTIMONIALS    BROCHURE    HUNT BOOKLET

Enter your email address to subscribe to this blog and receive notifications of new posts by email.

← Back

Thank you for your response. ✨

Email Me....

 
1 Comment

Posted by on January 14, 2016 in hunting, preparation, Wawang Lake Resort


Tags: , , , , ,

5 reasons – Why to Teach Your Kids to Hunt

wawang-lake
1. Learn Valuable Skills
–  sportsmanship, physical fitness, hunting, physics are just a few of the skills you learn. Equipment is set up for the ability of the child, so those just starting get equipment meant for a beginner, not having to jump right into what the more experienced child has. And to focus on our blog – preparedness skills – hunting and safety.

2. Leadership & Sportsmanship– with groups like 4-H, you learn more than just a sport, but you learn sportsmanship & leadership skills.

3. A Sense of Accomplishment – so many kids don’t do well with team sports, but individual sports give them a place to shine. Being able to pull back the string and loose an arrow right into the target on one’s own gives a child a great sense of accomplishment at having done this thing themselves. As they progress in skill, this is skill that they did, not as a team, but as an individual. And with the availability of competitions around the country, those kids who love to compete have a chance to do that as well.

4. Archery Clubs – With archery clubs popping up all over the country, archery clubs make it easy to be indoors or outdoors in a safe environment to practice and be taught. Many clubs provide equipment, instructors, and contact with other kids who participate in the same sport.

5. It’s just plain fun! Archery isn’t an aggressive sport, so it will appeal to those kids who aren’t so physical. It’s a relaxed sport, so there is little pressure for those not drawn to the nail biting of team sports. There are many avenues to enjoy this on it’s own or in competitions. You’re outdoors in nature enjoying an ancient shooting sport!

Follow the rules! Safety rules are most

important – while a fun sport, archery can be extremely dangerous, so please follow these safety rules:

  • Never point a knocked arrow at anyone  – keep pointed downrange at the target
  • Never walk with arrows pointing upwards – use two hands to carry them pointed down to the ground
  • Never retrieve your arrows until there is a cleared range – make sure everyone is done shooting and bows are put away – be aware of your surroundings!

tiro-con-arco-citazione-Tondelli-anteprima-600x400-728126

Follow our FISHING BLOG

WEBSITE    RATES     FISH    HUNT    CABINS    PHOTOS
TESTIMONIALS    BROCHURE    HUNT BOOKLET

Enter your email address to subscribe to this blog and receive notifications of new posts by email.

← Back

Thank you for your response. ✨

Email Me....


Leave a comment

Posted by on January 13, 2016 in hunting, Wawang Lake Resort


Tags: , ,

Winter Camping For Beginners

Winter Camping
Winter camping can mean different things to different people.  For some, it means renting a cabin heated by a wood stove. For oth­ers, it means pack­ing snow­mo­bile trail­ers to the brim. For the more adven­tur­ous, it means grab­bing a pack and haul­ing in all the neces­si­ties to a remote loca­tion. No mat­ter how you win­ter camp, the fol­low­ing tricks are useful.

WEAR A FIRE­PROOF SHELL
If you are going to build camp­fires, either for the sake of cook­ing, warmth, or morale, make sure that your outer layer of cloth­ing is less likely to end up ruined if struck by an errant ember.  Wool is one of the best, most fire-resistant nat­ural mate­ri­als and is great for this.  Down jack­ets are down­right (no pun intended) awful, and you can lose tons of feath­ers this way.

PACK THE SNOW
Before set­ting up your tent, pack down your camp­site. If you have skis or snow­shoes, that means tramp­ing around hard until all the snow is packed.  If you’re shod only in boots this will take some time, but if you don’t do this, you run the risk of step­ping into a soft bit of snow in your tent and tear­ing the floor.

PACK AN EXTRA HAT AND GLOVES
Always carry a spare hat and a set of mit­tens. No mat­ter how dili­gent you are, no mat­ter how reli­gious you are about using idiot strings and keeper cords, you will lose a hat, and you will lose a glove.  Keep a cheap spare, or be pre­pared for frost­bite or a fore­short­ened trip.

EMBRACE THE PEE BOT­TLE.
Being cold can cause you to want to uri­nate more fre­quently, and we all know how incon­ve­nient it is to dis­robe and undo your sleep­ing bag at 0 degrees F.  For women, I highly rec­om­mend look­ing into the var­i­ous acces­sories that allow you to pee whilst stand­ing, and for both gen­ders a WELL-MARKED pee bot­tle will keep you warm and sim­plify your nightly con­ti­nence. For the love of god, don’t con­fuse your water bottle—color is not enough, make sure your bot­tle is well-marked and maybe wrapped in some duct tape.

USE THOSE STAKES
If there is snow, you can stake out your tent.  You can always make dead­men out of sticks or fallen trees, stuff sacks full of snow, buried skis, snow­shoes, poles, ice axes, or what have you.  There is no excuse for a poorly staked-out tent.  If you expect no snow and frozen con­di­tions, plenty of com­pa­nies make hard tent stakes meant to push through frozen ground, either out of tita­nium, steel, or 7075-t6 aluminum.

BRING THE RIGHT SLEEP­ING PAD
As Bear Grylls says, two lay­ers on the bot­tom are worth one on the top.  That is, you lose more heat through con­duc­tive heat loss when sleep­ing than any­thing else, so win­ter is no time to skimp on your sleep­ing pad.  Make sure you have a pad with an r value of four or more, and if you have one, throw a closed-cell foam pad under­neath. If you feel like your pad isn’t cut­ting it, stuff extra cloth­ing under­neath you, and toss your down jacket on top of your sleep­ing bag.

BOIL THE SNOW
Leave your water fil­ter at home.  Chem­i­cal fil­ters take longer to work in the cold, and mechan­i­cal fil­ters can crack and fail. Your best bet for water fil­tra­tion is boil­ing your water, as you prob­a­bly have to melt snow any­way. Don’t be suck­ered into think­ing glacial melt or fresh snow is sterile–it isn’t. Snowflakes often form around small bits of dust (nucle­ation sites) which can be bac­te­ria or viruses float­ing in the upper atmosphere.

SLEEP WITH YOUR BOOTS
Use boots with remov­able lin­ers, so you can put those lin­ers at the bot­tom of your sleep­ing bag to keep them warm.  If you only have single-layer boots, put them in a water­proof stuff sack at the bot­tom of your sleep­ing bag.  Noth­ing means morn­ing hypother­mia more than frozen boots!

CAMP BY CAN­DLE­LIGHT
A can­dle lantern safely hung on the inside of your tent (far enough away from you and the ceil­ing so as not to be a fire haz­ard) does won­ders to both warm your tent and reduce con­den­sa­tion.  Despite this, a towel for scrap­ing off con­den­sa­tion is always welcome.

EMBRACE LITHIUM
Use lithium bat­ter­ies in all your win­ter elec­tron­ics.  Not only does lithium per­form con­sis­tently down to much colder tem­per­a­tures than alka­line or NiMh bat­ter­ies, but they are lighter, last three times as long, and have a flat decay curve.

WIPE WITH CARE 
In the sum­mer, comfy leaves or soft river stones abound, but in the win­ter they’re few and far-between. While many have picked up pinecones in des­per­a­tion, the best read­ily found alter­na­tive is just plain old snow. It’s effective, ubiquitous, and leaves behind lit­tle residue.  If you do bring TP, please either pack it out or burn it. The ground is too hard for catholes and for those who have hiked along the Appalachian Trail dur­ing the first spring thaw, a mound of TP gen­er­ally sig­ni­fies a poorly hid­den scat stash.

FIGHT CON­DEN­SA­TION WITH A VBL
If you’re out more than a week, use a VBL, or vapor-barrier-liner for your sleep­ing bag.  Con­den­sa­tion from your own body can freeze within the upper layer of your sleep­ing bag where the warm air meets the freez­ing air, and over time your sleep­ing bag can become frozen solid.  While they are not as com­fort­able to sleep in, it beats hit­ting your sleep­ing bag with a ham­mer every night like some polar explor­ers have had to do.

FLIP YOUR BAG
If it’s not snow­ing, turn your sleep­ing bag inside out on top of your tent to dry dur­ing the day.  This is a great rea­son to choose win­ter sleep­ing bags with a black interior–it absorbs more solar energy and dries out faster.

FLIP YOUR WATER
If you have a large water stor­age con­tainer, turn it upside-down when stor­ing it overnight.  Ice forms from the top down, so keep­ing the spout/opening of your con­tainer fac­ing down keeps it from get­ting frozen up. This can be com­bined with insu­lat­ing the con­tainer, of course.

VASE­LINE
Cover exposed skin in Vase­line or ani­mal fats. Inuit have been doing this for years–simply slather any exposed or poten­tially exposed skin on your face, ears, neck, wrists, or hands in a thick oil and they’ll be less prone to wind­burn and frostbite.

Stay warm!
winter-camping-uintas

Follow our FISHING BLOG

WEB   RATES     FISH    HUNT    CABINS    PHOTOS
TESTIMONIALS    BROCHURE    HUNT BOOKLET

Enter your email address to subscribe to this blog and receive notifications of new posts by email.

← Back

Thank you for your response. ✨

Email Me....


Tags: , , , ,

Muscle Exercises for Archery

Archery is a sport that involves the use of a bow and arrow, This sport is hundreds of years old and is even featured in the Olympics. The actions in archery utilize several main muscle groups in the body, including the triceps, which sit at the back of your upper arm, the deltoid muscles in your shoulders and the latissimus dorsi muscles in the lower back. To improve your archery skills, include exercises that target these muscles in your workout.

archery123

Raise One Arm to Boost Arm Strength

Dumbbell one-arm lateral raises strengthen the deltoid muscles, which are used to provide strength and power for holding and pulling back the bow in archery. Stand straight with your feet shoulder-width apart, your right hand holding onto a stationary object on your right and your left hand holding a dumbbell straight down so it’s resting in front of your pelvis. Slowly raise your left arm up to the side, continuing until your elbow is at shoulder-level. Lower it back down, repeat and then switch arms.

Row, Row, Row Your Muscles

Spending time on the rowing machine is well worth it if you want to improve muscles for archery, because it works all of the primary muscles used in the sport including the deltoids, latissimus dorsi and triceps. Sit on the seat with your feet strapped in securely. Keep your back straight and hold onto the handle. Slowly push off with your feet, sliding back until your legs are almost fully extended. Return to your starting position and repeat.


resistancebandsexercises

Go Overhead for Strong Triceps

The overhead triceps extension is one of the most effective exercises for the triceps muscles. Stand straight up with your feet close together, one slightly in front of the other and both flat on the floor. Extend your arms fully above your head, grasping the top of a dumbbell with both hands. While keeping your upper arms beside your head, slowly flex your arms, lowering your forearms behind you toward your back until you feel a light stretch in your triceps. Raise your arms back up above you to complete one rep. Repeat.

Get Big Results with the Barbell Pullover

The barbell pullover exercise targets the latissimus dorsi muscle in the back, but it also works the triceps and deltoids, making it an integral muscle exercise for archery. Lie your upper back perpendicular on a flat weight bench, your legs bent in front of you on a right angle with your feet flat on the floor. Grasp a barbell, position your arms so they’re extended straight above you and keep your hands aligned with your shoulders. While keeping your arms straight during the movement, move your arms back in a slow, controlled motion, until the barbell is directly behind your head. Then, return to your starting position. Repeat.

Why You Need the Lat Pulldown in Your Life

The latissimus dorsi is the largest muscle of the back and is one of the main muscles in the body used in archery, primarily during the drawing motion of the bow. Lat pulldown exercises are most effective for targeting this muscle, so try the cable close-grip pulldown. On the seat of a lat pulldown machine, place your feet flat on the floor below you and position your hands above you while grasping onto the parallel cable attachment. Engage your core, pull down on the cable attachment and then return it until your arms are fully extended. Repeat.

bow1

Weights, Reps and Sets

Even with all the right exercises, if you’re not using the right amount of weight or completing the proper number of sets and reps, you’re not going to get the results you’re hoping for. Start off with a weight you can manage, and only increase the amount of weight you’re using when you can complete a full set of 12 reps while maintaining proper form the entire time. Gradually work up to completing three sets of 12 reps.

Follow our FISHING BLOG

WEB   RATES     FISH    HUNT    CABINS    PHOTOS
TESTIMONIALS    BROCHURE    HUNT BOOKLET

Enter your email address to subscribe to this blog and receive notifications of new posts by email.

← Back

Thank you for your response. ✨

Email Me....


Leave a comment

Posted by on January 8, 2016 in archery, hunting, Wawang Lake Resort


Tags: , , ,

Time to Start Planning Your Bear Hunt!

The season has come and gone with plenty of success.
Many people dream one day of harvesting that trophy bear but put it off for one reason or another….time to put the excuses on hold!

Bear Rates


For in depth hunting information check out our Hunt Booklet:  http://www.flipsnack.com/wawangresort/hunt-information-booklet-fdc8w9nxq.html

Follow our FISHING BLOG

WEB   RATES     FISH    HUNT    CABINS    PHOTOS
TESTIMONIALS    BROCHURE    HUNT BOOKLET

Enter your email address to subscribe to this blog and receive notifications of new posts by email.

← Back

Thank you for your response. ✨

Email Me....


Tags: , , , , , ,