
One of the most common questions of a first time moose hunter is “The moose is down, now what?”
First-time moose hunters need to know that handling the animal once it is killed will not be easy. But, with the appropriate equipment and a bit of knowledge, the job can go smoothly. If you are planning to have your moose butchered by a professional, it would be wise to check with him in advance about his preferences for handling moose.
Whatever you choose to do will depend a great deal on your means of getting the moose out of the woods and how you plan to transport it to camp or home. The “game taste” people often speak of is usually the result of poor handling more than anything else. With proper care, moose meat can be outstanding table fare.
The main cause of moose meat spoilage is heat. You can avoid this danger by field dressing your moose immediately. Allow the meat to cool rapidly by providing good air circulation. You should also take every precaution to keep your moose free of dirt, debris, blood and hair.
Cheesecloth or commercial game bags offer the best protection from dirt and flies and still allow necessary air circulation. A liberal application of black pepper will also help to discourage flies.
Field dressing should take place as soon after the kill as possible. Once the animal is dead, bacterial action can spoil the meat quickly. The chance of spoilage increases the longer you wait and the warmer the temperature. Bleeding your moose is unnecessary in most cases. Normally, the animal will bleed internally, and immediate field dressing will ensure adequate bleeding.
Field Dressing Your Moose
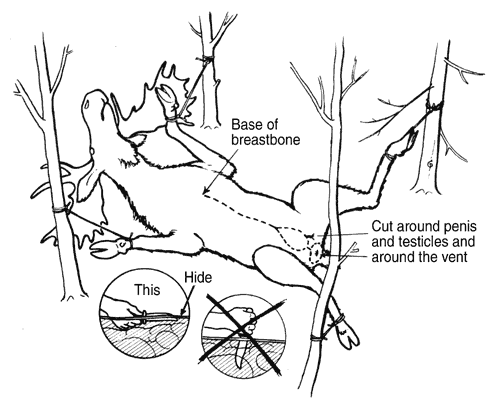
To begin field dressing, position the moose on its back with the head slightly uphill. It is helpful to tie the legs to nearby trees. Make an incision at the base of the breastbone with the tip of a sharp knife. Be careful not to cut the intestines or other internal organs. The contents can taint the meat. Continue the incision down the length of the belly to the anus. Cut through the skin and thin wall of the body cavity only. Face the blade of the knife upward, and away from the internal organs to avoid cutting them. Use the fingers of your free hand as a guide, but be careful not to cut yourself.
If the head is not to be mounted, you can continue this cut in the opposite direction to the base of the jaw, exposing the windpipe and esophagus. The windpipe and esophagus should now be severed as close to the head as possible. (Before doing so, tie a string tightly around the esophagus to prevent the stomach’s contents from spilling.) Using your bone saw, split the chest bone down the middle, exposing the contents of the chest cavity.
If you have shot a cow moose, the reproductive tract (ovaries and uterus) can now be removed; you also have the option of waiting until the bowel has been tied. Carefully roll the internal organs to the side until you see the point where two tubes (the rectum and the vagina) exit through the pelvic bone (see illustration). The vagina is the tube nearest the belly. Grasp this and follow it carefully forward until it forks into two tubes, which are the left and right horns of the uterus.
Once you have located the uterus, insert your fingers under it and work your hand in until the organ lays in the palm of your hand. You will notice a thin, almost transparent membrane which connects this organ to the animal’s back. All that now remains is to carefully follow the horns of the uterus to the ovaries. These are bean-shaped organs one to two inches in length. They may be covered with fat so keep looking! When you find them, cut the membranes holding them in place, remove ovaries, and place them in a plastic bag. The uterus can be removed by cutting through the vagina. The ovaries and the uterus should be kept as cool as possible.
Next, circle the anus with your knife, cutting deeply to free the lower bowel. Tie this off with a string to prevent droppings from coming in contact with the meat. Now cut through the flesh of the hams down to the pelvic bone and cut through the pelvic bone with the bone saw.
The internal organs can now be removed. Grasp the tied-off esophagus and trachea and pull them gently but firmly up and back towards the body of the moose. As you do so, have your sub-permitee cut these tissues away from the carcass. Continue this process into the chest cavity, pulling the heart and lungs up and back while cutting any attachments. Once the heart and lungs are freed, cut the diaphragm away from the body on all sides. Then continue firmly pulling on the esophagus and trachea and gently roll the stomach and intestines out of the body cavity, freeing them from all attaching tissues as you go. Once all the viscera is freed of the body, it is best to pull it away from your work space.
Warning!!
Because particularly high cadmium levels have been seen in some moose liver and kidney, it is recommended that you do not consume these organ meats at all.

Quartering
Quartering is recommended for moose to make handling easier and to allow rapid cooling of the carcass. The hide may be left on each quarter to offer some protection from dirt and flies. If temperatures are above 50 degrees F, you should skin the carcass in the field.
To quarter the animal, you will need a sharp knife and a bone saw. A saw is best to avoid bone splinters and damaged meat.
Begin by removing the head. To do this, cut through the flesh of the neck with your knife. Saw through the vertebrae, and use your knife again to remove the head. Make your cut as close to the head as possible to avoid wasting many pounds of valuable meat.
The next step will be to halve the animal. This is done by placing the back of your knife against the backbone between the second and third rib. Push the blade outward, completely through the flesh and hide. Cut upward using the ribs as a guide and do the same on the opposite side. You can now separate the halves by sawing through the backbone.
Quartering is accomplished by sawing straight down the backbone of each half. Underlying flesh or hide can be separated with your knife. The task of halving and quartering will be easier if the animal can be elevated on logs or sticks. Trim away any shot-damaged meat that could lead to premature spoilage.
Be sure to attach your tags before removing quarters from the place of kill. If the quarters can not be removed before darkness, try to hang them in a nearby tree or elevate them on logs to aid cooling. Cover them with boughs or meat socks and hang a marker nearby.

Getting Your Moose Out Of the Woods
Getting the moose from the kill site to your vehicle or camp will probably be the toughest task you will face. If you’re fortunate, you may be able to drive close to the kill site, but many of the roads through moose hunting zones are private and may not be open to public use.
Another possibility is to locate someone with a skidder or work horses. The majority of hunters will end up packing their moose out of the woods instead of using a vehicle. To do this, you can tie the quarters to a pack frame or pack board or even suspend them from a long pole so the load can be shared. Try not to overexert yourself; the pieces will be heavy, and the going could be rough. It is a good idea to flag each quarter with a piece of blaze orange material to prevent accidents.
If the quarters are still too much to carry, the carcass can be cut into more pieces, but remember, the law requires the field-dressed carcass be delivered to a checking station for examination. Each individual piece must also be labeled with the name, address and hunting license number of the person who shot it.
It is important to get the quarters hung in a cool, shady place, preferably a meat cooler as soon as possible.
Transportation and Cooling
Always protect the carcass from dirt, heat and moisture. Transport the quarters out in the open if possible. The open back of a pickup works well. Elevate the quarters to keep cool and protect from dirt. If conditions are dusty or rainy, cover them loosely with a porous canvas tarp. Do not stack the quarters, allow them to touch or cover them with plastic. Plastic retains body heat and prevents cooling. If you transport in a covered truck or trailer, you should open windows and vents for proper air circulation.
Once back at camp or your home, hang each quarter from a cross pole of some type in a shady area with good air circulation. If you will have a long trip home, it is best to allow the meat to cool overnight before heading home. If this is not possible, consider traveling at night when temperatures are cooler.
If you are transporting your animal directly home, be cautious about hanging the meat in a garage or shed. Often these areas are not cool enough to allow proper cooling and aging of the carcass.

Skinning
The quarters should be skinned immediately. If daytime temperatures are above 50 degrees and nighttime temperatures are above 40 degrees, you should remove the hide and over with cheesecloth. If the temperature is between 50 and 30 degrees, you can wait a few hours before skinning.
In skinning, work the hide away with the fingers, and peel it off while the quarters are hanging. Use a sharp knife to slice between the flesh and skin of the animal as it is pulled away. Be careful not to cut either one.
Whether you skin the quarters or not, you should cover each one with cheesecloth or a meat sock.
Aging and Butchering
Aging is intended to make the meat tender. This is best accomplished at a constant temperature of about 40 degrees. The temperature during aging must never exceed 50 degrees. For this reason, you will probably want the services of a professional butcher.
If you age your meat outdoors, three to five days is sufficient, but the period varies with temperature and size of the animal. Meat can be aged for as long as 21 days in a cooler.
If you will be handling the meat yourself, remove as much fat as possible before freezing. Removal of bones will save freezer space. Double-wrap and tightly seal all cuts of meat to prevent freezer burn. Meat should be frozen at zero degrees. Don’t try to freeze too much at once. Label and date all packages for future reference. If you don’t have the knowledge or time to process your own moose, then don’t risk ruining it; have it processed at a commercial facility.
Care Of Big Game Trophies
Proper field care of trophies is extremely important for good results in the final mount. If you intend to have the head of your moose mounted, you must take special precautions when skinning it out.
If the weather is warm, and you plan to have a head mount or a “fur on” rug made from the hide, you must remove the skin, salt flesh inside thoroughly, and roll it up flesh side in. Keep it in a cool place (never in a plastic bag) and get it to your taxidermist as soon as possible. Delay may cause “slipping” a condition in which the hair falls off the hide after the tanning process and ruins the hide for its intended use.
The taxidermist will need as much hide or “cape” to work with as possible. When field dressing, don’t cut any further up the underside than between the front legs. The diagram shows where the cuts should be made to skin the neck. Once the neck is skinned out, the head can be disjointed at the base of the skull and removed with the cape attached. Let the taxidermist skin out the head. He will want the measurements, and the skinning is included in the mounting charge. Remove as much flesh as you can, and salt the cape and all exposed flesh. The head and cape should be kept cool and delivered to the taxidermist as soon as possible.
If you keep only the antlers for mounting, be sure to leave a good portion of the skull attached. The best procedure is to check with your taxidermist in advance of your hunt for specific advice.
To care for the hide, remove all flesh and fat, then salt flesh side well. Moose hides spoil very rapidly in warm weather. You should deliver the hide to a taxidermist within 24 hours after the animal is skinned.
Fine table salt is best for use on hides. Capes will take about 30 pounds of salt. Flat skins will take 50 to 80 pounds. As a guide, figure on using half the weight of the skin in salt. About 24 hours after application, the salt will be wet and will have lost its efficiency — shake it off and re-salt.
Transport the hide rolled up, flesh side in.

Follow our FISHING BLOG
WEB RATES FISH HUNT CABINS PHOTOS
TESTIMONIALS BROCHURE HUNT BOOKLET


